
In this post we will implement a lambda function to generate thumbnail for images and videos whenever a file is uploaded in a bucket.
Requirements
- Sharp: We will be using sharp plugin for resizing images to create thumbnails.
- ffmpeg: We will be using ffmpeg to generate thumbnail images from videos.
- AWS Admin Account with console and services access.
Overview
Following are the steps that will be explained below in detail.
- Source and Destination Buckets
- Lambda Execution policy and role
- Function Code Package
- Lambda Trigger
- Testing
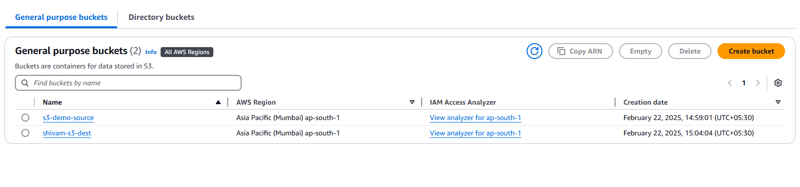
Source and Destination Buckets
- Go to the Amazon S3 > General Purpose Buckets > Create Bucket.
- Select bucket type as General Purpose and enter
s3-demo-sourceas the name of the bucket. You can use any name just make sure that source and destination buckets have different names. Also refer to the S3 Bucket Naming Convention. - Keep rest of the fields as default and create the bucket.
- Use Step 2 - 4 to create the destination bucket as well.
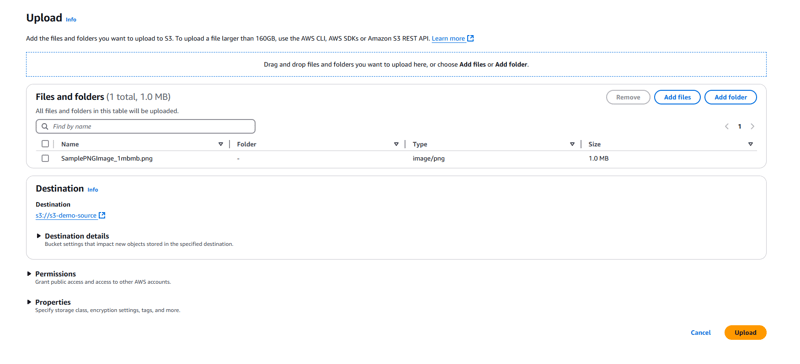
- Use this link to download a sample image. Click on the source bucket name and click on Upload to upload this image.
S3 buckets use a global namespace, meaning the bucket name has to be unique such that NO ONE else is using the name. Therefore, I have used such names for source and destination bucket. If a name you use is already taken, AWS Console will throw an error and you can change the name till you find a unique one.
Lambda Execution policy and role
- Go to IAM > Policies > Create Policy.
- Switch to JSON Tab and add the following policy code. This policy code involves access to lambda function for logging in CloudWatch logs, fetch and put object in S3:
{
    "Version": "2012-10-17",
    "Statement": [
        {
            "Effect": "Allow",
            "Action": [
                "logs:PutLogEvents",
                "logs:CreateLogGroup",
                "logs:CreateLogStream"
            ],
            "Resource": "arn:aws:logs:*:*:*"
        },
        {
            "Effect": "Allow",
            "Action": [
                "s3:GetObject"
            ],
            "Resource": "arn:aws:s3:::*/*"
        },
        {
            "Effect": "Allow",
            "Action": [
                "s3:PutObject"
            ],
            "Resource": "arn:aws:s3:::*/*"
        }
    ]
}
- Click on Next and click on Create Policy.
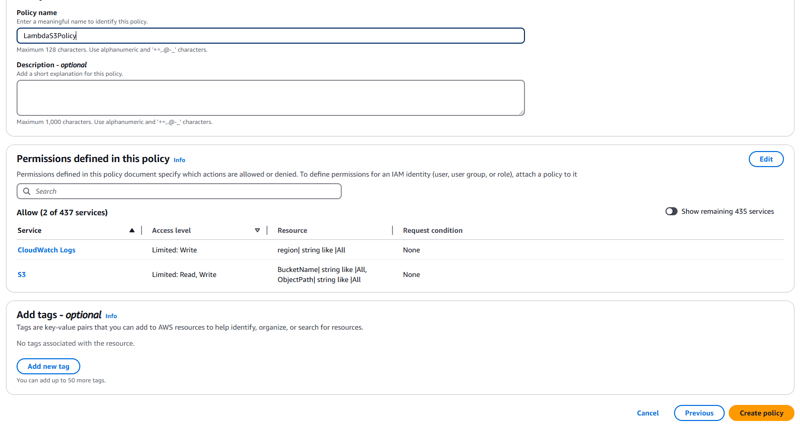 Notice the permissions in the Permissions Table.
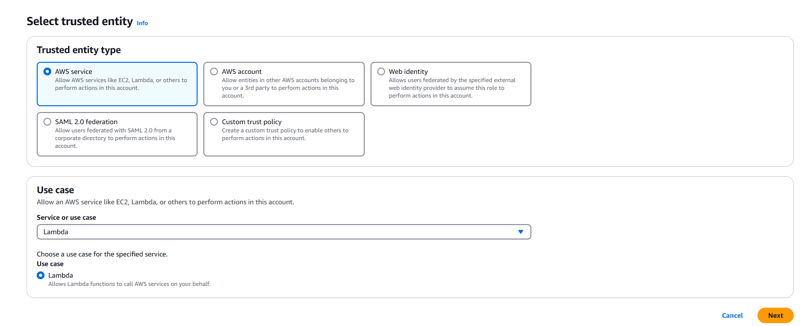
 - Go to IAM > Roles > Create Role.
- Select AWS Service in Trusted Entity Type and Lambda in Use Case. Click Next.
- In Permission Policies, search for the policy created earlier and tick the checkbox of the policy. Click on Next.
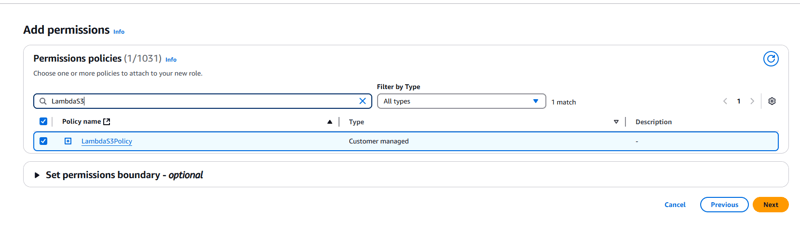
- Enter the Role name as LambdaS3Role and click on Create Role.
Function Code Package
Since we want to install a package sharp and a binary, ffmpeg we need to make a .zip of the code package and upload it in the lambda function code. This step is not required if the lambda function does not depends on external libraries as the code can be written in the online editor in AWS Console.
- Create a directory and move into it
mkdir thumbnail-lambda
cd thumbnail-lambda
- Create a new node js project and install
sharp@0.32.6(last lambda compatible version).
npm init
npm install sharp@0.32.6
- Create a new file in the root director named
index.mjsand add the following code:
// Imports
import { S3Client, GetObjectCommand, PutObjectCommand } from "@aws-sdk/client-s3";
import { Readable } from "stream";
import sharp from "sharp";
import * as path from "path";
import * as cp from "child_process";
import * as fs from "fs/promises";

// ffmpeg binary path
const ffmpegPath = "/opt/bin/ffmpeg";

// To validate image and video extensions. Can be updated as required
const CHECK_IMAGE_EXT = ["jpg", "jpeg", "png"];
const CHECK_VIDEO_EXT = ["mp4", "mov", "avi", "webm", "flv"];

// Note: Change region here according to your bucket region on AWS
const s3 = new S3Client({ region: "ap-south-1" });

export const handler = async (event) => {
  console.log("Received S3 event:", JSON.stringify(event));

  try {
    const record = event.Records[0].s3;
    // Source bucket
    const sourceBucket = record.bucket.name;
    // File name
    const fileName = record.object.key;
    // Destination bucket
    const destBucket = process.env.DESTINATION_BUCKET || sourceBucket;

    const fileExt = fileName.match(/\.([^.]*)$/);
    if (!fileExt) throw new Error(`Error while determining file type for file ${fileName}`);

    const fileType = fileExt[1].toLowerCase();
    const isImage = CHECK_IMAGE_EXT.includes(fileType);
    const isVideo = CHECK_VIDEO_EXT.includes(fileType);

    if (isVideo) {
      await generateVideoThumbnail(srcBucket, srcKey, dstBucket);
    } else if (isImage) {
      await generateImageThumbnail(sourceBucket, fileName, destBucket);
    } else {
      console.log(`File type is not supported: ${fileType}`);
    }
  } catch (error) {
    console.error("Error processing event:", error);
    throw error;
  }
};

// Get file buffer from S3
const getFileData = async (bucket, fileKey) => {
  console.log(`Fetching ${fileKey} from ${bucket}`);
  try {
    const response = await s3.send(new GetObjectCommand({ Bucket: bucket, Key: fileKey }));
    if (!response.Body || !(response.Body instanceof Readable)) throw new Error("Invalid response");

    const responses = [];
    for await (const result of response.Body) {
      responses.push(result);
    }

    return Buffer.concat(chunks);
  } catch (error) {
    console.error(`Error fetching ${fileKey} from S3: `, error);
    throw error;
  }
};

// Upload file to S3
const uploadFileToS3 = async (bucket, name, data, contentType) => {
  console.log(`Uploading ${name} to ${bucket}`);

  try {
    await s3.send(
      new PutObjectCommand({
        Bucket: bucket,
        Key: name,
        Body: data,
        ContentType: contentType,
      })
    );

    console.log(`Uploaded ${name} successfully`);
  } catch (error) {
    console.error(`Error uploading ${name} to S3:`, error);
    throw error;
  }
};

// Generate and upload image thumbnail
const generateImageThumbnail = async (sourceBucket, fileName, destBucket) => {
  console.log(`Generating thumbnail for image: ${fileName}`);

  try {
    // Fetch file data in the form of buffer
    const fileData = await getFileData(sourceBucket, fileName);

    // Feed buffer to sharp and provide the size of thumbnail. Change this as required and generate buffer of thumbnail.
    const resizedFileData = await sharp(fileData).resize({ width: 200 }).toBuffer();

    // Upload thumbnail to destination bucket
    await uploadFileToS3(destBucket, thumbnailKey, resizedFileData, "image/png");
  } catch (error) {
    console.error(`Error while generating thumbnail for ${fileName}: `, error);
    throw error;
  }
};

// Generate and upload video thumbnail
const generateVideoThumbnail = async (sourceBucket, fileKey, destBucket) => {
  console.log(`Generating thumbnail for video: ${fileKey}`);

  const extension = path.extname(fileKey);
  const fileName = path.basename(fileKey, extension);
  // Temp path for storing source and thumbnail file
  const tempSourceFile = `/tmp/${fileName}${extension}`;
  const tempThumbnailFile = `/tmp/${fileName}.png`;

  try {
    const fileData = await getFileData(sourceBucket, fileKey);
    await fs.writeFile(tempSourceFile, fileData);

    console.log(`Running ffmpeg for ${fileKey}`);
    await new Promise((resolve, reject) => {
      const ffmpeg = cp.spawn(ffmpegPath, [
        "-i",
        tempSourceFile,
        "-ss",
        "00:00:01.000",
        "-vframes",
        "1",
        tempThumbnailFile,
      ]);

      ffmpeg.on("close", (code) =>
        code === 0 ? resolve() : reject(new Error(`ffmpeg failed with code ${code}`))
      );
    });

    const thumbnailData = await fs.readFile(tempThumbnailFile);
    const thumbnailFileName = `${fileName}.png`;

    await uploadFileToS3(destBucket, thumbnailFileName, thumbnailData, "image/png");
  } catch (error) {
    console.error(`Error while generating thumbnail for ${fileKey}:`, error);
    throw error;
  } finally {
    console.log(`Removing file ${fileKey}`);
    await Promise.allSettled([fs.unlink(tempSourceFile), fs.unlink(tempThumbnailFile)]);
  }
};
Notice that the above code uses source bucket as destination bucket if not provided specifically. This can cause unwanted executions of lambda as each file upload will trigger the lambda for generating thumbnail and putting in S3 which will again trigger the lambda, thus falling in a loop. To prevent this, we can use prefix/suffix in such that the lambda will be only triggered if specified prefix or suffix match.
Zip the function code with the command ensuring that all files including
package.json,package-lock.jsonandnode_modulesare all included in the zip file.
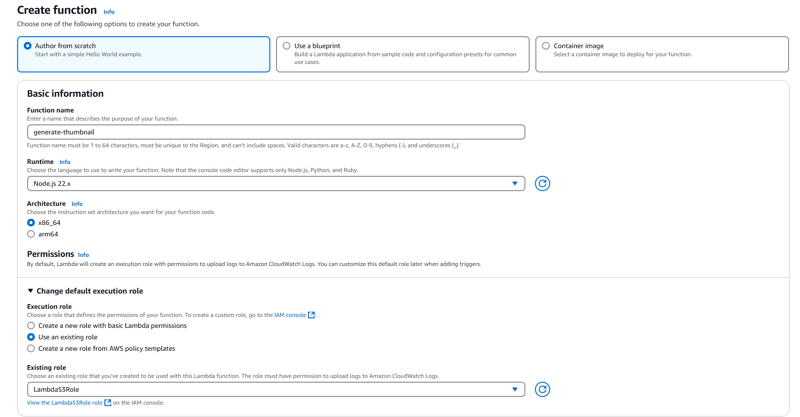
zip -r function.zip .On AWS Console, go to Lambda > Create a Function. Select Author from scratch. For Runtime, select
Node.js 22.x, for Architecture selectx86_64. For Execution Role, select Use an existing Role and select the role created earlier from the dropdown, LambdaS3Role in our case, and hit Create Function.
For generating thumbnails from videos, we need the ffmpeg binary as a lambda layer. Download the master build for ffmpeg from this link in a new folder, say layers. Make sure binary file has execution permission. Zip the folder using below command.
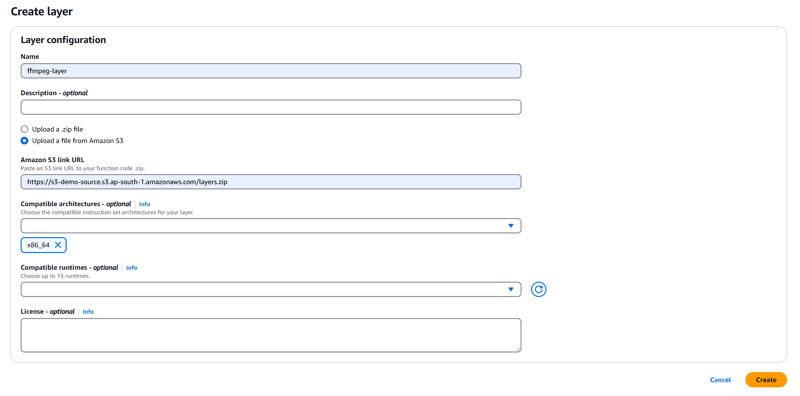
zip -r layers.zip layersOn the console, go to the Lambda > Layers > Create Layer. Enter the name as ffmpeg-layer and upload the zip file created in the above step, select
x86_64in Compatible Architectures and click Create.
If the zip file size is > 10 MB, you can upload the zip file in the source S3 bucket and add the Object URL of the file by choosing the Upload a file from Amazon S3 option.
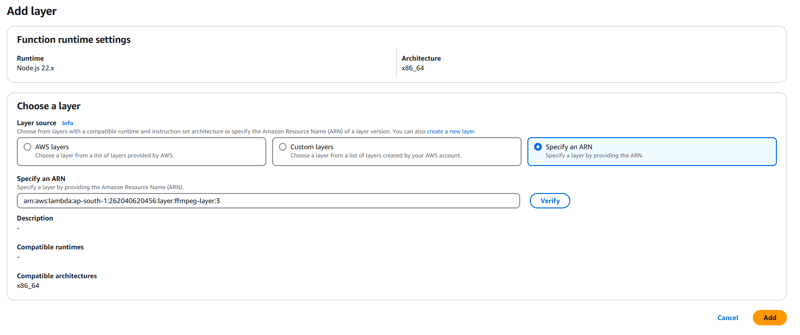
- On the console, go to the newly created lambda function and click on Layers > Add Layer. Copy the Version ARN from the ffmpeg-layer created earlier. In Add Layer form, select Specify an ARN option and paste the ARN copied earlier and click Add. It should show the layers count as 1 on the function page.
- To add the function code, go the function page, click on Code tab. On the right side, click on Upload from and select .zip File. Select the function.zip file created earlier and the function code should be imported.
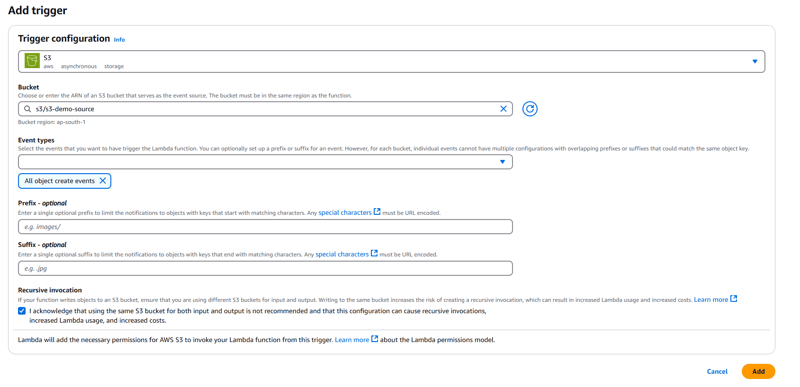
Lambda Trigger
- On the function page, click on Add Trigger, select S3 in Source. In the Bucket option, search for the source bucket, which should be s3-demo-source in our case, and select the same. Acknowledge the Recursive Invocation checkbox and click Add. Now the function is complete and ready to be tested.
Test
Go to the source bucket and upload a sample image which can be used to trigger test on lambda function and copy the file key.
-
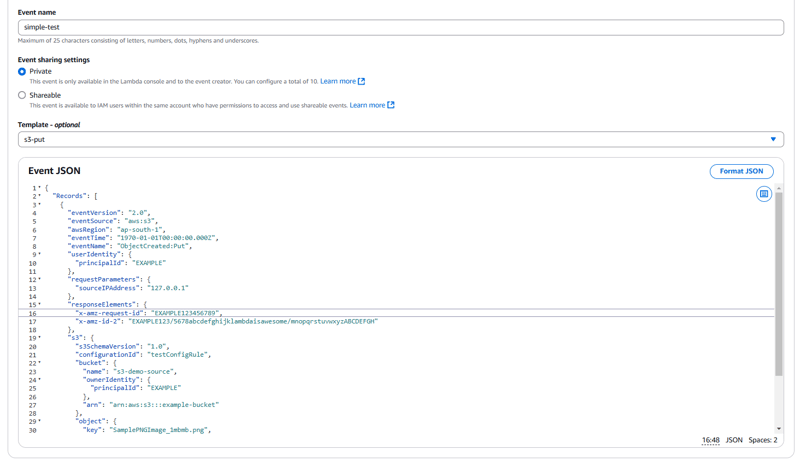
On the function page, click on the Test tab. Select Create New Event and enter Event Name. In the Template field search for S3 Put event and select the same. Now do the following changes in the Event JSON:
- Replace the
awsRegionwith the region you are using, ap-south-1 in this case. - Replace the
name,example-bucketwith the actual source bucket name, in this cases3-demo-source. - Replace the
keywith the key of the file copied from the sample image uploaded in the source bucket and click on Save.
- Replace the
- Click on Configuration > Environment Variables and add the variable for destination bucket name.

- Go to the Test tab and click on Test to start the testing. You can also view the printing of the logs from the code in CloudWatch by clicking CloudWatch Logs Live Trail button.

Now go to the destination bucket and there should be the thumbnail file generated for the sample image used for testing.
For actual testing, go to the source bucket and upload a sample image or video file. Go to the CloudWatch and observe the lambda logs and after it is completed you can go to the destination bucket where the thumbnail file will be present.
Final Thoughts
A basic lambda function to generate thumbnails is now ready. The function can be further optimized and customized to generate specific size thumbnails and generate video thumbnails at a specific timestamp using ffprobe command. Also, if you want to use the same bucket as source and destination, you can use the Suffix or Prefix option while setting the trigger in Lambda function to prevent recursive execution of the function. Let me know down below if you face any issues while implementing this.
Thank you for reading this long article, I hope it helps✌️.
Happy Coding!

Top comments (0)