Learn how to build a multilingual NextJS app using the new app directory and i18next library
TL;DR
Check the demo here
Check the source code here
Introduction
Internationalization, or i18n for short, is the process of designing and developing software applications that can be adapted to different languages and cultures. It is an important consideration for any application that is intended for a global audience.
Next.js is a popular framework for building web applications that simplifies the process of implementing i18n. In this article, we will explore how to handle i18n in Next.js using the app directory and the i18next library. We will also cover some of the key translation functions and techniques that you can use to make your application more accessible to users around the world.
I have written in another article about how to do i81n in Next.js using the URL segment to detect the locale. In this article, we will use the cookie-based approach instead.
Initialize a NextJS project
The easiest way to follow this guide is to degit a Nextjs boilerplate.
npx degit codegino/nextjs-ts-tw-tldr next13-i18n
I will be using TailwindCSS and TypeScript due to personal preference, but you can use plain CSS and JavaScript if you want.
Install dependencies
npm i
Remove unused files
Delete everything under the app and components folders
rm -rf app/* components/*
Project Setup
Our Internationalization strategy
In this blog post, we will use a cookie-based strategy to determine the locale of our web application. We can effortlessly obtain the locale from the cookies function exposed by next/headers in a server component. In a client component, we will create a custom hook to get the locale.
Install required dependencies
There are various libraries available for handling translations, but I find libraries from i18next very easy to use.
npm install i18next react-i18next i18next-resources-to-backend
i18next-resources-to-backend is a very small utility, so you can just copy the implementation if you don't want an additional dependency.
Create a reusable settings file
Let's create a utility file for both the server and the client-side translations
// i18n/settings.ts
import type {InitOptions} from 'i18next';

export const FALLBACK_LOCALE = 'en';
export const supportedLocales = ['en', 'zh-CN', 'sv'] as const;
export type Locales = (typeof supportedLocales)[number];

// You can name the cookie to whatever you want
export const LANGUAGE_COOKIE = 'preferred_language';

export function getOptions(lang = FALLBACK_LOCALE, ns = 'common'): InitOptions {
  return {
    // debug: true, // Set to true to see console logs
    supportedLngs: supportedLocales,
    fallbackLng: FALLBACK_LOCALE,
    lng: lang,
    ns,
  };
}
To learn more about the options, check out the i18next documentation.
Server Components translation setup
// i18n/server.ts
import {createInstance} from 'i18next';
import resourcesToBackend from 'i18next-resources-to-backend';
import {initReactI18next} from 'react-i18next/initReactI18next';
import {FALLBACK_LOCALE,getOptions,Locales,LANGUAGE_COOKIE} from './settings';
import {cookies} from 'next/headers';

async function initI18next(lang: Locales, namespace: string) {
  const i18nInstance = createInstance();
  await i18nInstance
    .use(initReactI18next)
    .use(
      resourcesToBackend(
        // Get the JSON file that matches the locale and namespace
        (lang: string, ns: string) => import(`./locales/${lang}/${ns}.json`),
      ),
    )
    // Initialize i18next with the options we created earlier
    .init(getOptions(lang, namespace));

  return i18nInstance;
}

// This function will be used in our server components for the translation
export async function createTranslation(ns: string) {
  const lang = getLocale();
  const i18nextInstance = await initI18next(lang, ns);

  return {
    t: i18nextInstance.getFixedT(lang, Array.isArray(ns) ? ns[0] : ns),
  };
}

// Utility function to get the locale from server components
export function getLocale() {
  return (cookies().get(LANGUAGE_COOKIE)?.value ?? FALLBACK_LOCALE) as Locales;
}
Create translation files
Unless our users use translation plugins like Google Translate, there is no way for our content to be magically translated. Therefore, we need to determine how our pages will be translated based on the selected locale and namespace.
Here is what our translation files' structure will look like. en is the locale, and home is the namespace.
i18n
└── locales
    ├── en
    │   └── home.json
    ├── zh-CN
    │   └── home.json
    └── sv
        └── home.json
NOTE: It does not matter where you put the translation files as long as you can import them correctly.
English translations
// i18n/locales/en/home.json
{
  "greeting": "Hello world!"
}
Chinese translations
// i18n/locales/zh-CN/home.json
{
  "greeting": "世界您好"
}
Swedish translation
// i18n/locales/sv/home.json
{
  "greeting": "Hej världen!"
}
Create our page to display the locale
// app/page.tsx
import {createTranslation} from '../i18n/server';

export default async function IndexPage() {
  const {t} = await createTranslation('home');

  return (
    <div>
      <h1>{t('greeting')}</h1>
    </div>
  );
}
NextJS has a feature that automatically creates a layout component if we don't provide one. However, I prefer to create my own layout component because I need to basic customization.
// app/layout.tsx
import React from 'react';
import {getLocale} from '../i18n/server';
import '../styles/tailwind.css';

export const metadata = {
  title: 'Next.js i18n',
};

export default function RootLayout({children}: {children: React.ReactNode}) {
  const locale = getLocale();
  return (
    // It's good to sync the html lang attribute with the locale
    <html lang={locale}>
      <body className="p-3">{children}</body>
    </html>
  );
}
Testing our page
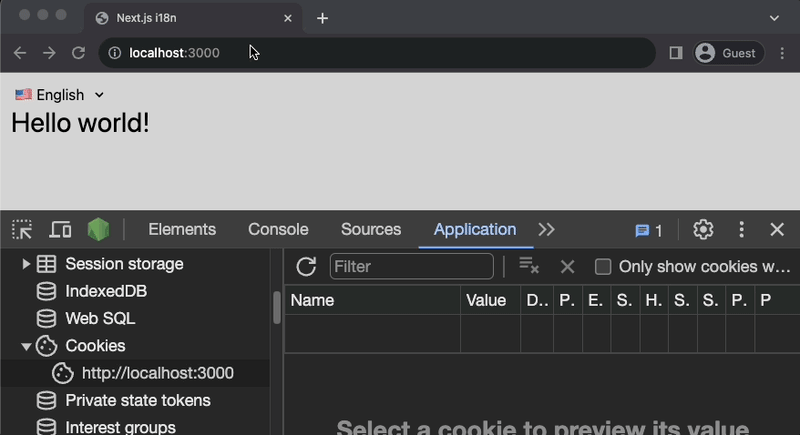
By default, our page will use the fallback locale. Then, I manually update the cookie and refresh the page to see the changes.

Locale switcher
It will be a weird application if we need to update the cookie manually in the dev tools. So, let's create a locale switcher component.
Create a server action to update the cookie
We will take advantage of server actions to update the cookie easily.
// actions/switch-locale.tsx
'use server';

import {cookies} from 'next/headers';
import {LANGUAGE_COOKIE} from '../i18n/settings';

export async function switchLocaleAction(value: string) {
  cookies().set(LANGUAGE_COOKIE, value);

  // It does not matter what we return here
  return {
    status: 'success',
  };
}
Create the locale switcher component
// components/ChangeLocale.tsx
'use client';
import React from 'react';
import {switchLocaleAction} from '../actions/switch-locale';

export default function ChangeLocale({locale}) {
  const handleLocaleChange = event => {
    switchLocaleAction(event.target.value);
  };

  return (
    <div>
      <select onChange={handleLocaleChange} value={locale}>
        <option value="en">🇺🇸 English</option>
        <option value="zh-CN">🇨🇳 Chinese</option>
        <option value="sv">🇸🇪 Swedish</option>
      </select>
    </div>
  );
}
Now it's easier to test around what language we want to see.

Client-side translation
Now, we need to find a way to translate the content on the client side. We will use almost the same approach as the server-side translation but with additional configuration and a custom React hook.
In this section, we will update the locale switcher options to display translated text.
Create a global provider of the locale
I could not make the react-i18n provider work so I created a simple provider and hook to share the active locale.
// hooks/locale-provider.tsx
'use client';

import {createContext, useContext} from 'react';
import {FALLBACK_LOCALE, Locales} from '../i18n/settings';

const Context = createContext<Locales>(FALLBACK_LOCALE);

export function LocaleProvider({
  children,
  value,
}: {
  children: React.ReactNode;
  value: Locales;
}) {
  return <Context.Provider value={value}>{children}</Context.Provider>;
}

export function useLocale() {
  return useContext(Context);
}
Install language detector in the browser
Install i18next-browser-languagedetector to simplify language detection in the frontend
npm install i18next-browser-languagedetector
Client Components translation setup
The code below might be lengthy because we need to support both server rendering and client rendering. Don't confuse SSR with Server Component rendering.
// i18n/client.ts
'use client';

import {useEffect} from 'react';
import i18next, {i18n} from 'i18next';
import {initReactI18next, useTranslation as useTransAlias} from 'react-i18next';
import resourcesToBackend from 'i18next-resources-to-backend';
import LanguageDetector from 'i18next-browser-languagedetector';
import {
  Locales,
  LANGUAGE_COOKIE,
  getOptions,
  supportedLocales,
} from './settings';
import {useLocale} from '../hooks/locale-provider';

const runsOnServerSide = typeof window === 'undefined';

// Initialize i18next for the client side
i18next
  .use(initReactI18next)
  .use(LanguageDetector)
  .use(
    resourcesToBackend(
      (lang: string, ns: string) => import(`./locales/${lang}/${ns}.json`),
    ),
  )
  .init({
    ...getOptions(),
    lng: undefined, // detect the language on the client
    detection: {
      // We only care about the cookie
      order: ['cookie'],
      // If `lookupCookie` is not set, it will use `i18next` as the cookie name
      lookupCookie: LANGUAGE_COOKIE,
      // This will automatically update the cookie
      caches: ['cookie'],
    },
    preload: runsOnServerSide ? supportedLocales : [],
  });

export function useTranslation(ns: string) {
  const lng = useLocale();

  const translator = useTransAlias(ns);
  const {i18n} = translator;

  // Run content is being rendered on server side
  if (runsOnServerSide && lng && i18n.resolvedLanguage !== lng) {
    i18n.changeLanguage(lng);
  } else {
    // Use our custom implementation when running on client side
    // eslint-disable-next-line react-hooks/rules-of-hooks
    useCustomTranslationImplem(i18n, lng);
  }
  return translator;
}

function useCustomTranslationImplem(i18n: i18n, lng: Locales) {
  // This effect changes the language of the application when the lng prop changes.
  useEffect(() => {
    if (!lng || i18n.resolvedLanguage === lng) return;
    i18n.changeLanguage(lng);
  }, [lng, i18n]);
}
Update the ChangeLocale to use the new hook
// components/ChangeLocale.tsx
'use client';
import React from 'react';
import {switchLocaleAction} from '../actions/switch-locale';
import {useTranslation} from '../i18n/client';

// We removed the `locale` prop because we can get it from the hook
function ChangeLocale() {
  const {i18n, t} = useTranslation('common');
  // You can also use our custom hook instead of `i18n.resolvedLanguage`
  // const locale = useLocale();

  return (
    <div>
      <select
        onChange={e => switchLocaleAction(e.target.value)}
        value={i18n.resolvedLanguage}
      >
        <option value="en">🇺🇸 {t('english')}</option>
        <option value="zh-CN">🇨🇳 {t('chinese')}</option>
        <option value="sv">🇸🇪 {t('swedish')}</option>
      </select>
    </div>
  );
}

export default ChangeLocale;
Update the layout component
// app/layout.tsx
import React from 'react';
import ChangeLocale from '../components/ChangeLocale';
import {LocaleProvider} from '../hooks/locale-provider';
import {getLocale} from '../i18n/server';
import '../styles/tailwind.css';

export const metadata = {
  title: 'Next.js i18n',
};

export default function RootLayout({children}: {children: React.ReactNode}) {
  const locale = getLocale();
  return (
    <html lang={locale}>
      <body className="p-3">
        <LocaleProvider value={locale}>
          <ChangeLocale />
          {children}
        </LocaleProvider>
      </body>
    </html>
  );
}
Create translation files
English translations
// i18n/locales/en/common.json
{
  "english": "English",
  "swedish": "Swedish",
  "chinese": "Chinese"
}
Chinese translations
// i18n/locales/zh-CN/common.json
{
  "english": "中国人",
  "swedish": "英语",
  "chinese": "瑞典"
}
Swedish translation
// i18n/locales/en/sv.json
{
  "english": "engelska",
  "swedish": "svenska",
  "chinese": "kinesiska"
}
After all those many changes, we can now see our locale switcher with the translated options. Also, the cookie value is updated automatically to the fallback when we first load our page.
Bonus
Nested translation keys and default translation
We are not limited to a flat JSON structure.
// i18n/locales/en/newsletter.json
{
  "title": "Stay up to date",
  "subtitle": "Subscribe to my newsletter",
  "form": {
    "firstName": "First name",
    "email": "E-mail",
    "action": {
      "signUp": "Sign Up",
      "cancel": "Cancel"
    }
  }
}
We can omit some translation keys if we want it to use the default locale value(en in our case. See the demo later).
// i18n/locales/zh-CN/newsletter.json
{
  "title": "保持最新状态",
  "form": {
    "email": "电子邮箱",
    "action": {
      "cancel": "取消"
    }
  }
}
// i18n/locales/sv/newsletter.json
{
  "title": "Håll dig uppdaterad",
  "subtitle": "Prenumerera på mitt nyhetsbrev",
  "form": {
    "firstName": "Förnamn",
    "email": "E-post",
    "action": {
      "signUp": "Registrera sig",
      "cancel": "Annullera"
    }
  }
}
Create the component
Let's create a component that uses the translations above. We'll make this a server component to demonstrate one way of using the createTranslation function.
// components/SubscribeForm.tsx
import React from 'react';
import {createTranslation} from '../i18n/server';

export default async function SubscribeForm() {
  const {t} = await createTranslation('newsletter');

  return (
    <section className="w-[350px]">
      <h3>{t('title')}</h3>
      <h4>{t('subtitle')}</h4>

      <form className="flex flex-col items-start">
        <input placeholder={t('form.firstName')} className="border mb-1 p-1 w-full" />
        <input placeholder={t('form.email')} className="border mb-1 p-1 w-full" />
        <button className="border mb-1 p-1 w-full">{t('form.action.signUp')}</button>
        <button className="border mb-1 p-1 w-full">{t('form.action.cancel')}</button>
      </form>
    </section>
  );
};
Render the form on the home page.
// app/page.tsx
import SubscribeForm from '../../components/SubscribeForm';
import {createTranslation} from '../../i18n/server';

export default async function IndexPage() {
  const {t} = await createTranslation('home');

  return (
    <div>
      <h1>{t('greeting')}</h1>
      <hr className="my-4" />
      <SubscribeForm />
    </div>
  );
};
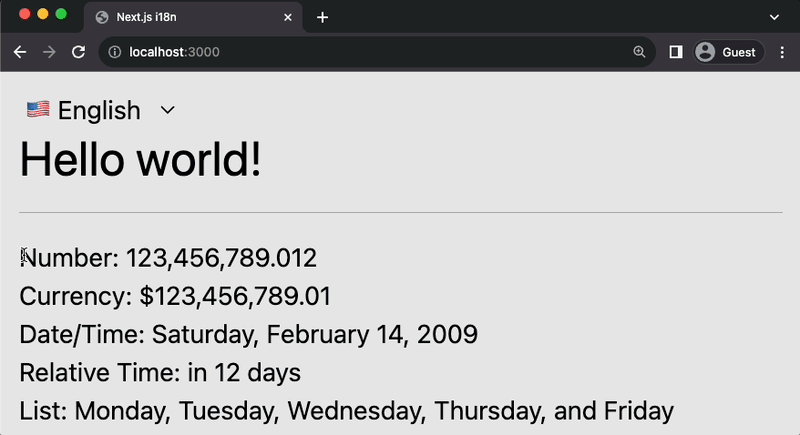
And now, we have this!

Built-in Formatting
It is very easy to format most of our data since i18next comes with a lot of utilities we can use.
Let's use the translation files below to showcase the formatting features.
// i18n/en/built-in-formats.json
{
  "number": "Number: {{val, number}}",
  "currency": "Currency: {{val, currency}}",
  "dateTime": "Date/Time: {{val, datetime}}",
  "relativeTime": "Relative Time: {{val, relativetime}}",
  "list": "List: {{val, list}}",
  "weekdays": ["Monday", "Tuesday", "Wednesday", "Thursday", "Friday"]
}
// i18n/sv/built-in-formats.json
  "number": "Nummer: {{val, number}}",
  "currency": "Valuta: {{val, currency}}",
  "dateTime": "Datum/tid: {{val, datetime}}",
  "relativeTime": "Relativ tid: {{val, relativetime}}",
  "list": "Lista: {{val, list}}",
  "weekdays": ["Måndag", "Tisdag", "Onsdag", "Torsdag", "Fredag"]
}
// i18n/zh-CN/built-in-formats.json
{
  "number": "数: {{val, number}}",
  "currency": "货币: {{val, currency}}",
  "dateTime": "日期/时间: {{val, datetime}}",
  "relativeTime": "相对时间: {{val, relativetime}}",
  "list": "列表: {{val, list}}",
  "weekdays": ["星期一", "星期二", "星期三", "星期四", "星期五"]
}
Create the component
Let's create a component that will use the previous translations. We'll make it a client component just for fun.
// app/components/BuiltInFormatsDemo.tsx
'use client';
import React from 'react';
import {useTranslation} from '../i18n/client';

const BuiltInFormatsDemo = () => {
  const {t} = useTranslation('built-in-demo');

  return (
    <div>
      <p>
        {/* "number": "Number: {{val, number}}", */}
        {t('number', {
          val: 123456789.0123,
        })}
      </p>
      <p>
        {/* "currency": "Currency: {{val, currency}}", */}
        {t('currency', {
          val: 123456789.0123,
          style: 'currency',
          currency: 'USD',
        })}
      </p>

      <p>
        {/* "dateTime": "Date/Time: {{val, datetime}}", */}
        {t('dateTime', {
          val: new Date(1234567890123),
          formatParams: {
            val: {
              weekday: 'long',
              year: 'numeric',
              month: 'long',
              day: 'numeric',
            },
          },
        })}
      </p>

      <p>
        {/* "relativeTime": "Relative Time: {{val, relativetime}}", */}
        {t('relativeTime', {
          val: 12,
          style: 'long',
        })}
      </p>

      <p>
        {/* "list": "List: {{val, list}}", */}
        {t('list', {
          // https://www.i18next.com/translation-function/objects-and-arrays#objects
          // Check the link for more details on `returnObjects`
          val: t('weekdays', {returnObjects: true}),
        })}
      </p>
    </div>
  );
};

export default BuiltInFormatsDemo;
Don't forget to render the component on the home page.
// app/page.tsx
import BuiltInFormatsDemo from '../../components/BuiltInFormatsDemo';
import {createTranslation} from '../../i18n/server';

export default async function IndexPage() {
  const {t} = await createTranslation('home');

  return (
    <div>
      <h1>{t('greeting')}</h1>
      <hr className="my-4" />
      <BuiltInFormatsDemo />
    </div>
  );
};
The more you look, the more you'll be amazed
Other translation functions to check
Conclusion
Internationalization is a complex requirement simplified in Nextjs due to the way applications are built using the framework.

Top comments (0)