
Create a link shortener with Next.js and Vercel Postgres. Learn dynamic routing, database connection, and domain customization.
TL;DR
Check the demo here
Check the source code here
Introduction
Link shorteners have become a go-to solution for sharing lengthy URLs, especially on platforms where character count matters. They're simple, efficient, and incredibly handy. In this blog post, we're diving into the creation of a simple and free link shortener using Next.js and Vercel Postgres.
Vercel Postgres is my new go-to solution for free Postgresql database hosting. It offers a generous free tier for small projects and is easy to set up.
Since Vercel hosting is also free, we can build and deploy our app without any cost.
Our demo will showcase the following features:
- Automatic redirection to the target link when a slug is accessed
- Track the number of visits for each link
- Display the stats of the links from the database
Prerequisites
In addition to the requirements for creating a typical NextJS app, you'll also need a Vercel account. If you don't have one, you can register here.
Installation
The easiest way to follow this guide is to degit a Nextjs boilerplate.
npx degit codegino/nextjs-ts-tw-tldr next13-i18n
I will be using TailwindCSS and TypeScript due to personal preference, but you can use plain CSS and JavaScript if you want.
Install dependencies
npm i
Remove unused files
Delete everything under the app and components folders
rm -rf app/* components/*
Setting Up NextJS - Part 1
Making a Placeholder Route Resolver
In a link shortener app, a 'slug' is a unique name for each shortened link. This slug helps the app send users to the right URL when they click on the shortened link.
We'll use NextJS's dynamic routes to make a route for our unique slug. For now, we'll keep it basic and just make any slug redirect to one page.
// app/[slug]/route.ts
export const GET = () => {
  return NextResponse.redirect('https://google.com', 302);
};
After running the app with npm run dev, we can go to http://localhost:3000/xyz and it should redirect to Google's home page.
Initial Deployment
Deploying our app first will simplify the process. Vercel provides an easy way to connect an existing project to a database, which we'll create later.
Installing the Vercel CLI
Start by installing the Vercel CLI:
npm i -g vercel
Login to Vercel
Next, log into your Vercel account:
vercel login
Deploying the App
Finally, deploy the app:
vercel --prod
For more information on deploying with Vercel CLI, check out this guide
Setting Up the Database
Creating the Vercel Postgres Database
First, log into your Vercel account, navigate to the dashboard, and select the Storage tab. Then, click on the Create Database button.

A dialog box will appear. Choose the PostgreSQL option and click Continue.
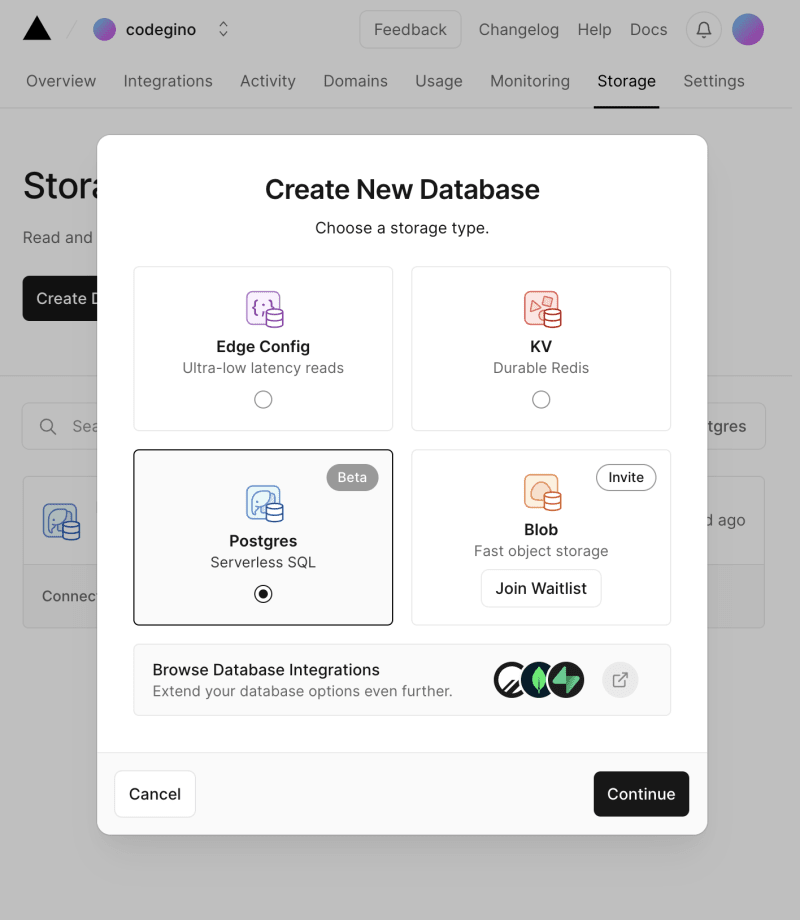
You'll see another popup. If you agree with the terms, click Accept. Then, set your database name and click Create.

Creating the Links Table
Currently, Vercel PostgreSQL doesn't offer a built-in interface for various operations. So, we'll use the query runner for now.
CREATE TABLE links (
    id SERIAL PRIMARY KEY,
    alias VARCHAR(255) NOT NULL UNIQUE,
    target VARCHAR(2048) NOT NULL,
    visit_count INTEGER DEFAULT 0
);
The query above will create a table with the following columns:
- id: A unique identifier for each link
- alias: The slug that will be used to create the shortened link
- target: The destination URL
- visit_count: The number of times the link has been visited

We can add other tracking information like the source host, the user agent, etc. but for this demo, we'll keep it simple.
Adding a New Link Entry
To test our setup, let's add a new link entry using the following query:
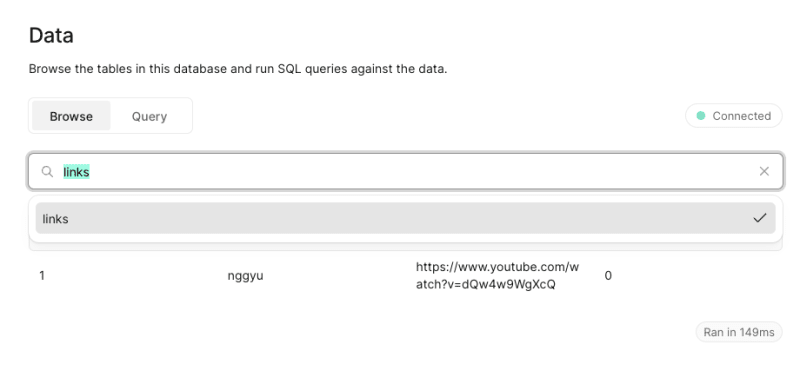
INSERT INTO links (alias, target)
VALUES ('nggyu', 'https://www.youtube.com/watch?v=dQw4w9WgXcQ');
We can browse the table using the Browse tab.
Setting Up NextJS - Part 2
Installing the Vercel Postgres Package
Start by installing the Vercel Postgres package:
npm i @vercel/postgres
Connecting the Project
Follow these steps to connect your Vercel project to the database:
Connect your Vercel project to the database
Pull the latest environment variables
Vercel simplifies the process of loading environment variables from the database. You can do this by running the following command:
vercel env pull .env.development.local
- Install the Vercel Postgres package
npm install @vercel/postgres
- Update the route handler
Next, replace the content of app/[slug]/route.ts with the provided code.
// app/[slug]/route.ts
import {NextResponse} from 'next/server';
import {sql} from '@vercel/postgres';

// Exporting an async GET function that takes the params object in the second argument
export const GET = async (_, {params}) => {

  // Making a SQL query to select a link from the links table where the alias matches the provided slug
  // The result is limited to 1 row
  const {rows} =
    await sql`SELECT * FROM links WHERE alias=${params.slug} LIMIT 1`;

  // If no rows are returned, return a response indicating the slug is not in the record
  if (rows.length === 0) {
    return new Response(`<h1>/${params.slug} is not in our record</h1>`, {
      status: 400,
      headers: {
        'content-type': 'text/html',
      },
    });
  }

  // If a row is returned, increment the visit_count for the link with the provided slug
  if (rows[0]) {
    await sql`UPDATE links SET visit_count = visit_count + 1 WHERE alias = ${params.slug}`;
  }

  // Redirect to the target of the first row (the selected link)
  return NextResponse.redirect(rows[0].target, 302);
};
Once the app is running, visiting http://localhost:3000/nggyu should redirect us to the target link.

We're seeing a 404 page because we haven't created a home/index page yet.
Setting Up a Default Page (Optional)
In cases where no slug is provided, the app will attempt to resolve the root route, which isn't defined. However, you're free to customize this behavior as needed. For this demo, I'll set up the root route to display basic statistics for all the links in the database.
Create the layout component
// app/layout.ts
import '../styles/tailwind.css';

export const metadata = {
  title: 'Next Link Shortener',
  description: 'Generated by Next.js',
};

export default function RootLayout({children}: {children: React.ReactNode}) {
  return (
    <html lang="en">
      <body>{children}</body>
    </html>
  );
}
Create the home page
This page will display the stats of all the links in the database in a table format.
// app/page.ts
import React from 'react';
import {sql} from '@vercel/postgres';

const Page = async () => {
  const links = await getData();

  return (
    <div className="min-h-screen bg-gray-100 flex flex-col items-center pt-8">
      <h1 className="text-2xl font-bold mb-5 text-gray-900">Links stats</h1>
      <div className="flex flex-col items-center overflow-hidden">
        <table className="min-w-full divide-y divide-gray-200">
          <thead className="bg-gray-50">
            <tr>
              <th className="px-6 py-3 text-left font-medium">Alias</th>
              <th className="px-6 py-3 text-left font-medium">Target</th>
              <th className="px-6 py-3 text-left font-medium">Visit Count</th>
            </tr>
          </thead>
          <tbody className="bg-white divide-y divide-gray-200">
            {links.map((link, index) => (
              <tr key={index}>
                <td className="px-6 py-4 whitespace-nowrap">{link.alias}</td>
                <td className="px-6 py-4 whitespace-nowrap">{link.target}</td>
                <td className="px-6 py-4 whitespace-nowrap">
                  {link.visit_count}
                </td>
              </tr>
            ))}
          </tbody>
        </table>
      </div>
    </div>
  );
};

const getData = async () => {
  const {rows} = await sql`SELECT * FROM links`;

  return rows;
};

export default Page;
Upon running the app, each visit to the alias should increase the visit count.

Customizing the Domain
Without customizing our domain, we might end up with a longer link, which defeats the purpose of a link shortener. For instance, the default domain provided by Vercel for this demo is https://demo-nextjs-link-shortener.vercel.app/nggyu.
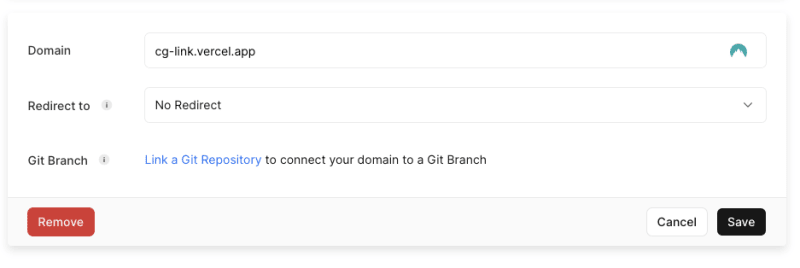
With Vercel
Vercel allows us to modify our domain. Here's the process:
- Navigate to the
Settingstab - Select
Domains - Choose the domain you wish to modify
- Hit
Edit - Enter the subdomain you wish to use and click
Save
With a DNS Provider
The previous option is great, but there is Vercel branding in the domain. If you want to remove it, you can use your own domain.
Remember, this isn't free as you'll need to purchase a domain. I got mine from NameCheap
To set it up:
- If you're using NameCheap, go to the
Advanced DNStab on the Dashboard. > If you are using a different provider, you can google how to add aCNAME Recordin<your provider>. - Create a new record
- To direct all traffic to Vercel, I added an
A Recordwith Host@and Value76.76.21.21 - Next, I added a
CNAME Recordwith Hostlinksand Valuecname.vercel-dns.com

To add the custom domain in Vercel:
- Go to the
Settingstab - Click on
Domains - Enter the domain you wish to add in the text field
- Click on
Add

It may ask if you want to redirect your existing traffic to the new domain which I recommend doing.
Once set, you should have a fully functional link shortener app that's ready to be shared with the world.

Conclusion
In conclusion, we've explored how to build a link shortener using Next.js and Vercel Postgres, set up dynamic routes, connect to a database, and track link visits. We also delved into customizing the domain with Vercel and a DNS provider, demonstrating the flexibility of our setup. Remember, while this demo is basic, it opens the door to endless possibilities for expansion. Happy coding!

Top comments (1)
Great, thank you