What is this all about?
This project is an excuse to practice React basic concepts and to experiment with Material UI. I will be building a simple application to build a list of favourite books 📚.
👉 You can use the app here .
👉 You can take a closer look at the full code of the project in my GitHub repository .
Table of content
- 🔗 Project structure
- 🔗 Material UI
- 🔗 Conditional rendering
- 🔗 Forms and input fields
- 🔗 Lifting states up
- 🔗 Updating and mapping arrays
- 🔗 Triggering a modal
- 🔗 Mind metamorphosis: going declarative
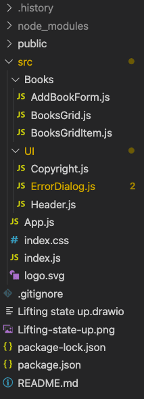
Project structure
In this React project, I chose to flex the brain muscle by implementing a tree structure and entering the fragmented amazing world of components 🏗.
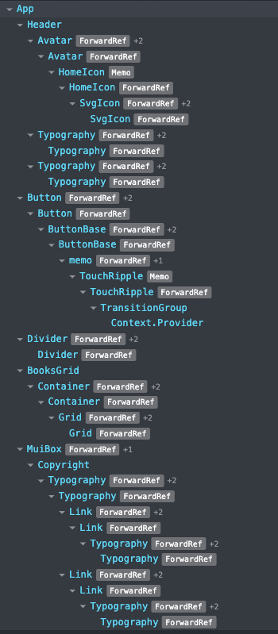
The basis of React is to work with components, hence our project ends up looking like an upside-down tree 🌳, like so:
This view can be better understood by using the React Developer Tools on Chrome.
As we can see, we have multiple components handling different tasks. Some of them are used to render UI code, others are in charge of rendering the form, and many of them are shuffling data from one component to another.
This structure gets steroids when we start working with Material UI, which provides its own components, making the React component tree grow even more, which can be daunting at the beginning, but I ended up feeling comfortable with it.
Material UI
Speaking of Material UI, in spite of it coming into existence in 2014 , I came across it this week (I know… I’m late to the party). I instantly became amazed by how fast was to achieve a good-looking design on a React app by using this library. You can read more about it, especially how to use it and some really eye-opening examples, in its official site .
What Material UI basically do is speed up the graphical styling process by providing already styled components, much like Bootstrap does. I found myself allocating a big chunk of a project’s time on CSS, so when you want to just practice React or JavaScript code, using Material UI speeds up the process quite a bit.
This is the form element I implemented, which is somewhat good-looking 💅 thanks to Material UI.
Conditional rendering
Diving into React basis, conditional rendering is one of the first tools I used in the project.
Sometimes we need to render a component only if a certain condition is met ☑️. We can do this in several ways, but I found the following approach is the easiest for me
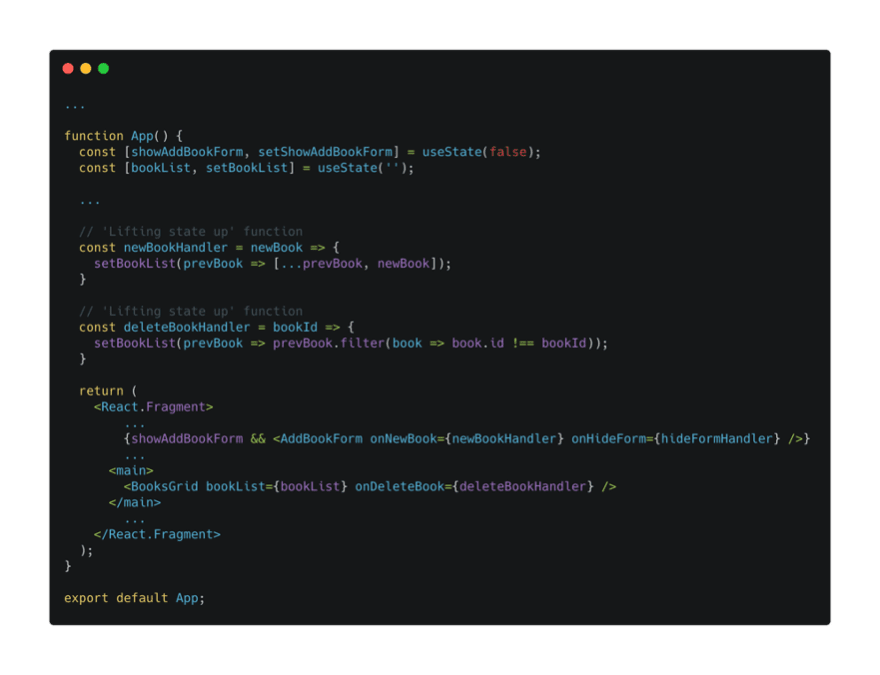
Let’s say we want to render the form only when the user clicks on the “Add new book” button. I chose to include a listener on the button, onClick={addNewBookHandler}, which would handle the event by calling a set state function, setShowAddBookForm(true), which in turn will update a Boolean variable, showAddBookForm that will be used to conditionally render the AddBookForm component.
I used this same technique to render headers and buttons as well, based on certain conditions.
Forms and input fields
When I started learning about React, I quickly came across the state data structure. The state is a JavaScript object used to encapsulate data and make it available when the user triggers a new component rendering (by clicking on the submit button of a form, for example).
Getting data out of input fields in a form needs to be handled in a specific way in React. I only know this way of doing it, but it may be other alternatives to it. It all boils down to two main actions:
- Gather the data from input fields
- Trigger an action on form submit.
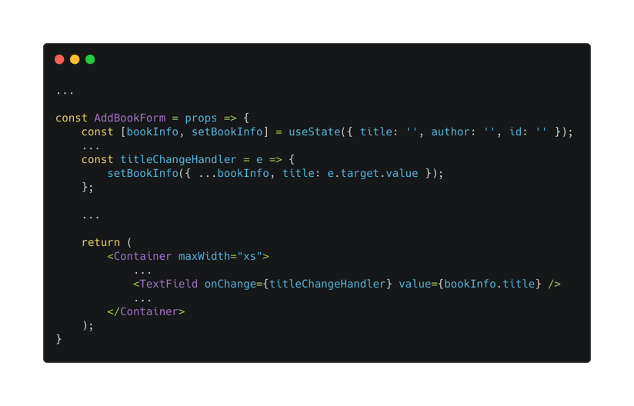
To get the data from the input fields we use the onChange event listener because it could be used on most of the form fields. This event will be triggered every time the input field changes, so it will cause the state to update every time the user presses a key to write something in the form input. We can keep track of the input data by calling a set state function each time the onChange handler is called.
Handling data from input fields can also be done in a better way using Refs , but that's a topic for some other time.
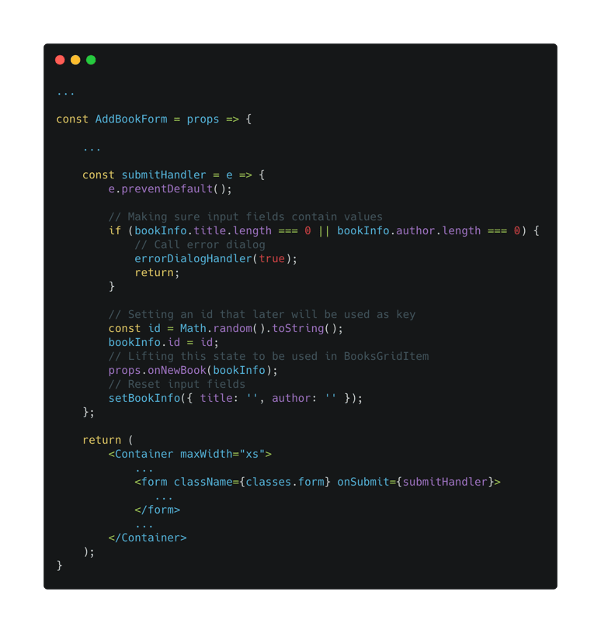
Once users finish inputting text, they will click on the submit button and, as the form has an onSubmit event listener, it will trigger the onSubmit handler, submitHandler in our case. This handler will prevent the default behaviour of the form (a page reload), check that the input is not empty, take the data of the input fields (that is actually stored in the state by now) and call a “lift state up” function (more on this later), and clear the input fields.
Lifting states up
In this project, we are getting data in a component and using it in a different component. Usually, these components are far away from each other, and the only way to link the data between them is by using a common ancestor.
Let’s say we want to get the book title and author from the component in which the form is rendered and use that data in the component in which the book card is rendered. In this example, the form component, AddBookForm, is the B component in the image shown above, and the book card render component, BooksGridItem, is the D.
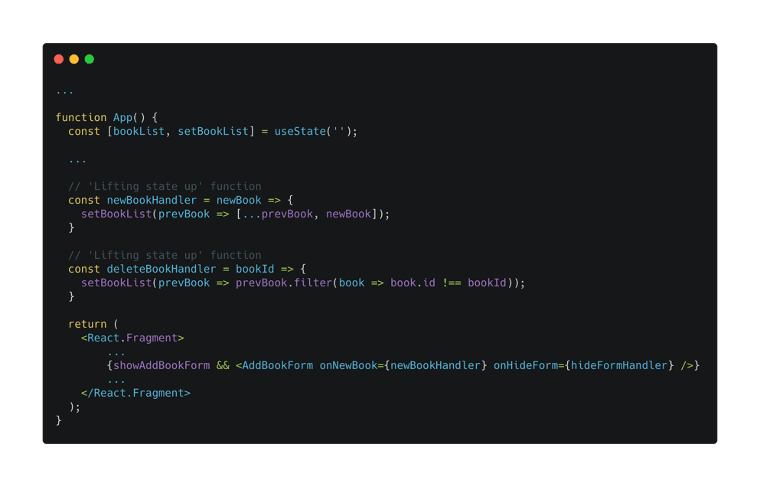
We need to declare a handler function, newBookHandler, in the common ancestor component, App, and pass it as a prop,onNewBook, to the form component, AddBookForm. It is important to note that we are passing the function, not the function call, so we shouldn’t include parenthesis after the function name when we write it in the prop.
The form component, AddBookForm, will call the function that was passed in its props and uses the data from the input fields as the argument. In this way, the arguments gathered in the form component will be available in the ancestor, the App component. This is called “lifting the state up”.
Lifting states 🆙 is used in many components in this project, each time data needs to be gathered from one component and used in another one. Data can be something like text entered on an input filed, or a click on a button, as is the case when we want to delete a book card from the card grid. The tricky part is to realise which component needs to deliver the data, and which one needs to act on it, but I think that with time and experience this will become easier 😅.
Updating and mapping arrays
Whenever I need to display a “series” of “things”, I tend to think about arrays and objects. In this case, we want to display a series of book cards containing the title and author of each book, so we are going to end up having an array containing a collection of objects, and inside those objects, titles and authors will be stored.
Each time a book is added (or deleted), our array will need to be updated. So, in our example, the App component will receive a new book data from the AddBookForm component and will use that data to update the values of an array, bookList. As this is a change in the state of our application, we use a set state function, setBookList, to update the array.
It is very important to note that when we want to update an array, object, counter, or any other variable based on its previous state, we shouldn’t call the set state function just with the new data but use a previous state function as an argument. This way, the set state function will update the variable only when the previous state has finished updating it.
Once our array is updated, we pass it as a prop to the component that will render it, in this case, BooksGrid. That component will call the component in charge of actually rendering the data on each of the elements of the array. For doing this we use the map() method.
Triggering a modal
Another common task on web apps is triggering modals, or dialog messages, when the user performs an action. In our case, we want to give the user a message indicating that the form shouldn’t be submitted when the input fields are empty.
Our ErrorDialog component is the one that will render the modal if the user actions meet a certain condition. As this is a different component from the one that is evaluating the condition, we need to use the “lifting the state up” method once more.
Mind metamorphosis 🪳: going declarative
In the past, I was used to coding with an imperative approach: stating line by line all the necessary steps the program needed to execute in order to achieve the desired outcome. With JavaScript, and especially with React, this mindset is changing, moving towards a declarative paradigm. I no longer state line by line what needs to be done, but the end results I’m pursuing.
This declarative approach is still new for me, and it’s taking me some work to get used to it, but I’m feeling more comfortable with it.
Final words
As always, any comment, correction or suggestion is welcome 🙏.








Oldest comments (0)