In the previous post, I already go over GraphQL implemented for API read data
You can checkout them in here
In this post, I go over how to implement a mutation GraphQL API with spring-boot.
To implement graphQL mutation API, you need 2 things.
- The .graphqls file where we define the type and object
- The class implements GraphQLMutation Resolver
We will create API for create new blog post (In the source code, I also implement authenticate and create new user api using graphql mutation, so you can checkout for more)
- Graphqls file
type Mutation{
    createUserInfo(input: CreateUserInfo!) : Boolean!
    authenticateUserInfo(input: AuthenticateUserInfo!): JwtResponse!
    createBlog(input: CreateBlog!) : Blog!
}

input CreateUserInfo{
    username: String!
    password: String!
    fullname: String!
}

input CreateBlog{
    title: String!
    content: String!
}

input AuthenticateUserInfo{
    username: String!
    password: String!
}

type JwtResponse{
    token: String!
}
Type Mutation is where we define which methods we will do for mutation
We define the fields or object in the request body in type (for example type CreateUserInfo, type Create Blog)
- GraphQL Mutation Resolver:
We need to create graphql mutation for BlogMutation as below
import com.coxautodev.graphql.tools.GraphQLMutationResolver;
import donald.apiwithspringboot.model.Blog;
import donald.apiwithspringboot.model.mutation.CreateBlog;
import donald.apiwithspringboot.repository.BlogRepository;
import lombok.AllArgsConstructor;
import org.springframework.stereotype.Component;
import org.springframework.transaction.annotation.Transactional;


@Component
@AllArgsConstructor
public class BlogMutation implements GraphQLMutationResolver {

    private BlogRepository blogRepository;


    @Transactional
    public Blog createBlog(CreateBlog body){
        String title = body.getTitle();
        String content = body.getContent();
        return blogRepository.save(new Blog(title, content));
    }


}
3.Test graphql api with postman:
You can use graphiql or postman.
But I already covered graphiql in the previous post, so in this post I will use postman.
Keep in mind that we need authentication for any url except url contains endpoint like '/user' or '/authenticate' like defined in websecurityConfig file
@Override
    protected void configure(HttpSecurity httpSecurity) throws Exception {

        httpSecurity.csrf().disable()

                .authorizeRequests().antMatchers("/authenticate","/user").permitAll().

        anyRequest().authenticated().and().

        exceptionHandling().authenticationEntryPoint(jwtAuthenticationEntryPoint).and().sessionManagement()

                .sessionCreationPolicy(SessionCreationPolicy.STATELESS);

        httpSecurity.addFilterBefore(jwtRequestFilter, UsernamePasswordAuthenticationFilter.class);

        httpSecurity.logout().logoutSuccessUrl("/authenticate").logoutUrl("/logout").permitAll();

    }
Run the app with : mvn spring-boot:run
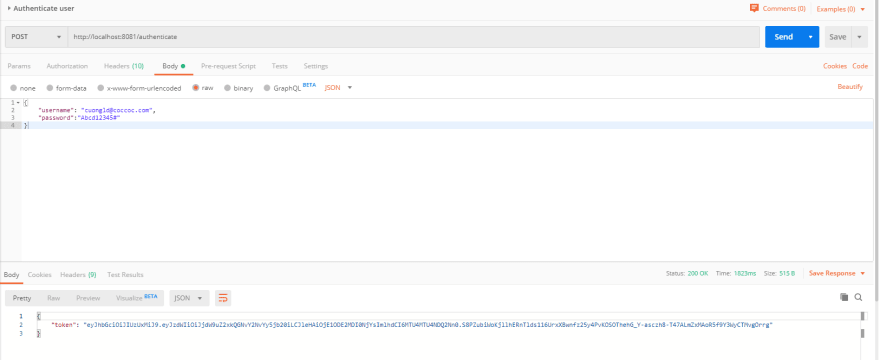
First we need to get the token using authenticate api
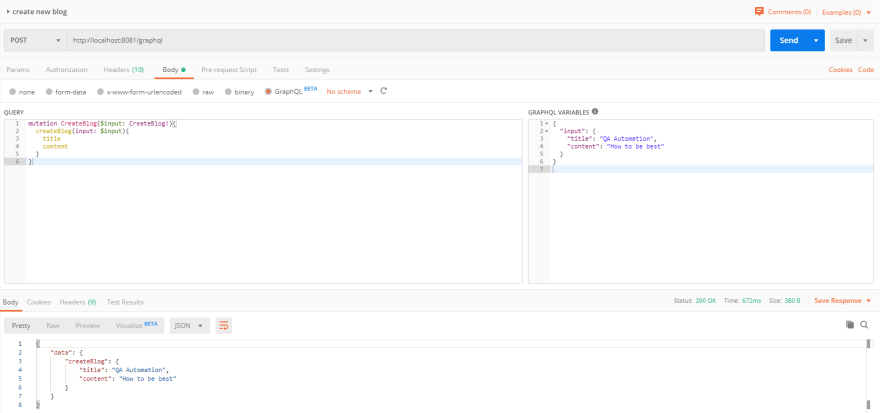
And use that token for create new blog post:
As usual you can checkout the source code for this in github
Notes: If you feel this blog help you and want to show the appreciation, feel free to drop by :

This will help me to contributing more valued contents.

Top comments (0)