
How it Started
I joined Chigu during my job search because I wanted to stay productive, sharpen my skills, and gain more hands-on experience working in a team.
Job hunting can be a unpredictable process, and instead of waiting around, I saw Chigu as the perfect opportunity to build something meaningful while collaborating with others.
Looking back, it turned out to be one of the best decisions I made—not only did I improve my technical and teamwork skills, but I also got to experience the full process of bringing a project from 0 to 1.
What We Built
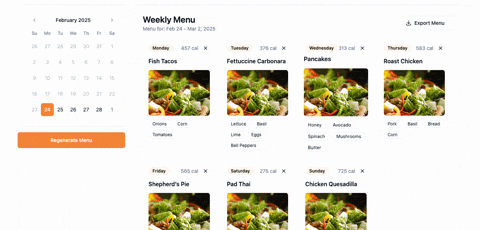
The project is a meal planning tool designed to help managers efficiently create weekly menus for employees.
Key Features:
- One-Click Menu Generation – Instead of manually selecting meals, managers can generate a balanced menu with a single click.
- No Repeated Meals – The system ensures that each day’s dish is unique, preventing repetition throughout the week.
- Easy Regeneration – If the results aren’t satisfactory, a “regenerate” button allows them to create a new menu instantly.
- Export Functionality – Users can save and track meal plans in PDF or Excel format for easy reference.
From 0 to 1
Each team receives a product spec with predefined features, but it’s up to us to break them down, plan the implementation, and bring the product to life.
Leading the Project
Our team was unique—no project manager, product owner, or UI/UX designer—just developers. Seeing the opportunity to lead in the absence of a project manager, I volunteered to take on the role. It felt like a perfect challenge to organize the team and drive the project forward.
I kicked off the project by planning the initial meeting: setting an agenda, defining each team member’s tasks, and ensuring we were aligned on the outcomes. Thanks to this preparation, the meeting was productive, and we defined our MVP features and roles for the upcoming sprint.
Building the Product Backlog
In sprint 2, I took on the responsibility of creating a Product Backlog, which is usually handled by a Product Owner. I broke down the MVP features into epics, user stories, and tasks, creating templates to ensure everyone was aligned.
This process made me realize how essential the backlog is as a roadmap for the team. It wasn’t easy—understanding each feature, defining clear acceptance criteria, and avoiding repetition was a challenge. But as I worked through it, I gained a clearer understanding of how each feature impacts the end user.
One instance where I exercised product thinking was when I adjusted the feature flow based on my own understanding of user needs and how they would interact with the product to ensure a smooth experience.
Unlike in more structured environments where backlogs are typically fixed, I had the freedom to adapt the “HOW” during development, tailoring the features to better suit user needs. This process was both challenging and rewarding, sharpening my product thinking and development skills.
The Tech Stack
For this project, we didn’t have to worry about a backend since we were working solely with a dish API. Therefore, I chose React as the core of the tech stack, paired with Vite as the build tool to ensure fast development and smooth hot reloading.
For state management, I initially considered Context API and Zustand, ultimately choosing Zustand for the following reasons:
- Our use case was simple but involved sharing state across multiple routes (e.g., allergies and weekly menus).
- Zustand provides built-in middleware for local storage persistence, which saved us time and effort in implementing our own solution.
- Out of the box, Zustand offers better performance, as it updates only the relevant parts of the state without unnecessary re-renders.
- Zustand is easier to scale. Should we need to manage more complex states, such as loading or error handling, or handle more sophisticated logic in the future, it can grow with the project.
UI/UX Design
For this MVP, I aimed to create a clean, modern, and easy-to-navigate UI that would allow users to start using the tool immediately without the need for a sign-in or sign-up process. The goal was to minimize friction and make the user experience as seamless as possible.
A bright color palette, chosen for its ability to convey a sense of openness and clarity, sets the tone for the UI, thanks to our talented UI/UX designer. She laid the foundation for the design, and I tailored the UX to suit the users’ needs.
Designing the Swap Feature
One of the key features I focused on was ensuring users could easily swap dishes if they weren’t happy with their selection.
Initially, I considered allowing users to search through a large list of dishes, which could be intuitive but might not be the most efficient way to save their time. Instead, I designed a modal popup that presents five recommended replacement dishes.
These dishes are randomly generated from the available dish database, ensuring no repeats with the current weekly menu. Offering five options strikes a balance between providing enough variety and avoiding overwhelming the user. I believe this design choice helps users make quick, informed decisions without limiting their options.
Here’s the UI in action:
Overcoming Challenges and Delivering the Project
Just two sprints into the project, our team faced some challenges when two members became less active, and our UI/UX designer, who was also expected to contribute to development, had to step back.
By the time we were ready to dive into the development phase, it was just me. Although I briefly considered quitting, I decided to push forward and deliver the project on my own.
I focused on core feature development and refining the user experience. Despite the challenges, I was able to successfully complete the product!
I shared my full journey on Twitter.
Special thanks to @numulaa for laying the foundation for the design, and you can find her work here on GitHub.
Check out the project!
I’m excited to share that this project is open source! You can explore the code, contribute, or just check it out on GitHub. If you found it useful or interesting, feel free to give it a star ⭐—it would mean a lot!
Try the live demo or watch the YouTube walkthrough to see it in action!
💬 Got feedback? I’d love to hear your thoughts! Feel free to open an issue on GitHub or drop me a message.
I’ll continue improving and iterating on it—stay tuned for updates! 🚀
If this helped you, I write about real dev problems at chloezhou.dev — you can subscribe to get new posts by email.

Top comments (0)