
This is my first post on dev.to - I feel like considering my name is Danielle Emma Vass I belong here (and would appreciate more DEV stickers to label all my things with please 😊)
Currently, I am a mobile SDK engineer at Pusher and in this post I will explain how I bought some Christmas cheer to our office with an internet connected angel!


Firstly, why?!
Early November, our office manager at Pusher asked asked if I could crochet an angel for the office. She knew I was a keen crocheter and I figured this could be a fun project where I'd have to make up my own pattern!
Later in the month I was talking to my Mum about my grand angel plans. She thought about it for a minute and asked if I could make it like my friend Jo's wedding dress, and connect the angel to the Internet. For background, my friend's dress was connected to Twitter, and you could tweet at her dress and it would change colour to whatever you tweeted at it!
I figured instead of connecting it to Twitter, I could use one of our own products Channels - this would enable people to change the colour in almost real time!
This was beginning to look like an ambitious project. So I began by splitting the work up into the separate, manageable areas; I needed to crochet the angel, build some electronics, write some microcontroller code, and construct a web app.
Crochet
I started with the crochet because I figured I had the most experience in it, knew that it would take time, and that it was foundational for all the other pieces. I built a small prototype to test my initial design out:
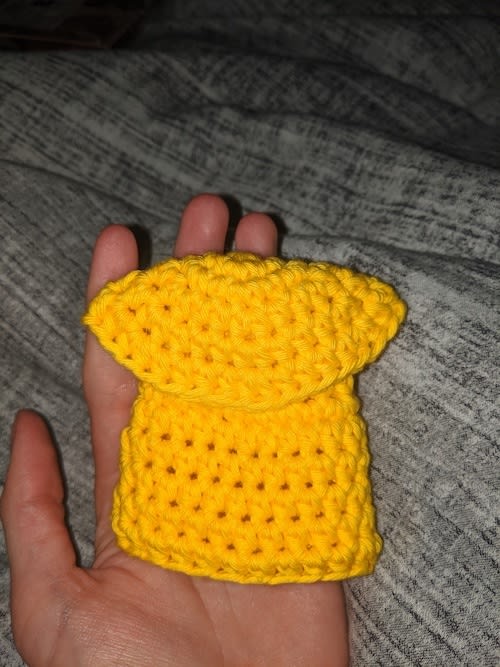
Once I was satisfied with the overall shape of the prototype, I then proceeded to make a bigger version. Determining the scale for the angel was more complicated than I anticipated, I knew the tree would be 6ft but that didn't really help me work out how big the angel should be.
The first angel that I started making, I determined was way too small after seeing what two lights would look like inside.

Progress on the second angel was much better but I got to a difficult stage where the angel just looked like a jellyfish!
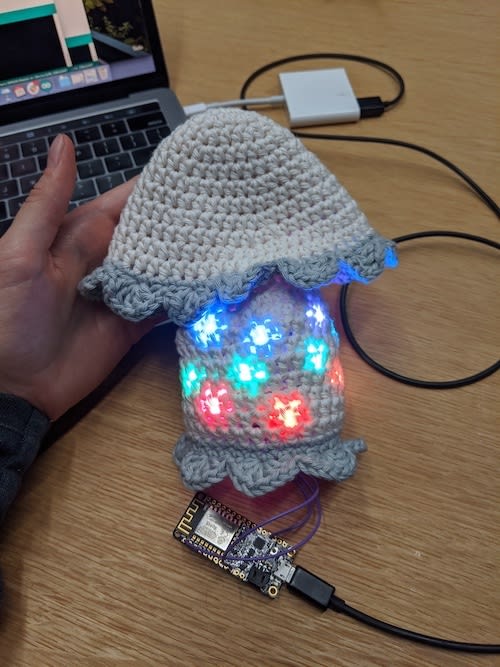
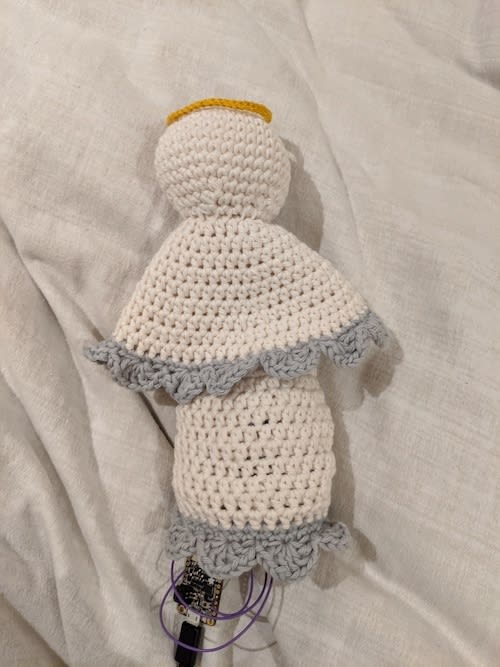
After crocheting her a head (and a halo) she looked much more angel like. I was happy that I could move on to the next stage, electronics!
Electronics
I'm going to prefix the next section with this is my first electronics project. I learned a lot throughout this process.
I chose the adafruit huzzah esp8226 board, it's designed to be small and light and has integrated wifi, but most importantly @thisisjofrank told me to get it. I also went with some adafruit flora neopixel v2 for the lights, they're super bright and individually addressable.
@thisisjofrank also gave me a whole bunch of copper wire so I could connect all my components. I also learnt that we have an electronics club in the office, so I could borrow a soldering iron (and guidance) from my colleague Callum.
I haven't used a soldering iron since secondary school, which was at least 15 years ago! I found it difficult ensuring that all six cables were threaded into and out of each pixel. I ended up taping them in place on an old amazon packaging so that I could move it around more easily and not damage any surfaces with hot solder.

My first pass at soldering everything concluded with only the first 5 pixels lighting up. I spotted one of the cables had fallen out of the sixth pixel so wasn't actually connected. A quick return to the soldering iron fixed that and then all my lights were operational! 🎉

After the solder had set, I cut back any straggling cables and covered the whole thing in sugru. Sugru is a moldable plastic, I could cover all my exposed cables and they'd not only be more robust but also be fully insulated. I was worried that putting any exposed cabling in cotton yarn could be a fire hazard 🔥 and I really didn't want to be the person who set fire to the office Christmas tree!
The next step was to sew the electronics into the body of the angel. I turned the body inside out and carefully stitched the wiring into the body. The hardest part here was turning the angel back the right way with all the cables set up! It made a horrifying crunch noise but everything survived okay!

Next, it was time to write the code for the microcontroller.
Microcontroller code
I split this section into two chunks - I needed to change the pixel colours, then I needed to connect to a Pusher Channel using websockets directly and receive colour changing events.
Setup
Firstly, I needed to be able to connect to my board from my MacBook. This required me to install the Arduino IDE.
Once that was set up, I needed to add my ESP8266 board in the preferences and adding http://arduino.esp8266.com/stable/package_esp8266com_index.json to the additional board managers. This meant I could then select this board in tools - boards and ensure any code would compile for that specifically. I also had to install the driver for the board on my MacBook. After that I could select the right port in the tools -> port, before I think it was just trying to send my microcontroller code to my MacBook USB adapter which obviously was never going to work! 😆
NeoPixel Colours
Next, I needed to install the Adafruit NeoPixel library. You can do this by clicking Tools -> Manage Libraries and searching for the NeoPixel library. Adafruit have written a bunch of example scripts you can use to get up and running fast. If you tap File -> Examples -> scroll down to your added libraries and the Adafruit NeoPixel section -> strandtest. The strandtest goes through a bunch of colours and settings. You need to provide how many pixels you have, and the pin you've connected your NeoPixels to on the board and it's a quick way to ensure your lights are all operational!
Using the example code is great because you can see how Adafruit change the lights to do what they want. I copied across the function that would let me change all the lights to a given colour colorWipe, and rainbow() so I could enable a special mode ✨
Websockets
The next part of the puzzle was to get the board to connect to the Internet. I looked at who else had solved this problem; I loaded up the examples but this time we had to look at the esp8226 examples. I used the BasicHttpClient example as originally I was looking to make a HTTP request. This had the code I needed to connect to the WiFi. Later, I found another example that looped in the setup until it the wifi was connected before it would move on. As I was using lights, I figured I could use them to let me know when I was connected too!
char* ssid = "SSID_HERE";
char* password = "WIFI_PASSWORD";
ESP8266WiFiMulti WiFiMulti;

void setup() {

  Serial.begin(115200);

  //make the lights red when it's not connected
  colorWipe(strip.Color(255,   0,   0), 10);

  WiFi.mode(WIFI_STA);
  WiFiMulti.addAP(ssid, password);

  while(WiFiMulti.run() != WL_CONNECTED) {
    delay(100);
  }

  //make the lights green when it's connected to the internet
  colorWipe(strip.Color(0,   255,   0), 10);

}
Now we know we're happily connected to the Internet, we needed to work out how to use websockets! There's a popular library from Links2004 for arduino sockets. I downloaded the repository and imported it as a library by going to the menu - Sketch - Include Library - add .ZIP library and selected the downloaded repo.
Like all the other libraries we've used today, this also had a WebSocketClient example. I could look at how their code worked and copy paste what I needed for my example!
I needed to follow the Pusher Channels protocol doc to connect to a Channels websocket however, every time I tried to run this on my device it just wouldn't connect. I needed to be able to see some debug messages so I could fix any issues.
In order to do this, I added the following line to my setup code:
Serial.setDebugOutput(true);
As well as setting the variable in code, you also need to configure the Arduino IDE to enable debug messages. You need to set tools - debug port to Serial (not disabled). You also need to set change the debug level (in the same menu tree). I setting with the most letters and I then saw a great deal more information in my Serial monitor!

I learned that the websocket library already prefixed the socket address, so my connection string needed to look as follows:
webSocket.begin("ws-CLUSTER.pusher.com", 80, "/app/APP_KEY?client=arduino&version=0.0.1&protocol=7");
With that set up, I could see in my Serial monitor that eventually it would connect successfully!
The next step to using Channels is to subscribe to a channel, which I was going to call angel. Reading the docs again, I could write the JSON needed to send a subscription event myself and send it through the websocket :
String json = "{\"event\":\"pusher:subscribe\", \"data\": {\"channel\": \"angel\"} }";
webSocket.sendTXT(json);
I made sure to send this event as soon as I get the connect event to the websocket. This means that I could then listen to any events that come through. Pusher Channels sends the payload in JSON format. The JSON looks something like the following:
{
  "event":"new-colour",
  "data":"{\"responseColour\":\"255,204,0\", \"r\":\"255\", \"g\":\"204\", \"b\":\"0\"}",
  "channel":"angel"
}
I could have spent time working out how to parse the request myself, or I could use yet another library! I chose Arduino JSON.
I struggled a little as the data returned in the event is encoded as a string, and I needed to deserialize that using a second DynamicJsonDocument. I had intended to send the colour value as a rgb payload but I soon learned it was very complicated to split a string on a delimiter in arduino land, and it was much easier to change the API to send the values in separate R G B values. My code now looked like the following :
DynamicJsonDocument root(1024);
DynamicJsonDocument data(1024);
void handleEvent(uint8_t * payload) {
  deserializeJson(root, payload);
  if (root["event"] == "new-colour") {
      deserializeJson(data, tmp);
      String colour = data["responseColour"];
      Serial.println(colour);
  }
Once I'd mastered how to get all the data I cared about in the event, I wrote a big if statement to check what kind of event I'd got, whether it was a standard rgb colour or a special mode. If it was a standard RGB value I could parse it straight to the lights to render using the colorWipe function we learned earlier.
Or could I?
This is where I learned that dealing with colour is hard. Different devices render colour differently. Where my computer screen displays #ffcc00 as a beautiful yellow, my NeoPixels were displaying them as a washed out yellow. I did some googling to work out why this was happening and stumbled upon this brilliant explanation that explains the issue very thoroughly. It looked like I was going to have to write a complicated algorithm to translate my colour into something the NeoPixel could display better :(
But how did the Adafruit rainbow function the example code had work? Their colours never appeared washed out! Were they doing something I could use? When I looked into it a bit more, they were using this mysterious gamma32() function. Reading from their uberguide:
Something you might observe when working with more nuanced color changes is that things may appear overly bright
or washed-out. It’s generally not a problem with simple primary and secondary colors, but becomes more an issue with
blends, transitions, and the sorts of pastel colors you might get from the ColorHSV() function. Numerically the color
values are correct, but perceptually our eyes make something different of it, as explained in this
guide https://adafru.it/w2B.
The gamma32() function takes a packed RGB value (as you might get out of Color() or ColorHSV()) and filters the result
to look more perceptually correct.
Perfect! This is exactly what I needed to solve this problem! My arduino code was complete 🌟
Web App
The final part of this project required a web application to enable other people to easily change the colours.
One of my other colleagues has recently built something similar to demonstrate how others could use a Pusher Channel to rate dogs on the Internet in real time. They kindly showed me how it was built so I could copy everything to build my web app to control my angel.
I built a basic website using bootstrap, to enable people to provide a hex colour, select a standard colour, or select a special mode and send it to the angel!

Pusher Channels don't allow clients to send events unless they're authenticated and using either a private or presence channel. I didn't want to authenticate people to use this web app, so instead I needed to create my own node api which could then trigger the events.
I was also recommended a service provider called zeit to deploy the web app too. They'd also be able to host my API for free too as a serverless function! After I installed their npm cli I could type now into my terminal to deploy my website! I configured some environment variables so that I could open source the code without any fear that other people would be able to use my Pusher Channel instance.
I also added some google analytics tracking to the app. I'm interested in knowing how many people are using it, and what colours you're sending her! I'll maybe do a follow up with what we learned from this!
After some user testing with meetups in the office, I added Pusher Channels into the web app to listen for the events. This means everyone currently watching the web page can also see what events are being sent. This means you know if someone else is "hilariously" setting the lights to #000000 (which turns the lights off), and not that the angel has broken!

Finishing
I feel like this has been a massively over engineered solution to the "crochet me a Christmas tree angel" problem. I'm very happy that she's now finished and I'm even happier that she's brought other people joy in the office!
I hope you learned something from this blog. My source code for the entire project is available at https://github.com/daniellevass/pusher-christmas-angel. And if you're going to attend any of our meetups in December please make sure you check it out and play around yourself :)

Top comments (1)
Cute idea! One of my favorite college courses was an elective I took where we learned to integrate the Adafruit Circuit Playground with .NET applications.