Introduction
In a traditional containerized environment, storage is ephemeral—meaning that when a pod is restarted, all its data is lost. This happens because container file systems are temporary and tied to the pod's lifecycle. This is a major challenge for stateful applications like databases and file storage systems that hold important data and information.
Kubernetes solves this issue by providing Persistent Volumes (PV) and Persistent Volume Claims (PVC), ensuring data persistence even when pods restart or move between nodes. This ensures that data remains persistent and secure.. In this article, I will guide you through how Persistent Volumes work, how to configure them, and best practices for managing persistent storage in Kubernetes, with a complete practical guide.
Understanding Persistent Volumes in Kubernetes
Why Do We Need Persistent Volumes?
By default, Kubernetes pods use ephemeral storage, which means:
- When a pod restarts or gets rescheduled to another node, its data is lost.
- Stateful applications (e.g., databases like MySQL, MongoDB) require persistent storage.
- Persistent Volumes provide a way to separate storage from pods, allowing data to persist beyond the lifecycle of a pod.
What is a Persistent Volume (PV) and a Persistent Volume Claim (PVC)?
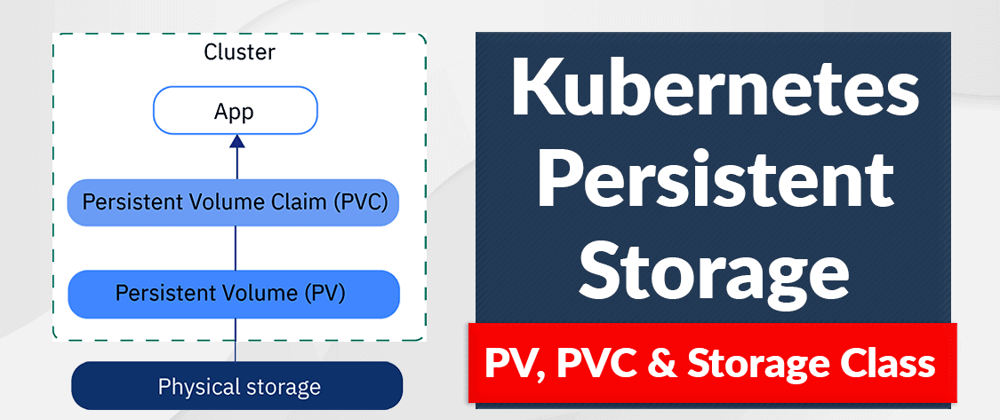
- Persistent Volume (PV): A physical storage resource in the cluster, provisioned by administrators or dynamically created using Storage Classes.
- Persistent Volume Claim (PVC): A request from a pod to use a Persistent Volume.
- StorageClass: Defines how storage should be dynamically provisioned by the cloud provider or local storage.
How Persistent Volumes Work
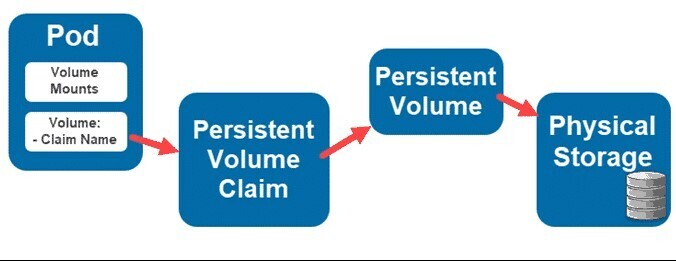
- Administrator creates a Persistent Volume (PV) with a specified storage size and access mode.
- A pod requests storage by creating a Persistent Volume Claim (PVC).
- Kubernetes binds the PVC to an available PV.
- The pod mounts the Persistent Volume and uses it for storage.
Persistent Volume Provisioning: Static vs Dynamic
Static Provisioning: The cluster administrator manually creates a Persistent Volume (PV) before any pod requests storage.
Dynamic Provisioning: Kubernetes automatically provisions storage when a pod creates a Persistent Volume Claim (PVC) using a StorageClass.
Creating a Persistent Volume and PVC (Hands-on Guide)
In this practical guide, I will be using MongoDB and Mongo Express (a UI for MongoDB) to demonstrate how to use Persistent Volumes. This example is tested on a Minikube cluster, so ensure your Minikube is running.
Since we will be using local storage to persist data, we need to create a storage path in Minikube. This storage path will be used to create our Persistent Volume (PV).
minikube ssh
sudo mkdir -p /data/mongodb
sudo chmod 777 /data/mongodb
exit
This will create the directory and grant the necessary permissions. Now, we can proceed to create the PV, PVC, and deployments.
Step 1: Create a Persistent Volume (PV)
apiVersion: v1
kind: PersistentVolume
metadata:
  name: mongodb-pv
  labels:
    type: local
spec:
  storageClassName: manual
  capacity:
    storage: 1Gi
  accessModes:
    - ReadWriteOnce
  persistentVolumeReclaimPolicy: Retain
  hostPath:
    path: "/data/mongodb"
Ensure that the hostPath matches the directory created in your Minikube setup.
Step 2: Create a Persistent Volume Claim (PVC)
apiVersion: v1
kind: PersistentVolumeClaim
metadata:
  name: mongodb-pvc
spec:
  storageClassName: manual
  accessModes:
    - ReadWriteOnce
  resources:
    requests:
      storage: 1Gi
Ensure the storageClassName, accessModes, and storage values match those defined in the PV
After applying these configurations, Kubernetes will bind the PVC to an available PV, allowing the pod to use persistent storage.
Run kubectl get pv and kubectl get pvc after applying the configuration to confirm the binding. The status should look like this:

Step 3: Deploy MongoDB with Persistent Volume
For a real-world use case, let’s deploy MongoDB with a Persistent Volume.
apiVersion: apps/v1
kind: Deployment
metadata:
  name: mongo-deployment
  labels:
    app: mongodb
spec:
  replicas: 1
  selector:
    matchLabels:
      app: mongodb
  template:
    metadata:
      labels:
        app: mongodb
    spec:
      volumes:
      - name: mongodb-storage
        persistentVolumeClaim:
          claimName: mongodb-pvc
      containers:
        - name: mongo
          image: mongo
          ports:
            - containerPort: 27017
          volumeMounts:
            - name: mongodb-storage
              mountPath: /data/db
          resources:
            limits:
              cpu: "500m"
              memory: "256Mi"
            requests:
              cpu: "250m"
              memory: "128Mi"
          env:
            - name: MONGO_INITDB_ROOT_USERNAME
              valueFrom:
                secretKeyRef:
                  name: mongo-secret
                  key: username
            - name: MONGO_INITDB_ROOT_PASSWORD
              valueFrom:
                secretKeyRef:
                  name: mongo-secret
                  key: password
Your MongoDB deployment file should look like this but take note of the following.
- In the
volumessection, theclaimNamemust match the name of your PVC. - In The
volumeMountssection, themountPathis the default mountPath for MongoDB - The
envwhich is the Environment Variables i.e the MONGO_INITDB_ROOT_USERNAME and MONGO_INITDB_ROOT_PASSWORD is stored in a secret file for security purposes, I will write about that in my next article.
Now apply the configuration
Step 4: Deploy Mongo Express as a UI for MongoDB
Now let's deploy Mongo Express
apiVersion: apps/v1
kind: Deployment
metadata:
  name: mongoexpress-deployment
  labels:
    app: mongoexpress
spec:
  replicas: 1
  selector:
    matchLabels:
      app: mongoexpress
  template:
    metadata:
      labels:
        app: mongoexpress
    spec:
      containers:
        - name: mongoexpress
          image: mongo-express
          ports:
            - containerPort: 8081
          resources:
            limits:
              cpu: "500m"
              memory: "256Mi"
            requests:
              cpu: "250m"
              memory: "128Mi"
          env:
            - name: ME_CONFIG_MONGODB_ADMINUSERNAME
              valueFrom:
                secretKeyRef:
                  name: mongo-secret
                  key: username
            - name: ME_CONFIG_MONGODB_ADMINPASSWORD
              valueFrom:
                secretKeyRef:
                  name: mongo-secret
                  key: password
            - name: ME_CONFIG_MONGODB_SERVER
              valueFrom:
                configMapKeyRef:
                  name: mongo-config
                  key: database_url
This is what your Mongo Express deployment should look like, the environment variables are contained in a secret and configMap file as I mentioned earlier.
Step 5: Configure services for communication
For internal and external communication, we need to configure services, MongoDB will use ClusterIP because there will be no need for external communication while Mongo Express will use a Nodeport to give external access.
apiVersion: v1
kind: Service
metadata:
  name: mongo-service
spec:
  selector:
    app: mongodb
  ports:
    - protocol: TCP
      port: 27017
      targetPort: 27017
  type: ClusterIP


---
apiVersion: v1
kind: Service
metadata:
  name: mongoexpress-service
spec:
  selector:
    app: mongoexpress
  ports:
    - protocol: TCP
      port: 8081
      targetPort: 8081
      nodePort: 30000
  type: NodePort
Run kubectl get svc to check your services, it should look like the image below.

Step 6: Minikube Service
Next, we will use Minikube to expose the Mongo Express service, making it accessible from the browser. This will enable us to interact with MongoDB through the UI. Run the command:
minikube service minikube service mongoexpress-service
You can now access Mongo Express from the given IP address. The web page should look like this:
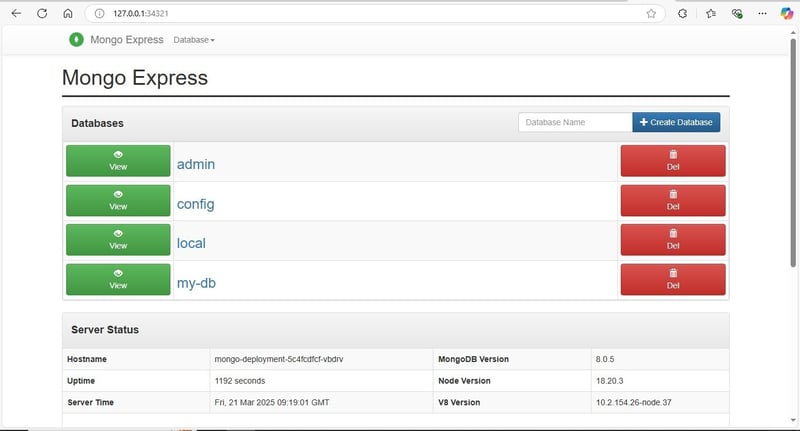
To test this, create databases and collections from the Mongo Express UI. Restart the pods, and you will still have the data intact. This demonstrates how Persistent Volumes work.
Common Issues & Troubleshooting
-
PVC stuck in "Pending" state?
- Run
kubectl describe pvc mongodb-pvcto check events. - Ensure that a matching PV is available.
- Check if the storageClassName matches between the PV and PVC.
- Run
-
Pod cannot write to storage?
- Ensure the permissions on the host path are correct.
-
Pod stuck in "ContainerCreating"?
- Verify that the Persistent Volume is properly mounted.
- Run
kubectl describe pod <pod-name>for detailed logs.
-
PV and PVC not bound?
- Check kubectl get pv and kubectl get pvc for status.
-
Data loss after pod restart?
- Ensure that the volume is mounted correctly.
- Check the reclaim policy (
Retain,Delete,Recycle).
Best Practices for Using Persistent Volumes
- Use Storage Classes for dynamic provisioning when working with cloud storage providers.
- Choose the right access mode (ReadWriteOnce, ReadWriteMany) based on the application's needs.
-
Set the appropriate reclaim policy (
Retain,Delete,Recycle) depending on data retention needs. - Monitor storage usage using Kubernetes metrics and alerts.
Conclusion
Persistent Volumes are essential for running stateful applications in Kubernetes. By using PV, PVC, and Storage Classes, you can ensure that your application data persists beyond pod restarts and rescheduling.
Now that you understand how Persistent Volumes work, try deploying them in your own Kubernetes cluster and see how they enhance data persistence! 🚀

Top comments (0)