Intro
Running Django, especially Django querysets in jupyter notebooks might be useful if you want to analyze/plot the data that is in your database. Also, sometimes it's hard to execute big querysets in CLI using Django's interactive shell.
In this article, we will see how to connect Django's shell with the Jupyter Notebook and get the advantage of executing querysets in notebook cells.
Django
Django is a web framework for perfectionists with deadlines. It has a shell command that starts the Python interactive interpreter.
Jupyter Notebook
The Jupyter Notebook is an open-source web application that allows you to create and share documents that contain live code, equations, visualizations, and narrative text. Uses include: data cleaning and transformation, numerical simulation, statistical modeling, data visualization, machine learning, and much more.
Django Extensions
Django Extensions is a collection of custom extensions for the Django Framework. These include management commands, additional database fields, admin extensions and much more. With the help of this python package, we will connect Django's shell with the Jupyter Notebook application.
Setup
I assume that you have python installed on your machine and you are familiar with creating virtual environments.
Create an empty folder for the django project:
$ mkdir django_jupyter && cd django_jupyter
Create a virtual environment inside of the newly created folder:
$ virtualenv .venv -p python3
Already using interpreter /usr/bin/python3
Using base prefix '/usr'
New python executable in /django_jupyter/.venv/bin/python3
Also creating executable in /django_jupyter/.venv/bin/python
Installing setuptools, pip, wheel...
done.
Activate the virtual environment:
$ source .venv/bin/activate
Install all necessary python packages:
(.venv) $ pip install django jupyter ipython django-extensions
Initialize an empty django project:
(.venv) $ django-admin startproject django_jupyter .
Migrate the database:
(.venv) $ python manage.py migrate
Operations to perform:
  Apply all migrations: admin, auth, contenttypes, sessions
Running migrations:
  Applying contenttypes.0001_initial... OK
  ...
  Applying auth.0011_update_proxy_permissions... OK
  Applying sessions.0001_initial... OK
To make the use of django_extensions list it in INSTALLED_APPS in settings.py file:
INSTALLED_APPS = [
    ...
    'django_extensions',
]
Usage
Now we will start jupyter notebook application with the command below:
(.venv) $ python manage.py shell_plus --notebook
IMPORTANT! IPython added top-level async/await support, which is running the whole interpreter session inside of a default event loop and starting from Django 3.0 version running application from a thread where there is a running event loop, will cause a SynchronousOnlyOperation error. So, setting DJANGO_ALLOW_ASYNC_UNSAFE to true is mandatory in that case. More on this here.
(.venv) $ DJANGO_ALLOW_ASYNC_UNSAFE=true && python manage.py shell_plus --notebook
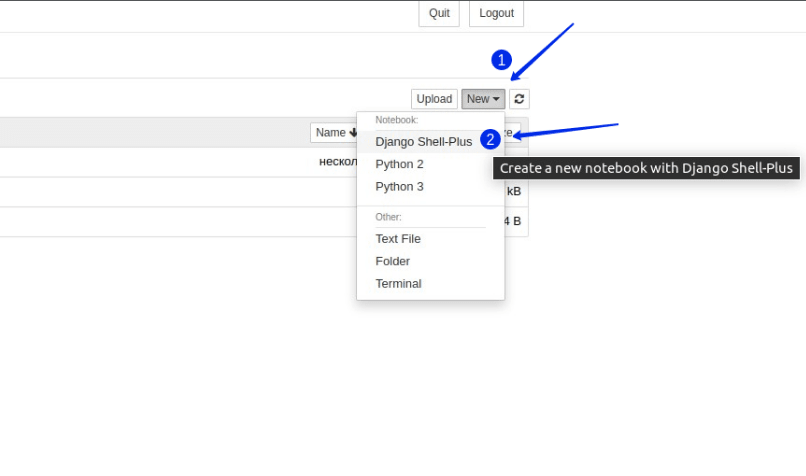
Now, when the jupyter notebook web application is on your screen, you can create a new notebook selecting Django Shell-plus as a kernel:
In the brand new notebook import the model you want and start writing and running querysets as you do in Django's shell.

Conclusion
This setup gives us lots of advantages. One of them is the absence of necessity to scroll through the shell history to reuse/change code snippets that we wrote because our code exists in handy Jupyter notebook cells in front of us.

Top comments (2)
Djano inside of jupyter. That’s crazy
❯ DJANGO_ALLOW_ASYNC_UNSAFE=true && python manage.py shell_plus --notebook
ModuleNotFoundError: No module named 'notebook.notebookapp'