I needed a calendar (or a date picker) for a product I'm working on. In the past, I would have always reached for a library.
A calendar isn't usually something I want to maintain myself and the features in a library typically cover many different use cases. However, in this case, I wanted to see what I could build in a couple hours.
So, let's build a calendar with Vue. We'll use a single HTML file. We won't use webpack or babel. We won't need to compile or install anything at all.
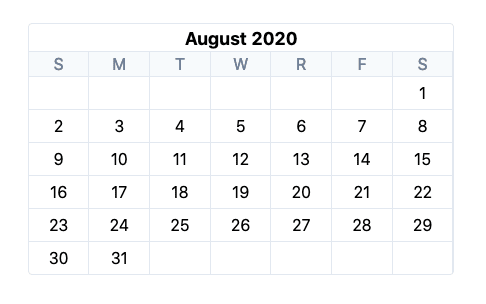
Here's what the end product will look like.
 First time using date-fns.org and I was able to cobble together a working calendar component in Vue in a couple hours. A delightful experience.
In the past, I would always reach for a library because I thought calendars were too complex to manage myself.15:21 PM - 22 Aug 2020
0
0


We'll start with this template. It contains everything we'll be using to get the job done.
- tailwind: a utility-first CSS framework
- vue: a JavaScript framework for building user interfaces
- date-fns: a date utility library
- lodash: a utility library
<!DOCTYPE html>
<html>
<head>
<title>Calendar.vue</title>
<link href="https://unpkg.com/tailwindcss@^1.0/dist/tailwind.min.css" rel="stylesheet">
<script src="https://unpkg.com/vue"></script>
<script src="https://cdnjs.cloudflare.com/ajax/libs/date-fns/1.30.1/date_fns.min.js"
integrity="sha512-F+u8eWHrfY8Xw9BLzZ8rG/0wIvs0y+JyRJrXjp3VjtFPylAEEGwKbua5Ip/oiVhaTDaDs4eU2Xtsxjs/9ag2bQ=="
crossorigin="anonymous"></script>
<script src="https://cdn.jsdelivr.net/npm/lodash@4.17.20/lodash.min.js"></script>
</head>
<body class="py-12">
<div class="container mx-auto flex justify-center">
<div id="calendar" class="w-1/3 rounded border">
</div>
</div>
<script>
var app = new Vue({
el: '#calendar'
})
</script>
</body>
</html>
To start, it's helpful to think about how a calendar can be represented in a data structure. This is how I thought it could look.
var august2020 = [
  [null, null, null, null, null, null, 1],
  [2, 3, 4, 5, 6, 7, 8],
  [9, 10, 11, 12, 13, 14, 15],
  [16, 17, 18, 19, 20, 21, 22],
  [23, 24, 25, 26, 27, 28, 29],
  [30, 31, null, null, null, null, null]
]
I wanted a data structure that could easily map to DOM elements. If we look at august2020, we can see how each array could be a row in the calendar and each value inside the array could map to a div. null values would be an empty div.
The challenge is that we need to build this data structure anytime the month is changed. A month can start and end on any day of the week, so we need to come up with an algorithm.
Let's get started.
We're going to need three functions. One to get the first day of the month, one to get the last day of the month, and one to get the number of days in the month. We'll use those functions to determine where to start drawing our calendar. In other words, how many empty elements do we need before we draw 1 and how many empty elements do we need after we draw 31.
var app = new Vue({
  el: '#calendar',
  data: {
    // August 1, 2020
    date: new Date(2020, 7, 1)
  },
  computed: {
    startOfMonth: function() {
      return dateFns.startOfMonth(this.date)
    },
    endOfMonth: function() {
      return dateFns.endOfMonth(this.date)
    },
    daysInMonth: function() {
      return dateFns.getDaysInMonth(this.date)
    }
  }
})
The dateFns object is provided by date-fns. The functions we're calling do what you'd expect them to do (awesome, right?).
Once we have the beginning and the end of the month, we have enough to build the august2020 data structure shown above. What we'll be building are the weeks of August 2020. We'll use the weeks to display the month of August 2020 on the page.
<body class="py-12">
  <div class="container mx-auto flex justify-center">
    <div id="calendar" class="w-1/3 rounded border">
      <section>
        <ul v-for="(week, weekIndex) in weeks" :key="weekIndex" class="border-t">
          <li>
            <ul class="flex">
              <li v-for="(day, dayIndex) in week" :key="`${weekIndex}-${dayIndex}`" class="flex-1 p-1 text-center border-r last:border-r-0">
                {{day && day.getDate()}}
              </li>
            </ul>
          </li>
        </ul>
      </section>
    </div>
  </div>

  <script>
    var app = new Vue({
      el: '#calendar',
      data: {
        // August 1, 2020
        date: new Date(2020, 7, 1)
      },
      computed: {
        startOfMonth: function() {
          return dateFns.startOfMonth(this.date)
        },
        endOfMonth: function() {
          return dateFns.endOfMonth(this.date)
        },
        daysInMonth: function() {
          return dateFns.getDaysInMonth(this.date)
        },
        weeks: function() {
          var firstDayOfWeek = dateFns.getDay(this.startOfMonth)

          var days = []

          for (var i = 0; i < firstDayOfWeek; i++) {
            days.push(null)
          }

          for (var i = 1; i <= this.daysInMonth; i++) {
            days.push(dateFns.setDate(this.date, i))
          }

          var lastDayOfWeek = dateFns.getDay(this.endOfMonth)
          for (var i = 0; i < 6 - lastDayOfWeek; i++) {
            days.push(null)
          }

          return _.chunk(days, 7)
        }
      }
    })
  </script>
</body>
The result of the above code looks like this. Let's break it down.

Once we determine the first day of the week (August 2020 starts on a Saturday), we can figure out how many blanks we need. In this case, we need six blanks. A loop that goes from 0 to 5 will give us just that. At this point, the days array looks like this: [null, null, null, null, null, null].
for (var i = 0; i < firstDayOfWeek; i++) {
  days.push(null)
}
At this point, we can add days 1-31 since we know there are 31 days in August. A loop that goes from 1 to 31 can get the job done. Instead of using integers, we push in Date objects. We use dateFns.setDate(this.date, i) to get a new date object set to the value of i. This will come in handy for other purposes.
After this look executes, days is an array with 6 null values followed by the integers 1 to 31.
for (var i = 1; i <= this.daysInMonth; i++) {
  days.push(dateFns.setDate(this.date, i))
}
Finally, once we're done with that, we can use the last day of the month to determine how many blanks we need to fill in the rest of the calendar. August 2020 ends on a Monday, so we need to fill in five blanks to finish. A loop that goes from 0 to 4 is here to help.
for (var i = 0; i < 6 - lastDayOfWeek; i++) {
  days.push(null)
}
Now, let's add some labels. To do that, we need a little HTML and a formatting function. We want to display August 2020 at the top with labels for each day of the week.
We'll add the following to our Vue template directly above the <section> for displaying the weeks and days.
<section class="flex">
  <h2 class="flex-grow text-center text-lg font-bold">{{month}}</h2>
</section>
<ul class="flex bg-gray-100 border-t text-gray-600">
  <li class="flex-1 text-center border-r last:border-r-0">S</li>
  <li class="flex-1 text-center border-r last:border-r-0">M</li>
  <li class="flex-1 text-center border-r last:border-r-0">T</li>
  <li class="flex-1 text-center border-r last:border-r-0">W</li>
  <li class="flex-1 text-center border-r last:border-r-0">R</li>
  <li class="flex-1 text-center border-r last:border-r-0">F</li>
  <li class="flex-1 text-center border-r last:border-r-0">S</li>
</ul>
And the function for month is a simple one as well. Again, dateFns is provided by date-fns and we use its format function. 'MMMM YYYY' just says give us a string representation of the date that looks like August 2020.
function() {
  return dateFns.format(this.date, 'MMMM YYYY')
}
Doing that gets us to this point. Here's what the calendar looks like n ow.
The last thing we need to do is allow ourselves to navigate to the previous and next months. This is the fun part. Everything we've done so far is setting us up to use Vue's most powerful feature: reactivity.
Whenever date changes, Vue will re-use the code we already wrote and draw a new calendar based on the new date. So if we change the date to be July 2020, we'll get a July 2020 calendar drawn for us. Let's do it.
First, we need a couple links to click on. We need a link that says "Previous" and a link that says "Next". Something like this will do just fine.
<section class="flex">
  <a class="ml-4 flex-shrink cursor-pointer text-gray-800 underline">Previous</a>
  <h2 class="flex-grow text-center text-lg font-bold">{{month}}</h2>
  <a class="ml-4 flex-shrink cursor-pointer text-gray-800 underline">Next</a>
</section>
As you might be able to tell, these links don't do anything. We don't have them hooked up to Vue at all, but that's easy enough - let's do it. We'll need a method and then tell the links to call that method when clicked. The previous link will decrement the month by 1 and the next link will increment the month by 1.
// ...
methods: {
  changeMonth: function(by) {
    this.date = dateFns.addMonths(this.date, by)
  }
}
// ...
<section class="flex">
  <a v-on:click="changeMonth(-1)" class="ml-4 flex-shrink cursor-pointer text-gray-800 underline">Previous</a>
  <h2 class="flex-grow text-center text-lg font-bold">{{month}}</h2>
  <a v-on:click="changeMonth(1)" class="ml-4 flex-shrink cursor-pointer text-gray-800 underline">Next</a>
</section>
When we click on the previous link, Vue calls our function with -1 as the argument. Then our function adds -1 months to the current date (which is August 1, 2020). This tells Vue to re-render our component with July 2020 as the current date. We're done.

If you'd like to view the full version, check it out on JSFiddle. Feel free to copy and paste this to your local machine and play around with it.
If you found this helpful, follow me on Twitter.

Top comments (0)