Recently, I completed a code challenge that included some bonus items. One of those bonus items involved image uploading which I had not yet done before. So, I decided to make it my goal this week to learn how to implement ActiveStorage to allow image and document uploading into an application. ActiveStorage eliminates the need for external gems to allow for image and document uploading. ActiveStorage also supports the use for different Cloud based storage systems such as Amazon S3, Microsoft Azure, Google Cloud Storage or you may use your computer's local disk.
First, after you've created or opened your app, install ActiveStorage with the command rails active_storage:install.
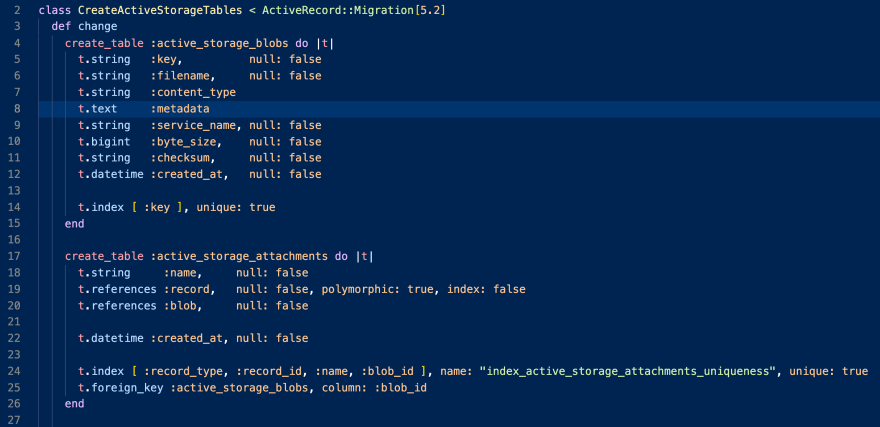
This line will do exactly what it says... install ActiveStorage. Using this command will also create ActiveStorage tables that will then need to be migrated with rails db:migrate. Let's take a quick look at the tables that were created.
Holy moly! That looks like a bunch of information, right?! Not to worry, these tables are essentially doing the following:
- Storing filename, byte size, content type, etc.
- Joining the attachment to the Model owner. (Think a User and their avatar)
If you are using Cloud storage you will also need to create a .env file and add that to a .gitignore file. This is extremely important so that your keys do not get used by others viewing your repository which can lead to charges on your Cloud storage account! This file will then contain the information needed to use the Cloud storage service.
# .env file
ACCESS_KEY_ID=yourid
SECRET_ACCESS_KEY_ID=yoursecretid
REGION=yourregion
BUCKET=yourbucket
In storage.yml ActiveStorage has configured the different Cloud options available. Simply uncomment whichever service you wish to use and reference your .env file.
Next, go into development.rb and/or production.rb and update the line of code that references the ActiveStorage service to use whichever service you prefer. Otherwise, it will automatically default to your local storage.
config.active_storage.service = :local
config.active_storage.service = :amazon
config.active_storage.service = :google
config.active_storage.service = :azure
Now that we've got the Cloud stuff out of the way we can move on to our Model relations. ActiveStorage gives us has_one_attached and has_many_attached which sets up mapping between records and files.
Make sure, in the associated Controller, to allow the image/document to be permitted in the params. In my example, since there are many documents, I set documents to an empty array to allow it to take in multiple.
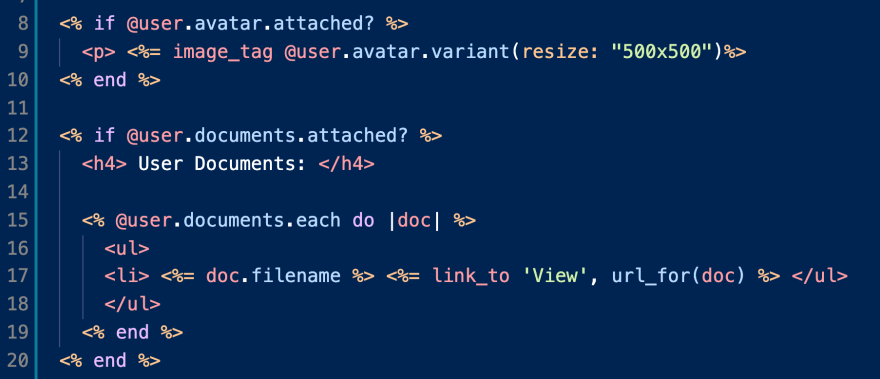
Finally, if you're using a frontend or views, add in a file_field to the associated form for the image/document to be uploaded. If you make use of has_many_attached, be sure to set multiple to true in the form. Don't forget about the show page! In the show page (or where ever the image/document is going to be displayed) be sure to call the proper association to have the image/document display.
Tada!! Now, ActiveStorage has been successfully added to your application. I hope this walk through helps even a tad.
BONUS:
ActiveStorage supports uploading directly from the client to the cloud. To do so, set
direct_uploadto true to begin upload on form submission.Use
variantto transform your image/document. Withvariantyou can do things like resize or format. To use variant you will need to add the gemimage_processingwhich relies on ImageMagick. ImageMagick will need to be installed on your operating system as it is not a Ruby gem.attached?is also given to us from ActiveStorage. Basically, it checks if there is an attachment present or not.
References:


Top comments (1)
Credentials kirillshevch.medium.com/encrypted-... is recommended for storing passwords instead of the
.envfile. Search forrails credentialsfor other discussions. This topic is confusing but important.Thank you for this overview.