
✔ What is JWT
💡 JSON Web Token is an open and standard (RFC 7519) way for you to represent your user’s identity securely during a two-party interaction. Particularly, when two systems exchange data you can use JSON Web Token to identify your user without having to send private credentials on every request.
A JWT typically looks like this
eyJhbGciOiJIUzI1NiIsInR5cCI6IkpXVCJ9.eyJleHAiOjEzODY4OTkxMzEsImlzcyI6ImppcmE6MTU0ODk1OTUiLCJxc2giOiI4MDYzZmY0Y2ExZTQxZGY3YmM5MGM4YWI2ZDBmNjIwN2Q0OTFjZjZkYWQ3YzY2ZWE3OTdiNDYxNGI3MTkyMmU5IiwiaWF0IjoxMzg2ODk4OTUxfQ.uKqU9dTB6gKwG6jQCuXYAiMNdfNRw98Hw_IWuA5MaMo
It looks complicated at first sight, but if you understand, the structure of a JWT is just simple as follows
<base64-encoded header>.<base64-encoded payload>.<base64-encoded signature>
In other words, a well-formed JWT consists of three concatenated Base64url-encoded strings, separated by dots (.), which are:
- Header
- Payload
- Signature
✔ Build RESTful API with JWT(JSON Web Token)
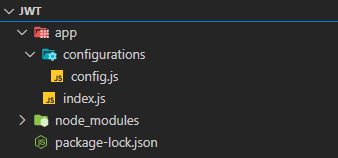
First let's create a folder with name "JWT" and take a look at our project structure
Then open your command line under JWT directory and write this command
npm install --save express body-parser morgan jsonwebtoken
1 - index.js
const express = require('express'),
    bodyParser = require('body-parser'),
    jwt = require('jsonwebtoken'),
    config = require('./configurations/config'),
    cors = require('cors'),
    app = express();

//set secret
app.set('Secret', config.secret);

// parse application/x-www-form-urlencoded
app.use(bodyParser.urlencoded({ extended: true }));

// parse application/json
app.use(bodyParser.json());

app.listen(3000, () => {
    console.log('Server is running on port 3000');
});
app.get('/', function (req, res) {
    res.send('App is running on http://localhost:3000/');
});
2 - configurations/config.js
module.exports = {
    secret: "heymynameisminh"
}
Now check if everthing is okay 😃 Run this command line.
node index.js
❗️ Make sure that you are standing in the right directory to run index.js file (following our project structure)
Open your browser at http://localhost:3000/

Well done! Everything works well. Keep going
3 - Setting up the authentication system
Assume the username and password in the database are "techx" and "123" then write this code in index.js file
app.post('/authenticate', function (req, res) {
    console.log(req.body);
    if (req.body.username !== "techx") res.json({ message: "user not found!" });
    if (req.body.password !== "123") res.json({ message: "please check your password!" });
    const payload = {
        check: true
    }
    let token = jwt.sign(payload, app.get('Secret'), {
        expiresIn: 14000
    });
    res.json({
        message: 'authentication done',
        token: token
    });
});
Now let's make a test with Postman
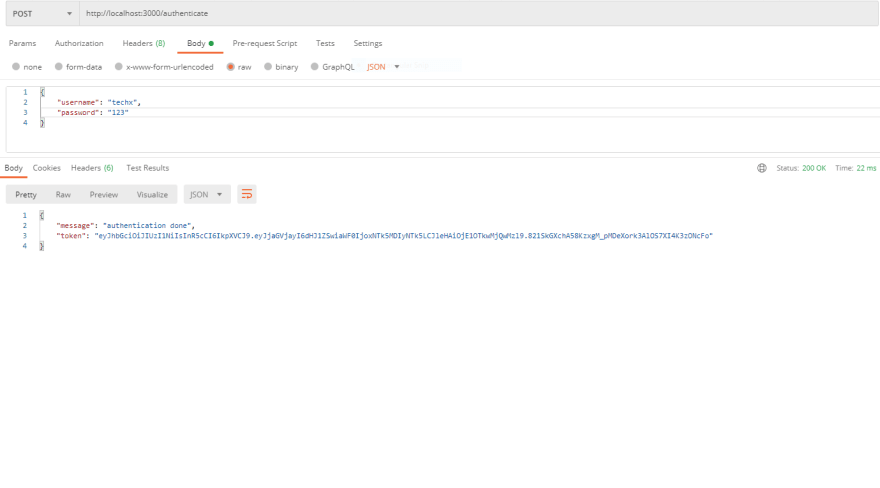
Perfect! 😃 We just sent an HTTP request to the server, which responed with the JWT we asked for. For now, Client's already had the token. Let's move to the next step - Setting route
const ProtectedRoutes = express.Router();
app.use('/api', ProtectedRoutes);
ProtectedRoutes.use((req, res, next) => {
let token = req.headers['access-token'];
console.log(token);
if (!token) res.send({ message: 'No token provided.' });
jwt.verify(token, app.get('Secret'), (err, decoded) => {
if (!err) { req.decoded = decoded; next(); }
return res.json({ message: 'invalid token' });
})
});
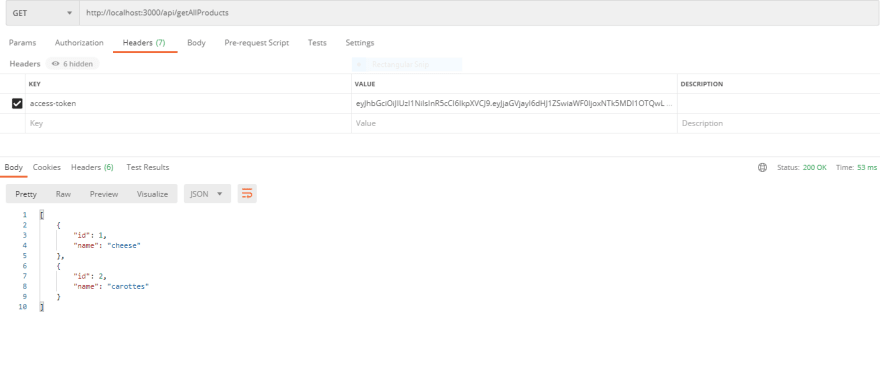
ProtectedRoutes.get('/getAllProducts', (req, res) => {
let products = [
{
id: 1,
name: "cheese"
},
{
id: 2,
name: "carottes"
}
]
res.json(products)
});
Everything have done, now we are comparing two different ways of getting data
- with Token
- without Token


Top comments (0)