Introduction
Monolithic architecture is a traditional model for designing applications where all components and functions are included in a single element. While monolithic applications are easy to develop and deploy, they become difficult to manage and maintain as the application grows. Microservices architecture, on the other hand, is a collection of smaller, independent, loosely coupled services that may communicate with each other via multiple protocols. Microservices are highly scalable, easy to maintain, and extremely suitable for container-based technologies. They complement cloud solutions and provide fault tolerance. Container orchestration tools are automation technologies that help manage the lifecycle of app containers and microservices architecture at scale. They automate container deployment, management, scaling, and networking, freeing teams from repetitive manual work. Container orchestration tools can be applied in any environment where containers are used. They help deploy the same application across different environments without needing to redesign it. Microservices in containers make it easier to orchestrate services, including storage, networking, and security. Enterprises that need to deploy and manage hundreds or thousands of Linux containers and hosts can benefit from container orchestration.
The first part of this tutorial dived deeper into the aforementioned concepts, and introduced Docker Swarm through an exercise of orchestrating containerized services on a Docker Swarm made of 2 Virtual Machines, on Amazon Web Services.
This article dives deeper into the orchestration of Microservices, and their deployment on Docker Swarm.
NK-Microservices Application
The NK-Microservices project is a basic, and open source application built using Microservices. It serves as a pilot project and/or a reference to be used by anyone who wishes to write software using the Microservices approach. Indeed, Microservices is a software development methodology that is being adopted widely nowadays, especially with the advancement of technology, and the adoption of cloud computing resources._
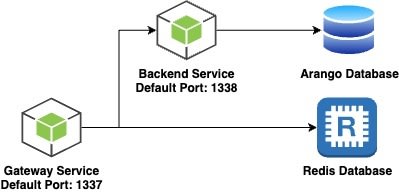
The project is made of the following components:
- Gateway Microservice: A REST API Microservice built using SailsJS, and serves as a Gateway, and request router.
- Backend Microservice: A REST API Microservice built using SailsJS, and serves as the first, out of many Microservices which can be incorporated and integrated with the aforementioned Gateway Service.
- Redis Database: An open source, in-memory data store, used for caching purposes, and for storing other ephemeral pieces of information such as JWT tokens.
- Arango Database: A multi-model database used for storing persistent information.
(Visit the documentation repository for the complete details of the project)
This tutorial concentrates on discussing the deployment of the backend microservices only (i.e., Backend, Gateway services). Enabling HA deployments for databases (i.e., Redis, ArangoDB) requires different strategies, and will be discussed in later articles.
To make the most value from this tutorial, you should be equipped with minimal technical and theoretical knowledge on Containers, Microservices, Cloud Computing, AWS. Readers who do not possess the knowledge above are encouraged to watch this Udemy crash course)
Tutorial 2 - NK-Microservices Application Deployment on Docker Swarm
Problem Statement
This tutorial provides a step-by-step to deploy the NK Microservices application with the following requirements:
-
Deployment Mode: High Availability - Docker Swarm.
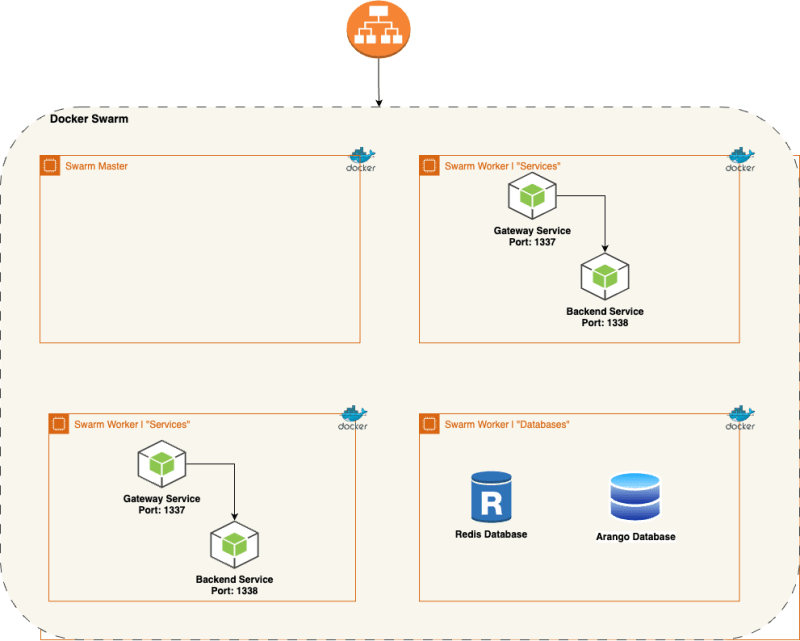
- A Docker Swarm composed of 4 Virtual Machines, configured as such:
- One Docker Swarm Master VM.
- Two Docker Swarm Worker VMs, on which the Gateway and Backend Services are deployed.
- One Docker Swarm Worker VM, on which the Arango and Redis Databases are deployed.
- Operating System: Ubuntu 20.04.
- A Docker Swarm composed of 4 Virtual Machines, configured as such:
- One Application Load Balancer to balance the load across all four VMs.
Expected Output
- The application must be fully deployed and running on port 80 using the
address:
http://<load balancer>:80 - The NK-gateway service and NK-backend service must be linked as a target group to the Application Load balancer.
- The security group attached to the services machines must enable access on port 80 from the Application Load Balancer.
- The security group attached to the load balancer must enable access to port 80 from the internet.
- The NK-gateway service and NK-backend service must be deployed as 2 replicas, each on one of the two VMs labeled “Services” strictly.
- The Arango and Redis databases must be deployed as one replica each, on the VM labeled “Databases” Strictly.
- The Arango database must have a volume configured. Test the validity of the deployment by deleting the container (Not the service). A correct configuration should allow Docker Swarm to re-create a replica of the database, on the machine labeled “***************Databases***************”, and all the data should persist.
- The Docker Swarm Master node must not have any container deployed on it.
- Communication with the Backend service and the databases must be done internally from within the Docker Network only, and not through the VM IP and external port.
Solution
AWS Resources
SSH Keypair
An SSH Keypair is required to SSH to the Virtual Machines. To create a Keypair:
- Navigate to the EC2 service, Key Pairs option from the left menu.
- Create a Keypair.
- The key will be automatically downloaded. Move it to a hidden directory.
- Modify the permissions to read only: chmod 400 .pem
n SSH Key is required to SSH to the Virtual Machines. To create a Keypair:
- Navigate to the EC2 service, Key Pairs option from the left menu.
- Create a Keypair.
- The key will be automatically downloaded. Move it to a hidden directory.
- Modify the permissions to read only:
chmod 400 <keyName>.pem

Security Group
A security Group is required to control access to the VMs. The ports below will be allowed access from anywhere:
- TCP Port 80: To perform requests against the Httpd service.
- TCP Port 22: To SSH to the machines.
- All TCP and UDP Ports open from within the VPC: Several ports are required for Docker Swarm, which are out of the scope of this article.

In addition, Outbound rules must allow all ports to anywhere. This is essential to provide internet access to the machines.

EC2 Machines
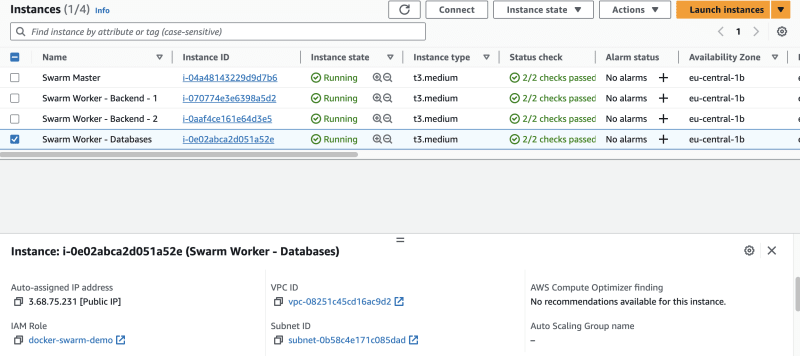
Navigate to AWS EC2 —> Launch instances, with the following parameters:
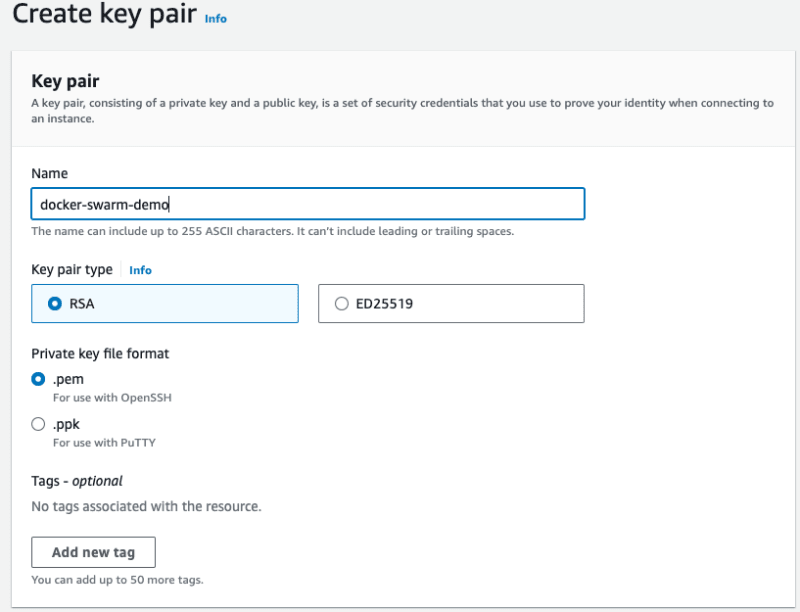
- Name: Docker Swarm Demo
- Number of instances: 4
- AMI: Ubuntu Server 22.04 LTS (HVM), SSD Volume Type
- Instance Type: t3.medium (Or any type of your choice)
- Key pair name: docker-swarm-demo
-
Network Settings:
- Select existing security group: Docker Swarm Demo
- Configure storage: 1 x 25 GiB gp2 Root volume
Once the machines are created, rename one of them to Swarm Master, and the others to Swarm Worker - Backend - 1, Swarm Worker - Backend - 2, and Swarm Worker - Databases.

ECR Repositories
Two private ECR Repositories must be created, with the following configuration:

IAM Roles
The machines will be used to pull and push images from and to the private ECR registries. An IAM role with enough permissions must be attached to the created machines. To create a role, navigate to the IAM service --> Roles, and create a role, with the following parameters:
- Trusted entity type: AWS Service.
- Use case: EC2
- Permission Policy: AmazonEC2ContainerRegistryPowerUser
- Role Name: docker-swarm-demo
Create the role.
Navigate back to the EC2 instances dashboard. Click on every instance, one by one, then select Actions --> Security --> Modify IAM Role. Select the docker-swarm-demo role. Repeat this step for every VM.
Docker Installation
SSH to each of the four machines, and paste the code block below to install Docker on each of them:
# Update the package index and install the required packages
sudo apt-get update
sudo apt-get install -y ca-certificates curl gnupg lsb-release

# Add Docker’s official GPG key:
sudo mkdir -p /etc/apt/keyrings
curl -fsSL https://download.docker.com/linux/ubuntu/gpg \
| sudo gpg --dearmor -o /etc/apt/keyrings/docker.gpg

# Set up the repository
echo "deb [arch=$(dpkg --print-architecture) \
signed-by=/etc/apt/keyrings/docker.gpg] \
https://download.docker.com/linux/ubuntu \
$(lsb_release -cs) stable" | sudo tee /etc/apt/sources.list.d/docker.list \
> /dev/null

# Update the package index again
sudo apt-get update

# Install the latest version of docker
sudo apt-get install -y docker-ce docker-ce-cli containerd.io \
docker-compose-plugin

# Add the Docker user to the existing User's group
#(to run Docker commands without sudo)
sudo usermod -aG docker $USER
To interact with Docker without sudo privileges, restart the SSH sessions of both machines. Validate the successful installation of Docker, by performing the following three commands on each machine:
docker ps -adocker imagesdocker -v
Docker Swarm Configuration
As specified, the purpose is to create a Docker Swarm made of 1 Master node, and 1 Worker node:
- SSH to the Master node, and initialize a swarm:
docker swarm init --advertise-addr <Private IP>
advertise-addr specifies the address that will be advertised to other members of the swarm for API access and overlay networking. Therefore, it is always better to use the machines' private IPs.

SSH to every Worker node, and join the swarm using the command generated in the Master node:
docker swarm join --token SWMTKN-1-210tp2olzm5z0766v71c6e6pmdzrjzz8pnkrw3z4mqj8ocjlbj-5758xx4x3dxib1249tceom6rr <Private IP>:2377List all the nodes available:
docker node ls

Node configuration
Part of the project requirements are as follows:
- The Master Node must not host any container.
- The databases (ArangoDB, and Redis) must be placed on the database machine only.
- The backend services must be placed on the backend machines only.
To make this happen, first, the nodes have to be properly configured. SSH to the Master machine.
-
Draining the Master node will prevent it from hosting any container. Drain the node:
docker node update --availability drain ip-172-31-46-120

- Label the remaining machines. The services VMs must be labeled
workload=service, and the database VM must be labeledworkload=database
docker node update --label-add workload=database ip-172-31-41-113
docker node update --label-add workload=service ip-172-31-40-214
docker node update --label-add workload=service ip-172-31-36-173
Ensure that the labels have been applied correctly by listing the nodes by label:
docker node ls -f node.label=workload=database
docker node ls -f node.label=workload=service

The scenarios below further test the validity of the configuration:
- Deploy 5 replicas of the HTTPD service with no constraints. The replicas must be deployed on all the worker VMs, and none on the Master node:
docker service create --name myhttpd -p 80:80 --replicas 5 httpd:latest

The picture above clearly shows that all of the replicas have been divided among all the worker nodes and none of them was placed on the master node.
- Update the HTTPD service to force the placement of the services on machines labeled workload=service only:
docker service update --constraint-add node.labels.workload==service myhttpd

The image above clearly shows how the placement was modified. All the replicas that were on the database node were removed, and replaced by others placed on the service nodes.
- Update the HTTPD service to force the placement of the services on machines labeled workload=database only:
docker service update --constraint-rm node.labels.workload==service --constraint-add node.labels.workload==database myhttpd

The image above shows how all the replicas are now on the database.
Remove the service: docker service rm myhttpd
NK-Microservices Deployment
Internal Network
An overlay network is needed to allow services to communicate with each other within the swarm: docker network create --driver overlay nk-microservices
ArangoDB
The first component to add is the Arango database. The deployment must respect the following constraints:
- The service can run only on the database node.
- The service must be reachable from within the Swarm network only.
- Data must persist and survive container failures.
Deploy the ArangoDB container: docker service create -d --name person-db --network nk-microservices --replicas 1 --constraint node.labels.workload==database --mount src=arango-volume,dst=/var/lib/arangodb3 -e ARANGO_STORAGE_ENGINE=rocksdb -e ARANGO_ROOT_PASSWORD=openSesame arangodb/arangodb:3.6.3
The command above instructs docker to create a service of 1 replica, attach it to the nk-microservices overlay network, attach the /var/lib/arangodb3 directory to a volume named arango-volume, use openSesame as root password, use the arangodb/arangodb:3.6.3 image, and place the container on the VM labeled workload=database.

The image above clearly shows that the container was created on the database node.

The image above is a screenshot from within the database node. Clearly the volumes and containers are created as they should be.
Redis
The deployment must respect the following constraints:
- The service can run only on the database node.
- The service must be reachable from within the Swarm network only.
docker service create -d --name redis --network nk-microservices --replicas 1 --constraint node.labels.workload==database redis:6.0.5
The command above instructs docker to create a service of 1 replica, attach it to the nk-microservices overlay network, use the redis:6.0.5 image, and place the container on the VM labeled workload=database.


The images above showcase the proper deployment of Redis
Connection testing
docker service create -d --name client --network nk-microservices --replicas 1 --constraint node.labels.workload==service alpine sleep 3600

The image above shows the correct placement of the client container on one of the service nodes.
SSH to the machine hosting the container, and then obtain a session into the container: docker exec -it client.1.vjhcn1zo86n1vqvr0iortjhe5 sh
Install the curl package: apk add curl
- Test the connection to ArangoDB by sending an API request to the ArangoDB hostname (Which is the service name in this case):
curl http://person-db:8529/_api/version.
The API request returns a 404 error response. Nonetheless, this indicates that the request from the clients container has successfully reached the ArangoDB container using the overlay network.

- To test the connection to redis, install the redis package on the alpine container:
apk --update add redis. Then connect to redis using its hostname (The service name in this case):redis-cli -h redis.

The image above shows the successful connection to the Redis service using the overlay network.
Remove the clients service, from the master node: docker service rm redis
Backend Service
As already described, the backend service is a NodeJS service hosted on a public Github Repository. The backend service must be deployed as 2 replicas, and hosted on the service nodes strictly.
Below are the steps that will be done to ensure the proper deployment of the service:
- Use the Master node to build and push the container images (A separate machine could be used for this operation, but to avoid using additional resources, we will use the master node).
- Create an Image for the backend service, using the existing dockerfile.
- Push the image to the ECR.
- Create the backend service.
- Ensure its proper connectivity to the database.
- Validation Tests
Create the Image
Clone the repository on the Master node:
git clone https://github.com/devops-beyond-limits/nk-backend-service.gitNavigate into the downloaded repository. A Dockerfile containing all the build steps exist. No modifications are required for this Dockerfile.
Build the image locally:
docker build -t backend-service:latest -f Dockerfile .

The image above shows the creation of the image locally.
Push the image to the ECR
To push the image to the ECR, perform the following steps:
Install the AWS CLI:
sudo apt install awscli -yLogin to the ECR:
aws ecr get-login-password --region eu-central-1 | docker login --username AWS --password-stdin 444208416329.dkr.ecr.eu-central-1.amazonaws.comTag the local image to reflect the repository name in the ECR:
docker tag backend-service:latest 444208416329.dkr.ecr.eu-central-1.amazonaws.com/nk-backend-service:latestPush the Docker image to the ECR:
docker push 444208416329.dkr.ecr.eu-central-1.amazonaws.com/nk-backend-service:latest
(Make sure to modify the region and account name in the commands above)


Create the Backend Service
Create the backend service using this command:
docker service create -d --name nk-backend --network nk-microservices --replicas 2 --constraint node.labels.workload==service --with-registry-auth 444208416329.dkr.ecr.eu-central-1.amazonaws.com/nk-backend-service:latest
The command above instructs Docker to create 2 replicas of the backend service image, located in the AWS ECR private registry, and hence use the --with-registry-auth flag (To allow the worker machines to authenticate to the ECR), attach the nk-microservices network, and place the replicas on the service machines only.

The picture above shows the correct placement of the containers on the machines.
Validation Tests
To validate the correct deployment of the backend service, perform the following:
- Ensure the proper connection to the database, through the service logs:
docker service logs nk-backend

The application logs shown in the picture above clearly show the successful connection of the application to the database
- Ensure the backend service is reachable from within the overlay network.
To do so, re-create the clients service: docker service create -d --name client --network nk-microservices --replicas 1 --constraint node.labels.workload==service alpine sleep 3600
SSH into the machine hosting the created container, exec inside it, install the curl package, and perform a Health API against the backend service, using its hostname (service name): curl http://nk-backend:1337/health

A successful response indicates the proper configuration of the network.
Delete the client service: docker service rm client
Gateway Service
As already described, the gateway service is a NodeJS service hosted on a public Github Repository. The gateway service must be deployed as 2 replicas, and hosted on the service nodes strictly.
Below are the steps that will be done to ensure the proper deployment of the service:
- Use the Master node to build and push the container images (A separate machine could be used for this operation, but to avoid using additional resources, we will use the master node).
- Create an Image for the backend service, using the existing dockerfile.
- Push the image to the ECR.
- Create the backend service.
- Validation Tests
Create the Image
Clone the repository on the Master node:
git clone https://github.com/devops-beyond-limits/nk-gateway-service.gitNavigate into the downloaded repository. A Dockerfile containing all the build steps exist. Modify the BACKEND_HOST environment variable, to reflect the correct service name of the backend service (nk-backend)
Build the image locally:
docker build -t gateway-service:latest -f Dockerfile .

The image above shows the creation of the image locally.
Push the image to the ECR
To push the image to the ECR, perform the following steps:
Login to the ECR:
aws ecr get-login-password --region eu-central-1 | docker login --username AWS --password-stdin 444208416329.dkr.ecr.eu-central-1.amazonaws.comTag the local image to reflect the repository name in the ECR:
docker tag gateway-service:latest 444208416329.dkr.ecr.eu-central-1.amazonaws.com/nk-gateway-service:latestPush the Docker image to the ECR:
docker push 444208416329.dkr.ecr.eu-central-1.amazonaws.com/nk-gateway-service:latest
(Make sure to modify the region and account name in the commands above)


Create the Gateway Service
Create the gateway service using this command:
docker service create -d --name nk-gateway --network nk-microservices --replicas 2 --constraint node.labels.workload==service -p 80:1337 --with-registry-auth 444208416329.dkr.ecr.eu-central-1.amazonaws.com/nk-gateway-service:latest
The command above instructs Docker to create 2 replicas of the gateway service image, located in the AWS ECR private registry, and hence use the --with-registry-auth flag (To allow the worker machines to authenticate to the ECR), attach the nk-microservices network, and place the replicas on the service machines only.

The picture above shows the correct placement of the containers on the machines.
Validation Tests
Ensure that the gateway service is up and running, through checking the service logs:
docker service logs nk-gateway.Ensure that the gateway service can be reached from the internet, through any of the four VMs. Perform a health check using each public IP.

- The remaining tests can be validated by performing different API tests against the gateway, and monitoring the behavior of the system. To do so, Download an API Client (i.e., Postman), and import the nk-microservices Postman collection

- The first API to test is the Create Person API, which attempts to create a person in the database. Make sure to modify the GATEWAY_HOST and GATEWAY_PORT variables with the correct values (of any node).
A correct setup should allow the API to traverse the gateway and backend services, and create a person record in the database.

The image above shows the:
- Request/Response of the API in Postman.
- The logs in the gateway service.
- The logs in the backend service.
- The second API to test is the Get All Persons API. This API attempts to fetch all the person records, by performing the following logic:
- Attempt to find the records in the Redis database.
- If the records are found in Redis, return them to the client.
- Else, dispatch the request to the backend service. The backend service will fetch the records, and return them to the gateway service. The gateway service will save the records in Redis, and return the result to the client.
Since this is the first time the API is requested, steps (1) and (3) will be performed.
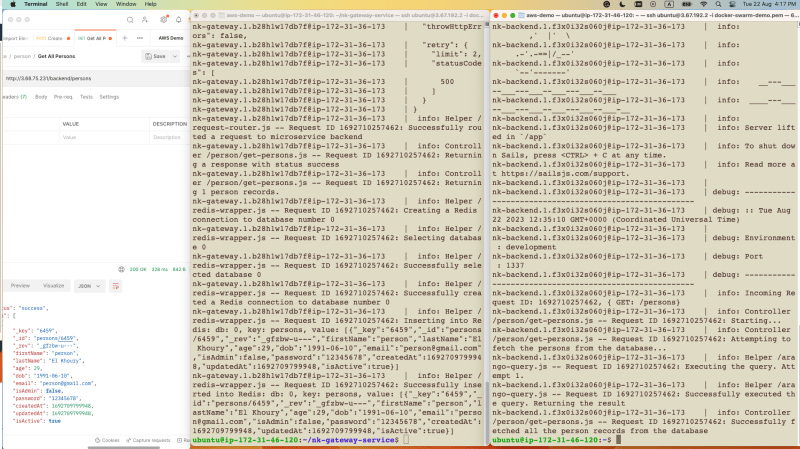
- Hit the API again and monitor the service logs. This time, the request will only reach the gateway service only, and fetch the records from redis.

Load Balancer
The final step is to create a load balancer, to divide the load across all VMs. To do so, Navigate to the EC2 Service --> Load Balancers, and create a load balancer with the following parameters:
- Load balancer types: Application Load Balancer
- Load balancer name: docker-swarm-demo
- Scheme: Internet-facing
- IP Address Type: IPv4
- VPC: Default
- Mappings: Select all Availability Zones (AZs) and subnets per AZ.
- Security Group: docker-swarm-demo
- Listener: Port 80
-
Default Action: Create a new Target Group with the following Paramters:
- Choose a target type: Instances
- Target group name: docker-swarm-demo
- Protocol: HTTP
- Port: 80
- VPC: default
- Health check protocol: HTTP
- Health check path: /health (The health check API of the gateway service)
- Include as Pending all the Swarm nodes
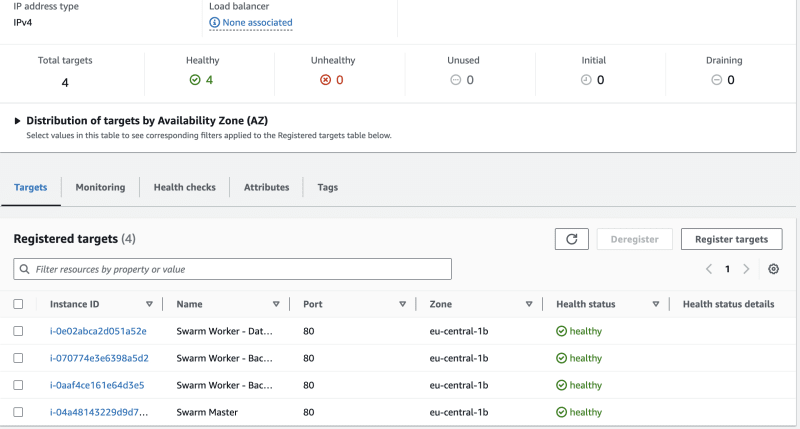
Create the target group. Navigate back to the Load Balancer page, and choose the created target group, as a value to the Default action option. Create the load balancer.
After a few minutes, the load balancer will be active, and the target groups will be healthy.

Replace the VM IP with the Load balancer DNS name in Postman, and perform the same API requests. Similar success responses must be returned, indicating the success of the setup.


Top comments (0)