
LoadBalancer Services are super convenient. Just change the type of a NodePort service to LoadBalancer and your cloud provider will provision a new cloud load balancer, external IP address, and firewall rules to make your workload reachable to the world. It's a fantastic user experience! It's no wonder that example installations and tutorials love to include them.
Load balancers, however, come with a cost. On Digital Ocean, for example, each load balancer will run you ten dollars a month -- and for small development clusters this cost can quickly dwarf the cost of the cluster itself.
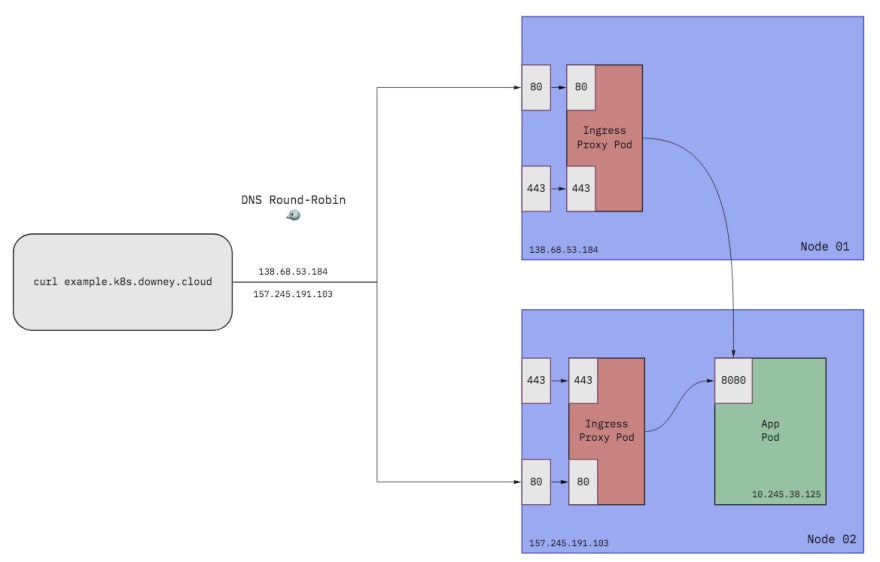
In this post I'll show how you can save money by skipping the load balancer for your development clusters. We'll see how with a few minor tweaks we can route traffic with an Ingress Controller and plain old fashioned DNS.
The Plan
In place of our cloud load balancer we are going to configure DNS for our domain to round-robin between each of our cluster's worker nodes. This will result in requests to our domain going directly to a worker node. We will install an Ingress Controller on our cluster and have it listen on ports 80 and 443 to handle incoming HTTP(S) traffic and forward it to workloads running on our cluster.
So, in short, we'll do the following:
- Install an Ingress Controller as a DaemonSet
- Use a
NodePortService instead of aLoadBalancerservice - Configure the ingress Pods to listen on
hostPort80and443 - Configure DNS for our domain to have
Arecords pointing to each of our node external IP addresses - Double check any firewall rules that apply to the worker VMs and ensure ingress traffic is allowed for ports
80and443 - Create an
Ingressresource to expose our app
Installing the Ingress Controller
I have yet to find an Ingress Controller that this doesn't work with. I've done this with Istio, Contour, and NGINX Ingress and they've all been fine. So choose an Ingress Controller and read its documentation on how to install it. To accomplish the steps outlined above, we'll need to tweak the installation YAML somewhat.
Contour can be installed with minimal changes. By default it installs itself as a DaemonSet and already configures the hostPorts to do what we want. So if you're using Contour, feel free to skip ahead to the "Converting a LoadBalancer Service into a NodePort Service" section.
NGINX Ingress Controller and Istio require some extra work. We'll need to convert their ingress proxy Deployments into DaemonSets and configure the hostPort properties for ports 80 and 443. The steps below apply directly to NGINX Ingress, but can be adapted for Istio.
Converting a Deployment into a DaemonSet
First we'll convert the ingress-nginx-controller Deployment into a DaemonSet. Why use a DaemonSet?
Well, for dev environments with a small number of nodes I prefer using a DaemonSet over a Deployment for managing the ingress Pods. This ensures that there will be an instance of our ingress proxy running on all nodes in the cluster and greatly simplifies configuring the DNS. We can just create an A record for every node! Otherwise we'd have to get fancier with placement and keep track of which nodes are configured to be ingress nodes. It's the "cattle not pets" philosophy.
Of course, if you have a large number of nodes it's probably a waste of resources to have them all running ingress proxies -- but if you're operating at that scale you'll probably be using a real load balancer anyway.
So to do this programatically we can use a tool called ytt. We can use ytt to apply the overlay below on top of what the NGINX Ingress Controller provides by default to transform a Deployment named ingress-nginx-controller into a valid DaemonSet.
Configuring Host Ports
We can also use this same overlay to update the containerPorts to include hostPorts so that the container can listen on port 80 and 443. This is necessary because we can't do any fancy port-forwarding with plain DNS, so the ingress proxy needs to be able to listen on the standard HTTP and HTTPS ports.
#@ load("@ytt:overlay", "overlay")

#@overlay/match by=overlay.subset({"kind": "Deployment", "metadata":{"name":"ingress-nginx-controller"}}),expects=1
---
#@overlay/replace
kind: DaemonSet
spec:
  #@overlay/match missing_ok=True
  updateStrategy:
    rollingUpdate:
      maxUnavailable: 1
  template:
    spec:
      containers:
      #@overlay/match by=overlay.subset({"name":"controller"}),expects=1
      - ports:
        #@overlay/match by=overlay.subset({"containerPort":80}),expects=1
        - containerPort: 80
          #@overlay/match missing_ok=True
          hostPort: 80
        #@overlay/match by=overlay.subset({"containerPort":443}),expects=1
        - containerPort: 443
          #@overlay/match missing_ok=True
          hostPort: 443
So if we save this overlay to a file -- let's call it /tmp/nginx-deployment-to-daemonset.yaml -- we can apply it as so:
ytt -f https://raw.githubusercontent.com/kubernetes/ingress-nginx/master/deploy/static/provider/cloud/deploy.yaml \
-f /tmp/nginx-deployment-to-daemonset.yaml \
--ignore-unknown-comments=true
Like I said earlier, though. If you're using Contour it's done this already for you so you can skip this part.
Converting a LoadBalancer Service into a NodePort Service
This next step you'll likely need to do regardless of what Ingress Controller you chose. Any pesky LoadBalancer services will need to be transformed into NodePort services. Everything we've done so far will all still work with a LoadBalancer Service, but since the whole point is not to waste money on one, we've got to convert it.
Note: You might be wondering why we needed to configure hostPorts earlier if a NodePort Service can fulfill a similar role. That's an excellent question. The main reason is that by default, most clusters will only allow a small, high-range of ports for the NodePort to select from... typically ports 30000-32767. A cluster admin would explicitly need to allow low port numbers like 80 and 443 and that's pretty uncommon. And probably not a very secure choice. We're converting the LoadBalancer Service into a NodePort mostly for any cluster internal networking that the Ingress Controller may be using it for. All external traffic will bypass the Service and go directly to the nodes.
Anyways, the following overlay will do this for you -- let's save it in /tmp/convert-lb-to-nodeport.yaml.
#@ load("@ytt:overlay", "overlay")

#@overlay/match by=overlay.subset({"kind": "Service", "spec":{"type":"LoadBalancer"}}),expects=1
---
spec:
  #@overlay/replace
  type: NodePort
It can be applied the same way as before using ytt.
Note: I go into more detail on how to convert a LoadBalancer Service into a NodePort Service with ytt here.
Validating our Changes
If you'd like to validate that you transformed the Deployment correctly, you can use kubeval.
ytt -f https://raw.githubusercontent.com/kubernetes/ingress-nginx/master/deploy/static/provider/cloud/deploy.yaml \
-f /tmp/nginx-deployment-to-daemonset.yaml \
-f /tmp/convert-lb-to-nodeport.yaml \
--ignore-unknown-comments=true | kubeval - --strict
Installing to the Cluster
Now let's apply both overlays together and install to the cluster:
ytt -f https://raw.githubusercontent.com/kubernetes/ingress-nginx/master/deploy/static/provider/cloud/deploy.yaml \
-f /tmp/nginx-deployment-to-daemonset.yaml \
-f /tmp/convert-lb-to-nodeport.yaml \
--ignore-unknown-comments=true | kubectl apply -f -
Configuring DNS
You'll want to configure a wildcard A record for the domain you want to be using. How you actually do this depends a lot on your DNS provider, but it's a pretty standard thing so hopefully it's not too rough.
For me, I'm using Digital Ocean to manage DNS for my domain, downey.cloud. I have two nodes in my cluster, each with an external IP (157.245.191.103 and 138.68.53.184). I want to be able to host workloads under the *.k8s.downey.cloud wildcard subdomain so I will need to configure two A records: one for each node.

Once you've done that, you can verify it all works by using a tool like dig or nslookup after waiting for the DNS changes to propagate. You should see something like this:
$ dig example.k8s.downey.cloud

; <<>> DiG 9.10.6 <<>> example.k8s.downey.cloud
;; global options: +cmd
;; Got answer:
;; ->>HEADER<<- opcode: QUERY, status: NOERROR, id: 40148
;; flags: qr rd ra; QUERY: 1, ANSWER: 2, AUTHORITY: 0, ADDITIONAL: 1

;; OPT PSEUDOSECTION:
; EDNS: version: 0, flags:; udp: 512
;; QUESTION SECTION:
;example.k8s.downey.cloud.  IN  A

;; ANSWER SECTION:
example.k8s.downey.cloud. 300   IN  A   157.245.191.103
example.k8s.downey.cloud. 300   IN  A   138.68.53.184

;; Query time: 109 msec
;; SERVER: 192.168.1.1#53(192.168.1.1)
;; WHEN: Sun Jun 14 10:22:19 PDT 2020
;; MSG SIZE  rcvd: 85
Configuring Firewall Rules
Like DNS, how to do this step is also dependent on your cloud provider. Wherever you configure firewall rules that apply to the worker node VMs in your cluster, you will want to allow incoming TCP traffic for ports 80 and 443. In Digital Ocean, for example, this is done on the "Firewall Rules" page under the "Networking" tab.

Configuring Ingress
Now that we have our Ingress Controller installed and DNS configured, all the pieces are in place and it's time to deploy an app. For example's sake, I'll be deploying a simple Go app called mando (as in Mandalorian).
It has some example Kubernetes deployment configuration prebaked for us:
deploy/example-deployment.yaml(includes the Deployment and a ClusterIP Service)deploy/example-ingress.yaml
We can install it with a kubectl apply for each of those files. It's all pretty run-of-the-mill, but let's take a closer look at that Ingress resource.
apiVersion: networking.k8s.io/v1beta1
kind: Ingress
metadata:
  name: mando
spec:
  rules:
  - host: mando.k8s.downey.cloud
    http:
      paths:
      - backend:
          serviceName: mando
          servicePort: 8080
This configures the Ingress Controller to direct traffic to mando.k8s.downey.cloud to the Service named mando on port 8080. So our DNS gets everything going to *.k8s.downey.cloud routed to our ingress proxies and this bit of config gets it to go to the correct backend application.
With this in place, we can now reach our application! Let's try curling it real quick.
$ curl mando.k8s.downey.cloud/this -v

*   Trying 157.245.191.103...
* TCP_NODELAY set
* Connected to mando.k8s.downey.cloud (157.245.191.103) port 80 (#0)
> GET /this HTTP/1.1
> Host: mando.k8s.downey.cloud
> User-Agent: curl/7.54.0
> Accept: */*
>
< HTTP/1.1 200 OK
< date: Sun, 14 Jun 2020 17:34:44 GMT
< content-length: 18
< content-type: text/plain; charset=utf-8
< x-envoy-upstream-service-time: 1
< server: envoy
<
this
is the way
Yep, the request went directly to one of our node IPs (157.245.191.103) on port 80 and we can see it was proxied through our Ingress Controller's (Contour in this case) Envoy!
We can create additional Ingress resources for other apps we have deployed, or do fancy things like weighted routing, TLS termination, or path-based routing. That stuff is all dependent on what your Ingress Controller supports, though, and out of scope for this post. 🙃
That's It!
What an achievement! We can now save tens of dollars a month! 🤑
That's not much if your employer is paying for it, but for the small personal clusters that I like to experiment with it basically halves the price I pay. Again, this probably isn't something you'll want to do for running production workloads, but it's definitely a handy technique. Cheers!

Top comments (0)