
In this blog: You will learn how to create an iOS app using Python frameworks. Get our "Mobile Development" Build to obtain a Python 3.7 version complete with the mobile development frameworks described in this post.
There are many libraries in the Python app development ecosystem that cover nearly all aspects of software development. It is especially interesting that many of these libraries include tools to compile Python into native code for specific mobile platforms, such as iOS and Android. You heard it right! You can use Python to build native mobile apps.
Why Python? Python's ease-of-use and readability are a major advantage in mobile development, where speed to market is crucial to maintaining and gaining market share. However, iOS and Android don't support interpreted languages so they cannot natively run Python applications. A number of frameworks exist to bridge this gap and allow Python apps to run on mobile devices that have a native appearance.
This tutorial will show you how to:
• Find the most used frameworks for cross-platform mobile app
development in Python
• Create a simple iOS app using Python frameworks
• Learn the pros and cons to using a Python framework instead of
native iOS or Android tooling
Let's get started.
Cross-Platform Mobile Frameworks for Python
There are two options when it comes to cross-platform mobile apps that can be used on both Android and iOS using Python: Kivy or BeeWare.
Kivy
Kivy is an open-source Python library that allows rapid development of cross platform UI applications. It uses OpenGL graphics engines, which allow it to handle GPU-bound workloads. You can also port Python apps to Android with the Python-to-Android project. Although packages can be created with Python 2.7, it has a like toolkit.
BeeWare
BeeWare, another popular tool, allows you to write Python applications and cross-compile them on a variety of operating systems including macOS and Windows, Linux GTK and macOS. It can also be used for mobile platforms such as Android app development and iOS app development.
Briefcase is an example of a tool that allows you to create boilerplates for native applications. Rubicon C and Rubicon Java provide bridge interfaces that allow you to use Python to call Objective C and Java bindings, respectively.
BeeWare seems to have a main repository that is updated frequently. They also offer commercial support, which includes consulting, training and technical support.
Python Mobile Application with BeeWare
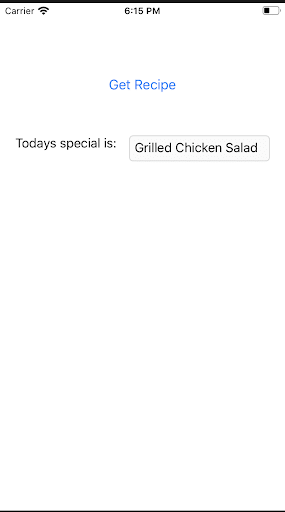
Let's make a simple mobile app to test the BeeWare toolkit. It will select today's cafeteria special randomly from a pre-populated listing.
- We start by creating a new development environment for python3.
$ python3 -m venv .env
- Install the briefcase software that will allow us to create the boilerplate code for the project.
$ pip3 install briefcase
- We will use the briefcase to create a brand new project.
$ briefcase new
Briefcase is an interactive tool that allows you to create your project. It prompts you for key information.
Formal Name [Hello World]: FoodTracker
App Name [foodtracker]:
Bundle Identifier [com.example]: com.thdespou.foodtracker
Project Name [FoodTracker]:
Author [Jane Developer]:
Author's Email:
Application URL:
Select one of the following:
[1] Toga
[2] PySide2
[3] PursuedPyBear
[4] None
GUI Framework [1]: 1
After completing the project, you can launch it to view the native app (Mac and Windows) representation. An empty modal window will be displayed in this instance.
$ cd foodTracker
$ briefcase dev
We want our app running on an iOS device so we must use the following command within the project:
$ briefcase create iOS
To proceed, we will need to install Apple's app development tools (Xcode).
Once Xcode is in place, we can edit the file src/foodtracker/app.py and replace the boilerplate with code that implements our "daily special" app:
"""
Keep my favourite meals
"""
import toga
import random
from toga.style import Pack
from toga.style.pack import COLUMN, ROW, LEFT
class FoodTracker(toga.App):
recipes = ["Baked chocolate orange cheesecake", "Baked Brie", "Chicken Tikka Masala", "Grilled Chicken Salad"]

def startup(self):
    """
    Construct and show the Toga application.

    Usually, you would add your application to a main content box.
    We then create a main window (with a name matching the app), and
    show the main window.
    """
    main_box = toga.Box()
    message_box = toga.Box()
    message_input = toga.TextInput(readonly=True)
    message_label = toga.Label('Todays special: ', style=Pack(text_align=LEFT))

    def button_handler(widget):
        message_input.value = random.choice(self.recipes)

    button = toga.Button('Get Recipe', on_press=button_handler)
    button.style.padding = 50
    button.style.flex = 1

    message_box.add(message_label)
    message_box.add(message_input)

    main_box.add(button)
    main_box.add(message_box)
    main_box.style.update(direction=COLUMN, padding=20)

    message_input.style.update(flex=1)
    message_label.style.update(width=150)


    self.main_window = toga.MainWindow(title=self.formal_name)
    self.main_window.content = main_box
    self.main_window.show()
def main():
return FoodTracker()
You can see that the elements of the window are constructed using imperative-style code. To hold all the child elements, we added a main element. We created composition by adding a button and a message box that contains a read-only text field. The button will display a random recipe when clicked.
In the final 3 lines of the startup procedure, we define the main windows and their properties.
We are now ready to build our project.
$ briefcase build iOS
We can see how our app looks on our desktop by using Xcode. This will open the project and allow us to run it in an iOS emulator.
You just need to tell it which folder to use:
./foodtracker/IOS
This is what you will see when the emulator is run:
To see the changes in our code, you will need to run these commands every time.
$ briefcase update iOS
$ briefcase build iOS
$ briefcase run iOS
Python Mobile Tooling Vs Native Tooling
We have now seen examples of simple Python mobile apps being built. Now, let's ask the important question:
Why not invest in Python mobile apps instead of standard mobile languages such as Java or Swift?
We will answer this question by discussing the pros and cons associated with using Python for mobile development.
Pros:
• The Power of Python: We can harness the power of Python with the Kivi or BeeWare frameworks. This is a great advantage for those who are familiar with Python and have the ability to port existing applications to mobile platforms.
• Cross-Platform Support: This means we create our application once, and then compile it on different platforms. This promotes reuseability.
Cons:
• Slower Compilation: This is likely due to the extra tools we need when changing code. This could be corrected with automation scripts and tooling integrations.
• Less Supported features: Google will always favor their native tooling over any other. Non-native framework users will be restricted by the latest version of Kivy/BeeWare. To resolve any issues that you are seeing, you will need to keep up to date with the issue list as well as the limitations of the current version.
• Inconsistency: Because not all features are available on every platform, there may be some inconsistencies. You might have a different layout on iOS than Android. You may need to find many ways to keep the designs consistent.
In general, using imperative code to describe user interfaces requires more effort. These workflows are usually easier to implement in Apple's Xcode and Android Studio's builtin editors.
There are many Python applications that can be used as examples and you have the opportunity to reuse code.
Before you decide to write Python applications and cross-compile them into native platforms such as iOS or Android, it is important that your organization carefully consider the pros and cons.
Next steps
Create a Free ActiveState Platform account to get started with our "Mobile app Development" build. This build includes Python 3.7 and all the frameworks mentioned in this post, so you can try them out yourself.
NOTE: The easiest way to install an environment is to first install ActiveState Platform's command-line interface (CLI), or the State Tool.
If you’re on Linux or Mac, you can use curl to install the State Tool:
sh <(curl -q https://platform.activestate.com/dl/cli/install.sh)
After the State Tool has been installed, you can run the following command and it will automatically install the build into a virtual environment.
State activate Pizza-Team/Mobile-Development

Top comments (0)