
Building a full stack web3 app with Next.js, Polygon, Solidity, The Graph, IPFS, and Hardhat
The video for this tutorial is also available here
In this in depth tutorial you'll learn the tools, protocols, and frameworks for building full stack web3 apps, and most importantly - how to put everything together to lay the groundwork for building out any of your own ideas in the future.
The codebase for this app is located here
The main network we'll be deploying to is Polygon. I chose Polygon because of its low transaction cost, fast block times, and current network adoption.
That being said, we're going to be building on the Ethereum Virtual Machine (EVM), so you can apply these skills to build for dozens of other blockchain networks as well, including Ethereum, Celo, Avalanche, and many others.
The app we'll be building is a full stack blog as well as a content management system (CMS), meaning that you will have an open, public, and composable back end that can be transferred and reused anywhere.
By the end of this tutorial you should have a good understanding of the most important pieces of a modern web3 stack and how to build performant, scalable, full stack decentralized blockchain applications.
This is the fourth guide in my "Full Stack" web3 series. Also be sure to check out:
- The Complete Guide to Full Stack Ethereum Development
- Building a Full Stack NFT Marketplace on Ethereum with Polygon
- The Complete Guide to Full Stack Solana Development with React, Anchor, Rust, and Phantom
The web3 stack
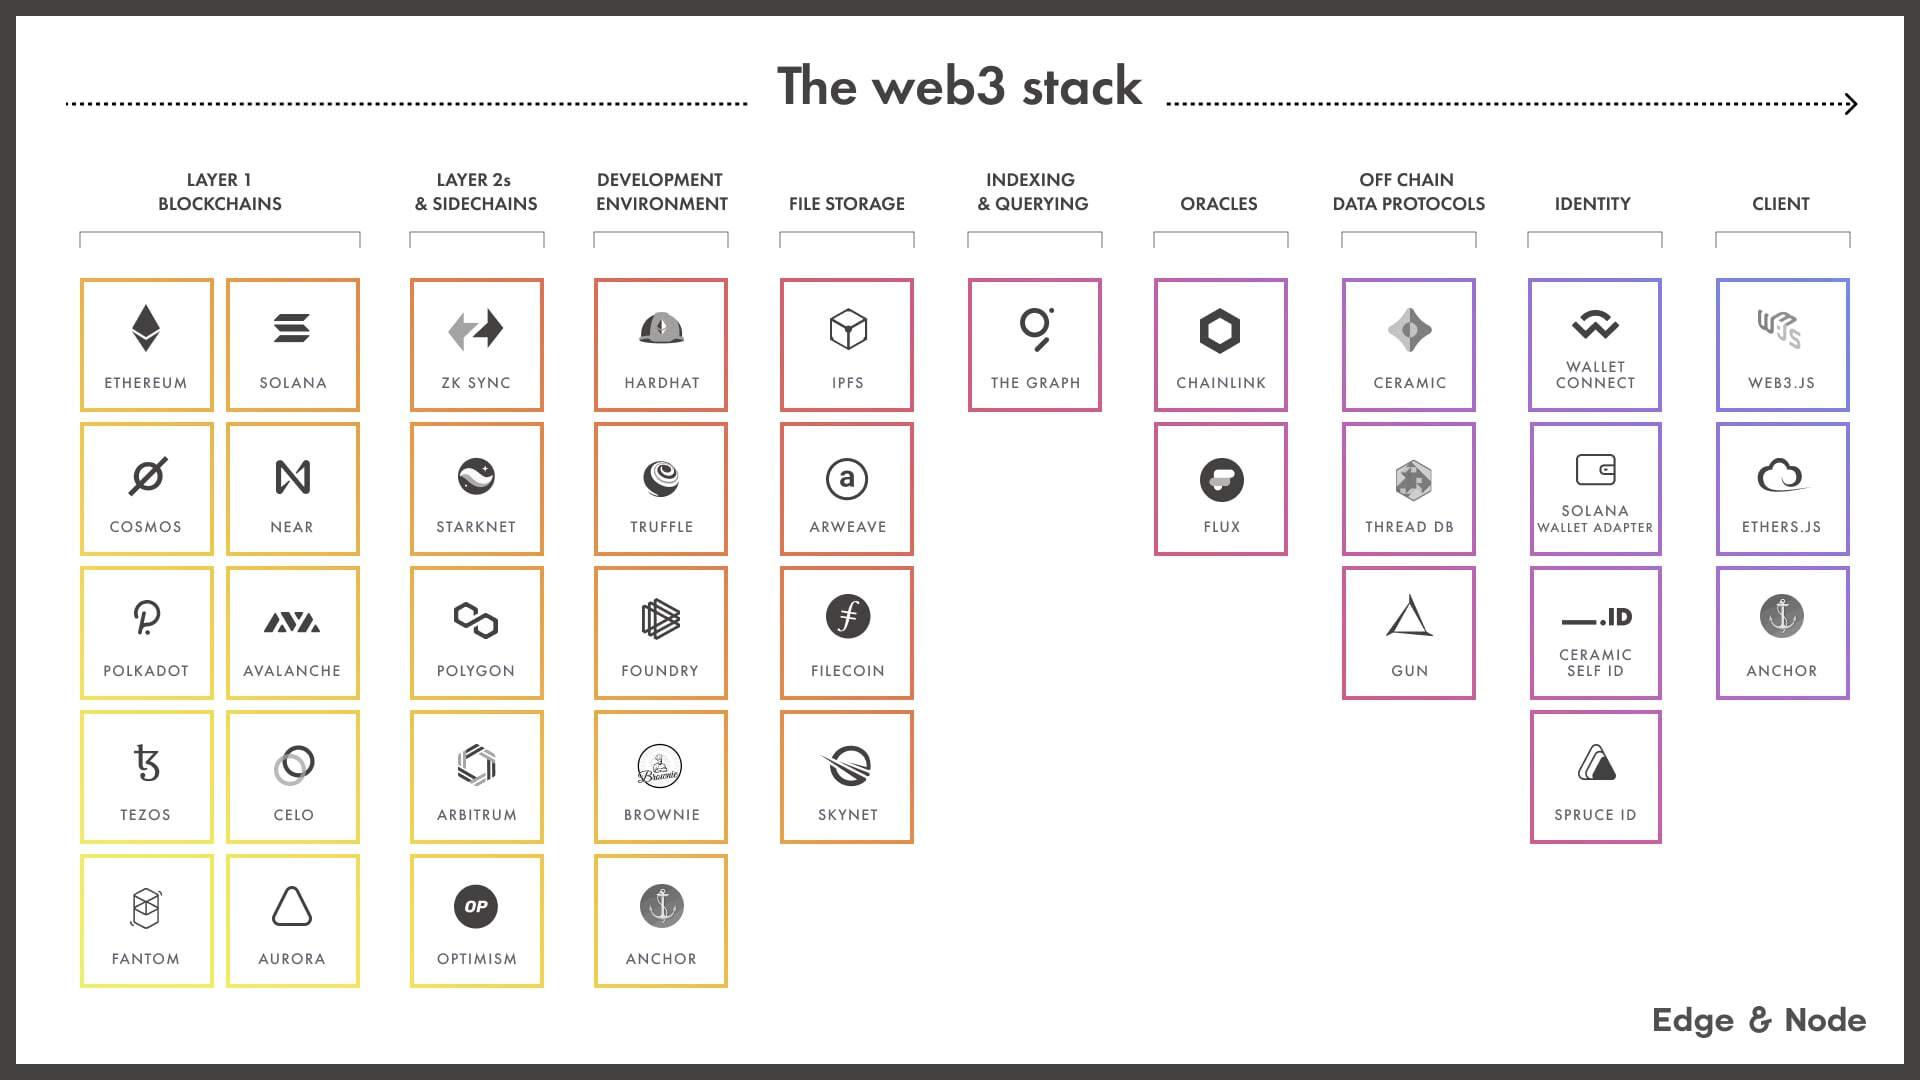
In Defining the web3 stack I wrote about my interpretation of the current state of the web3 tech stack from a developer's perspective using a combination of my own personal experience as well as research that was done over the past year on my team at Edge & Node.
We will be using pieces of this stack for this application:
- Blockchain - Polygon (with optional RPC provider)
- Ethereum development environment - Hardhat
- Front end framework - Next.js & React
- Ethereum web client library - Ethers.js
- File storage - IPFS
- Indexing and querying - The Graph Protocol
Learning how to use these building blocks we can build out many types of applications, so the goal with this tutorial is to show how they each work and how they all fit together.
Let's get started!
Prerequisites
- Node.js installed on your local machine
- MetaMask Chrome extension installed in your browser
Project setup
Here we will create the application boilerplates, install all of the necessary dependencies, and configure the project.
The code will be commented to give you insight as to what is happening, and I'll describe some of what is going on throughout the tutorial as well.
To get started, create a new Next.js application and change into the new directory:
npx create-next-app web3-blog

cd web3-blog
Next, change into the new directory and install the following dependencies using either npm, yarn, or pnpm:
npm install ethers hardhat @nomiclabs/hardhat-waffle \
ethereum-waffle chai @nomiclabs/hardhat-ethers \
web3modal @walletconnect/web3-provider \
easymde react-markdown react-simplemde-editor \
ipfs-http-client @emotion/css @openzeppelin/contracts
An overview of some of these dependencies:
hardhat - Ethereum development environment
web3modal - An easy-to-use library that allows users to connect their wallets to your app
react-markdown and simplemde - Markdown editor and markdown renderer for the CMS
@emotion/css - A great CSS in JS library
@openzeppelin/contracts - Open source implementations of useful smart contract standards and functionality
Next, we'll initialize the local smart contract development environment.
npx hardhat

? What do you want to do? Create a basic sample project
? Hardhat project root: <Choose default path>
If you get an error referencing your README.md, delete README.md and run
npx hardhatagain.
This should scaffold out the basic Solidity development environment that we will use. You should see a few new files and folders created, including contracts, scripts, test, and hardhat.config.js.
Next, let's update the hardhat configuration at hardhat.config.js.
Update this file with the following code:
require("@nomiclabs/hardhat-waffle");

module.exports = {
  solidity: "0.8.4",
  networks: {
    hardhat: {
      chainId: 1337
    },
    // mumbai: {
    //   url: "https://rpc-mumbai.matic.today",
    //   accounts: [process.env.pk]
    // },
    // polygon: {
    //   url: "https://polygon-rpc.com/",
    //   accounts: [process.env.pk]
    // }
  }
};
Here, we've configured the local hardhat development environment as well as set up (and commented out) the Polygon mainnet and Mumbai testnet environments that we'll be using to deploy to Polygon.
Next, let's add some basic global CSS that we'll be needing to style the markdown editor for the CMS.
Open styles/globals.css and add the following code below the existing css:
.EasyMDEContainer .editor-toolbar {
  border: none;
}

.EasyMDEContainer .CodeMirror {
  border: none !important;
  background: none;
}

.editor-preview {
  background-color: white !important;
}

.CodeMirror .cm-spell-error:not(.cm-url):not(.cm-comment):not(.cm-tag):not(.cm-word) {
  background-color: transparent !important;
}

pre {
  padding: 20px;
  background-color: #efefef;
}

blockquote {
  border-left: 5px solid #ddd;
  padding-left: 20px;
  margin-left: 0px;
}
Next, we'll create a couple of SVG files for the app images, one for the logo and one as an arrow button.
Create logo.svg and right-arrow.svg in the public folder and copy the linked SVG code into each of those files.
The smart contract
Next, let's create the smart contract that will be powering our blog and CMS.
Create a new file in the contracts folder named Blog.sol.
Here, add the following code:
// contracts/Blog.sol
//SPDX-License-Identifier: Unlicense
pragma solidity ^0.8.0;

import "hardhat/console.sol";
import "@openzeppelin/contracts/utils/Counters.sol";

contract Blog {
    string public name;
    address public owner;

    using Counters for Counters.Counter;
    Counters.Counter private _postIds;

    struct Post {
      uint id;
      string title;
      string content;
      bool published;
    }
    /* mappings can be seen as hash tables */
    /* here we create lookups for posts by id and posts by ipfs hash */
    mapping(uint => Post) private idToPost;
    mapping(string => Post) private hashToPost;

    /* events facilitate communication between smart contractsand their user interfaces  */
    /* i.e. we can create listeners for events in the client and also use them in The Graph  */
    event PostCreated(uint id, string title, string hash);
    event PostUpdated(uint id, string title, string hash, bool published);

    /* when the blog is deployed, give it a name */
    /* also set the creator as the owner of the contract */
    constructor(string memory _name) {
        console.log("Deploying Blog with name:", _name);
        name = _name;
        owner = msg.sender;
    }

    /* updates the blog name */
    function updateName(string memory _name) public {
        name = _name;
    }

    /* transfers ownership of the contract to another address */
    function transferOwnership(address newOwner) public onlyOwner {
        owner = newOwner;
    }

    /* fetches an individual post by the content hash */
    function fetchPost(string memory hash) public view returns(Post memory){
      return hashToPost[hash];
    }

    /* creates a new post */
    function createPost(string memory title, string memory hash) public onlyOwner {
        _postIds.increment();
        uint postId = _postIds.current();
        Post storage post = idToPost[postId];
        post.id = postId;
        post.title = title;
        post.published = true;
        post.content = hash;
        hashToPost[hash] = post;
        emit PostCreated(postId, title, hash);
    }

    /* updates an existing post */
    function updatePost(uint postId, string memory title, string memory hash, bool published) public onlyOwner {
        Post storage post =  idToPost[postId];
        post.title = title;
        post.published = published;
        post.content = hash;
        idToPost[postId] = post;
        hashToPost[hash] = post;
        emit PostUpdated(post.id, title, hash, published);
    }

    /* fetches all posts */
    function fetchPosts() public view returns (Post[] memory) {
        uint itemCount = _postIds.current();

        Post[] memory posts = new Post[](itemCount);
        for (uint i = 0; i < itemCount; i++) {
            uint currentId = i + 1;
            Post storage currentItem = idToPost[currentId];
            posts[i] = currentItem;
        }
        return posts;
    }

    /* this modifier means only the contract owner can */
    /* invoke the function */
    modifier onlyOwner() {
      require(msg.sender == owner);
    _;
  }
}
This contract allows the owner to create and edit posts, and for anyone to fetch posts.
To make this smart contract permissionless, you could remove the
onlyOwnermodifier and use The Graph to index and query posts by owner.
Next, let's write a basic test to test out the most important functionality we'll be using.
To do so, open test/sample-test.js and update it with the following code:
const { expect } = require("chai")
const { ethers } = require("hardhat")

describe("Blog", async function () {
  it("Should create a post", async function () {
    const Blog = await ethers.getContractFactory("Blog")
    const blog = await Blog.deploy("My blog")
    await blog.deployed()
    await blog.createPost("My first post", "12345")

    const posts = await blog.fetchPosts()
    expect(posts[0].title).to.equal("My first post")
  })

  it("Should edit a post", async function () {
    const Blog = await ethers.getContractFactory("Blog")
    const blog = await Blog.deploy("My blog")
    await blog.deployed()
    await blog.createPost("My Second post", "12345")

    await blog.updatePost(1, "My updated post", "23456", true)

    posts = await blog.fetchPosts()
    expect(posts[0].title).to.equal("My updated post")
  })

  it("Should add update the name", async function () {
    const Blog = await ethers.getContractFactory("Blog")
    const blog = await Blog.deploy("My blog")
    await blog.deployed()

    expect(await blog.name()).to.equal("My blog")
    await blog.updateName('My new blog')
    expect(await blog.name()).to.equal("My new blog")
  })
})
Next, run the test by opening your terminal and running this command:
npx hardhat test
Deploying the contract
Now that the contract has been written and tested, let's try to deploy it to a local test network.
To start the local network, open your terminal at least two separate windows. In one window, run the following script:
npx hardhat node
When we run this command, you should see a list of addresses and private keys.

These are 20 test accounts and addresses created for us that we can use to deploy and test our smart contracts. Each account is also loaded up with 10,000 fake Ether. In a moment, we'll learn how to import the test account into MetaMask so that we can use it.
Next, we need to deploy the contract to the test network. First update the name of scripts/sample-script.js to scripts/deploy.js.
Next, update the file with this new deploy script:
/* scripts/deploy.js */
const hre = require("hardhat");
const fs = require('fs');

async function main() {
  /* these two lines deploy the contract to the network */
  const Blog = await hre.ethers.getContractFactory("Blog");
  const blog = await Blog.deploy("My blog");

  await blog.deployed();
  console.log("Blog deployed to:", blog.address);

  /* this code writes the contract addresses to a local */
  /* file named config.js that we can use in the app */
  fs.writeFileSync('./config.js', `
  export const contractAddress = "${blog.address}"
  export const ownerAddress = "${blog.signer.address}"
  `)
}

main()
  .then(() => process.exit(0))
  .catch((error) => {
    console.error(error);
    process.exit(1);
  });
Now in a separate window (while the local network is still running) we can run the deploy script and give a flag to the CLI that we would like to deploy to our local network:
npx hardhat run scripts/deploy.js --network localhost
When the contract is deployed, you should see some output in your network terminal 🎉.
Importing the test account into your wallet
To send transactions to the smart contract, we will need to connect our MetaMask wallet using one of the accounts created when we ran npx hardhat node. In the list of contracts that the CLI logs out, you should see both an Account number as well as a Private Key:
➜  react-dapp git:(main) npx hardhat node
Started HTTP and WebSocket JSON-RPC server at http://127.0.0.1:8545/

Accounts
========
Account #0: 0xf39fd6e51aad88f6f4ce6ab8827279cfffb92266 (10000 ETH)
Private Key: 0xac0974bec39a17e36ba4a6b4d238ff944bacb478cbed5efcae784d7bf4f2ff80

...
We can import this account into MetaMask in order to start using some of the fake Eth available there.
To do so, first open MetaMask and enable test networks:

Next, update the network to be Localhost 8545:

Next, in MetaMask click on Import Account from the accounts menu:

Copy then paste the very first Private Key logged out by the CLI and click Import. Once the account is imported, you should see the Eth in the account:

Be sure you imported the first account in the list of accounts (Account #0) as this will be the account used by default when the contract is deployed and therefore the contract owner.
Now that we have a smart contract deployed and an account ready to use, we can start interacting with it from the Next.js app.
The Next.js app
Next, let's write the code for the app.
The first thing we'll do is set up a couple of environment variables that we'll use to switch between a local testing environment, Mumbai testnet, and Polygon mainnet.
Create a new file named .env.local in the root of your project and add the following configuration to start with:
ENVIRONMENT="local"
NEXT_PUBLIC_ENVIRONMENT="local"
We will be able to switch these variables between local, testnet, and mainnet to switch between
This will allow us to reference our environment both on the client as well as the server. To learn more about how environment variables work in Next.js, check out the documentation here.
context.js
Next, let's create the app context. Context will give us an easy way to share state throughout the app.
Create a file named context.js and add the following code:
import { createContext } from 'react'

export const AccountContext = createContext(null)
Layout and Nav
Next, let's open up pages/_app.js. Here we will update the code to include navigation, wallet connection, context, and some basic styling.
This page serves as a wrapper or layout for the rest of the app.
/* pages/__app.js */
import '../styles/globals.css'
import { useState } from 'react'
import Link from 'next/link'
import { css } from '@emotion/css'
import { ethers } from 'ethers'
import Web3Modal from 'web3modal'
import WalletConnectProvider from '@walletconnect/web3-provider'
import { AccountContext } from '../context.js'
import { ownerAddress } from '../config'
import 'easymde/dist/easymde.min.css'

function MyApp({ Component, pageProps }) {
  /* create local state to save account information after signin */
  const [account, setAccount] = useState(null)
  /* web3Modal configuration for enabling wallet access */
  async function getWeb3Modal() {
    const web3Modal = new Web3Modal({
      cacheProvider: false,
      providerOptions: {
        walletconnect: {
          package: WalletConnectProvider,
          options: {
            infuraId: "your-infura-id"
          },
        },
      },
    })
    return web3Modal
  }

  /* the connect function uses web3 modal to connect to the user's wallet */
  async function connect() {
    try {
      const web3Modal = await getWeb3Modal()
      const connection = await web3Modal.connect()
      const provider = new ethers.providers.Web3Provider(connection)
      const accounts = await provider.listAccounts()
      setAccount(accounts[0])
    } catch (err) {
      console.log('error:', err)
    }
  }

  return (
    <div>
      <nav className={nav}>
        <div className={header}>
          <Link href="/">
            <a>
              <img
                src='/logo.svg'
                alt="React Logo"
                style={{ width: '50px' }}
              />
            </a>
          </Link>
          <Link href="/">
            <a>
              <div className={titleContainer}>
                <h2 className={title}>Full Stack</h2>
                <p className={description}>WEB3</p>
              </div>
            </a>
          </Link>
          {
            !account && (
              <div className={buttonContainer}>
                <button className={buttonStyle} onClick={connect}>Connect</button>
              </div>
            )
          }
          {
            account && <p className={accountInfo}>{account}</p>
          }
        </div>
        <div className={linkContainer}>
          <Link href="/" >
            <a className={link}>
              Home
            </a>
          </Link>
          {
            /* if the signed in user is the contract owner, we */
            /* show the nav link to create a new post */
            (account === ownerAddress) && (
              <Link href="/create-post">
                <a className={link}>
                  Create Post
                </a>
              </Link>
            )
          }
        </div>
      </nav>
      <div className={container}>
        <AccountContext.Provider value={account}>
          <Component {...pageProps} connect={connect} />
        </AccountContext.Provider>
      </div>
    </div>
  )
}

const accountInfo = css`
  width: 100%;
  display: flex;
  flex: 1;
  justify-content: flex-end;
  font-size: 12px;
`

const container = css`
  padding: 40px;
`

const linkContainer = css`
  padding: 30px 60px;
  background-color: #fafafa;
`

const nav = css`
  background-color: white;
`

const header = css`
  display: flex;
  border-bottom: 1px solid rgba(0, 0, 0, .075);
  padding: 20px 30px;
`

const description = css`
  margin: 0;
  color: #999999;
`

const titleContainer = css`
  display: flex;
  flex-direction: column;
  padding-left: 15px;
`

const title = css`
  margin-left: 30px;
  font-weight: 500;
  margin: 0;
`

const buttonContainer = css`
  width: 100%;
  display: flex;
  flex: 1;
  justify-content: flex-end;
`

const buttonStyle = css`
  background-color: #fafafa;
  outline: none;
  border: none;
  font-size: 18px;
  padding: 16px 70px;
  border-radius: 15px;
  cursor: pointer;
  box-shadow: 7px 7px rgba(0, 0, 0, .1);
`

const link = css`
  margin: 0px 40px 0px 0px;
  font-size: 16px;
  font-weight: 400;
`

export default MyApp
Entrypoint
Now that we have the layout set up, let' create the entrypoint to the app.
This page will fetch the list of posts from the network and render the post titles in a listview. When the user clicks on a post, we will navigate them to another page for a detail view (page will be created next).
/* pages/index.js */
import { css } from '@emotion/css'
import { useContext } from 'react'
import { useRouter } from 'next/router'
import { ethers } from 'ethers'
import Link from 'next/link'
import { AccountContext } from '../context'

/* import contract address and contract owner address */
import {
  contractAddress, ownerAddress
} from '../config'

/* import Application Binary Interface (ABI) */
import Blog from '../artifacts/contracts/Blog.sol/Blog.json'

export default function Home(props) {
  /* posts are fetched server side and passed in as props */
  /* see getServerSideProps */
  const { posts } = props
  const account = useContext(AccountContext)

  const router = useRouter()
  async function navigate() {
    router.push('/create-post')
  }

  return (
    <div>
      <div className={postList}>
        {
          /* map over the posts array and render a button with the post title */
          posts.map((post, index) => (
            <Link href={`/post/${post[2]}`} key={index}>
              <a>
                <div className={linkStyle}>
                  <p className={postTitle}>{post[1]}</p>
                  <div className={arrowContainer}>
                  <img
                      src='/right-arrow.svg'
                      alt='Right arrow'
                      className={smallArrow}
                    />
                  </div>
                </div>
              </a>
            </Link>
          ))
        }
      </div>
      <div className={container}>
        {
          (account === ownerAddress) && posts && !posts.length && (
            /* if the signed in user is the account owner, render a button */
            /* to create the first post */
            <button className={buttonStyle} onClick={navigate}>
              Create your first post
              <img
                src='/right-arrow.svg'
                alt='Right arrow'
                className={arrow}
              />
            </button>
          )
        }
      </div>
    </div>
  )
}

export async function getServerSideProps() {
  /* here we check to see the current environment variable */
  /* and render a provider based on the environment we're in */
  let provider
  if (process.env.ENVIRONMENT === 'local') {
    provider = new ethers.providers.JsonRpcProvider()
  } else if (process.env.ENVIRONMENT === 'testnet') {
    provider = new ethers.providers.JsonRpcProvider('https://rpc-mumbai.matic.today')
  } else {
    provider = new ethers.providers.JsonRpcProvider('https://polygon-rpc.com/')
  }

  const contract = new ethers.Contract(contractAddress, Blog.abi, provider)
  const data = await contract.fetchPosts()
  return {
    props: {
      posts: JSON.parse(JSON.stringify(data))
    }
  }
}

const arrowContainer = css`
  display: flex;
  flex: 1;
  justify-content: flex-end;
  padding-right: 20px;
`

const postTitle = css`
  font-size: 30px;
  font-weight: bold;
  cursor: pointer;
  margin: 0;
  padding: 20px;
`

const linkStyle = css`
  border: 1px solid #ddd;
  margin-top: 20px;
  border-radius: 8px;
  display: flex;
`

const postList = css`
  width: 700px;
  margin: 0 auto;
  padding-top: 50px;
`

const container = css`
  display: flex;
  justify-content: center;
`

const buttonStyle = css`
  margin-top: 100px;
  background-color: #fafafa;
  outline: none;
  border: none;
  font-size: 44px;
  padding: 20px 70px;
  border-radius: 15px;
  cursor: pointer;
  box-shadow: 7px 7px rgba(0, 0, 0, .1);
`

const arrow = css`
  width: 35px;
  margin-left: 30px;
`

const smallArrow = css`
  width: 25px;
`
Creating posts
Next, create a new file in the pages directory named create-post.js.
This will hold the route that will allow us to create posts and save them to the network.
We'll also have the option to upload and save a cover image to IPFS, with the hash of the ipfs upload anchored on chain with the rest of the most data.
Add the following code to this file:
/* pages/create-post.js */
import { useState, useRef, useEffect } from 'react' // new
import { useRouter } from 'next/router'
import dynamic from 'next/dynamic'
import { css } from '@emotion/css'
import { ethers } from 'ethers'
import { create } from 'ipfs-http-client'

/* import contract address and contract owner address */
import {
  contractAddress
} from '../config'

import Blog from '../artifacts/contracts/Blog.sol/Blog.json'

/* define the ipfs endpoint */
const client = create('https://ipfs.infura.io:5001/api/v0')

/* configure the markdown editor to be client-side import */
const SimpleMDE = dynamic(
  () => import('react-simplemde-editor'),
  { ssr: false }
)

const initialState = { title: '', content: '' }

function CreatePost() {
  /* configure initial state to be used in the component */
  const [post, setPost] = useState(initialState)
  const [image, setImage] = useState(null)
  const [loaded, setLoaded] = useState(false)

  const fileRef = useRef(null)
  const { title, content } = post
  const router = useRouter()

  useEffect(() => {
    setTimeout(() => {
      /* delay rendering buttons until dynamic import is complete */
      setLoaded(true)
    }, 500)
  }, [])

  function onChange(e) {
    setPost(() => ({ ...post, [e.target.name]: e.target.value }))
  }

  async function createNewPost() {
    /* saves post to ipfs then anchors to smart contract */
    if (!title || !content) return
    const hash = await savePostToIpfs()
    await savePost(hash)
    router.push(`/`)
  }

  async function savePostToIpfs() {
    /* save post metadata to ipfs */
    try {
      const added = await client.add(JSON.stringify(post))
      return added.path
    } catch (err) {
      console.log('error: ', err)
    }
  }

  async function savePost(hash) {
    /* anchor post to smart contract */
    if (typeof window.ethereum !== 'undefined') {
      const provider = new ethers.providers.Web3Provider(window.ethereum)
      const signer = provider.getSigner()
      const contract = new ethers.Contract(contractAddress, Blog.abi, signer)
      console.log('contract: ', contract)
      try {
        const val = await contract.createPost(post.title, hash)
        /* optional - wait for transaction to be confirmed before rerouting */
        /* await provider.waitForTransaction(val.hash) */
        console.log('val: ', val)
      } catch (err) {
        console.log('Error: ', err)
      }
    }
  }

  function triggerOnChange() {
    /* trigger handleFileChange handler of hidden file input */
    fileRef.current.click()
  }

  async function handleFileChange (e) {
    /* upload cover image to ipfs and save hash to state */
    const uploadedFile = e.target.files[0]
    if (!uploadedFile) return
    const added = await client.add(uploadedFile)
    setPost(state => ({ ...state, coverImage: added.path }))
    setImage(uploadedFile)
  }

  return (
    <div className={container}>
      {
        image && (
          <img className={coverImageStyle} src={URL.createObjectURL(image)} />
        )
      }
      <input
        onChange={onChange}
        name='title'
        placeholder='Give it a title ...'
        value={post.title}
        className={titleStyle}
      />
      <SimpleMDE
        className={mdEditor}
        placeholder="What's on your mind?"
        value={post.content}
        onChange={value => setPost({ ...post, content: value })}
      />
      {
        loaded && (
          <>
            <button
              className={button}
              type='button'
              onClick={createNewPost}
            >Publish</button>
            <button
              onClick={triggerOnChange}
              className={button}
            >Add cover image</button>
          </>
        )
      }
      <input
        id='selectImage'
        className={hiddenInput}
        type='file'
        onChange={handleFileChange}
        ref={fileRef}
      />
    </div>
  )
}

const hiddenInput = css`
  display: none;
`

const coverImageStyle = css`
  max-width: 800px;
`

const mdEditor = css`
  margin-top: 40px;
`

const titleStyle = css`
  margin-top: 40px;
  border: none;
  outline: none;
  background-color: inherit;
  font-size: 44px;
  font-weight: 600;
  &::placeholder {
    color: #999999;
  }
`

const container = css`
  width: 800px;
  margin: 0 auto;
`

const button = css`
  background-color: #fafafa;
  outline: none;
  border: none;
  border-radius: 15px;
  cursor: pointer;
  margin-right: 10px;
  font-size: 18px;
  padding: 16px 70px;
  box-shadow: 7px 7px rgba(0, 0, 0, .1);
`

export default CreatePost
Viewing a post
Now that we have the ability to create posts, how do we navigate and view posts? We want to have the ability to view a post in a route that looks something like myapp.com/post/some-post-id.
We can do this in a couple of different ways with next.js dynamic routes.
We will be leveraging server-side data fetching using getStaticPaths and getStaticProps which will create these pages at build time using the array of posts queried from the network.
To make this happen, create a new folder in the pages directory named post and a file in that folder named [id].js. There, add the following code:
/* pages/post/[id].js */
import ReactMarkdown from 'react-markdown'
import { useContext } from 'react'
import { useRouter } from 'next/router'
import Link from 'next/link'
import { css } from '@emotion/css'
import { ethers } from 'ethers'
import { AccountContext } from '../../context'

/* import contract and owner addresses */
import {
  contractAddress, ownerAddress
} from '../../config'
import Blog from '../../artifacts/contracts/Blog.sol/Blog.json'

const ipfsURI = 'https://ipfs.io/ipfs/'

export default function Post({ post }) {
  const account = useContext(AccountContext)
  const router = useRouter()
  const { id } = router.query

  if (router.isFallback) {
    return <div>Loading...</div>
  }

  return (
    <div>
      {
        post && (
          <div className={container}>
            {
              /* if the owner is the user, render an edit button */
              ownerAddress === account && (
                <div className={editPost}>
                  <Link href={`/edit-post/${id}`}>
                    <a>
                      Edit post
                    </a>
                  </Link>
                </div>
              )
            }
            {
              /* if the post has a cover image, render it */
              post.coverImage && (
                <img
                  src={post.coverImage}
                  className={coverImageStyle}
                />
              )
            }
            <h1>{post.title}</h1>
            <div className={contentContainer}>
              <ReactMarkdown>{post.content}</ReactMarkdown>
            </div>
          </div>
        )
      }
    </div>
  )
}

export async function getStaticPaths() {
  /* here we fetch the posts from the network */
  let provider
  if (process.env.ENVIRONMENT === 'local') {
    provider = new ethers.providers.JsonRpcProvider()
  } else if (process.env.ENVIRONMENT === 'testnet') {
    provider = new ethers.providers.JsonRpcProvider('https://rpc-mumbai.matic.today')
  } else {
    provider = new ethers.providers.JsonRpcProvider('https://polygon-rpc.com/')
  }

  const contract = new ethers.Contract(contractAddress, Blog.abi, provider)
  const data = await contract.fetchPosts()

  /* then we map over the posts and create a params object passing */
  /* the id property to getStaticProps which will run for ever post */
  /* in the array and generate a new page */
  const paths = data.map(d => ({ params: { id: d[2] } }))

  return {
    paths,
    fallback: true
  }
}

export async function getStaticProps({ params }) {
  /* using the id property passed in through the params object */
  /* we can us it to fetch the data from IPFS and pass the */
  /* post data into the page as props */
  const { id } = params
  const ipfsUrl = `${ipfsURI}/${id}`
  const response = await fetch(ipfsUrl)
  const data = await response.json()
  if(data.coverImage) {
    let coverImage = `${ipfsURI}/${data.coverImage}`
    data.coverImage = coverImage
  }

  return {
    props: {
      post: data
    },
  }
}

const editPost = css`
  margin: 20px 0px;
`

const coverImageStyle = css`
  width: 900px;
`

const container = css`
  width: 900px;
  margin: 0 auto;
`

const contentContainer = css`
  margin-top: 60px;
  padding: 0px 40px;
  border-left: 1px solid #e7e7e7;
  border-right: 1px solid #e7e7e7;
  & img {
    max-width: 900px;
  }
`
Editing a post
The final page we need to create is a way to edit existing posts.
This page will carry over some functionality from both pages/create-post.js as well as pages/post/[id].js. We will be able to toggle between viewing and editing a post.
Create a new folder in the pages directory named edit-post and a file named [id].js there. Next, add the following code:
/* pages/edit-post/[id].js */
import { useState, useEffect } from 'react'
import { useRouter } from 'next/router'
import ReactMarkdown from 'react-markdown'
import { css } from '@emotion/css'
import dynamic from 'next/dynamic'
import { ethers } from 'ethers'
import { create } from 'ipfs-http-client'

import {
  contractAddress
} from '../../config'
import Blog from '../../artifacts/contracts/Blog.sol/Blog.json'

const ipfsURI = 'https://ipfs.io/ipfs/'
const client = create('https://ipfs.infura.io:5001/api/v0')

const SimpleMDE = dynamic(
  () => import('react-simplemde-editor'),
  { ssr: false }
)

export default function Post() {
  const [post, setPost] = useState(null)
  const [editing, setEditing] = useState(true)
  const router = useRouter()
  const { id } = router.query

  useEffect(() => {
    fetchPost()
  }, [id])
  async function fetchPost() {
    /* we first fetch the individual post by ipfs hash from the network */
    if (!id) return
    let provider
    if (process.env.NEXT_PUBLIC_ENVIRONMENT === 'local') {
      provider = new ethers.providers.JsonRpcProvider()
    } else if (process.env.NEXT_PUBLIC_ENVIRONMENT === 'testnet') {
      provider = new ethers.providers.JsonRpcProvider('https://rpc-mumbai.matic.today')
    } else {
      provider = new ethers.providers.JsonRpcProvider('https://polygon-rpc.com/')
    }
    const contract = new ethers.Contract(contractAddress, Blog.abi, provider)
    const val = await contract.fetchPost(id)
    const postId = val[0].toNumber()

    /* next we fetch the IPFS metadata from the network */
    const ipfsUrl = `${ipfsURI}/${id}`
    const response = await fetch(ipfsUrl)
    const data = await response.json()
    if(data.coverImage) {
      let coverImagePath = `${ipfsURI}/${data.coverImage}`
      data.coverImagePath = coverImagePath
    }
    /* finally we append the post ID to the post data */
    /* we need this ID to make updates to the post */
    data.id = postId;
    setPost(data)
  }

  async function savePostToIpfs() {
    try {
      const added = await client.add(JSON.stringify(post))
      return added.path
    } catch (err) {
      console.log('error: ', err)
    }
  }

  async function updatePost() {
    const hash = await savePostToIpfs()
    const provider = new ethers.providers.Web3Provider(window.ethereum)
    const signer = provider.getSigner()
    const contract = new ethers.Contract(contractAddress, Blog.abi, signer)
    await contract.updatePost(post.id, post.title, hash, true)
    router.push('/')
  }

  if (!post) return null

  return (
    <div className={container}>
      {
      /* editing state will allow the user to toggle between */
      /*  a markdown editor and a markdown renderer */
      }
      {
        editing && (
          <div>
            <input
              onChange={e => setPost({ ...post, title: e.target.value })}
              name='title'
              placeholder='Give it a title ...'
              value={post.title}
              className={titleStyle}
            />
            <SimpleMDE
              className={mdEditor}
              placeholder="What's on your mind?"
              value={post.content}
              onChange={value => setPost({ ...post, content: value })}
            />
            <button className={button} onClick={updatePost}>Update post</button>
          </div>
        )
      }
      {
        !editing && (
          <div>
            {
              post.coverImagePath && (
                <img
                  src={post.coverImagePath}
                  className={coverImageStyle}
                />
              )
            }
            <h1>{post.title}</h1>
            <div className={contentContainer}>
              <ReactMarkdown>{post.content}</ReactMarkdown>
            </div>
          </div>
        )
      }
      <button className={button} onClick={() => setEditing(editing ? false : true)}>{ editing ? 'View post' : 'Edit post'}</button>
    </div>
  )
}

const button = css`
  background-color: #fafafa;
  outline: none;
  border: none;
  border-radius: 15px;
  cursor: pointer;
  margin-right: 10px;
  margin-top: 15px;
  font-size: 18px;
  padding: 16px 70px;
  box-shadow: 7px 7px rgba(0, 0, 0, .1);
`

const titleStyle = css`
  margin-top: 40px;
  border: none;
  outline: none;
  background-color: inherit;
  font-size: 44px;
  font-weight: 600;
  &::placeholder {
    color: #999999;
  }
`

const mdEditor = css`
  margin-top: 40px;
`

const coverImageStyle = css`
  width: 900px;
`

const container = css`
  width: 900px;
  margin: 0 auto;
`

const contentContainer = css`
  margin-top: 60px;
  padding: 0px 40px;
  border-left: 1px solid #e7e7e7;
  border-right: 1px solid #e7e7e7;
  & img {
    max-width: 900px;
  }
`
Testing it out
We can now test it out.
To do so, be sure you have already deployed the contract to the network in the previous steps and you still have the local network running.
Open a new terminal window and start the Next.js app:
npm run dev
When the app starts, you should be able to connect your wallet and interact with the app.

You should also be able to create a new post.

You may notice that the app is not as fast as it could be, but Next.js is blazingly fast in production.
To run a production build, run the following commands:
npm run build && npm start
Deploying to Polygon
Now that we have the project up and running and tested locally, let's deploy to Polygon. We'll start by deploying to Mumbai, the Polygon test network.
The first thing we will need to do is set one of our private keys from our wallet as an environment variable.
To get a private key, you can export them directly from MetaMask.

Private keys are never meant to be shared publicly under any circumstance. It is advised never to hardcode a private key in a file. If you do choose to do so, be sure to use a testing wallet and to never under any circumstances push a file containing a private key to source control or expose it publicly.
If you are on a Mac, you can set an environment variable from the command line like so (be sure to run the deploy script from this same terminal and session):
export pk="your-private-key"
Configuring the network
Next, we need to switch from the local test network to the Mumbai Testnet.
To do so, we need to create and set the network configuration.
First, open MetaMask and click on Settings.

Next, click on Networks and then Add Network:

Here, we will add the following configurations for the Mumbai test network as listed here:
Network Name: Mumbai TestNet
New RPC URL: https://rpc-mumbai.matic.today
Chain ID: 80001
Currency Symbol: Matic
Save this, then you should be able to switch to and use the new network!
Finally, you will need some testnet Polygon tokens in order to interact with the applications.
To get these, you can visit the Polygon Faucet, inputting the address of the wallets that you would like to request the tokens.
Deploying to the Polygon network
Now that you have some tokens, you can deploy to the Polygon network!
To do so, be sure that the address associated with the private key you are deploying your contract with has received some tokens in order to pay the gas fees for the transaction.
Next, uncomment the mumbai configuration in hardhat.config.js:
mumbai: {
  url: "https://rpc-mumbai.matic.today",
  accounts: [process.env.pk]
},
To deploy to Polygon testnet, run the following command:
npx hardhat run scripts/deploy.js --network mumbai
If you run into this error:
ProviderError: RPCError, the public RPC may be congested. In production, it's recommended to use an RPC provider like Infura, Alchemy, or Quicknode.
Next, update the environment variables in .env.local to be testnet:
ENVIRONMENT="testnet"
NEXT_PUBLIC_ENVIRONMENT="testnet"
Next, restart the server to register the change in environment variables:
npm run dev
You should now be able to test the app on the new network 🎉!
If you have any issues connecting to the public Mumbai RPC endpoint, consider replacing the endpoints in your app using endpoints from an RPC provider like Infura, Alchemy, or Quicknode.
Creating a subgraph API
By default the only data access patterns we have are the two functions we've written into the contract, fetchPost and fetchPosts.
This is a fine place to start, but as your app starts to scale you'll probably find yourself needing a more flexible and scalable API.
For instance, what if we wanted to give the user the ability to search posts, fetch posts created by a certain user, or to sort posts by the date which they were created?
We can build all of this functionality into an API by using The Graph protocol. Let's see how to do this.
Creating the project in The Graph
To get started, visit The Graph hosted service and either sign in or create a new account.
Next, go to the dashboard and click on Add Subgraph to create a new subgraph.
Configure your subgraph with the following properties:
- Subgraph Name - Blogcms
- Subtitle - A subgraph for querying post data
- Optional - Fill the description and GITHUB URL properties
Once the subgraph is created, we will initialize the subgraph locally using the Graph CLI.
Initializing a new subgraph using the Graph CLI
Next, install the Graph CLI:
$ npm install -g @graphprotocol/graph-cli

# or

$ yarn global add @graphprotocol/graph-cli
Once the Graph CLI has been installed you can initialize a new subgraph with the Graph CLI init command.
Since we've already deployed our contract to the network, we can initialize from that contract address by passing in the contract address using the --from-contract flag.
This address is available for reference in config.js as contractAddress.
$ graph init --from-contract your-contract-address \
--network mumbai --contract-name Blog --index-events

? Protocol: ethereum
? Product for which to initialize › hosted-service
? Subgraph name › your-username/blogcms
? Directory to create the subgraph in › blogcms
? Ethereum network › mumbai
? Contract address › your-contract-address
? ABI file (path) › artifacts/contracts/Blog.sol/Blog.json
? Contract Name › Blog
This command will generate a basic subgraph based off of the contract address passed in as the argument to --from-contract. By using this contract address, the CLI will initialize a few things in your project to get you started (including fetching the abis and saving them in the abis directory).
By passing in
--index-eventsthe CLI will automatically populate some code for us both in schema.graphql as well as src/mapping.ts based on the events emitted from the contract.
The main configuration and definition for the subgraph lives in the subgraph.yaml file. The subgraph codebase consists of a few files:
- subgraph.yaml: a YAML file containing the subgraph manifest
- schema.graphql: a GraphQL schema that defines what data is stored for your subgraph, and how to query it via GraphQL
- AssemblyScript Mappings: AssemblyScript code that translates from the event data in Ethereum to the entities defined in your schema (e.g. mapping.ts in this tutorial)
The entries in subgraph.yaml that we will be working with are:
-
description(optional): a human-readable description of what the subgraph is. This description is displayed by the Graph Explorer when the subgraph is deployed to the Hosted Service. -
repository(optional): the URL of the repository where the subgraph manifest can be found. This is also displayed by the Graph Explorer. -
dataSources.source: the address of the smart contract the subgraph sources, and the abi of the smart contract to use. The address is optional; omitting it allows to index matching events from all contracts. -
dataSources.source.startBlock(optional): the number of the block that the data source starts indexing from. In most cases we suggest using the block in which the contract was created. -
dataSources.mapping.entities: the entities that the data source writes to the store. The schema for each entity is defined in the the schema.graphql file. -
dataSources.mapping.abis: one or more named ABI files for the source contract as well as any other smart contracts that you interact with from within the mappings. -
dataSources.mapping.eventHandlers: lists the smart contract events this subgraph reacts to and the handlers in the mapping — ./src/mapping.ts in the example — that transform these events into entities in the store.
Defining the entities
With The Graph, you define entity types in schema.graphql, and Graph Node will generate top level fields for querying single instances and collections of that entity type. Each type that should be an entity is required to be annotated with an @entity directive.
The entities / data we will be indexing are the Token and User. This way we can index the Tokens created by the users as well as the users themselves.
To do this, update schema.graphql with the following code:
type _Schema_
  @fulltext(
    name: "postSearch"
    language: en
    algorithm: rank
    include: [{ entity: "Post", fields: [{ name: "title" }, { name: "postContent" }] }]
  )

type Post @entity {
  id: ID!
  title: String!
  contentHash: String!
  published: Boolean!
  postContent: String!
  createdAtTimestamp: BigInt!
  updatedAtTimestamp: BigInt!
}
Now that we have created the GraphQL schema for our app, we can generate the entities locally to start using in the mappings created by the CLI:
graph codegen
In order to make working smart contracts, events and entities easy and type-safe, the Graph CLI generates AssemblyScript types from a combination of the subgraph's GraphQL schema and the contract ABIs included in the data sources.
Updating the subgraph with the entities and mappings
Now we can configure the subgraph.yaml to use the entities that we have just created and configure their mappings.
To do so, first update the dataSources.mapping.entities field with the User and Token entities:
entities:
  - Post
Next we'll need to find the block which the contract was deployed (optional). We need this so that we can set the start block for the indexer to begin syncing so that it does not need to sync from the genesis block. You can find the start block by visiting https://mumbai.polygonscan.com/ and pasting in your contract address.
Finally, update the configuration to add the startBlock :
source:
  address: "your-contract-adddress"
  abi: Blog
  startBlock: your-start-block
Assemblyscript mappings
Next, open src/mappings.ts to write the mappings that we defined in our subgraph subgraph eventHandlers.
Update the file with the following code:
import {
  PostCreated as PostCreatedEvent,
  PostUpdated as PostUpdatedEvent
} from "../generated/Blog/Blog"
import {
  Post
} from "../generated/schema"
import { ipfs, json } from '@graphprotocol/graph-ts'

export function handlePostCreated(event: PostCreatedEvent): void {
  let post = new Post(event.params.id.toString());
  post.title = event.params.title;
  post.contentHash = event.params.hash;
  let data = ipfs.cat(event.params.hash);
  if (data) {
    let value = json.fromBytes(data).toObject()
    if (value) {
      const content = value.get('content')
      if (content) {
        post.postContent = content.toString()
      }
    }
  }
  post.createdAtTimestamp = event.block.timestamp;
  post.save()
}

export function handlePostUpdated(event: PostUpdatedEvent): void {
  let post = Post.load(event.params.id.toString());
  if (post) {
    post.title = event.params.title;
    post.contentHash = event.params.hash;
    post.published = event.params.published;
    let data = ipfs.cat(event.params.hash);
    if (data) {
      let value = json.fromBytes(data).toObject()
      if (value) {
        const content = value.get('content')
        if (content) {
          post.postContent = content.toString()
        }
      }
    }
    post.updatedAtTimestamp = event.block.timestamp;
    post.save()
  }
}
These mappings will handle events for when a new post is created and when a post is updated. When these events fire, the mappings will save the data into the subgraph.
Running a build
Next, let's run a build to make sure that everything is configured properly. To do so, run the build command:
$ graph build
If the build is successful, you should see a new build folder generated in your root directory.
Deploying the subgraph
To deploy, we can run the deploy command. To deploy, you will first need to copy the Access token for your account, available in the Graph Dashboard:

Next, run the following command:
$ graph auth
✔ Product for which to initialize · hosted-service
✔ Deploy key · ********************************
The deploy the subgraph:
$ yarn deploy
Once the subgraph is deployed, you should see it show up in your dashboard.
When you click on the subgraph, it should open the subgraph details:

Querying for data
Now that we are in the dashboard, we should be able to start querying for data. Run the following query to get a list of posts:
{
  posts {
    id
    title
    contentHash
    published
    postContent
  }
}
We can also configure the order direction by creation date:
{
  posts(
    orderBy: createdAtTimestamp
    orderDirection: desc
  ) {
    id
    title
    contentHash
    published
    postContent
  }
}
We can also do full text search on the post title or content:
{
  postSearch(
    text: "Hello"
  ) {
    id
    title
    contentHash
    published
    postContent
  }
}
Congratulations, you have now build out a more flexible API that you can use to query your app!
To learn how to use the API endpoint in your app, check out the documentation here or the video here
Next steps
If you'd like a challenge, consider adding some functionality that will allow you to update the cover image in pages/edit-post/[id].js.
If you'd like to deploy your code to a web3 / decentralized git hosting protocol, check out this video on Radicle.
If you'd like to deploy your app and make it live, check out Vercel.
If you enjoyed this tutorial, be sure to check out my other three comprehensive guides:
- The Complete Guide to Full Stack Ethereum Development
- Building a Full Stack NFT Marketplace on Ethereum with Polygon
- The Complete Guide to Full Stack Solana Development with React, Anchor, Rust, and Phantom https://dev.to/dabit3/the-complete-guide-to-full-stack-solana-development-with-react-anchor-rust-and-phantom-3291

Top comments (72)
Thanks Nader, this is epic! Looking forward to giving this a run through.
Btw, dev.to pro tip: If you use
jsxinstead ofjsfor the code blocks with React code you'll get better syntax highlighting.Even better with
tsx@dabit3
Thanks for share first post that I will follow to start learning web3.
good to have my first contract deployed
Some errors that I detected and fixed.
1.Please add in the prerrequisites, that you also need to install git, if not the npm install command will fail for the @walletconnect/web3-provider
For the moment I'm only in that step. I will put more feedback later if needed.
Hope in the future you can post some article for LUNA/TERRA blockchain.
Thanks, I would have never finished the tutorial without your comment
Same, Thanks!
but my error persists..
Thanks for comprehensive piece.
But let me clarify coooouple of details. Maybe I misunderstood something
Here I have first real questions
Post storage postmeans in smart contract code?fetchPostswill be literaly slower and more expensive every day, since physically, data will be distributed across many-many-many blocks?The whole "data on blockchain" thingy means I (as an author of a blog) will need to pay (quite literally) for each action - create/update post?
Also that means that there is no point (aside from using grpah later) in
publishedfield, since every post will be accessible throughfetchPostsmethod of a smart contract. Is that correct?Actual data of blog post is a JSON file put up on IPFS. Which brings a next set of questions
There is no pagination for this blog. So if I have 100k posts they all will fetched and displayed at once at one page.
Deploy via
deploy.jsdeploys only smart-contract? What about all other js? Where it will be stored? Where from and how user will download that? How user will be able to access this blog via browser? I can do that from dev env with proper prod config and I can even post there. But who and how will read it?)Subgraph part. So we
postCreated, `postUpdatedPostmodel and store it (in the graph?)About grpah itself
In general.
Couple of answers to myself
Side thoughts
You forgot that every logo on Web3 websites need to be a jpg monkey :)
That's the whole thing of web3 — solve what's already solved, but now with blockchain
It seems like that, because you'd need a the use case when fetching data and getting fetched in turn, what is, you need a business purpose to that. Let's say you provide a good, someone else a service that converts your good into a product, which is then getting incentified. Simple view but cashflow is the driver.
Great run through of the stack. I've been deploying some clones of other projects for a while and battled through countless hours of gotchas that you've captured here and resolved.
Bringing in components like the graph in this example really shows how you can scale.
If you're on linux and this command doesn't work:
npx hardhat run scripts/deploy.js --network mumbaiTry appending the pk env var like so:
pk=_paste_here_your_private_key_ npx hardhat run scripts/deploy.js --network mumbaiAn incredibly good article.
If you don't have anymore ideas for new articles, think about how to test chainlink vrf contracts. All my tests fail because it's an external function call.
Umm, I just wanted to say - you are awesome! Thank you for the guide.
Thanks for the great article and detailed steps. But really is all this necessary? Looks like a big step back to what we have been doing in "web2". Again thanks for sharing.
I don't think this would be necessary for a normal blog post, but for what he is trying to teach, it's a really good concept, in which you are able to learn file storage, indexing and querying etc...
In the end, believe web3 will replace some parts of web2.
Cheers
Why stacks has to be harder and more complicated or complex.
Once its was html-css +js.
Now its already 10+ framework to pick front-end and/or back-end. Not yet include the between both library..
Tomorrow will be all of this? :-(
So overwhelming and re-inventing the wheel
Some comments may only be visible to logged-in visitors. Sign in to view all comments.