This is the second part of a series where I’m building my first Node.js web app called “Tribute to Swissted”, which displays all Swissted poster designs and links to corresponding Codepen recreations in one interface.
In the previous post, we already get a simple Node app up and running. Now we are going to add the content from Swissted and Codepen websites. But wait a moment... neither websites provide a public API to access their data. Does it mean I have to copy and paste the data for hundreds of posters? 😱

There’s good news and bad news.
-
The good news: We can scrape web content in Javascript with Node.js! There exists libraries like
scrape-it, or combination ofcheerioandrequest. (Go to the end of this post for links to tutorials.) - The bad news: Not all websites allow scraping. Neither websites I need to scrape allow it. 🤷🏽♀️
This being a tiny project with no strict requirements, I decided to omit the programmatic scraping and manually copy the raw HTML data instead. Of course this decision comes with trade-offs:
- I have to manually copy the HTML from all pages. There are only 7 pages I need to “scrape” (four pages of Swissted and three pages of Codepen results), though—still doable.
- My web app would not be able to fetch new data every time it runs (or every x hours/days). If there are new posters or Codepen entries, I have to manually add it.
Since scraping libraries also receives raw HTML data, subsequent steps would be the same as if I were to scrape the HTML programmatically. We are going to parse the raw data to get the information we want, then send the data to be rendered by the Nunjucks HTML template file.
The cool thing is that the Javascript part runs in the server rather than the client (browser), so this website works in all browsers, with or without Javascript. 😎
Let’s get started!
💡 Sidenote: If you want to practice programmatic scraping, see this tutorial and starter app on Glitch. Other than Node, you might also be interested in web scraping with Python, as described in this tutorial.
Libraries
Table of Contents
- Design the data model
- Prepare and process our data
- Display data in HTML with Nunjucks
- “Scrape” and parse posters data with Cheerio
- “Scrape” and parse recreations data with Cheerio
- Modify recreations data
- Replace dummy data with our new data
0. Install the prerequisites
Setup a Node app with the libraries described above.
I made a Glitch starter app that you can remix, which I described in my previous post.
1. Design the data model
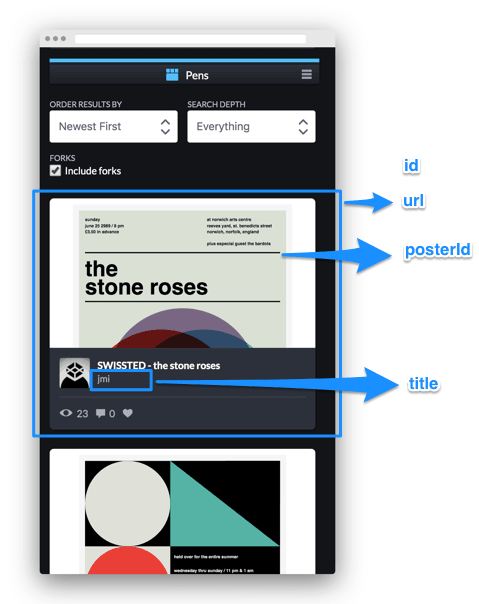
First, we need to figure out what exactly we want to display on the website. Our data model consists of two “entities”, posters and recreations. A poster may have multiple recreations—for example, “the stone roses at norwich arts centre, 1989” poster has at least two Codepen recreations by users jmi and Shelby Perry.
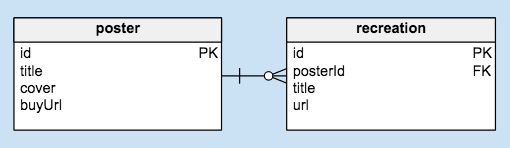
A poster consists of:

-
id— unique identifier -
title— the poster’s title, eg. “the stone roses at norwich arts centre, 1989” -
cover— the cover image URL -
buyUrl— URL to buy the poster on Swissted, eg. https://www.swissted.com/products/the-stone-roses-1989
A recreation consists of:
-
id— unique identifier -
posterId— id value of corresponding poster -
title— creator’s name and source (NOT the pen’s title), eg. “jmi (Codepen)” -
url— recreation entry URL, eg. https://codepen.io/jmi/pen/wjvmpr
Note: I decided to call it recreation instead of, say, pen or codepen because in the future I might add items from other sources (maybe someone did it on Glitch?). I decided against generic names like item or entry to avoid confusion with the poster entry itself.
In this step, we’re still using dummy content for our data. That way, when we do have the actual content, we have solid reference for what our data should be like. Make a new file called dummyData.js in your root directory and add the following code.
// dummyData.js
module.exports = {

  posters: [
    {
      "id": "",
      "title":"",
      "cover":"",
      "buyUrl":""
    }
  ],

  recreations: [
    {
      "id":"",
      "posterId": "",
      "title":"",
      "url":""
    }
  ]
}
As you can see, we are making two array objects representing our two entities, posters and recreations. Now let's fill these with dummy content that we copy from our source websites: two posters and one recreation. We can make up any id values for now.
// dummyData.js
module.exports = {

  posters: [
    {
      "id": "stone-roses-1989",
      "title":"the stone roses at norwich arts centre, 1989",
      "cover":"https://cdn.shopify.com/s/files/1/0140/7312/products/stone_roses_300x300.gif",
      "buyUrl":"https://www.swissted.com/products/the-stone-roses-1989"
    },
    {
      "id": "talking-heads-1975",
      "title":"talking heads at cbgb and omfug, 1975",
      "cover":"https://cdn.shopify.com/s/files/1/0140/7312/products/talking_heads_300x300.jpg",
      "buyUrl":"https://www.swissted.com/products/talking-heads-at-cbgb-and-omfug-1975"
    }
  ],

  recreations: [
    {
      "id":"jmi-stone-roses-1989",
      "posterId": "stone-roses-1989",
      "title":"jmi (Codepen)",
      "url":"https://codepen.io/jmi/pen/wjvmpr"
    }
  ]
}
2. Prepare and process our data
After we have our data, now let’s import it from our server-side script. Open server.js and add the following lines before the router.get request (line 20 if you use my Glitch app).
// server.js
// ....

// import hardcoded JSON data
const data = require('./dummyData')
const posters = data.posters
const recreations = data.recreations

console.log('posters', posters)
console.log('recreations', recreations)

// ....
Check your Logs and we should find our dummy data printed there. (It’s up to you, but I usually remove console.log lines after it prints the expected output.)
We could send our current data as they are to the view template, but the view template would have to process the data to display the correct recreation for each poster, which is not what it’s designed for. Our server code should handle this type of work as much as possible.
Now let’s add this under the code we just wrote.
// server.js
// ...

// add recreations into corresponding poster
posters.forEach(function(element, index) {
  console.log('element', element)
});

// ...
Now it only prints each poster object to the log. Let’s replace the console.log line with the code below.
// server.js

// add recreations into corresponding poster
posters.forEach(function(element, index) {

  const id = posters[index]['id']

  // loop over recreations data
  // if recreation's `posterId` match current poster's `id`,
  // then add it to this poster's `recreations` object
  posters[index]['recreations'] = []
  for (var i = 0; i < recreations.length; i++) {
    if (recreations[i].posterId == id) {
      posters[index]['recreations'].push(recreations[i])
    }
  }
});
What happens in this code:
- We loop over each poster object
- We define poster’s id
- We define a new empty array object in poster object, called
recreations - We loop over each recreation object
- If recreation’s
posterIdmatch current poster’sid, then add the recreation to poster’srecreationsarray (ie. this recreation belongs to this poster)
Finally, let’s send our data to view! Find our router.get function and replace the name field with posters: posters.
// server.js
// GET request
router.get('/', (ctx, next) => {
  return ctx.render('./index', {
    // name: 'Eka'
    posters: posters
  })
})
3. Display data in HTML with Nunjucks
Let’s go to our view template, namely index.html. Our view uses Nunjucks templating engine, which we are going to write presently. Replace the <body> content with the following.
<!-- index.html -->
<html lang="en">
<!-- no change in <head> -->
<body>
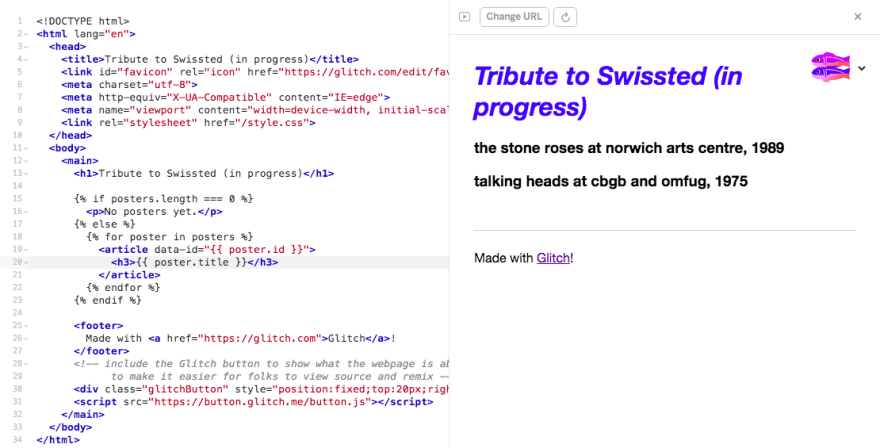
<main>
<h1>Tribute to Swissted (in progress)</h1>
{% if posters.length === 0 %}
<p>No posters yet.</p>
{% else %}
<p>YES, we have posters!</p>
{% endif %}
<!-- footer and Glitch button -->
</main>
</body>
</html>
Click Show and you should see the second paragraph on our page. Here we use Nunjucks conditional if tag to anticipate empty posters data and print the message “No posters” (as opposed to showing a blank screen), thus improving user experience.
Next we are replacing the else content with a for loop to iterate over the posters object.
<!-- index.html -->

      {% if posters.length === 0 %}
        <p>No posters yet.</p>
      {% else %}
        {% for poster in posters %}
          <article>
            <h3>{{ poster.title }}</h3>
          </article>
        {% endfor %}
      {% endif %}
Reload your page, and it should display a list of poster titles.
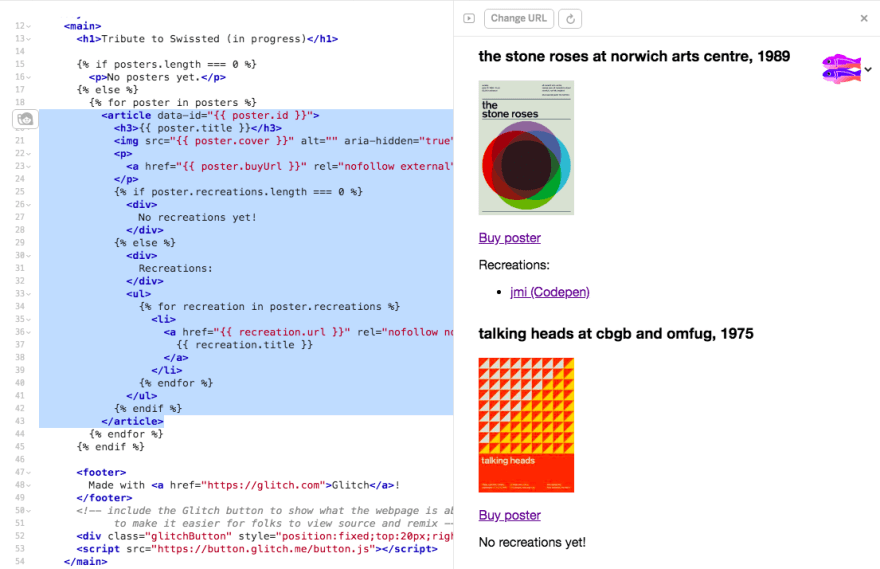
Now we are adding the rest of the data to our template.
<!-- index.html -->

      {% if posters.length === 0 %}
        <p>No posters yet.</p>
      {% else %}
        {% for poster in posters %}
          <article data-id="{{ poster.id }}">
            <h3>{{ poster.title }}</h3>
            <img src="{{ poster.cover }}" alt="" aria-hidden="true" width="120" />
            <p>
              <a href="{{ poster.buyUrl }}" rel="nofollow noopener external">Buy poster</a>
            </p>
            {% if poster.recreations.length === 0 %}
              <div>
                No recreations yet!
              </div>
            {% else %}
              <div>
                Recreations:
              </div>
              <ul>
                {% for recreation in poster.recreations %}
                  <li>
                    <a href="{{ recreation.url }}" rel="nofollow noopener external" target="_blank">
                      {{ recreation.title }}
                    </a>
                  </li>
                {% endfor %}
              </ul>
            {% endif %}
          </article>
        {% endfor %}
      {% endif %}
In this code, we display each posters object with for loop. For each poster, we display <article> element containing:
-
idindata-attribute (so we can find out a poster’sideasily) title-
coverimage (we hide it from screen readers because it would be redundant) - link to
buyUrl - list of
recreations, if any (note that we also use conditional to check if the current poster has any recreations, and only run theforloop if it does)
If all goes well, we should end up with something like this. We have successfully displayed our data in the template!
4. “Scrape” and parse posters data with Cheerio
Let’s replace our dummy data with “real” data. To make parsing and processing data easier, we are installing cheerio, a lightweight implementation of core jQuery that “parses markup and provides an API for traversing/manipulating the resulting data structure”. Run the command below in your Console.
pnpm install cheerio --save
Create a file called postersData.js, where we will be working with our data. Import our cheerio library there.
// postersData.js

// initialize data parsing/processing with cheerio
const cheerio = require('cheerio')
4a) “Scrape” data
Next, we are “scraping” our content manually (hence the quotation marks). We are going to use our browser’s Developer Tools—also known as DevTools—to copy the raw HTML data. To be precise, we are using the ”Inspect Element” tool. If you are not familiar with DevTools, learn about it here:
Open swissted.com, then right-click on the page content and choose “Inspect element”. (You can also open it from the menu or with a keyboard shortcut—check your browser’s DevTools documentation).
In the Element Inspector interface, we can see the DOM nodes of the web page. Click the triangles to get the furthest node that contains all our posters. In this case, it’s section#ProductListing. Right click on it, then choose Copy > Copy Element.
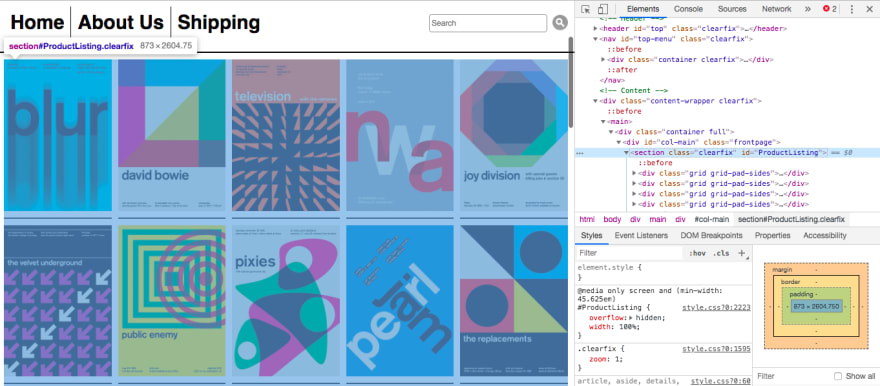
Paste to your text editor. I use a minifying tool to make the code more compact. If you use VSCode, you can also use the “Join Lines” feature. Go back to postersData.js and paste our data like so.
// postersData.js

const cheerio = require('cheerio')

// prepare raw HTML data
const page1 = '<section class="clearfix" id="ProductListing">... content here ...</section>'
The Swissted website consists of four pages, so let’s repeat the same steps for three other pages: (1) Open Element Inspector, (2) find the #ProductListing node, (3) copy element, (4) minify/join, and (5) paste to postersData.js.
After we have the raw data from all four pages, we can concatenate all data into one variable, allHtmlString.
// postersData.js

// ... previous code

// prepare raw HTML data
const page1 = '<section class="clearfix" id="ProductListing">... content here ...</section>'
const page2 = '<section class="clearfix" id="ProductListing">... content here ...</section>'
const page3 = '<section class="clearfix" id="ProductListing">... content here ...</section>'
const page4 = '<section class="clearfix" id="ProductListing">... content here ...</section>'
const allHtmlString = page1.concat(page2.concat(page3.concat(page4)))
4b) Parse and process data
Finally, the fun part of this post—a.k.a. where we get to take advantage of cheerio’s succint but powerful API!
But first, let’s examine the Swissted page with the Element Inspector to see what a single poster look like. Here we have the buyUrl (line 1), the id (line 2), the cover image (line 3), and the title (line 5).
<a href="/products/blur-at-mandela-hall-1993" title="blur at mandela hall, 1993">
  <article id="product-198784422">
    <img src="//cdn.shopify.com/s/files/1/0140/7312/products/blur_swissted_1024x1024.gif?v=1485982167" alt="blur at mandela hall, 1993">
    <div>
      <h3>blur at mandela hall, 1993</h3>
      <p>From $50.00</p>
      <span class="button">view print</span>
    </div>
  </article>
</a>
Using Cheerio, we are extracting/parsing the information from our raw data based on the selectors above, and saving it to a new array object called posters.
// postersData.js

// ... previous code

// load raw HTML data
const $ = cheerio.load(allHtmlString);

// create empty posters array
const posters = []

// create empty recreations array
const recreations = []

// parse data and add as child of `posters`
$('article').each(function(index, element) {

  // initialize poster object
  posters[index] = {};

  // get title
  const title = $(element).find('article h3').text()
  posters[index]['title'] = title

  // get cover
  const cover = $(element).find('article>img').attr('src')
  posters[index]['cover'] = cover.replace('1024x1024', '120x120')

  // get buyUrl
  const buyUrl = $(element).parent().attr('href')
  posters[index]['buyUrl'] = 'https://www.swissted.com' + buyUrl

  // get id
  const id = $(element).attr('id')
  posters[index]['id'] = id

  // create `recreations` array
  // loop over recreations data
  // if recreation's `posterId` match current poster's `id`,
  // then add it to this poster's `recreations` object
  posters[index]['recreations'] = []
  for (var i = 0; i < recreations.length; i++) {
    if (recreations[i].posterId == id) {
      posters[index]['recreations'].push(recreations[i])
    }
  }
});

console.log(posters)
What happens in the code above:
- Load our HTML data into cheerio
- Create an empty
postersarray to hold our data later - Iterate over each poster (
article) with cheerio’s.each- Note: You can also use vanilla Javascript
forloop, but I chose to use cheerio’s jQuery-like API.
- Note: You can also use vanilla Javascript
- Extract information for each poster
- Look for a selector inside our node with
.find - Target the parent of our node with
.parent - Get text inside elements with
.text(fortitle) - Get attribute value with
.attr(forcover,buyUrl, andid)
- Look for a selector inside our node with
Note that at the end of the .each function, we have the recreations loop code from Step 2. At the moment, it will not do anything since our recreations object is empty. We’re going to process the recreations data in the next step, and go back to this file to add them later.
Open our Logs, and we should see hundreds of posters data printed there.
5. “Scrape” and parse recreations data with Cheerio
This step resembles the previous step, only now we are doing it with the recreations data. Just like in previous step, create a file called recreationsData.js and import our cheerio library there.
// recreationsData.js

// initialize data parsing/processing with cheerio
const cheerio = require('cheerio')
5a) “Scrape” data
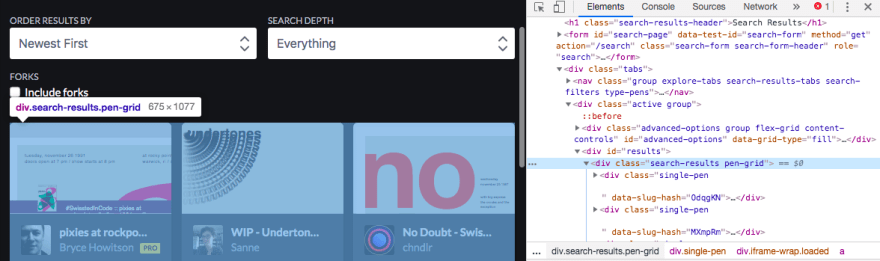
Open Codepen and search for “swissted”. By default, the search results are sorted by Relevance & Popularity, but let’s change it to Newest First so it will be easier to add more items in the future. Again, right click on the page and choose “Inspect Elements”.
In the Element Inspector panel, look for the node that contains all the results, namely div.search-results.pen-grid. Right click, choose Copy Element, and minify the pasted code.
Go back to recreationsData.js and paste our data.
// recreationsData.js

const cheerio = require('cheerio')

// prepare raw HTML data
const codepen1 = '<div class="search-results pen-grid">... content here ...</div>'
At the time of writing, there are three pages in the Codepen search results. Repeat the process for the other two pages, then concatenate all data into one variable, allHtmlString.
// recreationsData.js

// ... previous code

// prepare raw HTML data
const codepen1 = '<div class="search-results pen-grid">... content here ...</div>'
const codepen2 = '<div class="search-results pen-grid">... content here ...</div>'
const codepen3 = '<div class="search-results pen-grid">... content here ...</div>'
const allHtmlString = codepen1Html.concat(codepen2Html.concat(codepen3Html))
5b) Parse and process data
Let’s examine the Codepen search results page with the Element Inspector. The actual HTML for each pen (recreation) is quite long. Below is the truncated version that contains the data we need: title (line 10), url (line 4), and id (line 1).
<div class="single-pen" data-slug-hash="OdqgKN">
  <div class="meta-title-name">
    <h3 class="item-title">
      <a href="https://codepen.io/graphixboy/pen/OdqgKN" title="pixies at rockpoint palladium 1991" >
        pixies at rockpoint palladium 1991
      </a>
    </h3>
    <div class="user">
      <a class="username" href="/graphixboy">
        <span>Bryce Howitson</span>
      </a>
    </div>
  </div>
</div>
Again, we are extracting the information we need with Cheerio and saving it to a new array object called recs.
// recreationsData.js

// ... previous code

// load raw HTML data
const $ = cheerio.load(allHtmlString);

// create empty recreations array
const recs = []

// parse data and add as child of `recs`
$('.single-pen').each(function(index, element){

  // initialize recreation object
  recs[index] = {};

  // get title
  const title = $(element).find('.username span').text()
  recs[index]['title'] = title + ' (Codepen)'

  // get url
  const url = $(element).find('.item-title a').attr('href')
  recs[index]['url'] = url

  // get id
  const id = $(element).attr('data-slug-hash')
  recs[index]['id'] = id

  // add empty posterId field
  recs[index]['posterId'] = ''

});

console.log(recs)
What happens in the code above:
- Load our HTML data into cheerio
- Create an empty
recsarray to hold our data later - Iterate over each poster (
.single-pen) with cheerio’s.each - Extract information for each pen
- Look for a selector inside our node with
.find - Get text inside elements with
.text(fortitle) - Get attribute value with
.attr(forurlandid)
- Look for a selector inside our node with
- Add a blank
posterIdfield that we’re going to populate manually in the next step
Check our Logs; if we see our recreations data, then we can proceed to the next step!
6. Modify recreations data
We have our posters data, we have our recreations data, but we have not connected them together. In large real-world projects, ideally machine learning could be used to compare the posters to the recreations. In this project, however, we are going to do this manually. We do it by (1) printing our recreations data to a separate route, (2) creating duplicate data, (3) finding a matching poster for each recreation and adding the poster’s id to the recreation’s posterId field, and finally (4) add the recreations data to the posters data.
6a) Create a route that returns recreations data
First, we convert our recreations data to JSON format with stringify and export it.
// recreationsData.js

// add to the bottom of the file
const recsWithoutPosterId = JSON.stringify(recs)
module.exports = recsWithoutPosterId
Then go to server.js and add the following before our exising router.get function.
// server.js

// load recommendations (without poster) data
const recsWithoutPosterId = require('./recreationsData')

// GET URL for recreations data without poster id
router.get('/recreations-data', (ctx, next) => {
  ctx.body = recsWithoutPosterId
})
The code above creates a new route called recreations-data that prints data imported from our recreationsData.js file above.
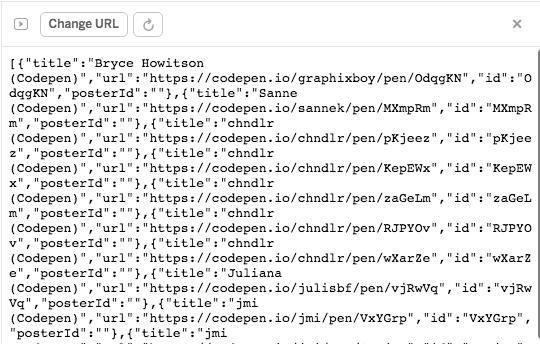
Click “Change URL” in the top of your Glitch app panel, type our new route (my-glitch-app-name.glitch.me/recreations-data), and we should see the recreations data in JSON format.
6b) Create duplicate recreations data and add posterId
Right-click, select all, and copy the recreations JSON data. Then create a new file called recreationsWithPosterData.js. Define a variable called recreations and paste our data there. It should look like this:
// recreationsWithPosterData.js
const recreations = [
  {
    "posterId":"",
    "title":"Bryce Howitson (Codepen)",
    "url":"https://codepen.io/graphixboy/pen/OdqgKN",
    "id":"OdqgKN"
  },
  {
    "posterId":"",
    "title":"Sanne (Codepen)",
    "url":"https://codepen.io/sannek/pen/MXmpRm",
    "id":"MXmpRm"
  },
  // etc
]
Now comes the manual work. My steps are:
- Open each Codepen link
- Search Swissted for matching poster
- Use Inspect Element to get the
posterId - Add
posterIdtorecreationsWithPosterData.js
I have input around 20 items for now, will continue if I have time one day. Here is what our data looks like after I add the posterId. At the bottom, export our data with module.exports.
// recreationsWithPosterData.js
const recreations = [
  {
    "posterId":"product-198789752",
    "title":"Bryce Howitson (Codepen)",
    "url":"https://codepen.io/graphixboy/pen/OdqgKN",
    "id":"OdqgKN"
  },
  {
    "posterId":"product-407927401",
    "title":"Sanne (Codepen)",
    "url":"https://codepen.io/sannek/pen/MXmpRm",
    "id":"MXmpRm"
  },
  // etc
]

module.exports = recreations
6c) Add recreations to posters data
Remember Step 4? Now that we’ve had recreations data complete with the associated posterId, we are editing our posters data to replace the empty recreations array with our new data from recreationsWithPosterData.
// postersData.js

// create empty posters array
const posters = []

// remove this line
// const recreations = []

// replace with this line
// import recreations data
const recreations = require('./recreationsWithPosterData')
Run console.log(posters) to see if the recreations are duly added to our posters data. If everything goes well, let’s export the data!
// postersData.js
// add to the bottom of the file
module.exports = posters
7. Render data from the view template
Finally, our very last step! We have exported our new posters data, now we only need to send it to our HTML template from the server.
Open server.js and delete (or comment out) the dummy data code from Step 2, from const data = require('./dummyData') to posters.forEach(function(element, index) { ... }).
We’re going to get an 🔴 error because we have to send posters data to our template in the router.get function.

Now add our new posters data anywhere before router.get.
// server.js

// load posters data
const posters = require('./postersData')
Reload the app. Not only should the error be gone, but our app should be displaying the new “scraped” data now. WE MADE IT!! 🎉
📝 My Notes
- Scraping public data from websites is not in itself illegal. The nature of the content and how you display the content may make it illegal (eg. copyright violation). If you make too many or too frequent requests to a website’s server, you might get blocked. Be mindful about your scraping usage.
- On a related note, I’m going to address caching and saving image locally with
fsin the next post. If this app ever got blocked by Shopify (which hosts Swissted’s images), I would save the images into Glitch’sassetsfolder. - If you run an automatic scraper, do anticipate change in source data (different markup, different class names, eg. if autogenerated with CSS-in-JS libraries), which will affect your data structure.
- On a related note, I’m going to address caching and saving image locally with
- Cheerio's jQuery-like API makes it easier for me to work with DOM data, for example in this case
.find(),.parent(), and.text(). It is very helpful!
📚 Further Read
- Scrape the Data You Need with Cheerio!
- How to write a web scraper in Node.js
- The Ultimate Guide to Web Scraping with Node.js
Thus we have finished building the most basic version of our web app. But as you can see, it still needs finishing touches before we can ship it! In the next post, I’m going to improve the app's markup, styling, and performance.
Thank you for reading. Stay tuned for the next post!

Oldest comments (0)