A couple of months ago, I was searching for a way to integrate the authentication and authorization phase of my application with the Cisco ISE solution, like integrating the application to the ISE system as another network device in order to manage from ISE which group of users could use which feature inside my code.
Hopefully, with some research, I could find a python module that already performs the job like the TACACS+ Python client that implement the TACACS+ message stack. With this in mind, we have two things to work on:
- The configuration of the users, network device, groups, and policies on Cisco ISE.
- The python code that asks ISE via TACACS+ about user's credentials and permissions.
Cisco ISE Configuration
For the simplicity of this tutorial, a standalone solution of Cisco ISE (version 2.7) was used. Users will be created locally on ISE. Before starting this section, consider the following schema.
The first thing you need to do is enable the Admin Device Services, to enable TACACS Server on ISE. For performing this task, go to Administration > Deployment, select the ISE Node and click on the edit button. Next, scroll all the way down and check the Enable Device Admin Service checkbox, and save it.


To create the groups go to Administration > Groups and click on the User Identity Group option, when you get there, click again on the add button. In the User Identity group creation page, fill as shown in the image below. Just for this tutorial, name the group as Engineering.

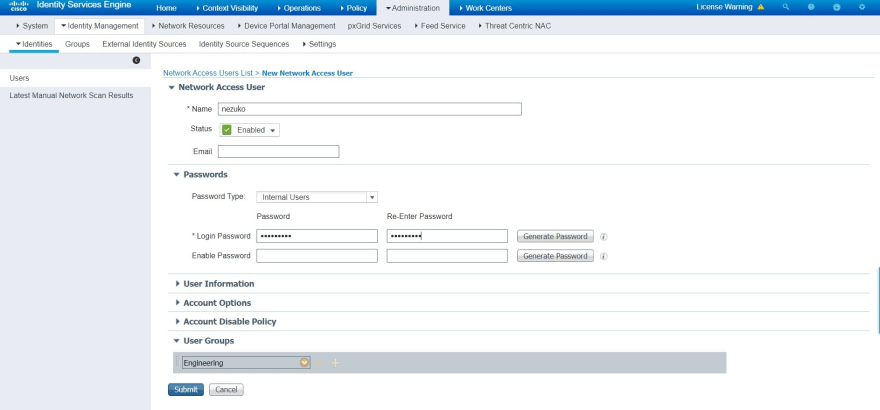
To create the user go to Administration > Identities and click on the add button. In the user creation page, fill as shown in the image below. For the instance, create an user called nezuko (remember to keep in a save place the password).

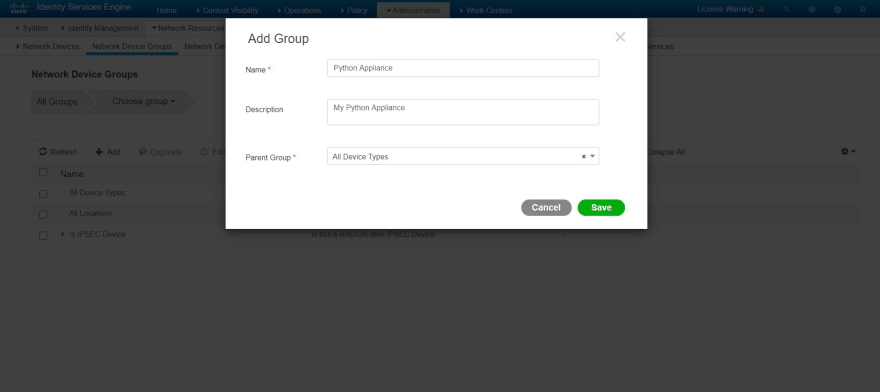
In the device creation, first of all, you have to create a new device type. For this purpose go to Administration > Network Device Group, click on the add button and fill as shown in the image below. Just for this tutorial, name the device group as Python Appliance.

Following up with the device creation, go to Administration > Network Device Profile and click on the add button. Fill the next page as shown in the image below.

For finishing the device creation, go to Administration > Network Device and click on the add button. Here take in note which IP Address you assign to the server and which shared secret you use. For the purpose of this tutorial, the name of the server is computeserver with an IP address 192.168.149.131/32 and shared secret secretKey1. For other options, fill as shown in the image below.

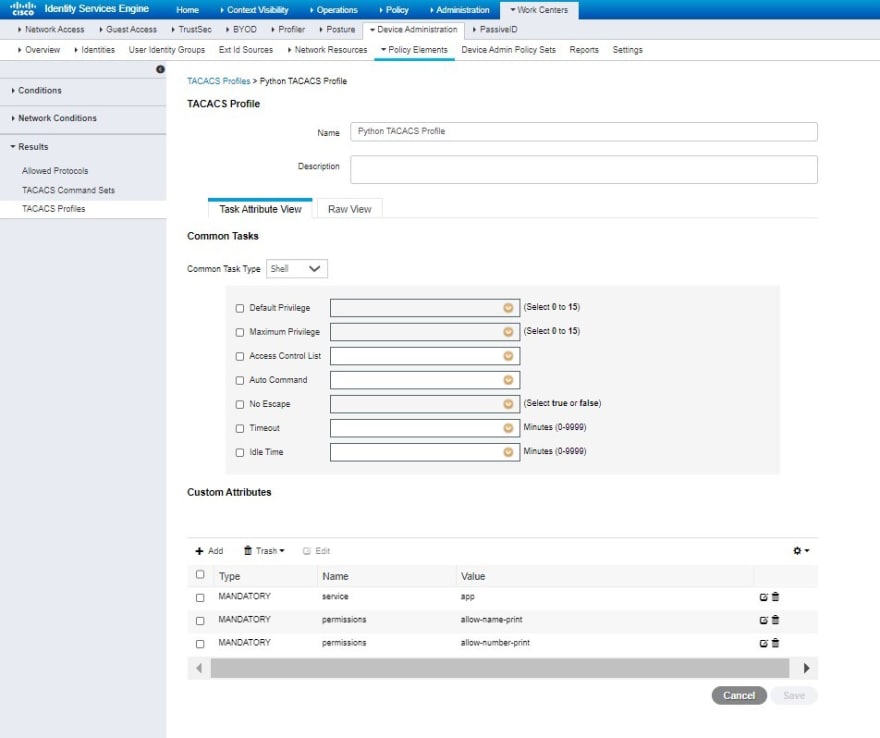
For create the permissions go to Work Center > Policy Elements and click on Results > TACACS Profiles option. When you get there, click on the add button. Here you have to define the set of rules you want to capture later on in your code. For that purpose, define two attributes the service and the permissions attributes. The service attribute for capturing the whole list of permissions and the permissions attribute for defining the allowance in your profile. Below, you will find a short example of how to fill this information in the TACACS Profile Page.

Next, you have to attach the profile to the corresponding user group. Go to Work Center > Device Admin Policy and click on the add (+) button to add a new policy. Here, you have to define the trigger condition that will be all network devices with a device type equal to Python Appliance. Use the image below for reference.


When you create the policy, click on the arrow button to view the authentication and authorization policy rules, then click on authorization policy rules - local exception and click on the add (+) button. Next, you need to add the TACACS Profile to the shell profile, as shown in the image below.

Last but not least, In the authentication policy rules, you need to change the authentication database to an internal user, as shown in the image below.

With this final step, you have prepared Cisco ISE to respond to any requests made by the script of the next section.
Python Code
In this section, you will explore the code that asks ISE about the trustworthiness of the user's credentials and permissions.
This section was written using a Debian host and Python 3.8 interpreter, but feel free to adapt to any Linux/Windows distribution and any python version.
First, you need to prepare your python environment and install the tacacs_client module.
$ python -m venv env
$ source env/bin/activate
(env) $ pip install tacacs_plus
Next, perform a connection to ISE and test if the authentication phase returns the correct answer, using the following code:
from tacacs_plus.client import TACACSClient
import socket

host = '192.168.149.10'
secretKey = 'secretKey1'

username = 'nezuko'
password = '***' #Write here user's password

cli = TACACSClient(host, 49, secretKey, family=socket.AF_INET)
print(cli.authenticate(username, password))
If the action was made succesfully your script will print the following line, with the status code equals to PASS:
(env) $ python app.py
data: b'', data_len: 0, flags: 0, server_msg: b'', server_msg_len: 0, status: PASS
Next, test the authorization phase of the code, for performing this task you can use the following code:
from tacacs_plus.client import TACACSClient
import socket

host = '192.168.149.10'
secretKey = 'secretKey1'

username = 'nezuko'
password = '***' #Write here user's password

cli = TACACSClient(host, 49, secretKey, family=socket.AF_INET)
answer = cli.authenticate(username, password)
if answer.valid:
    author = cli.authorize(username, arguments=[b"service=app"])
    print(author)
Here, you must add the service=app argument on the authorize method, in order to match the shell profile on ISE and get the whole set of permissions. Below is the expected respond from ISE.
(env) $ python app.py
args: permissions=allow-name-print, permissions=allow-number-print, service=app, args_cnt: 3, data: b'', data_len: 0, server_msg: b'', server_msg_len: 0, status: PASS
With this output, you could extract from the response string, the list of permissions defined previously in the ISE configuration. For performing this modification, use the parse_response function defined in the next example:
from tacacs_plus.client import TACACSClient
import socket
import re
from collections import defaultdict

#Function for retrieving the list of permissions of ISE
#authorization response and save it in a dictionary object.
def parse_response(rawData):
  rawData = rawData.replace('args: ','')
  rawData = rawData.split(',')
  ans = defaultdict(lambda:list())
  pattern = re.compile('(.*)=(.*)')
    for d in rawData:
      if '=' in d:
        temp = pattern.search(d)
        ans[temp.group(1).strip()].append(temp.group(2).strip())
  return dict(ans)

host = '192.168.149.10'
secretKey = 'secretKey1'

username = 'nezuko'
password = '***' #Write here user's password

cli = TACACSClient(host, 49, secretKey, family=socket.AF_INET)
answer = cli.authenticate(username, password)
if answer.valid:
  author = cli.authorize(username, arguments=[b"service=app"])
  print(parse_response(author.__str__()))
When you test again the code, you will get a more clean and useful output:
(env) $ python app.py
{'permissions': ['allow-name-print', 'allow-number-print'], 'service': ['app']}
At this point, you could integrate this logic to perform the authentication and authorization phase in further steps of the application by validating the user's credentials and then gathering all the permissions it has for performing any action inside the program.
I hope you find it useful, feel free to use it at your convenience.


Latest comments (0)