
Here's a quick guide to setup up a static website using AWS simple storage service (S3). This is the first part of a longer tutorial I'm working on (check it out at in the exampro workshops section.
By the end of this short guide, you'll be set up with a live website that is referenced by an amazon generated URL.
A great application for this tutorial is using it as a professional web resume. If you're job seeking in the webdev market, this is a great way to demonstrate to employers that you have exposure to AWS services. If you're into AWS you can use this guide as a hands-on lab to familiarise yourself with the console and build confidence.
Creating an S3 bucket
Our first task in creating a static website is to set-up our S3 bucket. We can use the bucket to store files, images, audio recordings, etc. but in this tutorial we will use it to store our websites project files and then render them into the browser.
Have a static template on hand. I've picked the following. Make sure you have an index.html and an error.html file in the root directory. Add some type of error message into the error.html file.

- Navigate to the S3 management console
- Click on the services dropdown tab in the top left corner

- Type S3 into the search bar and select it from the search results
- This should now open the S3 console page:

- Go ahead and “Create bucket”
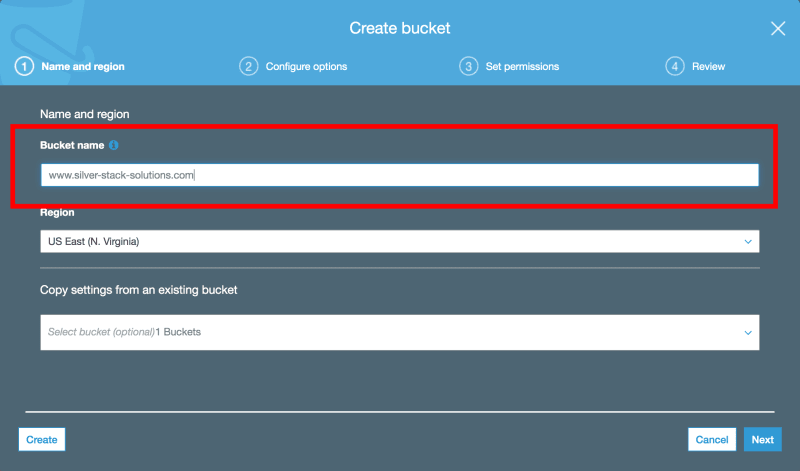
Enter a bucket name. This will be used as your unique URL generated by AWS. Each bucket name must be unique because this is the URL associated with your website.
Add "www." to the beginning and ".com" (or whatever the suffix of your domain is) to the end of your bucket name.
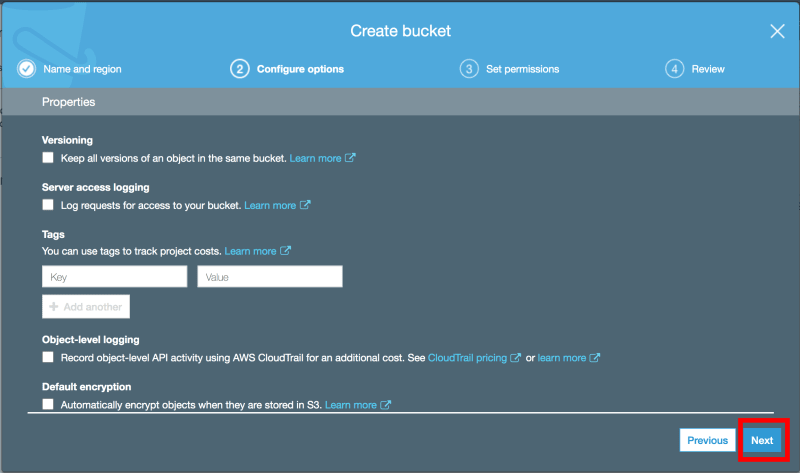
- Leave the configure options blank and hit "Next"
Uncheck both options under “Manage public bucket policies”
Leave the ACL (access control list) options check marked

- Your review page now looks like this. Hit “Create Bucket”

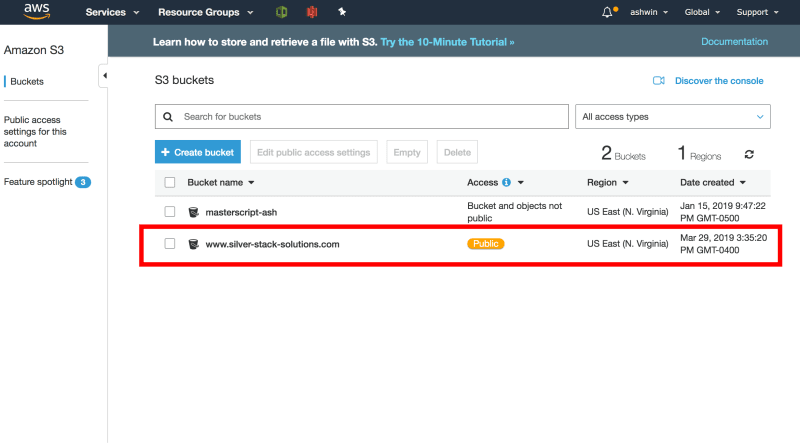
- You will now have your domain/ bucket name listed under your S3 bucket list.

Enable Static Web Hosting
We have our bucket listed in our S3 console. Notice that it is not set to public. We have to alter the bucket permissions and properties to make this happen.
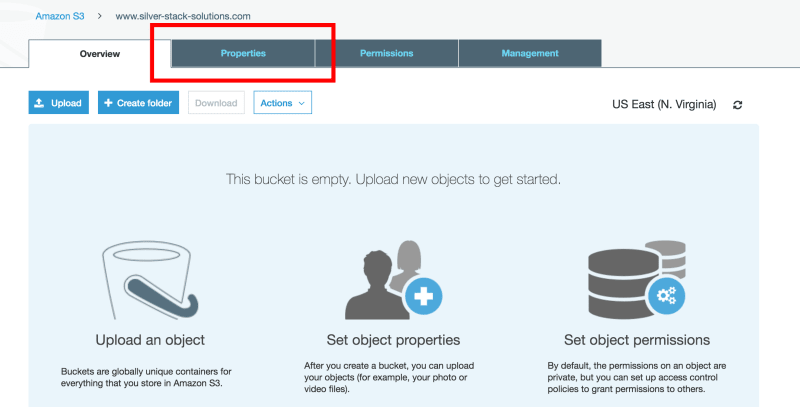
- Click into your newly created bucket name which should now be listed under S3 buckets and select the properties tab
- Click on the “Static website hosting” option which at the moment is disabled, we need to enable it

- A modal should open after selecting “Static website hosting”.
- Checkmark the “Use this bucket to host a website” option.
- Then fill in the index and error inputs with “index.html” and "error.html"
- Save the changes

- In your overview properties tab, it should now show "Static website hosting" as enabled
- We have officially set-up our bucket for static web hosting
- Next we need to set up “permissions” to allow read access to our files

Bucket policy
- Select the “Permissions” tab, located beside properties.
- Then within permissions, choose the Bucket policy tab.

-
Within the bucket policy editor, paste the following lines of code
{
  "Version": "2012-10-17",
  "Statement": [
  {
    "Sid": "AllowPublicReadAccess",
    "Effect": "Allow",
    "Principal": "*",
    "Action": [
    "s3:GetObject"
    ],
    "Resource": [
    "arn:aws:s3:::www.silver-stack-solutions.com/*"
    ]
  }
  ]
}
Replace “www.silver-stack-solutions.com” with your own bucket name and "Save"

It’s normal that you get a warning message: “You’ve given public access to your bucket”. This allows read access to our index.html file
Navigate back to the S3 console. Your AWS S3 console should list your bucket as "Public" now
Upload content
- Click back into your S3 bucket and select the “upload option”
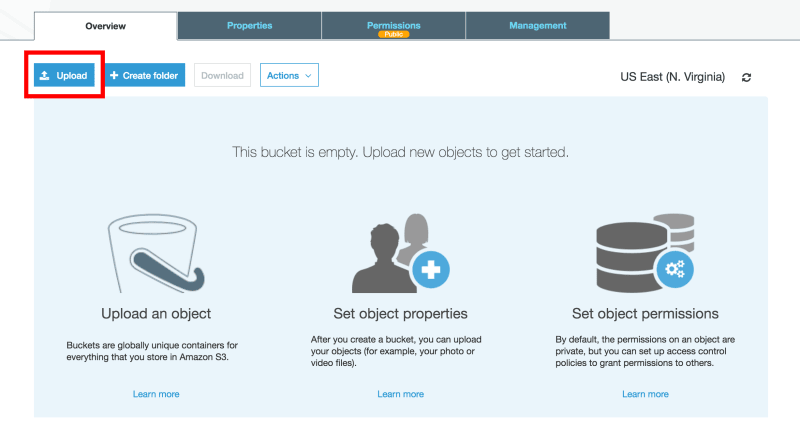
- Drag and drop your project files and upload them

- Once finished, your project files should be in your bucket
View website
We've completed setting up our bucket and giving it permissions. We can now access our content from the web browser.
- Navigate into your S3 bucket
- Click into your index.html file

- Notice this URL, it is the endpoint for your static website. Go ahead and click into it.

The object URL is affiliated to your bucket name but generated as an AWS resource URL. We can change this by importing a pre-purchased domain name or buying one directly from aws route53 (not covered here).
If everything went well, you should be able to view your newly created website. If you encountered any problems, you will be directed to the error.html file.
Conclusion
I hope this tutorial was helpful to readers. It's my first tutorial post to dev.to so if you followed along let me know how I did.
If you liked this article, check out another ExamPro article by our UX Engineer Karan. It's also his first post so share some encouragement:


Part 2 is about setting up your own Domain


Top comments (4)
Nice tuto, what is the price estimation of this kind of housing ?
S3 is very cheap. You could literally pay a couple of bucks for 100s of millions of requests. You also have other solutions like stormkit.io, zeit, netlify, firebase or google app engine which provide you single click deploys.
Yes as Savas pointed out, S3 is cheap.
If you're learning and want to build the architecture shown on the cover image of this post (makes up the full tutorial), it costs a $1.75. I ran my web resume using this for 3 months with requests from within Canada as well as the US.
$1 was for importing my domain name servers. Not sure what the 0.75 was for.
hope that helped
Very helpful, thank you !