
AWS App Runner is a new service from AWS that allows you to run and scale web applications in only a few clicks. App Runner can build and deploy containers for you directly from your GitHub repo, freeing you from Dockerfile creation and management. The service also hides the complexity of VPC configuration. In short, with App Runner, you write it, AWS runs it.
In this post, you use App Runner to deploy a REST API in minutes using Express.js and Fauna, the data API for modern applications. You create a database in Fauna and securely store an access key in AWS Systems Manager Parameter Store. You clone an Express.js application that performs CRUD operations on your data in Fauna. Finally, you launch an App Runner service that builds, deploys, and runs your code.
Pre-requisites
To follow along with this post you must have access to a Fauna account, a GitHub account, and an AWS account.
- Register for a free Fauna account and benefit from Fauna’s free tier while you learn and build. You do not need to provide payment information until you upgrade your plan.
- Sign up for a free GitHub account if you do not already have one.
- Sign up for an AWS account by following these instructions. AWS also offers a free tier, but you must provide a payment method to create an AWS account.
Configuring a database in Fauna
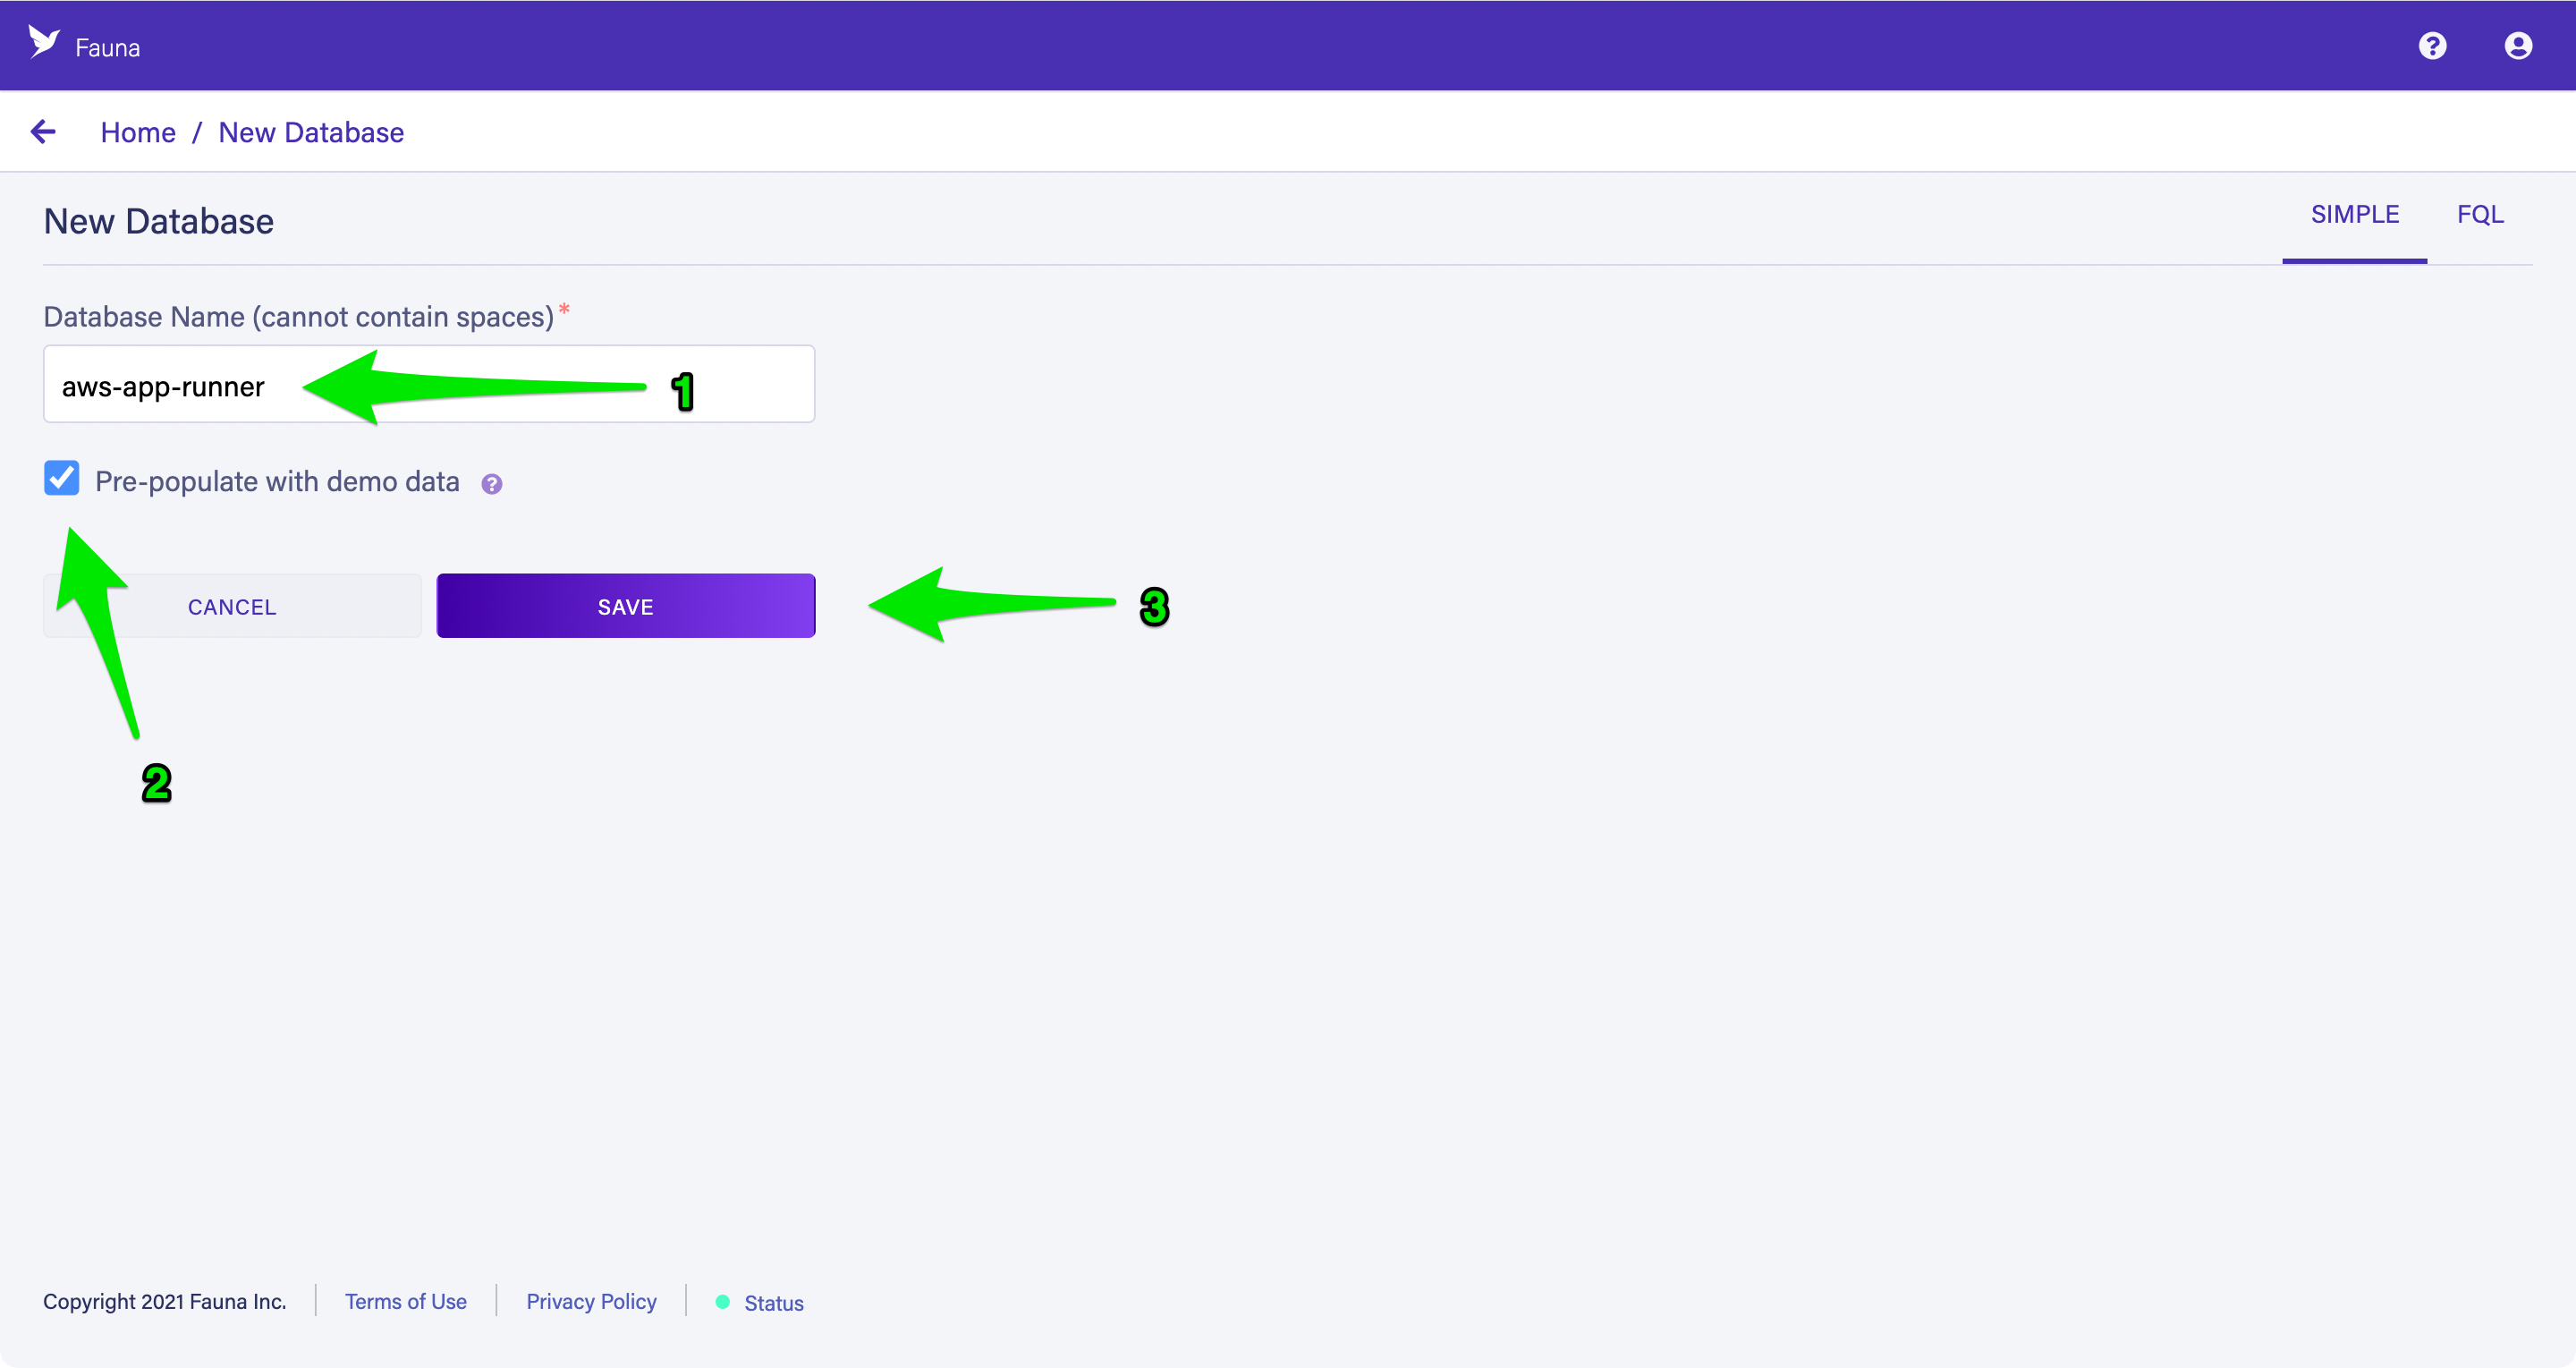
Open the Fauna dashboard and choose “New Database” to create a new database for your application. Enter aws-app-runner as the Database Name, ensure that Pre-populate with demo data is selected, and choose Save.
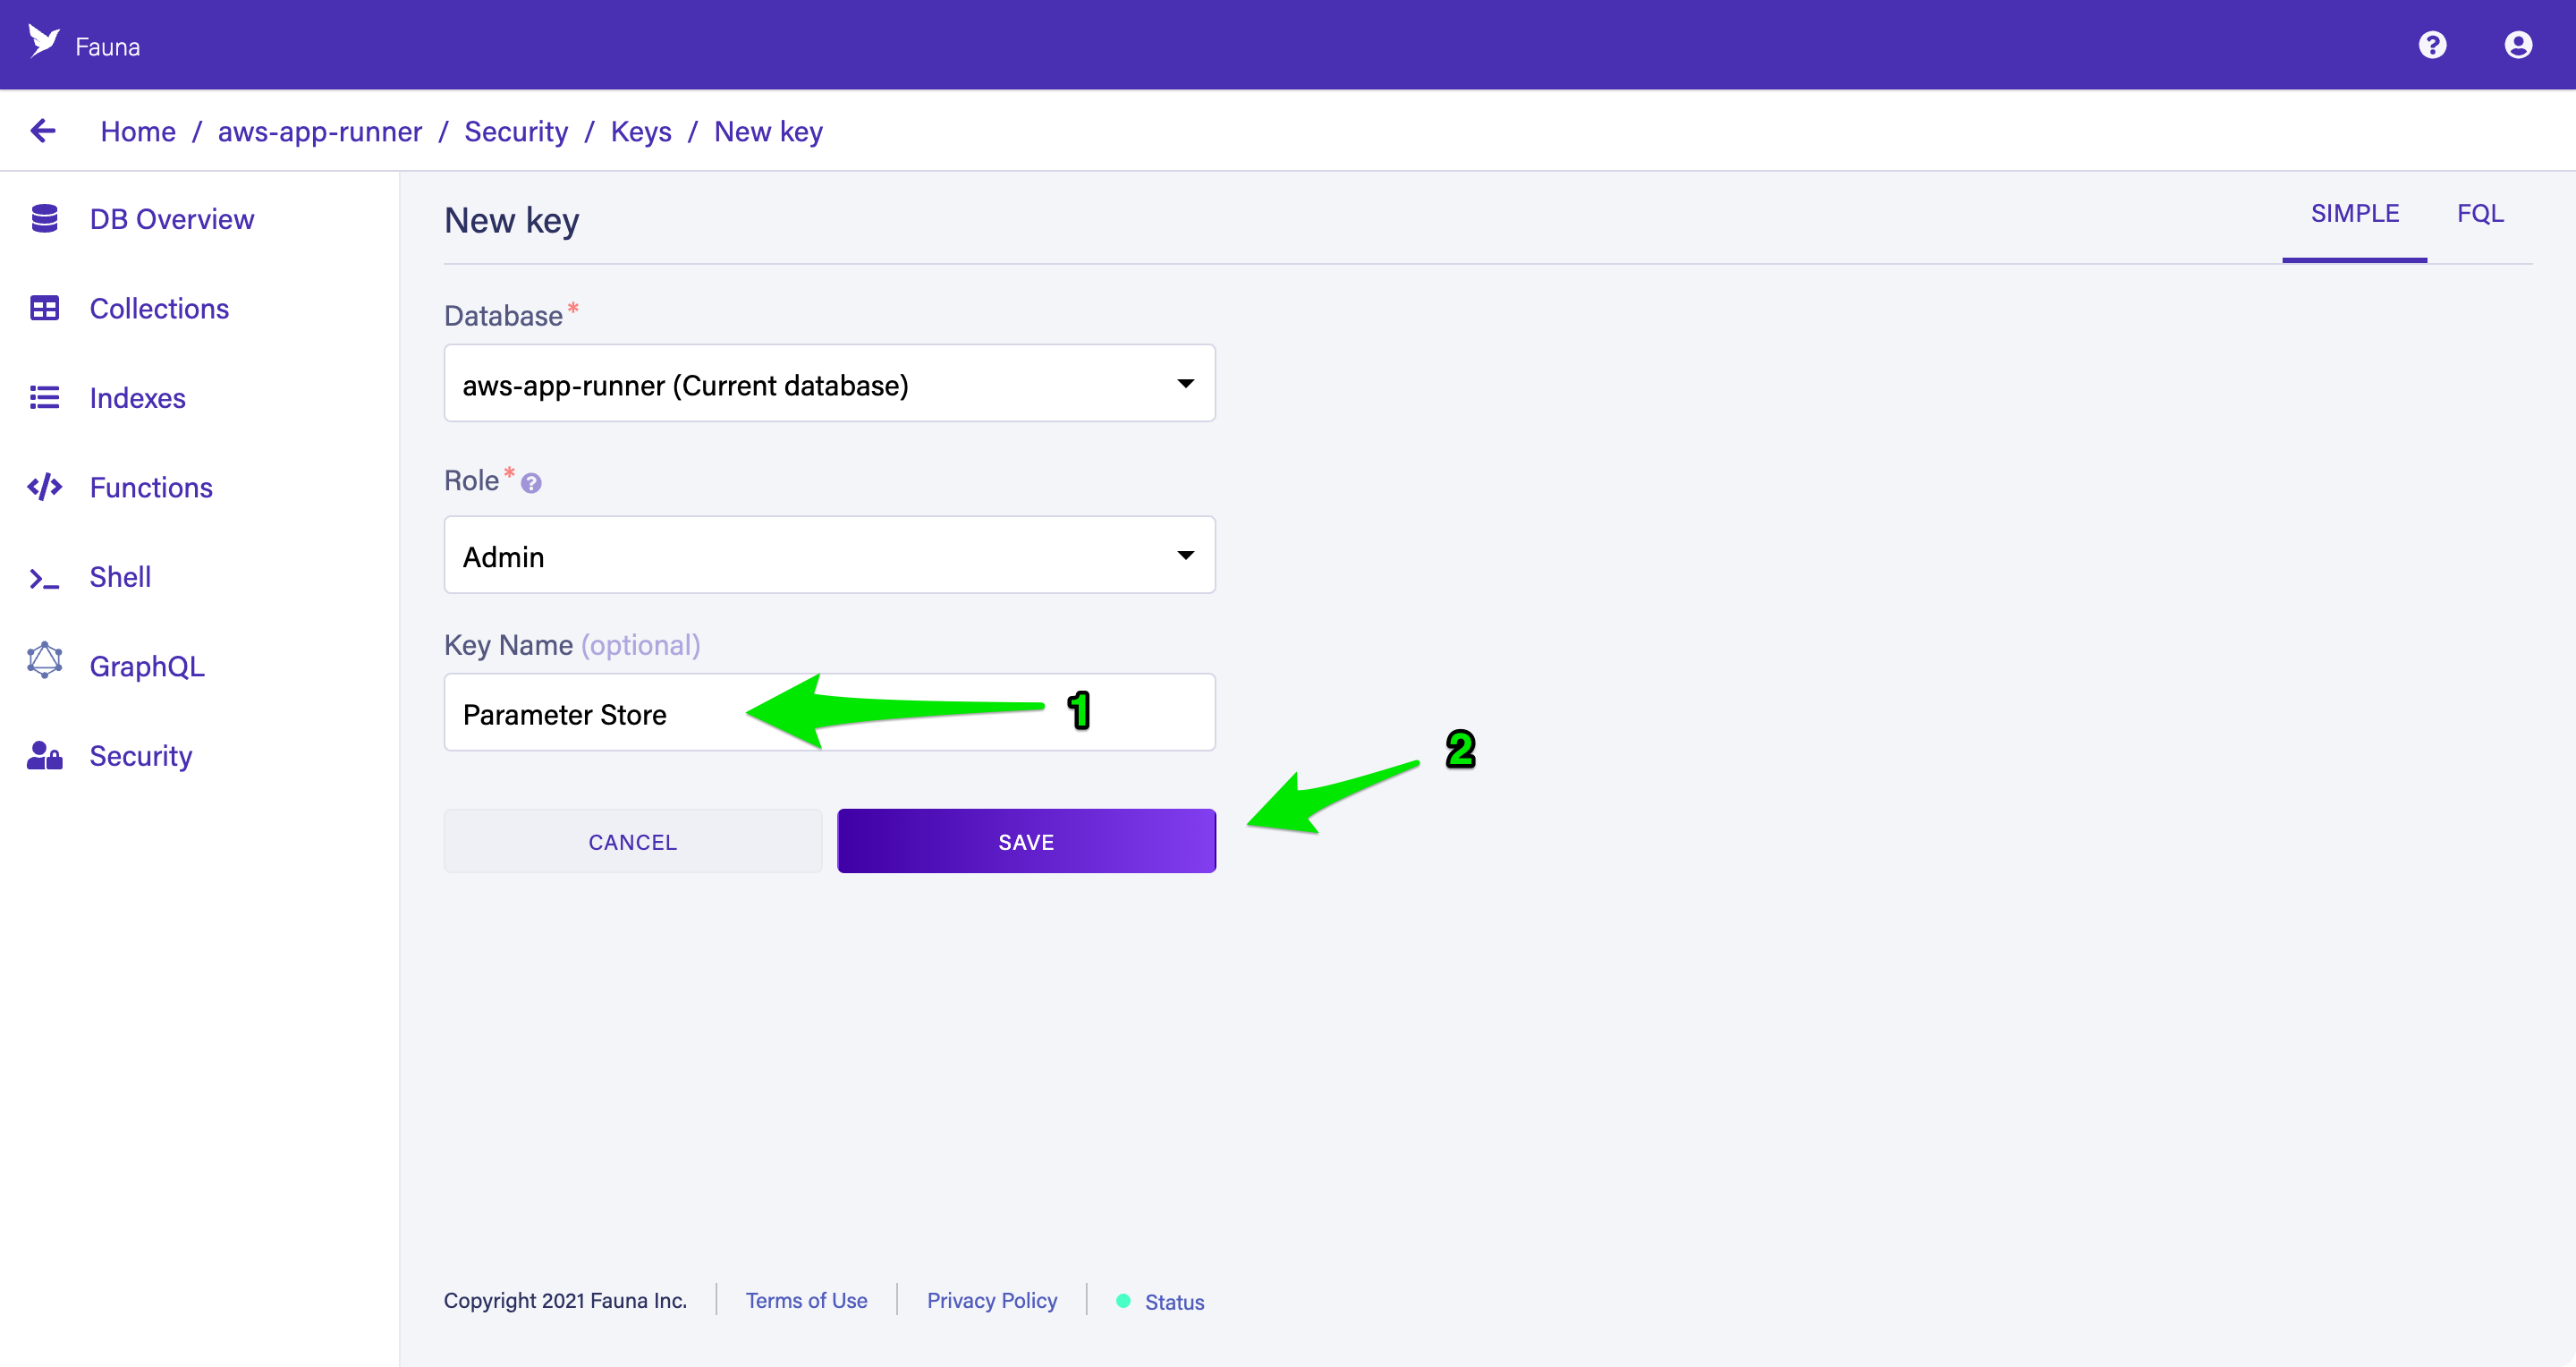
Once your database is available, select the Security tab and choose New Key to create your first key. Accept the defaults of the current database and Admin for the role, enter Parameter Store as the Key Name, and choose Save to create a new key.
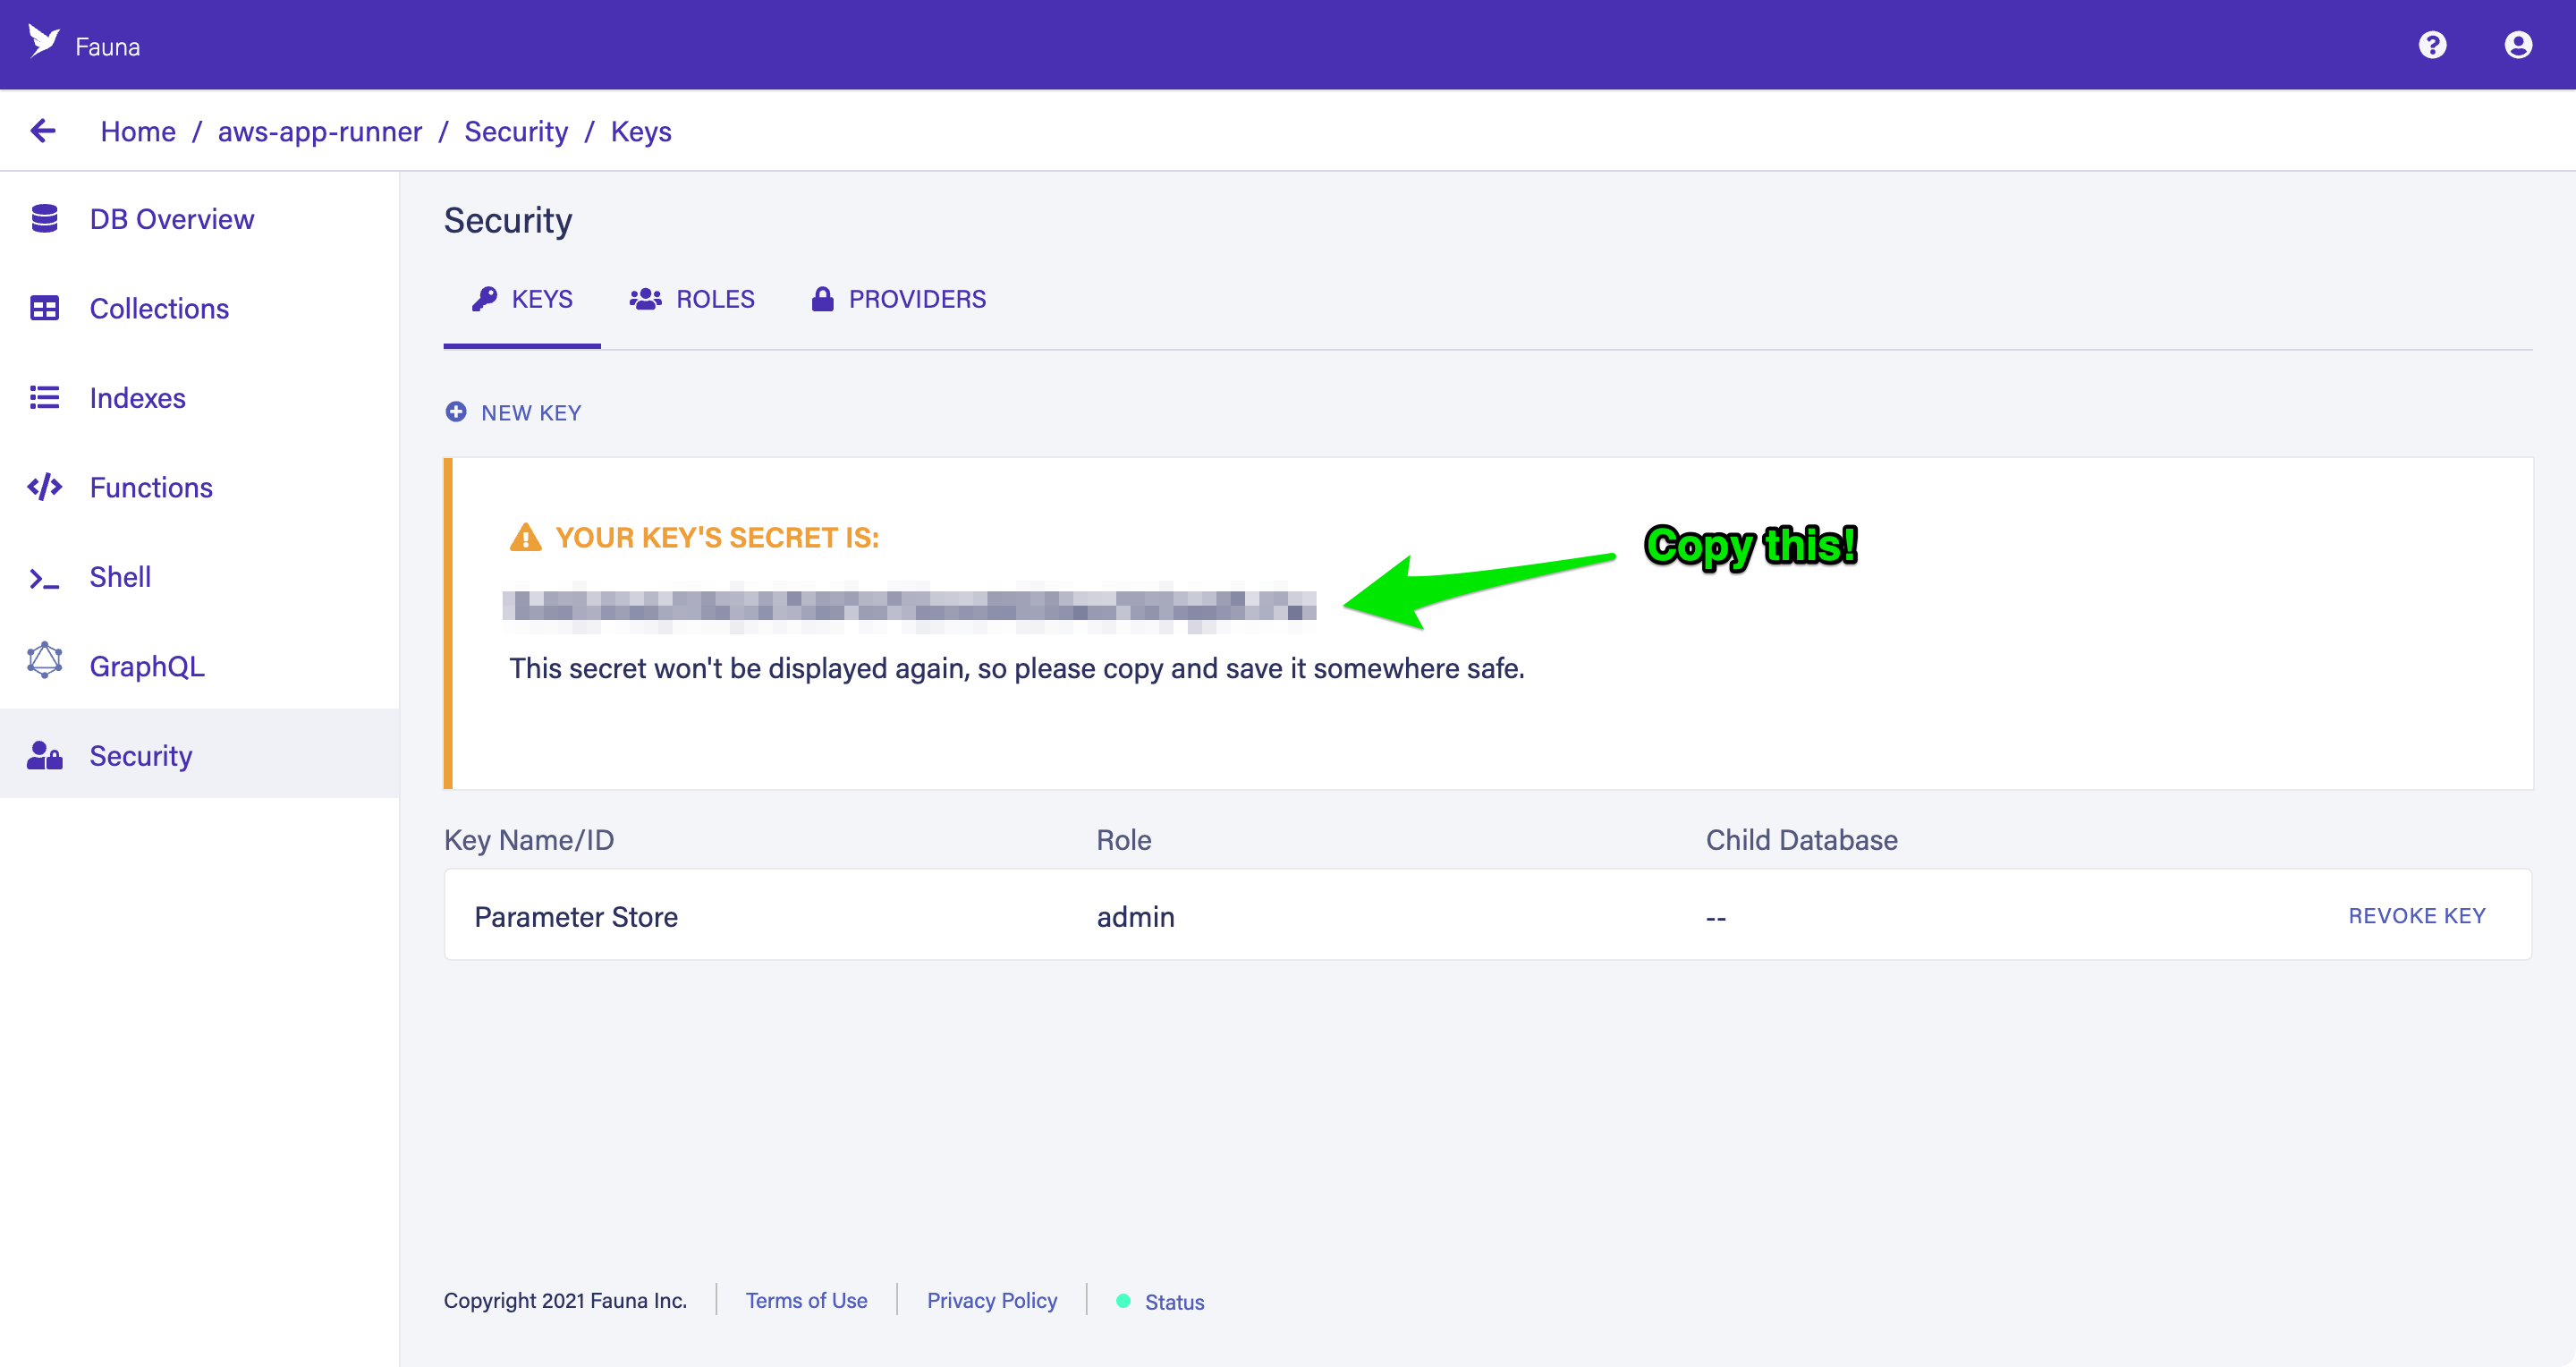
Copy the key’s secret to your clipboard to store in the next step.
Storing secrets in Parameter Store
The key you create in the previous step can perform any action on your database, so you must protect it by storing it securely. App Runner does not offer a built-in way to access secrets securely, so you will store your API key in Parameter Store.
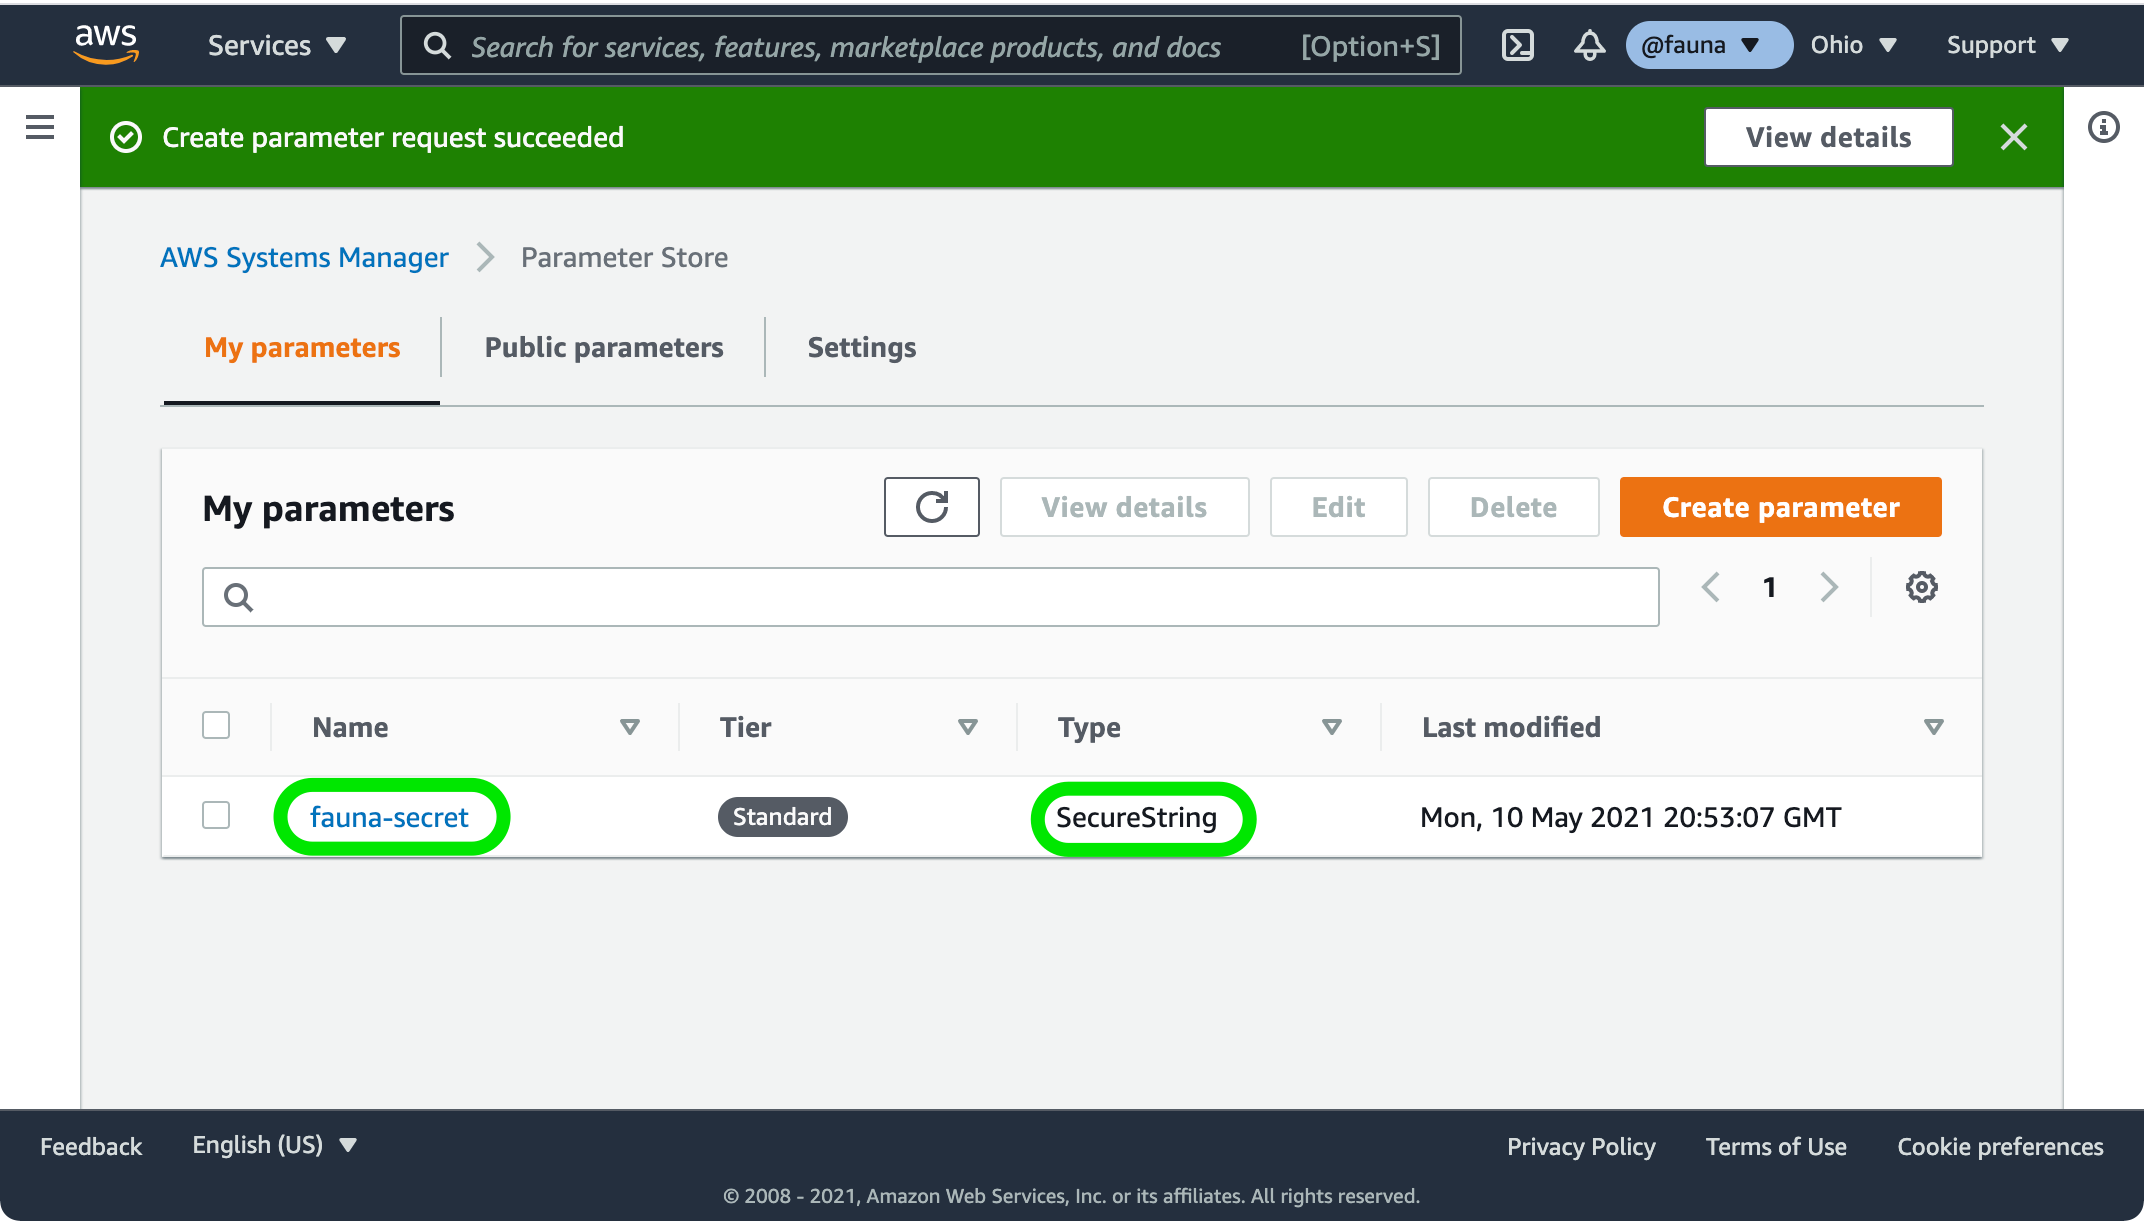
Parameter Store SecureString values allow you to encrypt and store secrets and API keys for use in your application. Open Parameter Store in the AWS Management Console and choose Create parameter. Enter fauna-secret as the name of your parameter, select SecureString as the parameter type, and paste the key you copied in the previous step into the Value text box. Choose Create parameter to store your key. Parameter Store creates the fauna-secret parameter and displays it on the My parameters tab.
Fork this repository
App Runner installs the "AWS Connector for GitHub" app in your GitHub account to provide access for deployments. To deploy the sample app, you need to fork a copy into your own GitHub account.
- Open the sample app repository.
- Choose the Fork button and select an account or organization to fork the repository into. Note: If you choose an organization as the destination, you must have permission to create repositories and install apps in that organization.
- After a few seconds, the forked repository is displayed.
Deploy with App Runner
The sample app uses the environment variable FAUNA_SECRET_PARAMETER to identify the Parameter Store key for retrieving your database secret. Note: This is not the value of the secret, only its location in Parameter Store. The value of this environment variable is set in your App Runner config file. It should match the parameter you created in the section Storing secrets in Parameter Store.
To retrieve the value of your secret, you must create an AWS IAM role with permission to read from Parameter Store. You assign this role to your App Runner service when you create it in the console.
Create an AWS IAM role
Open the Create role page in the AWS IAM console. As of the creation of this blog post (19 May 2019), App Runner is not a listed service on the AWS service tab. Choose EC2 as a placeholder, and choose Next: Permissions.
In the Attach permissions policies section, enter SSMReadOnly in the search box, select the AmazonSSMReadOnlyAccess policy, and choose Next: Tags to continue. In the Add tags (optional) section that appears, choose Next: Review.
Enter AppRunnerSSMReadOnlyAccess for the Role name, ensure the AmazonSSMReadOnlyAccess AWS managed policy is listed, and choose Create role.
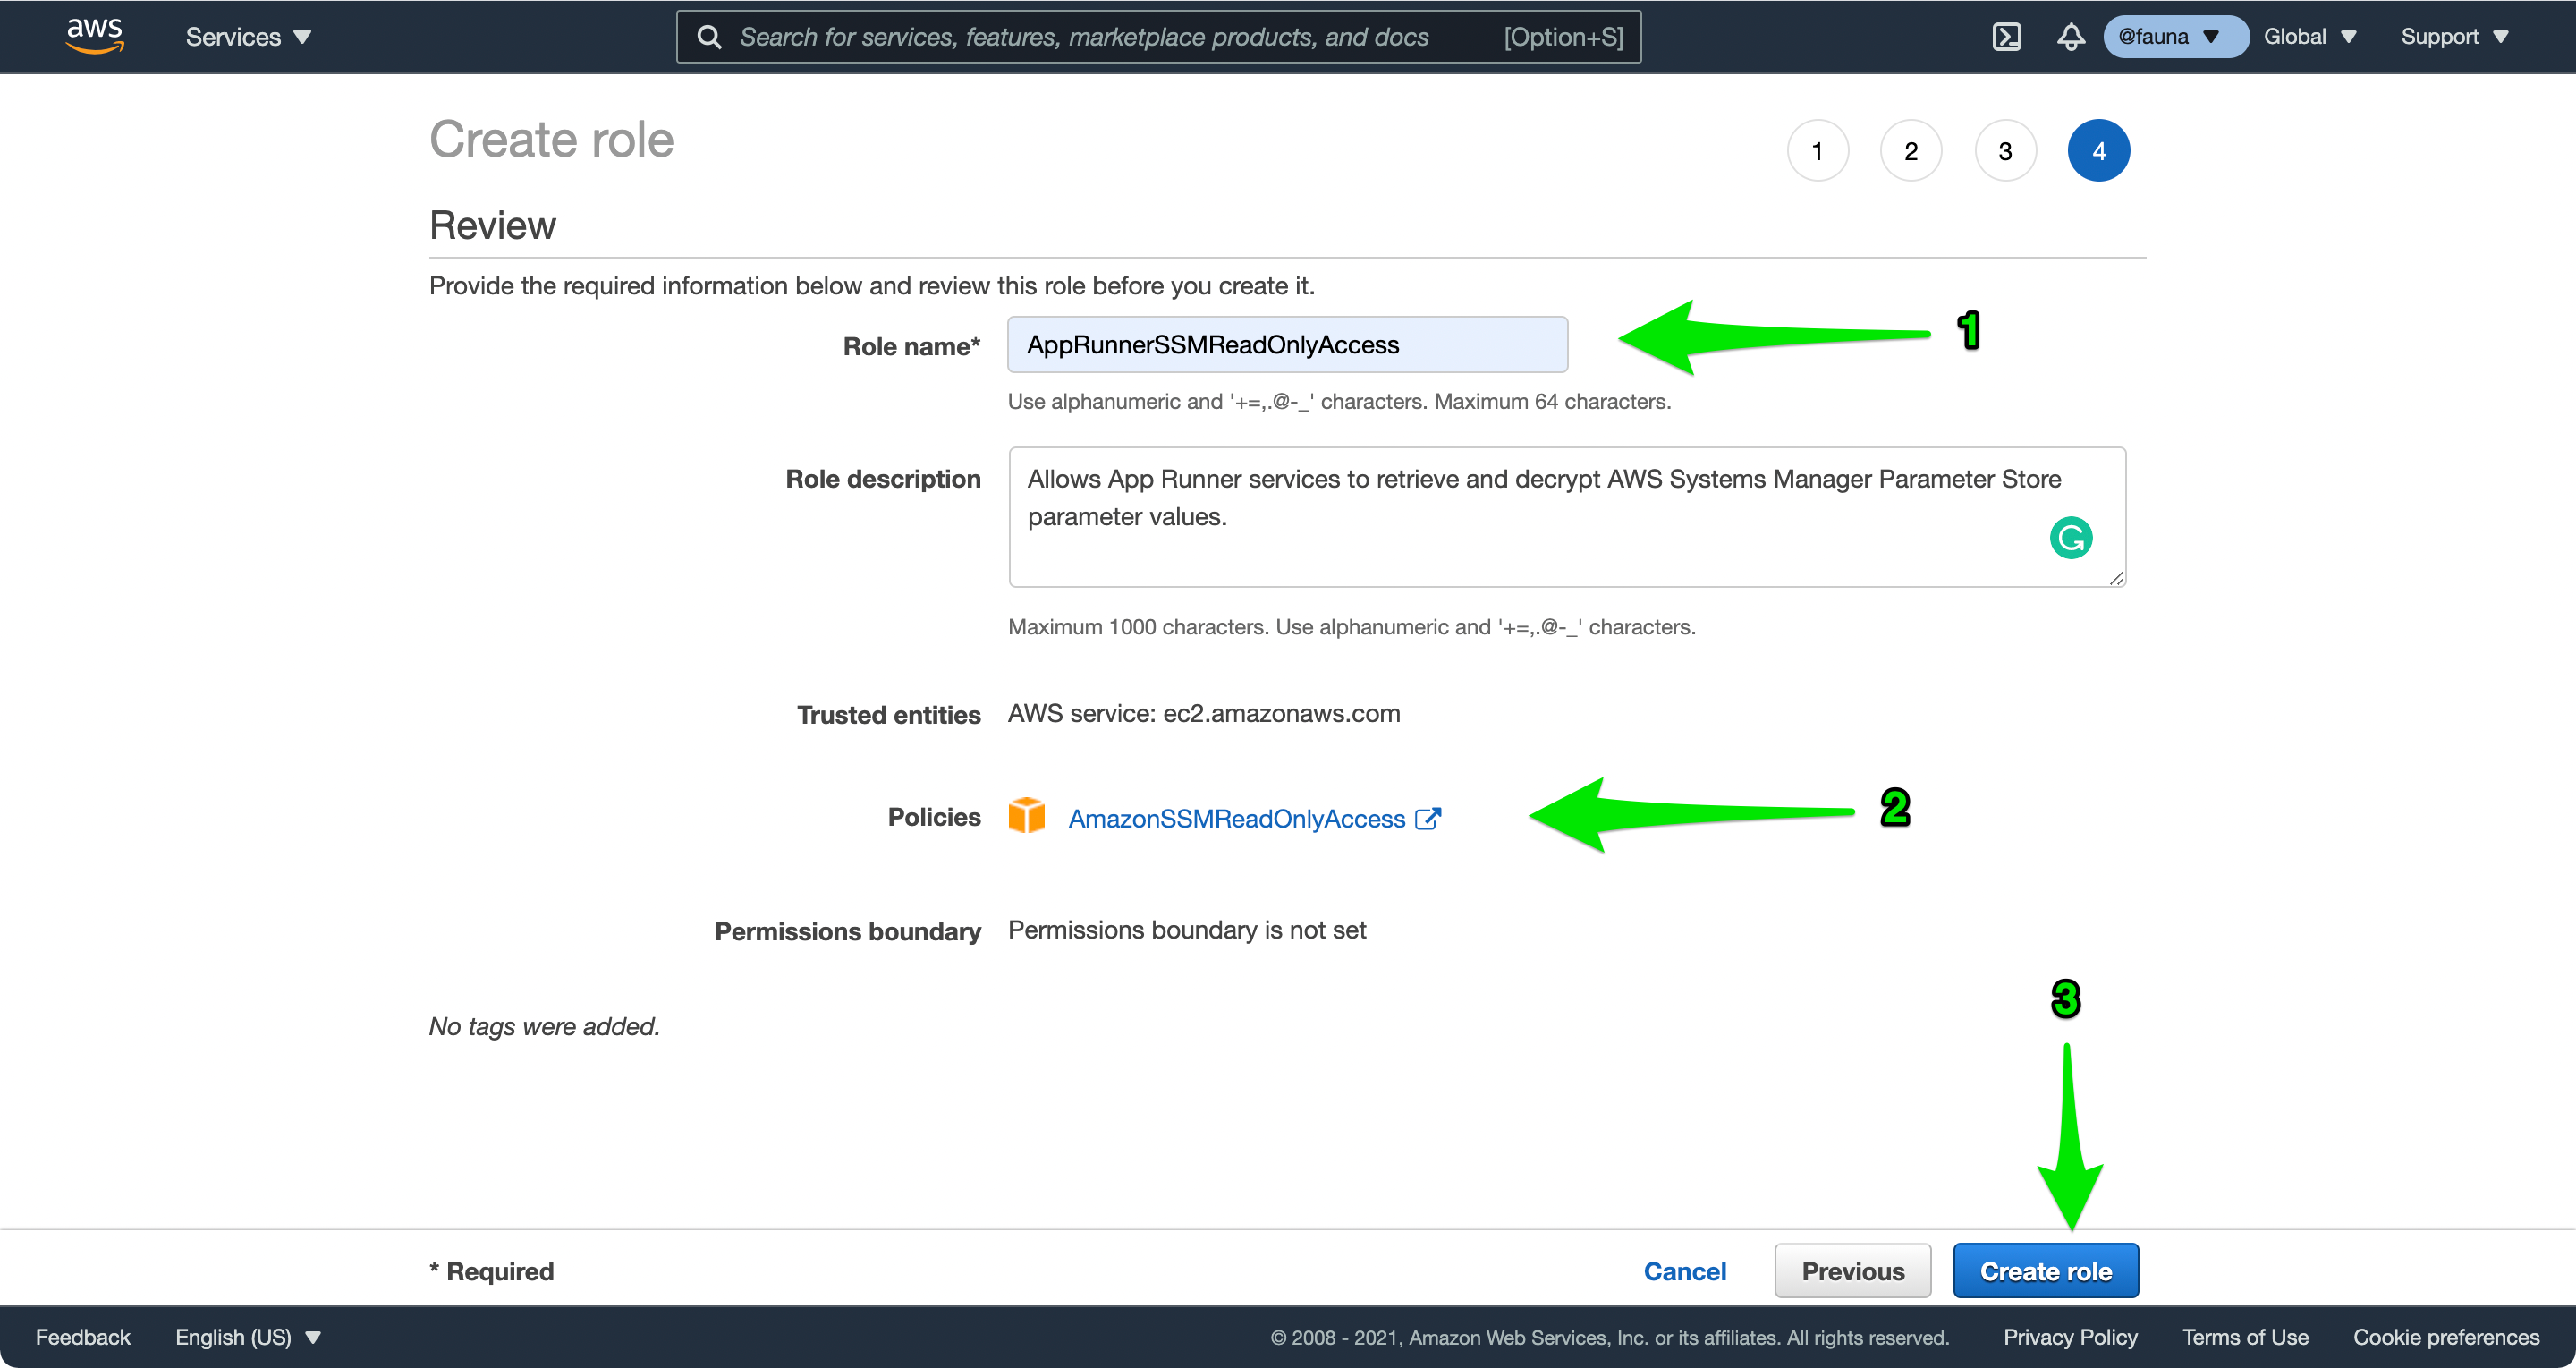
AWS IAM creates the role and displays a confirmation. Choose AppRunnerSSMReadOnlyAccess, select the Trust relationships tab, and choose Edit trust relationship.
In the Policy Document that appears, change ec2.amazonaws.com to tasks.apprunner.amazonaws.com and choose Update Trust Policy.
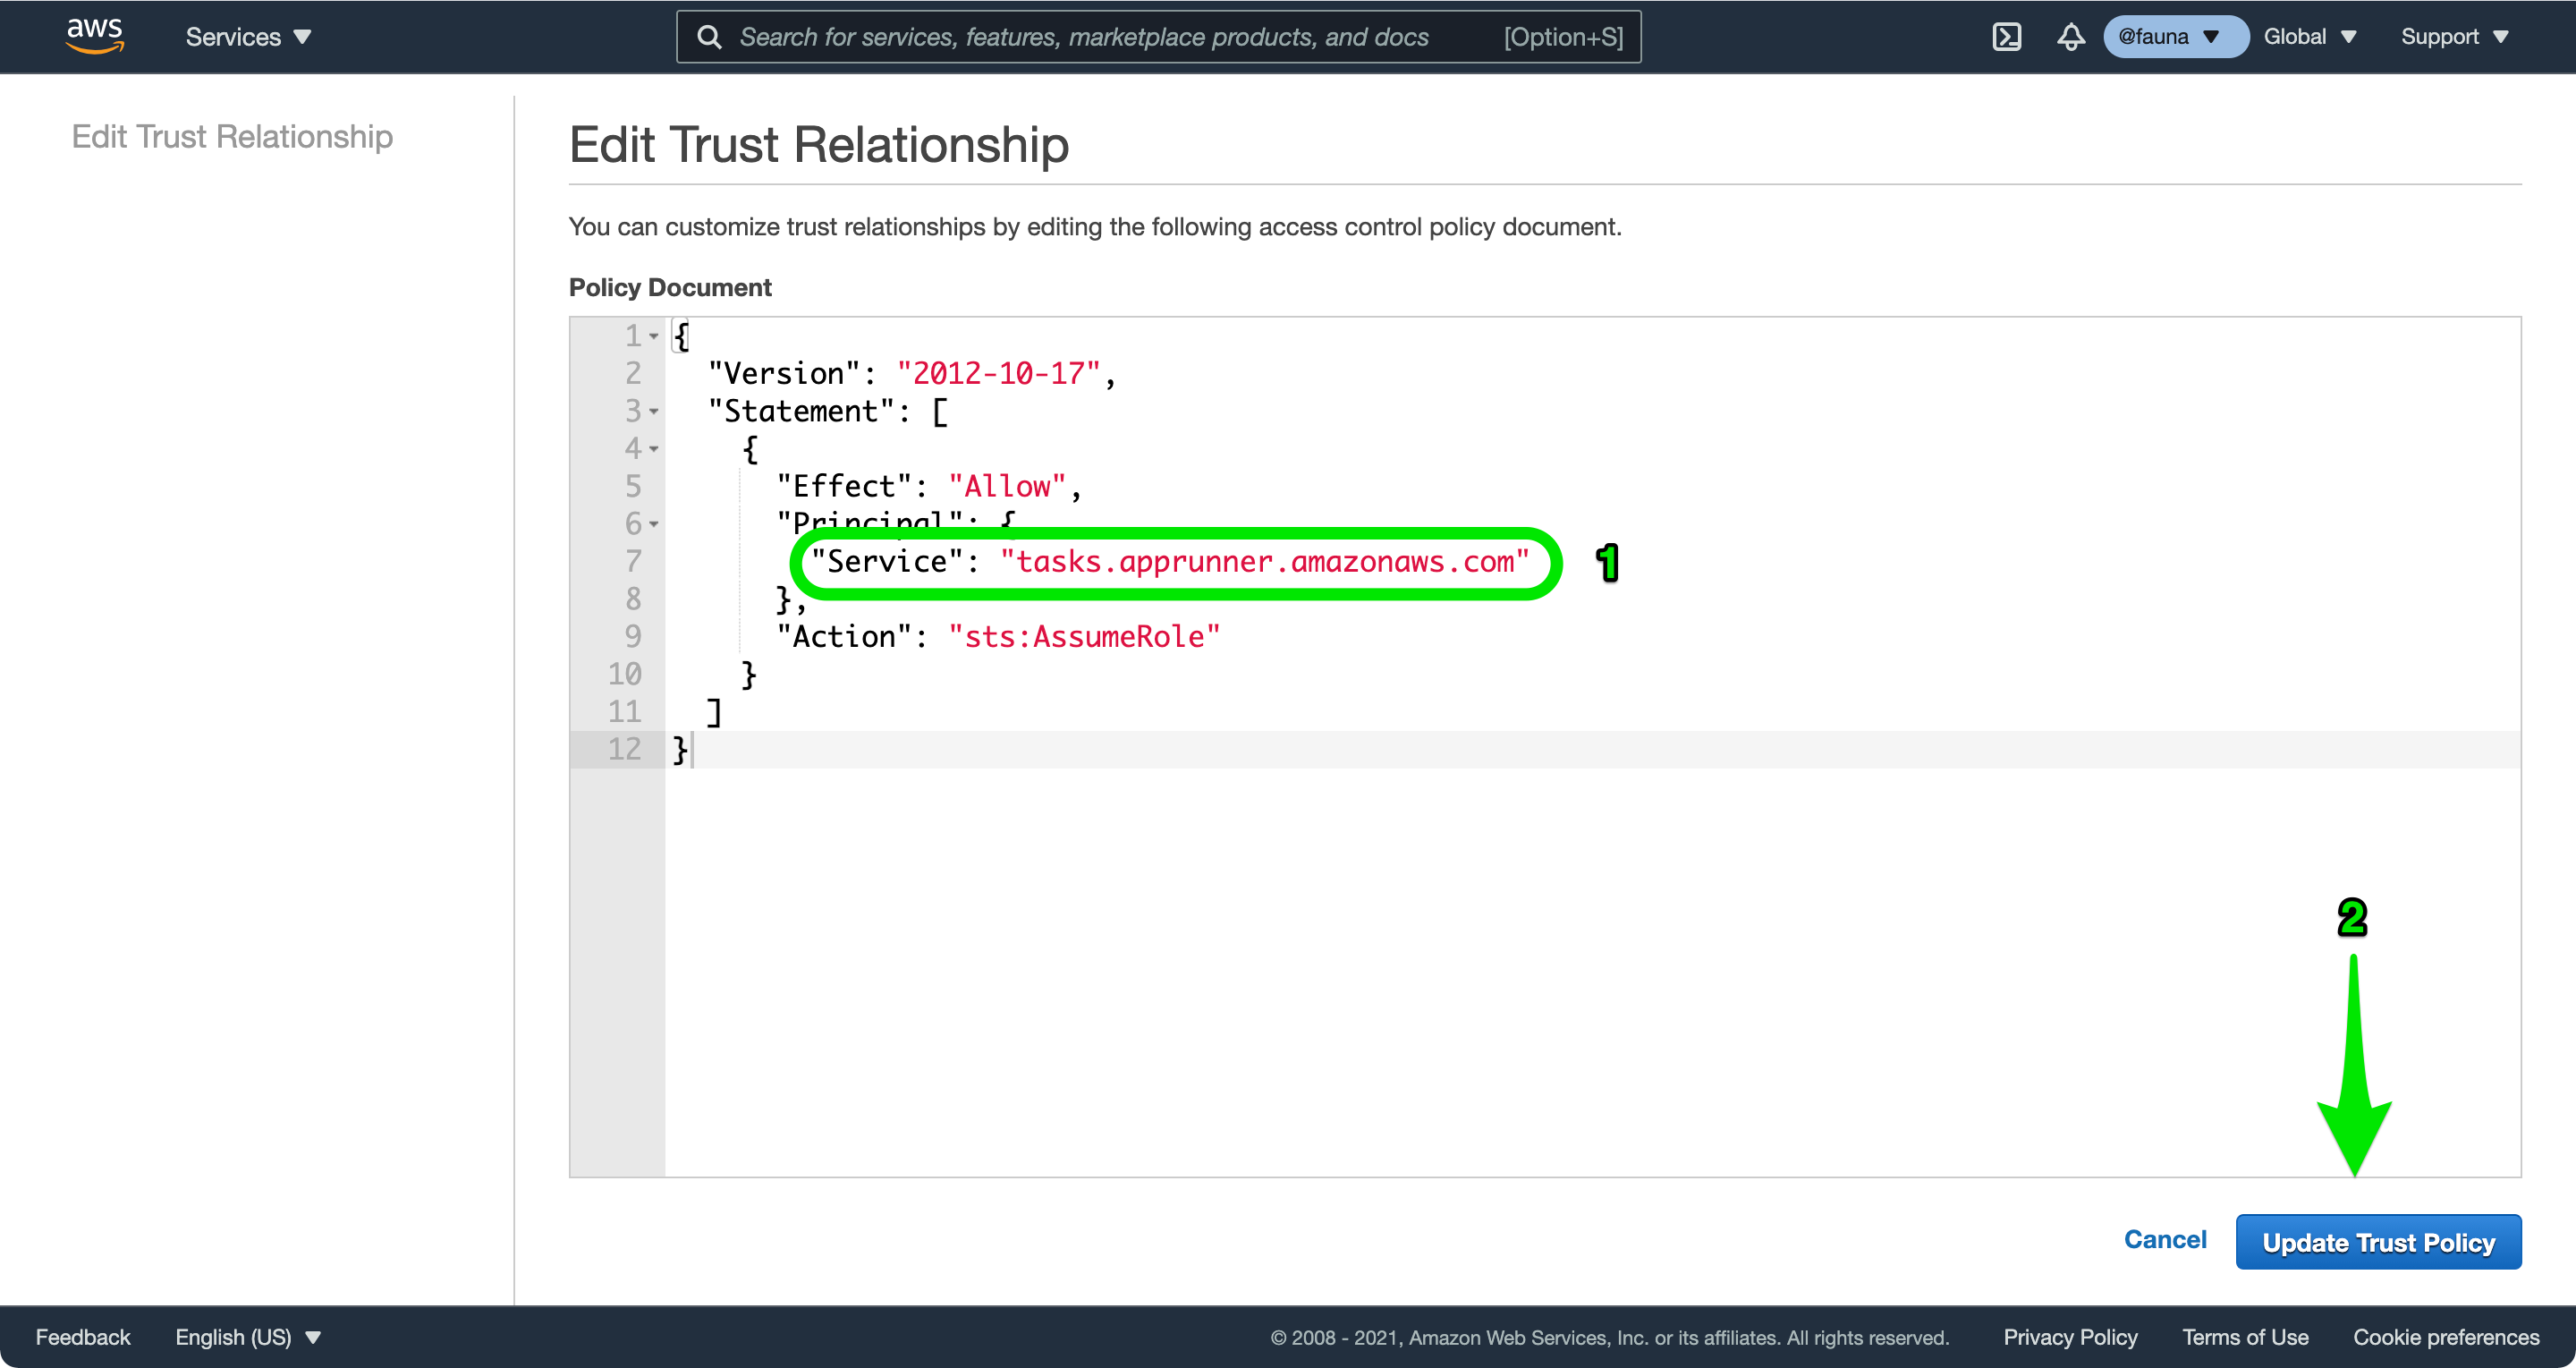
IAM updates the trust policy, allowing the App Runner service to assume the role you create and retrieve parameters from Parameter Store.
Create an App Runner service
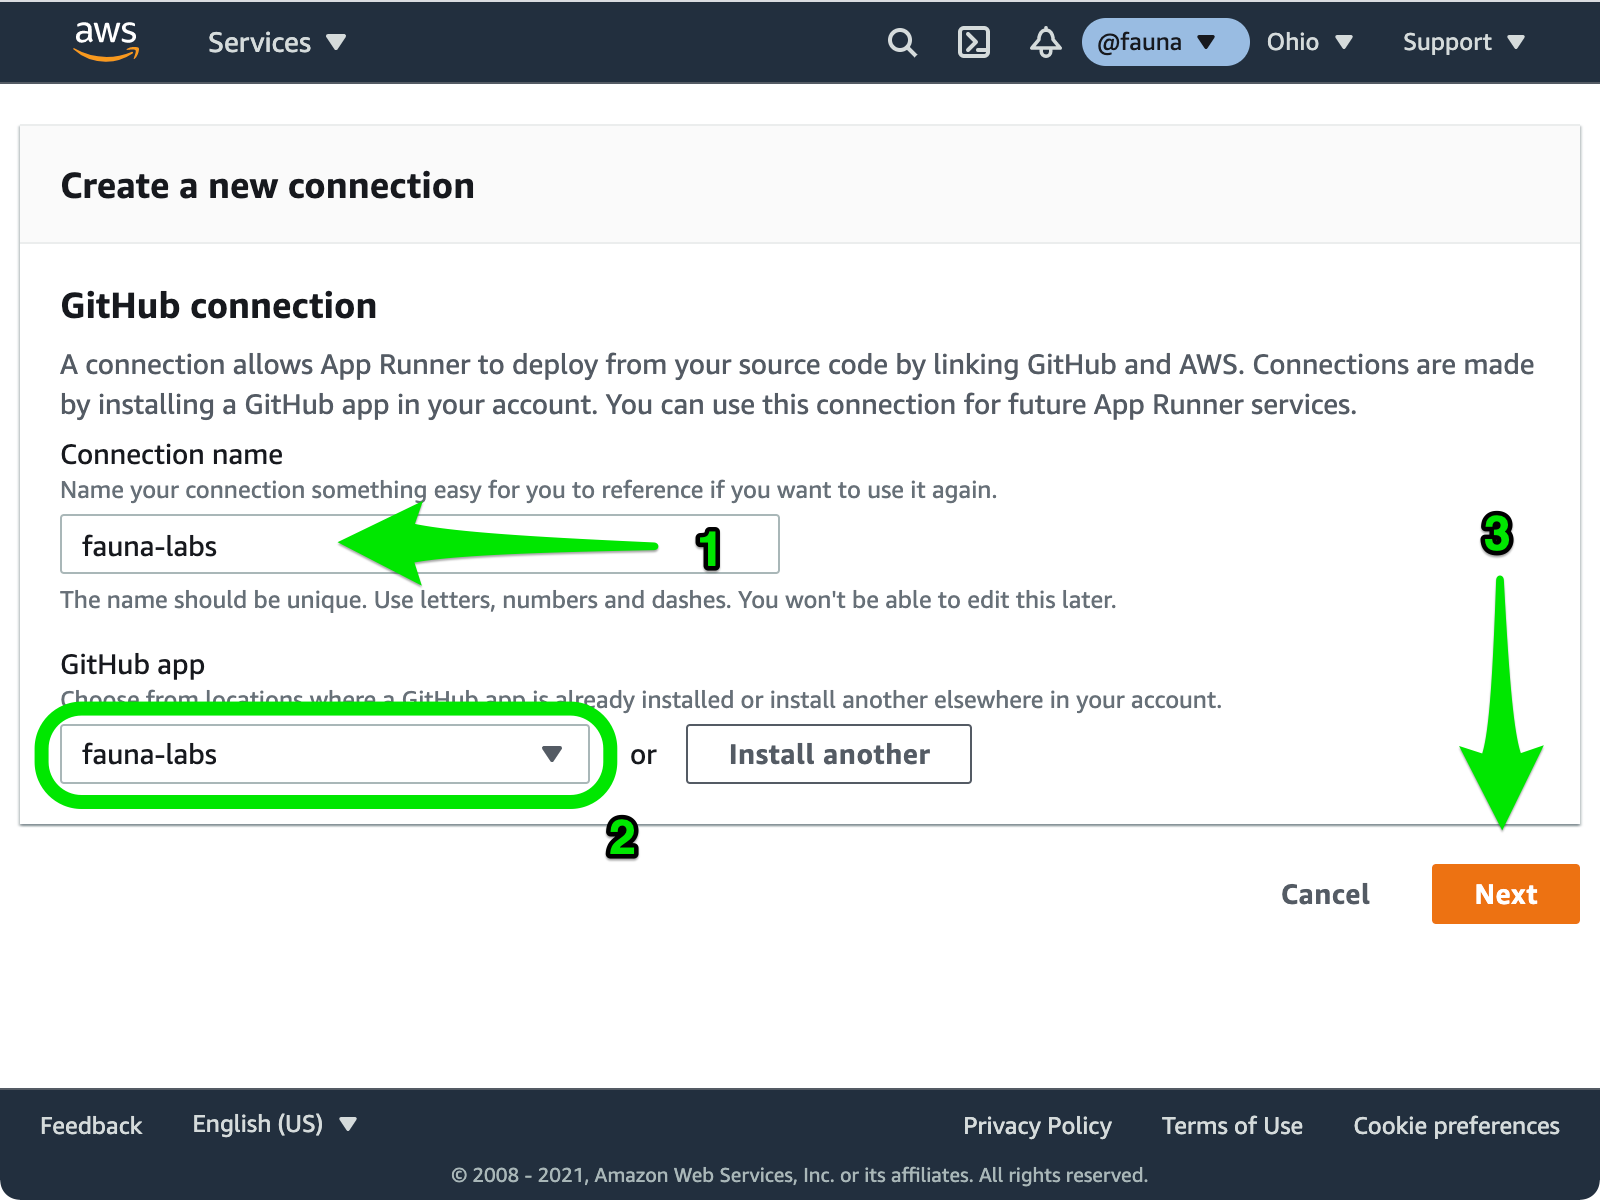
From the App Runner console, choose Create an App Runner service. On the Source and deployment screen, select Source code repository and choose Add new to install the AWS Connector for GitHub in the account or organization where you forked the sample repository. The Create a new connection wizard walks you through installing the app. Give your connection a name, e.g. fauna-labs, install the app if required, make sure the correct account or organization is selected, and choose Next.
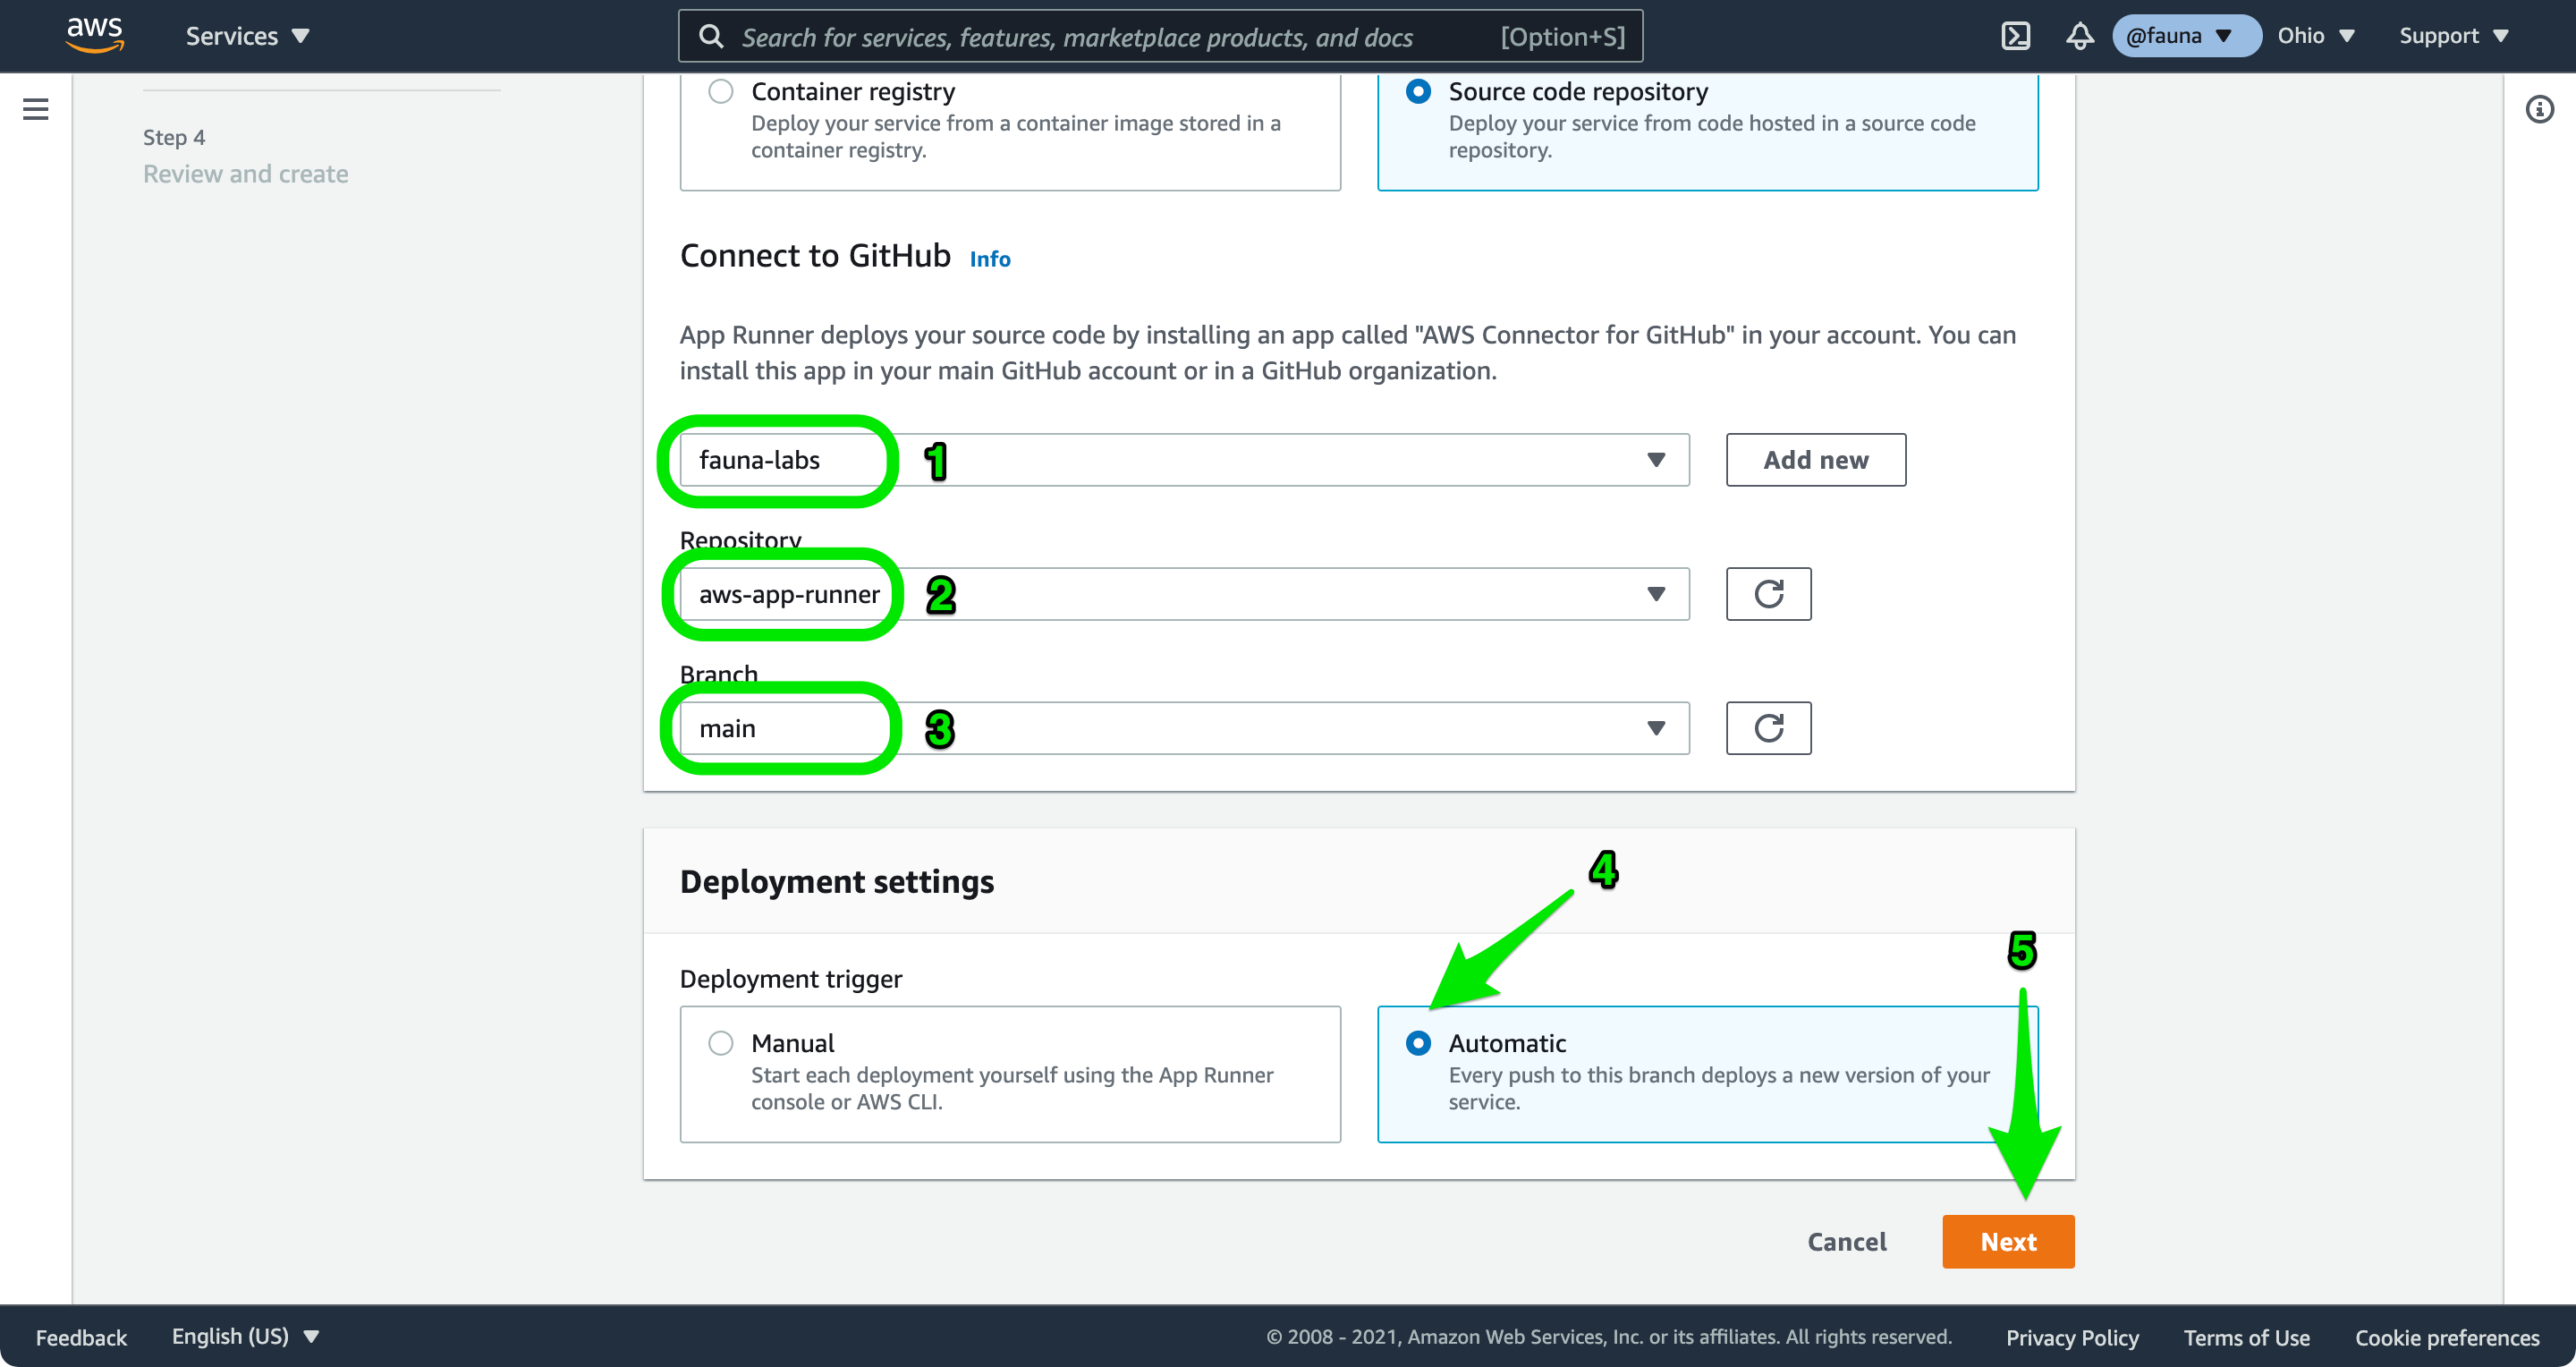
Select the connection you create, select the forked repository aws-app-runner, and choose to build from the main branch. Select Automatic to deploy the service every time you push changes to your main branch, and choose Next.
On the Configure build screen select Use a configuration file and choose Next. This tells App Runner to pull build and run settings from the appconfig.yaml file in your repository.
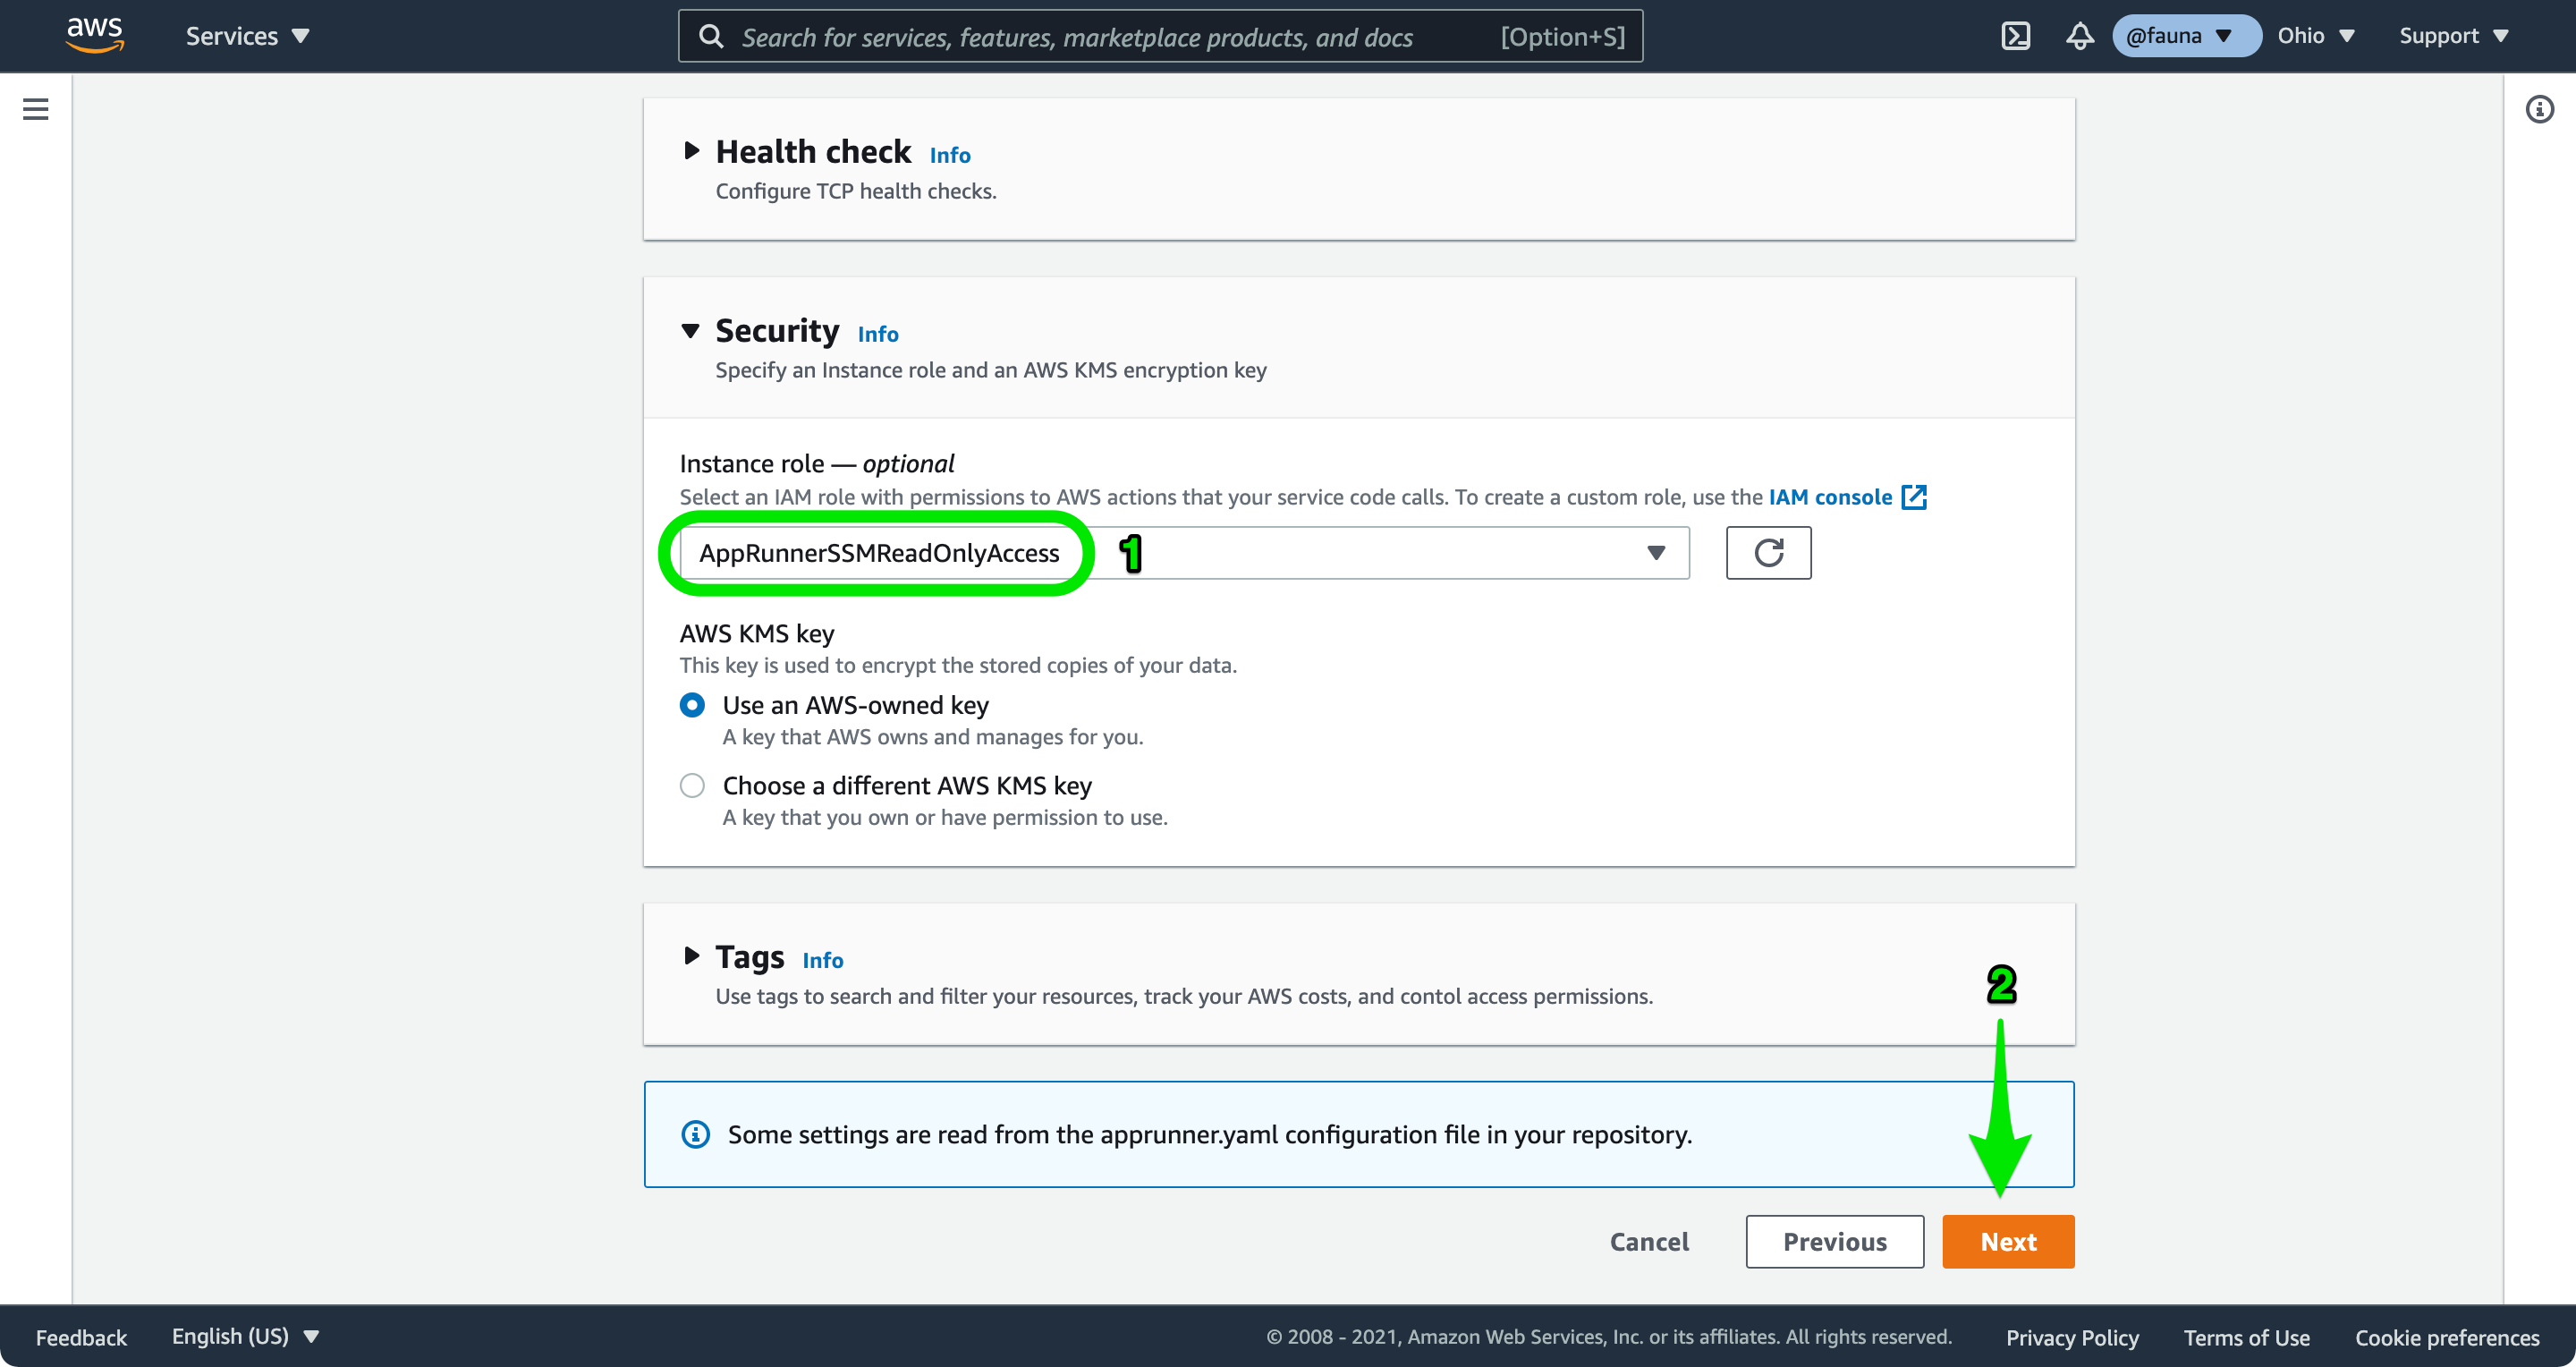
On the Configure service screen, enter fauna-rest-api as the Service name and leave the Virtual CPU & memory defaults. Open the Security section and choose the AppRunnerSSMReadOnlyAccess IAM role you created previously from the Instance role dropdown. Choose Next to review your App Runner service.
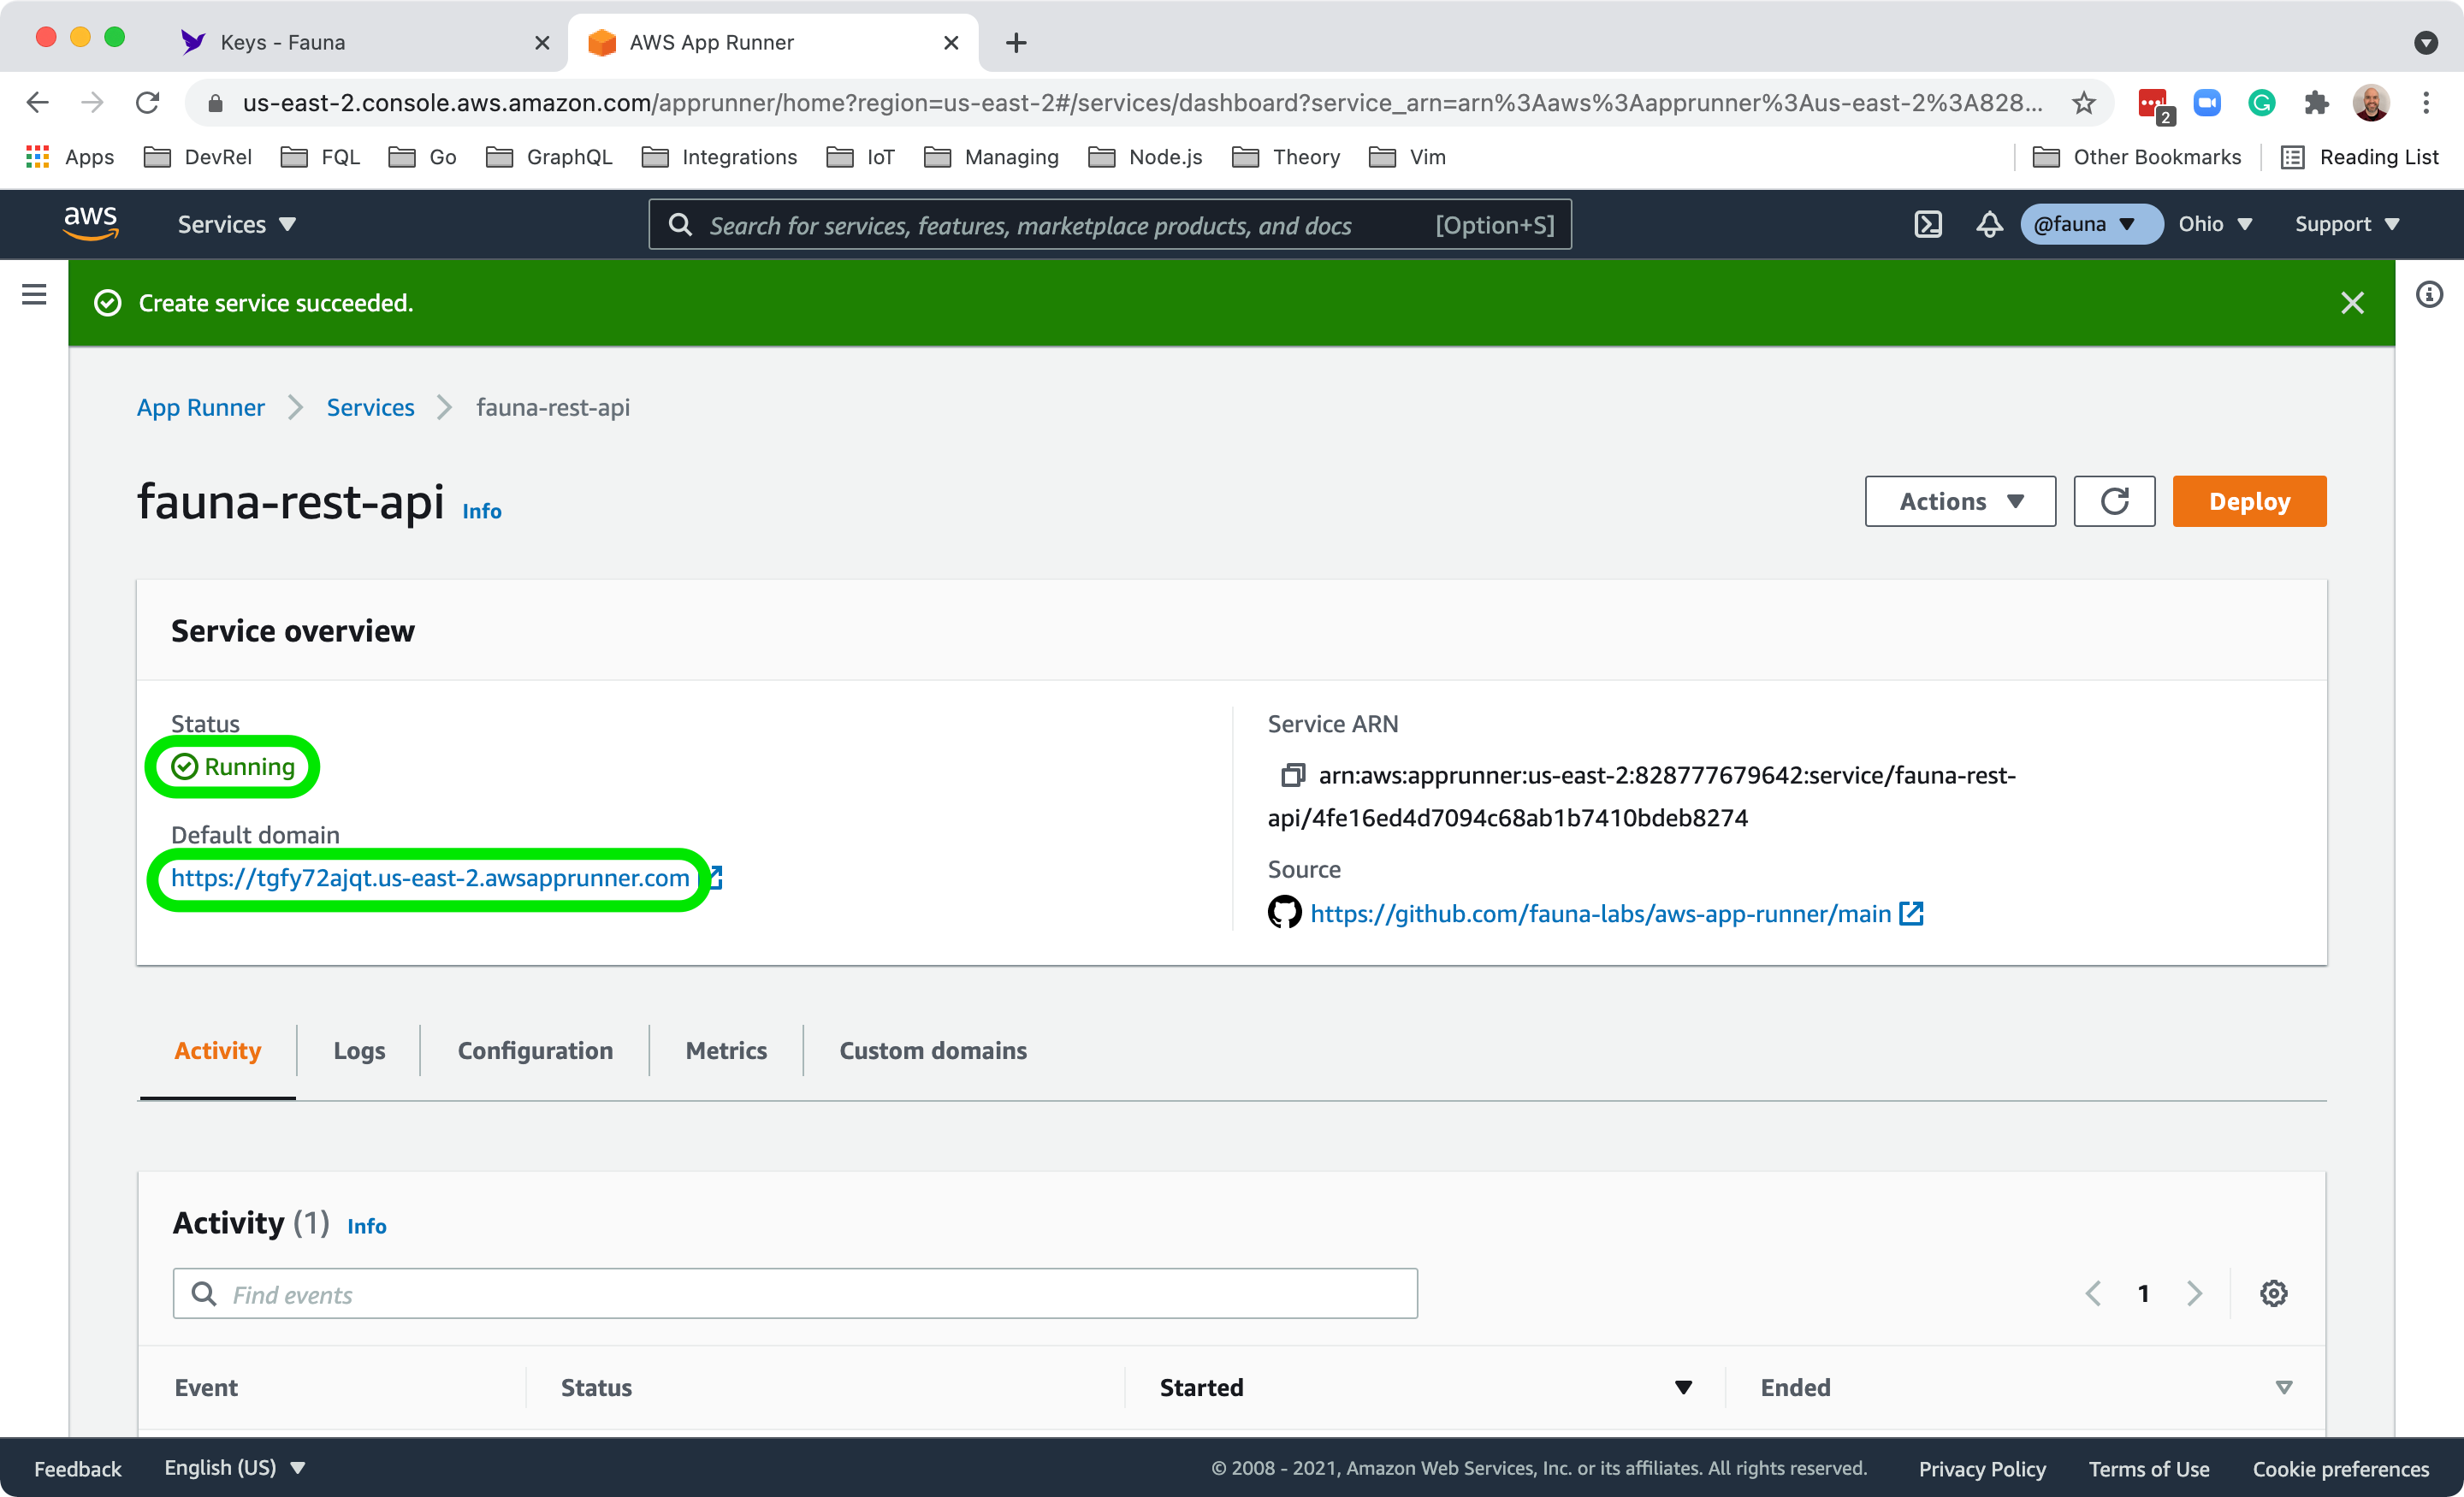
Review the settings for your service and choose Create & deploy. App Runner clones your repository, installs dependencies, and deploys your application to the Default domain shown on the Service overview card. Copy this value, as you will use it to test your service in the next step.
Test your service
Once the App Runner console displays Create service succeeded and the Status in the Service overview is Running, you are ready to test your API.
Test your service by sending HTTP requests to the App Runner URL using curl, httpie, or an API client like Postman. Replace ${App Runner URL} in the commands below with the value of Default domain from your App Runner dashboard. This will look something like https://<unique-identifier>.<region>.awsapprunner.com.
-
List all stores (HTTP GET)
curl ${App Runner URL}/stores -
Create a store (HTTP POST). The file @events/create-store.json can be retrieved from the accompanying repository.
curl --request POST \ --header "Content-Type: application/json" \ --data @events/create-store.json \ ${App Runner URL}/stores -
Update a store (HTTP PUT). Note that you must replace
{id}in the URL with the value ofidof an existing store. As before, the file @events/update-store.json can be retrieved from the accompanying repository.
curl --request PUT \ --header "Content-Type: application/json" \ --data @events/update-store.json \ ${App Runner URL}/stores/{id} -
Delete a store (HTTP DELETE). Note that you must replace
{id}in the URL with the value ofidof an existing store.
curl --request DELETE ${App Runner URL}/stores/{id}
Next steps
This application demonstrates how to quickly deploy an API with Fauna, GitHub, and AWS App Runner. Before running an API in production you should add authentication, monitoring, input validation, and more. This blog post helps you choose an authentication strategy with Fauna and provides links to example code for first and third-party authentication strategies. For a deeper understanding of FQL, see this blog series and the FQL API documentation.
Cleaning up resources
Once you complete this tutorial, you may wish to remove all the resources you create to avoid unexpected charges. You will need to remove your App Runner service, Parameter Store parameter, CloudWatch logs, and Fauna database.
Open the App Runner console, select the fauna-rest-api stack, and choose Delete from the Actions dropdown menu. Confirm that you want to delete the stack and all resources by typing delete and choosing Delete. App Runner initiates the delete process, which should take less than one minute to complete.
Open the Parameter Store console, select the fauna-secret parameter, and choose Delete. Confirm that you want to delete the parameter by choosing Delete parameters.
Open the CloudWatch console, select Log groups in the Logs section, and select any log groups created by your application that you wish to remove. App Runner log groups begin with /aws/apprunner. Open the Actions dropdown menu and choose Delete log group(s). Confirm that you want to delete the selected log groups by choosing Delete.
Open the Fauna dashboard and choose the aws-app-runner database from the list of databases. Choose Settings to open the Database Settings screen, then choose Delete. Confirm that you want to delete the database by choosing Delete.
Conclusion
In this post, you learned how to build a simple REST API using AWS App Runner and Fauna. You created a database and access key in Fauna and stored that key securely using Parameter Store. You learned how to launch your service using an AWS IAM role that provides read access to an API key stored in Parameter Store. Finally, you built and deployed your application from a GitHub repository using App Runner.
Fork this GitHub repository, add your routes and business logic, and start building with Fauna today!

Top comments (0)