
Introduction
I once thought about how hard and costly would it be to create a functional voice assistant that could accurately answer most questions.
To elaborate, I wanted to create a web-application that records an audio of a question, converts audio to text, finds an answer, and gives it in the audio version. These were the functional requirements which I stated for the project.
Client side
I created a simple React project with create-react-app and added a component “RecorderAndTranscriber” that contains all the client side functionality. It is worth noting that I used the getUserMedia method from MediaDevices API to get access to the microphone. This access is used by MediaRecorder, which is what we use to record the actual audio. I use setInterval for the timer.

Then we create an empty array as an optional parameter in React hook - useEffect. This array is called only once, when the component is created.
useEffect(() => {
    const fetchStream = async function() {
        const stream = await navigator
            .mediaDevices
            .getUserMedia({ audio: true });

        setRecorderState((prevState) => {
            return {
                ...prevState,
                stream,
            };
        });
    }

    fetchStream();
}, []);
We then use the saved stream to create a MediaRecorder instance, which I also save.
useEffect(() => {
   if (recorderState.stream) {
       setRecorderState((prevState) => {
           return {
               ...prevState,
               recorder: new MediaRecorder(recorderState.stream),
           };
       });
   }
}, [recorderState.stream]);
Then, I added a block to start the counter for seconds elapsed since the start of the recording.
useEffect(() => {
    const tick = function() {
        setRecorderState((prevState) => {
            if (0 <= prevState.seconds
                && 59 > prevState.seconds) {
                return {
                    ...prevState,
                    seconds: 1 + prevState.seconds,
                };
            } else {
                handleStop();

                return prevState;
            }
        });
    }

    if (recorderState.initTimer) {
        let intervalId =
            setInterval(tick, 1000);
        return () => clearInterval(intervalId);
    }
}, [recorderState.initTimer]);
Hook only fires when the initTimer value changes, and callback for setInterval updates the counter value and stops the recording if it lasts more than 60 seconds. This is done since 60 seconds and/or 10Mb are the Speech-to-Text API limits for audio files which can be decrypted when sent directly. Larger files need to be first uploaded into the Google Cloud Storage and processed from there. You can read more about this restriction here.
One more thing that has to be mentioned is how the recording is being done.
const handleStart = function() {
    if (recorderState.recorder
        && 'inactive' === recorderState.recorder.state) {
        const chunks = [];

        setRecorderState((prevState) => {
            return {
                ...prevState,
                initTimer: true,
            };
        });

        recorderState.recorder.ondataavailable = (e) => {
            chunks.push(e.data);
        };

        recorderState.recorder.onstop = () => {
            const blob = new Blob(chunks,
                { type: audioType });

            setRecords((prevState) => {
                return [...prevState,
                    {
                        key: uuid(),
                        audio: window
                                .URL
                                .createObjectURL(blob),
                        blob: blob
                    }];
            });
            setRecorderState((prevState) => {
                return {
                    ...prevState,
                    initTimer: false,
                    seconds: 0,
                };
            });
        };

        recorderState.recorder.start();
    }
}
To begin with, I check that an instance of the MediaRecorder class exists and its status is inactive, one of the three possible statuses. Next, the initTimer variable is updated to create and run interval. To control the recording I subscribed to process two events: ondataavailable and onstop. The handler for ondataavailable saves a new piece of audio into a pre-created array. And when onstop fires, a blod file is created from these pieces and is added to the list of ready-to-process recordings. In the recording object, I save the url to the audio file to use audio in the DOM element as a value for src. Blob is used to send the file to the server part of the app. Speaking of which…
Server part
To support the client side, I chose to use Node.js and Express. I made an index.js file, in which collected th the needed APIs and methods:
- getTranscription(audio_blob_file)
- getWordErrorRate(text_from_google, text_from_human)
- getAnswer(text_from_google)
To calculate the Word Error Rate I took a python script from the tensorflow/lingvo project and rewrote it in js. In essence, it is just a simple solution of the Edit Distance task, in addition to error calculation for each of the three types: deletion, insertion, and replacement. In the end, I did not the most intelligent method of comparing texts, and yet it was sufficient enough to later on add parameters to queries to Speech-to-Tex.
For getTranscription I used ready-made code from the documentation for Speech-to-Text, and for the translation of the text answer into the audio file I similarly used code from documentation for Text-to-Speech. The tricky part was to create an access key for Google Cloud from the server part. To start, I had to create a project, then turn on Speech-to-Text API and Text-to-Speech API, create an access key, and finally write the path to the key into the GOOGLE_APPLICATION_CREDENTIALS variable.
To get a json file with a key, we need to create a Service account for a project.

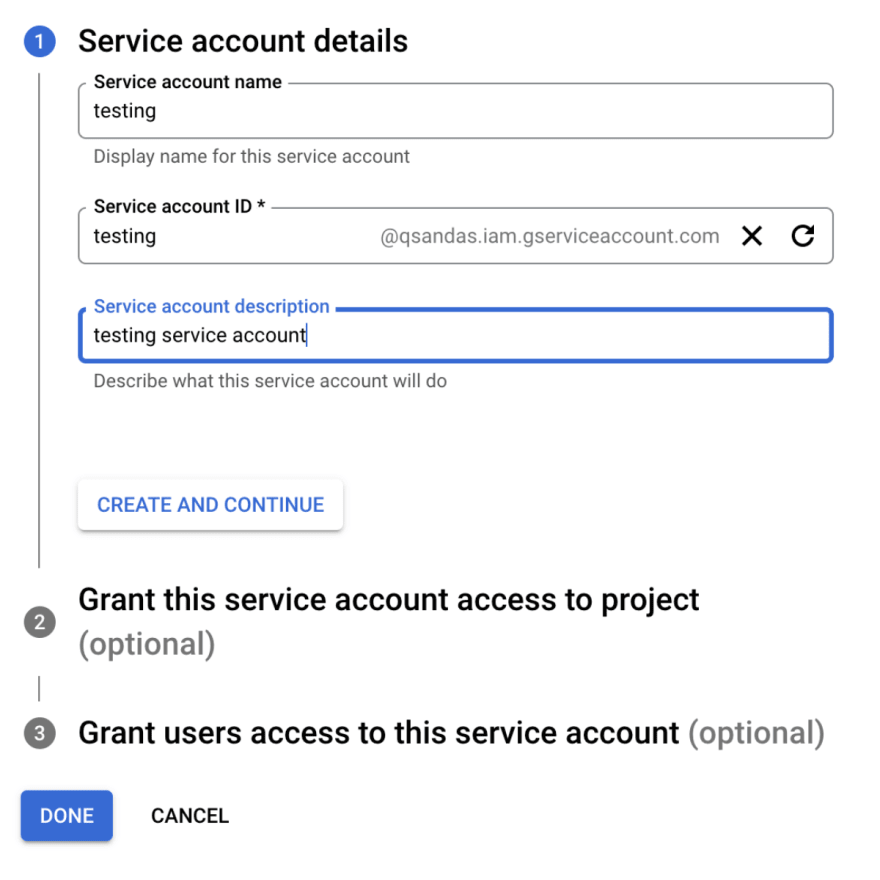
After clicking the Create and Continue and Done buttons in the Credentials tab, a new account appears in the Service Accounts table. If we go to this account, we can click on the Add Key button in the Keys tab and get the json-file with a key. This key is needed to grant the server part of the app access to the Google Cloud services activated in the project.
I think I will cut the first part of the article here. The next part revolves around the database and experiments with profanity.

Oldest comments (0)