
This article was originally posted as a Flotiq Deep Dive.
Overview
In this article, we'll setup an extremely powerful, yet totally effortless (and free!) deployment pipeline for your Gatsby websites. We'll use Netlify as a deployment target, so no servers required.
Why?
Gatsby is a static website generator. What that means is - your content won't update, unless you rebuild and redeploy your website. This might quickly become a bit of a pain if you're doing content updates often, or if the person doing these updates doesn't know how to rebuild your site.
You can easily set up GitHub hooks to update your website when your code changes, but that doesn't work for content changes.
Go explain to a copywriter that they need to
gatsby buildandnpm run deployevery time they update the website's content!
What you want to have is an automated process that will publish the website once your content is updated.
This article covers step by step guide, how to:
- Setup your data source using a Gatsby Starter and Flotiq
- Setup your page deployment in Netlify
- Setup an automation workflow in Zapier
In the end - whenever you update your page content in Flotiq, Zapier will trigger deploy process in Netlify to make sure your site is up to date!
Let's dive deep.
Prerequisites
- Netlify Account (free) Sign up for Netlify
- GitHub/Gitlab/Bitbucket account (free) Sign up for GitHub
- Zapier account (free) Sign up for Zapier
- Flotiq account (free) Register a Flotiq account here.
Grab one of our Gatsby Starters!
Head out to our Github repository and pick one of Gatsby starter projects. Let's use the popular Gatsby Recipes Starter.
gatsby new gatsby-starter-recipes https://github.com/flotiq/gatsby-starter-recipes.git
cd gatsby-starter-recipes
You can either build the Content Types yourself or use our predefined content
node ./example/importExample.js
This handy command will add 4 images and 2 recipes to your Flotiq account.
Each of our gatsby starters has a "Deploy to Netlify" button at the bottom of the README:

Click it: 
Configure your Netlify site deploy
You'll now see a 3-step configuration process, that involves:
- Connecting to your GitHub account
- Setting up required parameters for deploy
- Deploying your site
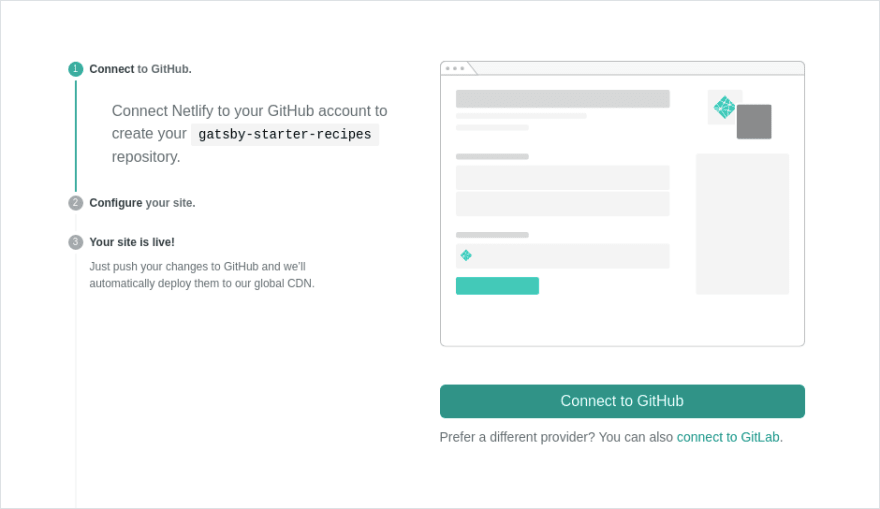
Connect your GitHub account and head on to the next step.
In the next view, you will be prompted to enter 3 parameters:
- Repository name - this is where Netlify will create a new repository for you.
- Flotiq API url - enter:
https://api.flotiq.com - Your Flotiq read-only API Key.
We advise that you always create a scoped API key. Its disposable nature makes it a safer choice. More about Flotiq API Keys here
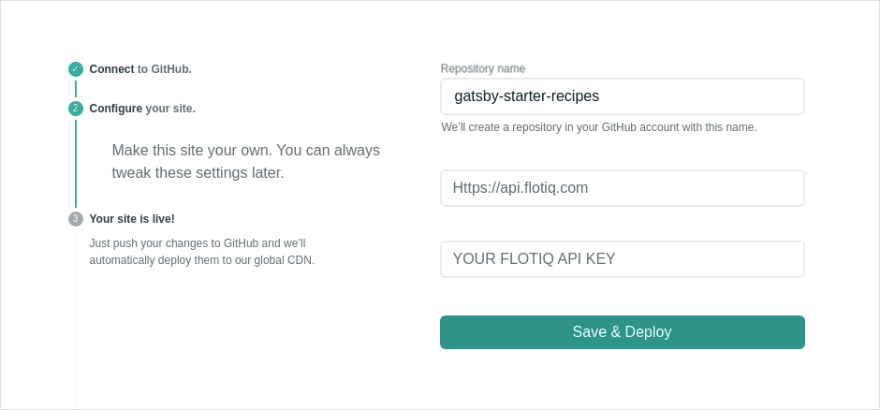
After filling in all the fields, hit the Save & Deploy button and wait for your site to build.
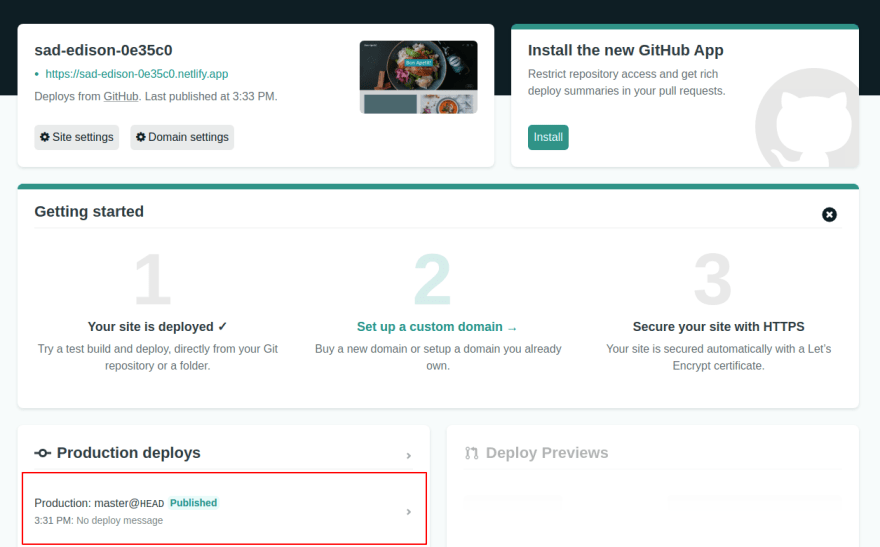
That's all! You will be redirected to your Netlify dashboard. You can check the build logs by clicking here:
Manage Netlify deploys using Zapier
By default, Netlify will observe any changes in your repository, so any push will trigger a build on Netlify. This is usually what you want because you might be pushing some new features to your website and you want them to automatically appear online.
But your website is not just the code in your repository. You want your content to be up to date too! We'll show you how to use Zapier to update your website every time you create new content.
- Log in to Zapier
- On your account dashboard, hover over the left sidebar and click
Make a Zap. -
As a trigger application, choose
Flotiq, and for the eventNew Content Object.
-
Next, choose your Flotiq account and click
Continue.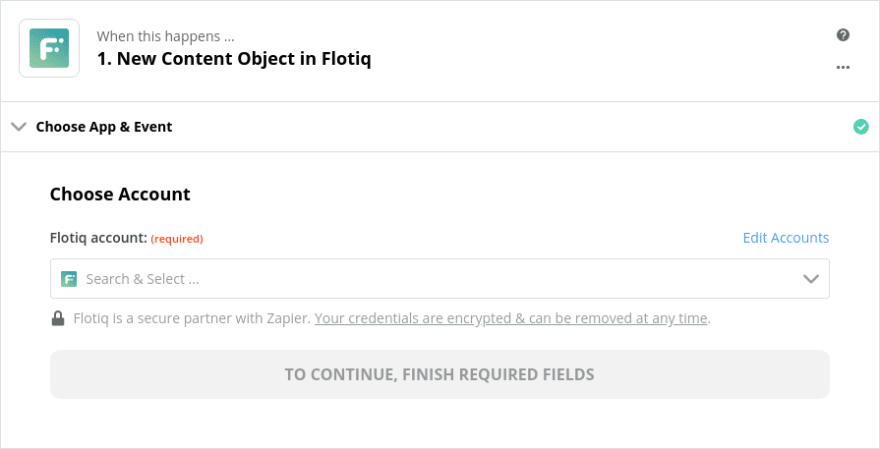
-
Choose your Content Type Definition from the list.
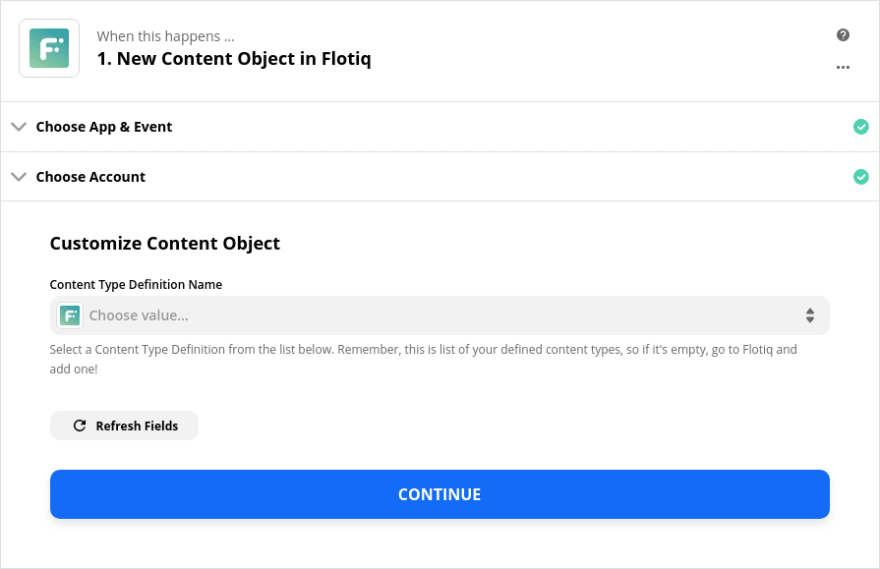
Click continue. You can skip the test phase and proceed to the next action.
-
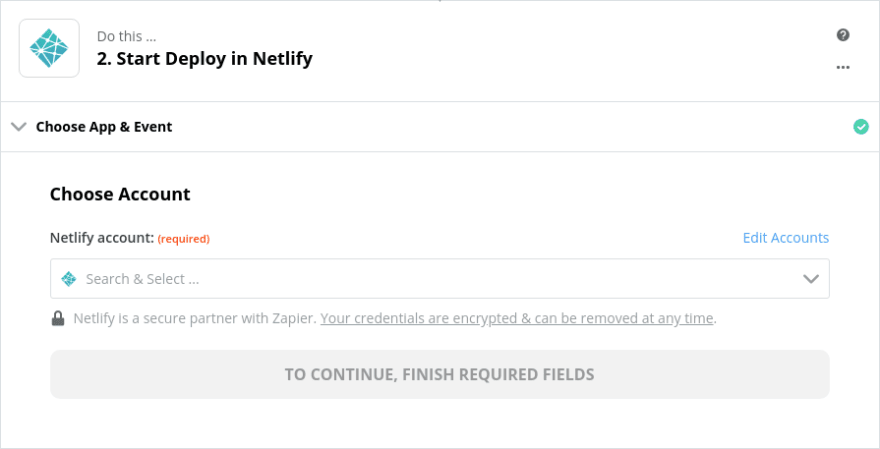
Choose
Netlifyas an action application, andStart deployas an event.
-
Sign in to your Netlify account and proceed further.
-
Select your site from the list. Alternatively, you can choose to clear build cache, but it will increase the build time.

In the last step, you can test if this action works properly. It will rebuild your site.
That's it
You're set! Click Turn the Zap On!. Now you can create a new entry in the Flotiq editor and see that your recipe will appear on your website in a moment.
Useful links
Learn more about building powerful integrations with Zapier and Flotiq:
Or try one of the awesome Gatsby starters we've integrated with Flotiq:

Top comments (2)
Let us know how it went for you!
You'll find the flotiq team on discord and twitter
And here are all our Gatsby starters - give them a shot: