
Surely you've seen some GIF-like elements on web pages that attract a lot of attention because of their movement and design, and you're wondering: What are these elements? and How can I use them in my web page??
Well, this is precisely what you will learn, but using React JS.
Any kind of feedback is welcome, thanks and I hope you enjoy the article.🤗
Table of contents.
📌 Technologies to be used.
📌 What are Lottie animations?
📌 Difference between GIF and Lottie.
📌 Websites where you can download Lottie files.
📌 Creating the project.
📌 Installing dependency to use Lottie with React JS.
📌 First steps.
📌 Using Lottie.
📌 Other configurations for Lottie.📍 Speed.
📍 Background.
📍 Direction.
📍 Style.
📍 onEvent.📌 Adding controls.
📌 Conclusion.
🖍️ Technologies to be used.
- ▶️ React JS (v 18)
- ▶️ Vite JS
- ▶️ TypeScript
- ▶️ LottieFiles
- ▶️ CSS vanilla
🖍️ What are Lottie animations?
Lottie is a library created by Airbnb to facilitate the creation of animations for different platforms.
A Lottie file is composed of a JSON file. This means that, if you have knowledge of this type of file, you can modify both its appearance and its variables (although there are also applications that allow you to modify them in an easier way).
Lottie files work on any device and can be scaled without loss of quality, just like an SVG file.
🖍️ Difference between GIF and Lottie.
The big difference between animated GIFs and Lottie files is that GIFs are made up of images and Lottie files are generated through code in a JSON file, which allows them to be completely customized.
In terms of loading times, Lottie files are much faster than most GIF files and have a lower weight than GIFs.
🖍️ Websites where you can download Lottie files.
🖍️ Creating the project.
We will name the project: lottie-app (optional, you can name it whatever you like).
npm init vite@latest
We create the project with Vite JS and select React with TypeScript.
Then we run the following command to navigate to the directory just created.
cd lottie-app
Then we install the dependencies.
npm install
Then we open the project in a code editor (in my case VS code).
code .
🖍️ Installing dependency to use Lottie with React JS.
To use Lottie files in react, there are some libraries for that task, in this case we will use @lottiefiles/react-lottie-player
Then, in the terminal (we must be in the lottie-app project), we execute the following command to install the dependency to use the Lottie files.
npm install @lottiefiles/react-lottie-player
🖍️ First steps.
Inside the folder src/App.tsx we delete all the contents of the file and place a functional component that displays a title.
export const App = () => {
  return (
    <div className='container'>
      <h1>Using Lottie with React JS ⚛️</h1>
    </div>
  )
}
export default App
It should look something like this 👀:

🖍️ Using Lottie.
Now we need a special component to display our Lottie. The component is called Player and we get it from the following package.
import { Player } from '@lottiefiles/react-lottie-player';
Time to use it!
import { Player } from '@lottiefiles/react-lottie-player';

const App = () => {
  return (
    <div className='container'>
      <h1>Using Lottie with React JS ⚛️</h1>

      <Player/>

    </div>
  )
}

export default App
The Player component needs a property that is mandatory, which is the src. Which receives a string.
And where do we get that src??
This property can be located in some page where you can download Lottie files. (in this case, we will use the page of LottieFiles).
1- First, we log in or create an account at LottieFiles.
2- We search for a Lottie and select it.
3- The most probable thing is that under the Lottie you will see some options and one of them will be the Lottie Animation URL and that URL will be the one that we will place in the property src of the component Player.
🚨 Note: You must put a width and height to this Player component. You can use the style property that the component offers; in this case I do it through a className and CSS styles.
import { Player } from '@lottiefiles/react-lottie-player';

const App = () => {
  return (
    <div className='container'>
      <h1>Using Lottie with React JS ⚛️</h1>

      <Player
        src='https://assets1.lottiefiles.com/packages/lf20_myejiggj.json'
        className="player"
      />

    </div>
  )
}

export default App
It should look like this 👀:

You will notice that the lottie does not perform any movement as animation, that is because some properties that we must configure are missing.
- autoplay: allows the lottie to start automatically once it is ready (receives boolean values).
- loop: allows the animation to repeat automatically (receives boolean values).
<Player
  src='https://assets1.lottiefiles.com/packages/lf20_myejiggj.json'
  className="player"
  loop
  autoplay
/>
It should now look like this 👀:

Generally this is all you would need to use lottie in your application, but let's see what other properties this component offers.
🖍️ OOther configurations for Lottie.
In addition to the properties we saw previously, the Player component has other interesting properties such as:
🟣 Speed.
Property that receives a numeric value, which manages the speed of the animation and by default has the value of 1.
<Player
  src='https://assets1.lottiefiles.com/packages/lf20_myejiggj.json'
  className="player"
  loop
  autoplay
  speed={10}
/>
🟣 Background.
Property that receives a string value and which handles the background color of the Lottie.
<Player
  src='https://assets1.lottiefiles.com/packages/lf20_myejiggj.json'
  className="player"
  loop
  autoplay
  background='red'
/>
🟣 Direction.
Property that receives a numeric value (1 or -1) and which manages in which direction the animation should be performed (starting from the beginning to the end or starting from the end to the beginning). By default its value is 1.
<Player
  src='https://assets1.lottiefiles.com/packages/lf20_myejiggj.json'
  className="player"
  loop
  autoplay
  direction={-1}
/>
🟣 Style.
Property that receives an object (just like an inline style in JSX) and which handles the style of the Lottie container.
<Player
  src='https://assets1.lottiefiles.com/packages/lf20_myejiggj.json'
  className="player"
  loop
  autoplay
  style={{ height: '300px', width: '300px' }}
/>
🟣 onEvent.
This property receives a function that allows to receive as parameter a PlayerEvent.
Basically this function is listening for several events:
- load: When the animation data is loaded.
- error: When an animation source cannot be parsed, is not loaded or has formatting errors.
- ready: When the animation data is loaded and the player is ready.
- play: When the animation starts playing.
- pause: When the animation is paused.
- stop: When the animation is stopped.
- freeze: When the animation stops because the player is invisible.
- loop: When an animation loop is completed.
- complete: When the animation is completed.
- frame: When a new frame is inserted.
const handleEventPlayer (e:PlayerEvent) => {
  if (event === 'load') alert('Lottie Load!')
}

<Player
  src='https://assets1.lottiefiles.com/packages/lf20_myejiggj.json'
  className="player"
  loop
  autoplay
  onEvent={handleEventPlayer}
/>
🖍️ Getting the reference.
To obtain the reference to the Player component is similar to how we would do it with a JSX component. We only need to use the property ref and in conjunction with the hook useRef, we would already have what we need.
const playerRef = useRef<Player>(null);

<Player
  src='https://assets1.lottiefiles.com/packages/lf20_myejiggj.json'
  className="player"
  loop
  autoplay
  ref={playerRef}
/>
And why would we need to obtain the reference to the Player component?
Well, to obtain the reference will be necessary to execute several methods that the component offers us. Which we will see next.
🟣 Executing Player's methods.
Inside the current property of the playerRef reference, we will have access to a few methods like:
play: Starts playing the animation.
pause: Pause the animation.
stop: Stops the animation.
None of the above methods require any parameters and return nothing.
playerRef.current.play();

playerRef.current.pause();

playerRef.current.stop();
We also have some setters functions to set certain values to the Player.
setPlayerSpeed: Sets the speed of the animation, receives only numeric values.
s*etLoop*: Sets whether the animation should run more than once automatically, receives only boolean values.
setSeeker: Sets a specific frame, receives only numeric values or percentage strings.
playerRef.current.setPlayerSpeed(5);

playerRef.current.setLoop(true);

playerRef.current.setSeeker('50%');
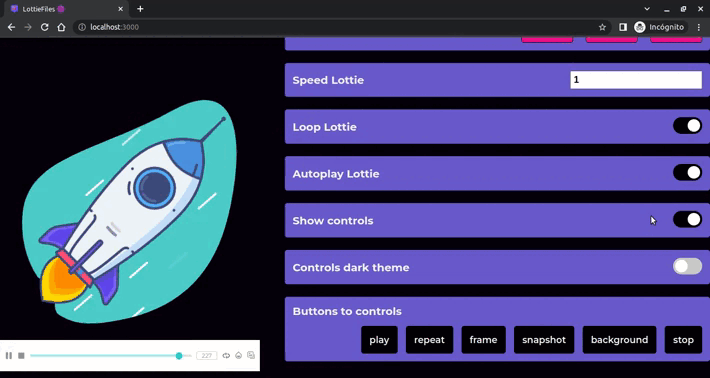
🖍️ Adding controls.
Apart from the Player component, there is also another component called Controls , and to use it it must be nested inside the Player component as follows:
<Player
  src='https://assets1.lottiefiles.com/packages/lf20_myejiggj.json'
  className="player"
>
  <Controls/>
</Player>
This component receives several parameters, but we will only mention some of them, such as:
visible. Property that allows to make visible or not, the control box. It only accepts boolean values.
darkTheme. Property that allows to change the appearance of the control box to a dark theme. Only accepts boolean values.
-
buttons. Property that allows to display the buttons that can have the control box. It only accepts an array of strings with some of the following values:
- play
- repeat
- stop
- frame
- snapshot
- background
<Player
  src='https://assets1.lottiefiles.com/packages/lf20_myejiggj.json'
  className="player"
>
  <Controls
    visible={true}
    darkTheme={true}
    buttons={['play', 'repeat', 'frame', 'stop']}
  />
</Player>
I made this example also so that you can observe these controls. Take a look at it! 👀 Go to the section of the 'Live demo'

🖍️ Conclusion.
Lottie files are a better option to decorate your website and bring it to life with these animations. It is an increasingly used element in web design. 👐
🚨 But nevertheless, you must have control over the amount of animations you place, you don't want to overload your website and slow it down.
🚨 And also, you should be careful where you download these files from, because remember they are code based! So you should look for viable sources.
🟣 Live demo.
https://lottie-app-demo.netlify.app/
🟣 Source code.
 Franklin361
/
lottie-app
Franklin361
/
lottie-app
Application to show how Lottie files work using React JS ⚛️
How to use Lottie animations in React? 🖌️
This project will help you understand how to use Lottie animations together with the React JS library.
Technologies 🧪
- React JS
- TypeScript
- Vite JS
- LottieFiles
Installation 🧰
- Clone the repository (you need to have Git installed).
git clone https://github.com/Franklin361/lottie-app
- Install dependencies of the project.
npm install
- Run the project.
npm run dev
Links ⛓️
Demo of the application 🔥
- 🔗
Here's the link to the tutorial in case you'd like to take a look at it! eyes 👀
-
🇲🇽 🔗
-
🇺🇲 🔗

Top comments (30)
Really insightful thanks
you're welcome! 😉
Thank you! Useful info 👍
My pleasure to have helped you! hehe 😉
Hey, this is really helpful 🔥, will definitely use them in my next projects
I know, and your next project will look great with this! 🔥
Awesome work and tutorial Franklin!! This is precious to create a cool landing page in a few steps! Thanks! And also for explaining the difference between a gif and a lottie
I'm glad you found this post useful 😊, and you're right, landing pages will look great using lottie. 🤩
Thanks a lot
Helpful.
Thanks for this awesome article
No problem, wait for more to come! 😉
Very useful! Thanks for sharing!
great one
This is great! Thank you for the explanation of the differences with gif.
You're welcome, I hope you use them in your next projects! hehe 😉
Wow! I had no idea something like this also existed! Thanks a lot Franklin 🤩!
I also got excited when I discovered them 🤯 hehe, and you are welcome, it was my pleasure 😉