An Annotated webpack 4 Config for Frontend Web Development
As web development becomes more complex, we need tooling to help us build modern websites. Here’s a complete real-world production example of a sophisticated webpack 4 config
Andrew Welch / nystudio107

Building a modern website has become custom application development. Websites are expected to do more than just be marketing sites as they take on the functionality of traditional apps.
Any time a process becomes complicated, we break it down into manageable components, and automate the build process with tooling. This is the case in whether we are manufacturing cars, drafting legal documents, or building websites.
Tools like webpack have been at the forefront of modern web development for precisely that reason: they help us build complex things.
webpack 4 boasts some amazing improvements, the most appealing to me was how much faster it’d become at building. So I decided to adopt it.

Buckle up, because this is a long article filled with tons of information.
Adopting Webpack
A bit over a year ago, I published the article A Gulp Workflow for Frontend Development Automation that showed how to use Gulp to accomplish the same thing. However in the intervening time, I’ve been doing more and more with frontend frameworks like VueJS and GraphQL, as discussed in the Using VueJS + GraphQL to make Practical Magic article.
I have found that webpack makes it easier for me to build the types of websites and applications that I’m making these days, and it also allows me to use the most modern toolchain around.
There are other choices:
- Laravel Mix is a layer on top of webpack. It’s appealing in its simplicity: you can get up and running quickly, and it’ll do what you want 90% of the time. But that remaining 10% means a drop down into webpack anyway.
- vue-cli is very appealing if you’re building nothing but VueJS frontends. It again is a layer on top of webpack that works great most of the time, and does some amazing things for you. But again, you need to drop down into webpack when your needs diverge from what it provides. And I’m not always using VueJS exclusively.
- Neutrino is an interesting layer on webpack that we explored in the Neutrino: How I Learned to Stop Worrying and Love Webpack podcast. The premise is amazing, building a webpack config by snapping together prefab Lego brick components. But learning how it worked seemed almost as much work as learning webpack itself.
I won’t fault you if you choose any of the above tools (or even something else), but note that there’s a common theme to all of them: they layer on top of webpack.
Ultimately, you just need to decide where in the pyramid of frontend technologies you want to stand.
At some point, I think it makes sense to understand how an important tool like webpack works. A while ago, I’d complained to Sean Larkin (one of the webpack core team members) that webpack was like a “black box”. His reply was pithy, but quite poignant:
He’s right. Time to open the box.
This article will not teach you all there is to know about webpack or even how to install it. There are plenty of resources available for that — pick the format that you learn best from:
- webpack — the Confusing Parts — for a concise overview of how webpack works
- webpack documentation — if you learn best by reading
- webpack fundamentals — if you learn best by watching
- How to switch from Gulp to webpack — if that’s where you’re coming from
…and there are many, many more. Instead, this article will annotate a full working example of a fairly sophisticated webpack 4 setup. You may use all of it; you may use bits and pieces of it. But hopefully you’ll learn a thing or two from it.
While on my continuing journey learning webpack, I found many tutorial videos, a bunch of write-ups showing how to install it and a basic config, but not a whole lot of real-world production examples of webpack configs. So here we are.
What We Get Out of the Box
As I set about learning webpack by opening up the box, I had a list of technologies that I relied upon that I wanted to be part of the build process. I also took the time to look around to see what else was out there that I could adopt in the process.
As discussed in the A Pretty Website Isn’t Enough article, website performance has always been a key concern of mine, so it should be no surprise that there’s a focus on that in this webpack config as well.

So here is my very opinionated list of things that I wanted webpack to do for me, and technologies I wanted to incorporate in my build process:
- Development / Production — in local development, I want fast builds via the in-memory webpack-dev-server, and for production builds (often done in a Docker container via buddy.works), I want the every possible optimization. Thus we have separate dev and prod configs & builds.
- Hot Module Replacement — as I make changes to my JavaScript, CSS, or templates, I want the webpage to seamlessly refresh. This speeds development tremendously: just say no to the Reload button.
- Dynamic Code Splitting — I don’t want to manually have to define JavaScript chunks in a config file, I want webpack to sort it out for me.
- Lazy Loading — aka async dynamic module loading. Load only the code/resources needed, when they are needed, without render blocking.
- Modern & Legacy JS Bundles — I wanted to deploy modern ES2015+ JavaScript modules to the 75%+ of worldwide browsers that support it, while gracefully providing a fallback legacy bundle for legacy browsers (with all of the transpiled code and polyfills).
- Cache Busting via manifest.json - this allows us to set a long expiry data for our static assets, while also ensuring that they are automatically cache busted if they change.
- Critical CSS — as per the Implementing Critical CSS on your website article, this is something that makes initial page loads significantly faster.
- Workbox Service Worker — we can leverage Google’s Workbox project to generate a Service Worker for us that will know about all of our project’s assets. PWA, here we come!
- PostCSS — I think of it as the “Babel of CSS”, things like SASS and SCSS are built on it, and it lets you use upcoming CSS features now.
- Image Optimization — Images are by far the largest thing on most webpages, so it makes sense to optimize them via automated tools like mozjpeg, optipng, svgo, etc.
- Automatic .webp Creation — Chrome, Edge, and Firefox all are supporting .webp, a format that is more efficient than JPEG.
- VueJS — VueJS is my frontend framework of choice. I want to be able to use single file .vue components as a seamless part of my development process.
- Tailwind CSS — Tailwind is a utility-first CSS that I use for rapidly prototyping in local dev, and then run through PurgeCSS for production, to reduce the size dramatically.
- Offline Compression of static resources — We can pre-compress our static resources into .gz files that our webserver can automatically serve up to clients that accept them
Phew, quite an ambitious list!

There’s more too, like the automatic uglification of JavaScript, minification of CSS, and other standard things we’d expect from a frontend build system.
I also want it to work with a development team that may use disparate tools for their local dev environment, and to have the config be easy to maintain and reuse from project to project.
Your stack of frontend frameworks/technologies may look different from mine, but the principles applied will be the same. So read on, regardless of what you use!
Project Tree & Organization
To give you an overview of what the setup looks like, here’s a bare bones project tree:
├── example.env
├── package.json
├── postcss.config.js
├── src
│   ├── css
│   │   ├── app.pcss
│   │   ├── components
│   │   │   ├── global.pcss
│   │   │   ├── typography.pcss
│   │   │   └── webfonts.pcss
│   │   ├── pages
│   │   │   └── homepage.pcss
│   │   └── vendor.pcss
│   ├── fonts
│   ├── img
│   │   └── favicon-src.png
│   ├── js
│   │   ├── app.js
│   │   └── workbox-catch-handler.js
│   └── vue
│   └── Confetti.vue
├── tailwind.config.js
├── templates
├── webpack.common.js
├── webpack.dev.js
├── webpack.prod.js
├── webpack.settings.js
└── yarn.lock
For the complete source code for everything presented here, check out the annotated-webpack-4-config github repo.
So in terms of the core config files, we have:
- .env — environmental-specific settings for the webpack-dev-server; this is never checked into git
- webpack.settings.js — a JSON-ish settings file, the only file we need to edit from project to project
- webpack.common.js — common settings for both types of builds
- webpack.dev.js — settings for local development builds
- webpack.prod.js — settings for production builds
Here’s a diagram of how it all fits together:
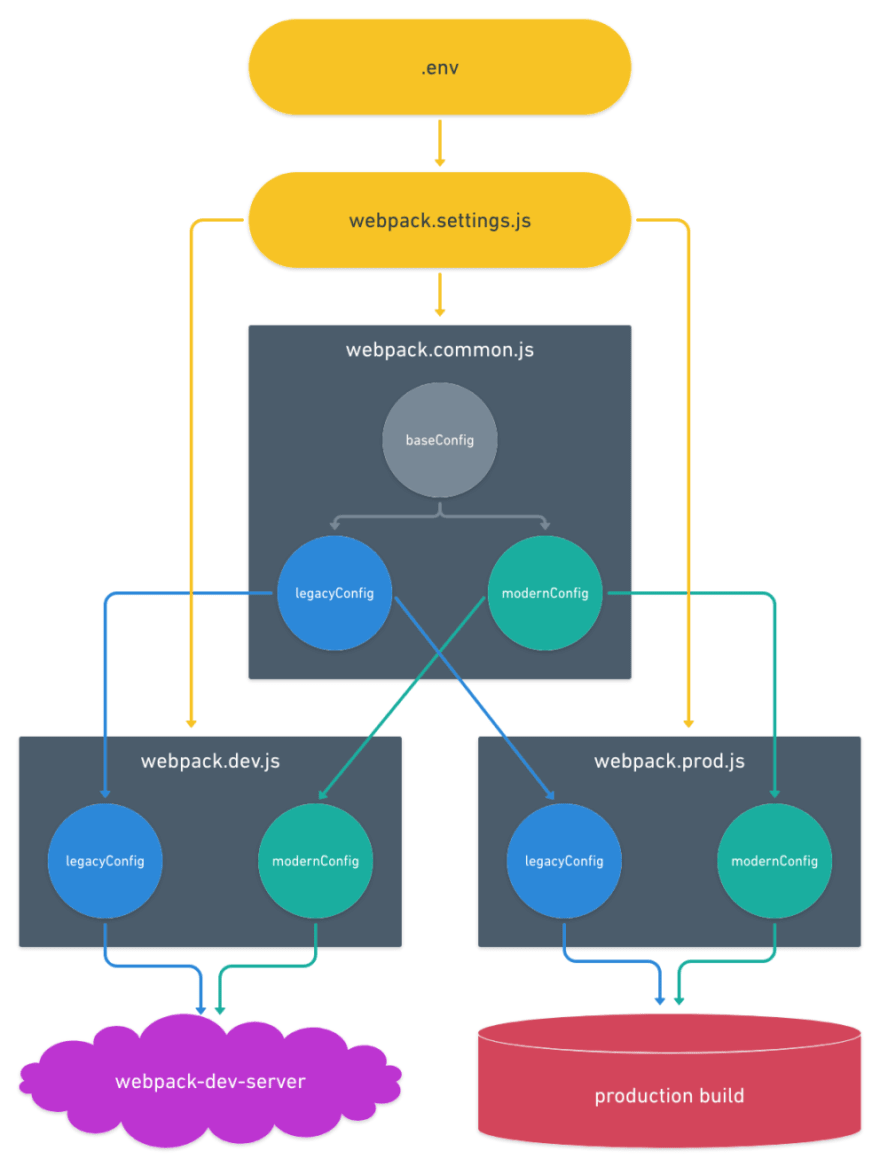
The goal is that you need to edit only what is in the gold colored rounded-rectangles (.env & webpack.settings.js) from project to project.
Separating things out in this way makes working with the config files quite a bit easier. Even if you do end up changing the various webpack config files from what I’ve presented here, keeping with this methodology will help you maintain them long-term.
Don’t worry, we’ll get into each file in detail later.
Annotated package.json
Let’s start by breaking down our package.json :
{
    "name": "example-project",
    "version": "1.1.0",
    "description": "Example Project brand website",
    "keywords": [
        "Example",
        "Keywords"
    ],
    "homepage": "https://github.com/example-developer/example-project",
    "bugs": {
        "email": "someone@example-developer.com",
        "url": "https://github.com/example-developer/example-project/issues"
    },
    "license": "SEE LICENSE IN LICENSE.md",
    "author": {
        "name": "Example Developer",
        "email": "someone@example-developer.com",
        "url": "https://example-developer.com"
    },
    "browser": "/web/index.php",
    "repository": {
        "type": "git",
        "url": "git+https://github.com/example-developer/example-project.git"
    },
    "private": true,
Nothing particularly interesting here, just meta information for our website as outlined in the package.json specification.
"scripts": {
    "debug": "webpack-dev-server --config webpack.dev.js",
    "dev": "webpack-dashboard -- webpack-dev-server --config webpack.dev.js",
    "build": "webpack --config webpack.prod.js --progress --hide-modules"
},
These are the scripts that represent the two major build steps we have for our project:
- debug — used when you need to debug the webpack build itself; this disables the webpack-dashboard (see below) to make getting at the console output easier
- dev — used whenever we’re working on the project, it spins up the webpack-dev-server to allow for Hot Module Replacement (HMR), in memory compilation, and other niceties.
- build — used when we do a production deployment, it does all of the fancy and time consuming things like Critical CSS, uglification of JavaScript, etc. that need to be done for production deployment.
To run them, we just use the CLI inside of our development environment to do yarn dev or yarn build if we’re using yarn, and npm run dev or npm run build if we’re using npm. These are the only two commands you’ll need to use.
Notice that via the --config flag, we’re also passing in separate config files. This lets us break down our webpack config into separate logical files, because we’re going to be doing things very differently for development builds compared to production builds.
Next up we have our browserslist :
"browserslist": {
        "production": [
            "> 1%",
            "last 2 versions",
            "Firefox ESR"
        ],
        "legacyBrowsers": [
            "> 1%",
            "last 2 versions",
            "Firefox ESR"
        ],
        "modernBrowsers": [
            "last 2 Chrome versions",
            "not Chrome < 60",
            "last 2 Safari versions",
            "not Safari < 10.1",
            "last 2 iOS versions",
            "not iOS < 10.3",
            "last 2 Firefox versions",
            "not Firefox < 54",
            "last 2 Edge versions",
            "not Edge < 15"
        ]
    },
This is a browserslist that targets specific browsers based on human-readable configs. The PostCSS autoprefixer defaults to using our production settings. We pass in the legacyBrowsers and modernBrowsers to Babel to handle building both legacy and modern JavaScript bundles. More on that later!
Next up we have our devDependencies , which are all of the npm packages required for our build system:
"devDependencies": {
    "@babel/core": "^7.1.0",
    "@babel/plugin-syntax-dynamic-import": "^7.0.0",
    "@babel/plugin-transform-runtime": "^7.1.0",
    "@babel/preset-env": "^7.1.0",
    "@babel/register": "^7.0.0",
    "@babel/runtime": "^7.0.0",
    "@gfx/zopfli": "^1.0.11",
    "babel-loader": "^8.0.2",
    "clean-webpack-plugin": "^3.0.0",
    "compression-webpack-plugin": "^2.0.0",
    "copy-webpack-plugin": "^4.5.2",
    "create-symlink-webpack-plugin": "^1.0.0",
    "critical": "^1.3.4",
    "critical-css-webpack-plugin": "^0.2.0",
    "css-loader": "^2.1.0",
    "cssnano": "^4.1.0",
    "dotenv": "^6.1.0",
    "file-loader": "^2.0.0",
    "git-rev-sync": "^1.12.0",
    "glob-all": "^3.1.0",
    "html-webpack-plugin": "^3.2.0",
    "ignore-loader": "^0.1.2",
    "imagemin": "^6.0.0",
    "imagemin-gifsicle": "^6.0.0",
    "imagemin-mozjpeg": "^8.0.0",
    "imagemin-optipng": "^6.0.0",
    "imagemin-svgo": "^7.0.0",
    "imagemin-webp": "^5.0.0",
    "imagemin-webp-webpack-plugin": "^3.1.0",
    "img-loader": "^3.0.1",
    "mini-css-extract-plugin": "^0.4.3",
    "moment": "^2.22.2",
    "optimize-css-assets-webpack-plugin": "^5.0.1",
    "postcss": "^7.0.2",
    "postcss-import": "^12.0.0",
    "postcss-loader": "^3.0.0",
    "postcss-preset-env": "^6.4.0",
    "purgecss-webpack-plugin": "^1.3.0",
    "purgecss-whitelister": "^2.2.0",
    "resolve-url-loader": "^3.0.0",
    "save-remote-file-webpack-plugin": "^1.0.0",
    "stylelint": "^9.9.0",
    "stylelint-config-recommended": "^2.1.0",
    "style-loader": "^0.23.0",
    "symlink-webpack-plugin": "^0.0.4",
    "terser-webpack-plugin": "^1.1.0",
    "vue-loader": "^15.4.2",
    "vue-style-loader": "^4.1.2",
    "vue-template-compiler": "^2.5.17",
    "webapp-webpack-plugin": "https://github.com/brunocodutra/webapp-webpack-plugin.git",
    "webpack": "^4.19.1",
    "webpack-bundle-analyzer": "^3.0.2",
    "webpack-cli": "^3.1.1",
    "webpack-dashboard": "^3.0.0",
    "webpack-dev-server": "^3.3.0",
    "webpack-manifest-plugin": "^2.0.4",
    "webpack-merge": "^4.1.4",
    "webpack-notifier": "^1.6.0",
    "workbox-webpack-plugin": "^3.6.2"
},
Yep, that’s quite a bit of packages. But our build process does quite a bit.
And finally, we use the dependencies for the packages we use on the frontend of our website:
"dependencies": {
    "axios": "^0.18.0",
    "core-js": "^3.0.0",
    "regenerator-runtime": "^0.13.2",
    "tailwindcss": "^1.0.0",
    "vue": "^2.5.17",
    "vue-confetti": "^0.4.2"
}
Obviously for an actual website/app, there would be more packages in dependencies ; but we’re focusing on the build process.
Annotated webpack.settings.js
I’m also using a similar approach I discussed in the A Better package.json for the Frontend article, which is to cordon off the config that changes from project to project into a separate webpack.settings.js, and keep the webpack config itself the same.
Since most projects have a very similar set of things that need to be done, we can create a webpack config that works for a wide variety of projects. We just need to change the data it operates on.
Thus the separation of concerns between what is in our webpack.settings.js file (the data that changes from project to project) and what is in our webpack config (how that data is manipulated to produce an end result).
// webpack.settings.js - webpack settings config

// node modules
require('dotenv').config();

// Webpack settings exports
// noinspection WebpackConfigHighlighting
module.exports = {
    name: "Example Project",
    copyright: "Example Company, Inc.",
    paths: {
        src: {
            base: "./src/",
            css: "./src/css/",
            js: "./src/js/"
        },
        dist: {
            base: "./web/dist/",
            clean: [
                '**/*',
            ]
        },
        templates: "./templates/"
    },
    urls: {
        live: "https://example.com/",
        local: "http://example.test/",
        critical: "http://example.test/",
        publicPath: () => process.env.PUBLIC_PATH || "/dist/",
    },
    vars: {
        cssName: "styles"
    },
    entries: {
        "app": "app.js"
    },
    babelLoaderConfig: {
        exclude: [
            /(node_modules|bower_components)/
        ],
    },
    copyWebpackConfig: [
        {
            from: "./src/js/workbox-catch-handler.js",
            to: "js/[name].[ext]"
        }
    ],
    criticalCssConfig: {
        base: "./web/dist/criticalcss/",
        suffix: "_critical.min.css",
        criticalHeight: 1200,
        criticalWidth: 1200,
        ampPrefix: "amp_",
        ampCriticalHeight: 19200,
        ampCriticalWidth: 600,
        pages: [
            {
                url: "",
                template: "index"
            }
        ]
    },
    devServerConfig: {
        public: () => process.env.DEVSERVER_PUBLIC || "http://localhost:8080",
        host: () => process.env.DEVSERVER_HOST || "localhost",
        poll: () => process.env.DEVSERVER_POLL || false,
        port: () => process.env.DEVSERVER_PORT || 8080,
        https: () => process.env.DEVSERVER_HTTPS || false,
    },
    manifestConfig: {
        basePath: ""
    },
    purgeCssConfig: {
        paths: [
            "./templates/**/*.{twig,html}",
            "./src/vue/**/*.{vue,html}"
        ],
        whitelist: [
            "./src/css/components/**/*.{css}"
        ],
        whitelistPatterns: [],
        extensions: [
            "html",
            "js",
            "twig",
            "vue"
        ]
    },
    saveRemoteFileConfig: [
        {
            url: "https://www.google-analytics.com/analytics.js",
            filepath: "js/analytics.js"
        }
    ],
    createSymlinkConfig: [
        {
            origin: "img/favicons/favicon.ico",
            symlink: "../favicon.ico"
        }
    ],
    webappConfig: {
        logo: "./src/img/favicon-src.png",
        prefix: "img/favicons/"
    },
    workboxConfig: {
        swDest: "../sw.js",
        precacheManifestFilename: "js/precache-manifest.[manifestHash].js",
        importScripts: [
            "/dist/js/workbox-catch-handler.js"
        ],
        exclude: [
            /\.(png|jpe?g|gif|svg|webp)$/i,
            /\.map$/,
            /^manifest.*\\.js(?:on)?$/,
        ],
        globDirectory: "./web/",
        globPatterns: [
            "offline.html",
            "offline.svg"
        ],
        offlineGoogleAnalytics: true,
        runtimeCaching: [
            {
                urlPattern: /\.(?:png|jpg|jpeg|svg|webp)$/,
                handler: "CacheFirst",
                options: {
                    cacheName: "images",
                    expiration: {
                        maxEntries: 20
                    }
                }
            }
        ]
    }
};
We’ll cover what all of these things are down in the webpack config sections. The important thing to note here is that we’ve taken things that change from project to project, and broken them out of our webpack config, and into a separate webpack.settings.js file.
This means we can just define what’s different in each project in our webpack.settings.js file, and not have to be wrangling with the webpack config itself.
Even though the webpack.settings.js file is just JavaScript, I tried to keep it as JSON-ish as possible, so we’re just changing simple settings in it. I didn’t use JSON as a file format for flexibility, and also to allow for comments to be added.
Common Conventions for webpack configs
I’ve adopted a few conventions for the webpack config files webpack.common.js & webpack.prod.js to make things more consistent.
Each config file has two internal configs:
- legacyConfig — the config that applies to the legacy ES5 build
- modernConfig — the config that applies to the modern ES2015+ build
We do it this way because we have separate configurations to create the legacy and modern builds. This keeps them logically separate. The webpack.common.js also has a baseConfig ; this is purely organizational.
Think of it like Object Oriented Programming, where the various configs inherit from each other, with the baseConfig being the root object.
The webpack.dev.js config does not have a concept of legacy & modern builds; if we’re working in local dev with webpack-dev-server, we can assume a modern build.
Another convention that I’ve adopted to keep the configuration clean and readable is to have configure() functions for the various webpack plugins and other pieces of webpack that need configuring, rather than putting it all inline.
I did this because some data coming from the webpack.settings.js needs to be transformed before it can be used by webpack, and because of the dual legacy/modern builds, we need to return a different config depending on the type of build.
It also makes the config files a bit more readable as well.
As a general webpack concept, understand that webpack itself knows only how to load JavaScript and JSON. To load anything else, we need to to use a loader. We’ll be using a number of different loaders in our webpack config.
Annotated webpack.common.js
Now let’s have a look at our webpack.common.js config file that has all of the settings that are shared by both the dev and prod build types.
// webpack.common.js - common webpack config
const LEGACY_CONFIG = 'legacy';
const MODERN_CONFIG = 'modern';

// node modules
const path = require('path');
const merge = require('webpack-merge');

// webpack plugins
const CopyWebpackPlugin = require('copy-webpack-plugin');
const ManifestPlugin = require('webpack-manifest-plugin');
const VueLoaderPlugin = require('vue-loader/lib/plugin');
const WebpackNotifierPlugin = require('webpack-notifier');

// config files
const pkg = require('./package.json');
const settings = require('./webpack.settings.js');
In the preamble we pull in the Node packages we need, and the webpack plugins we use. We then import our webpack.settings.js as settings so we can access the settings there, and also import our package.json as pkg to access a few settings there as well.
CONFIGURATION FUNCTIONS
Here’s what the configureBabelLoader() looks like:
// Configure Babel loader
const configureBabelLoader = (browserList) => {
    return {
        test: /\.js$/,
        exclude: settings.babelLoaderConfig.exclude,
        cacheDirectory: true,
        use: {
            loader: 'babel-loader',
            options: {
                cacheDirectory: true,
                sourceType: 'unambiguous',
                presets: [
                    [
                        '@babel/preset-env', {
                            modules: false,
                            corejs: {
                                version: 2,
                                proposals: true
                            },
                            useBuiltIns: 'usage',
                            targets: {
                                browsers: browserList,
                            },
                        }
                    ],
                ],
                plugins: [
                    '@babel/plugin-syntax-dynamic-import',
                    '@babel/plugin-transform-runtime',
                ],
            },
        },
    };
};
The configureBabelLoader() function configures the babel-loader to handle the loading of all files that end in .js. It uses @babel/preset-env instead of a .babelrc file so we can keep everything compartmentalized in our webpack config.
Babel can compile modern ES2015+ JavaScript (and many other languages like TypeScript or CoffeeScript) down to JavaScript that targets a specific set of browsers or standards. We pass in the browserList as a parameter so that we can build both modern ES2015+ modules and legacy ES5 JavaScript with polyfills for legacy browsers.
By setting useBuiltIns to 'usage' we are also telling babel to apply individual pollyfills on a per-file basis. This can allow for a much smaller bundle size, since it includes only what we use. For more on this, check out the Working with Babel 7 and Webpack article.
In our HTML, we just do something like this:
<!-- Browsers with ES module support load this file. -->
<script type="module" src="main.js"></script>

<!-- Older browsers load this file (and module-supporting -->
<!-- browsers know *not* to load this file). -->
<script nomodule src="main-legacy.js"></script>
No polyfills, no fuss. Old browsers ignore the type="module" script, and get the main-legacy.js. Modern browsers load the main.js, and ignore the nomodule. It’s brilliant; I wish I came up with the idea! Lest you think it’s fringe, vue-cli has adopted this strategy in version 3.
The @babel/plugin-syntax-dynamic-import plugin is what allows us to do dynamic imports even before the ECMAScript dynamic import proposal is implemented by web browsers. This lets us load our JavaScript modules asynchronously, and dynamically as needed.
So what does this mean? It means we can do something like this:
// App main
const main = async () => {
    // Async load the vue module
    const { default: Vue } = await import(/* webpackChunkName: "vue" */ 'vue');
    // Create our vue instance
    const vm = new Vue({
        el: "#app",
        components: {
            'confetti': () => import(/* webpackChunkName: "confetti" */ '../vue/Confetti.vue'),
        },
    });

    return vm;
};
// Execute async function
main().then( (vm) => {
});
// Accept HMR as per: https://webpack.js.org/api/hot-module-replacement#accept
if (module.hot) {
    module.hot.accept();
}
This does two primary things:
- Via the /* webpackChunkName: "vue" */ comment, we’ve told webpack what we want this dynamically code split chunk to be named
- Since we’re using import() in an async function (“main”), that function awaits the result of our dynamically loaded JavaScript import while the rest of our code continues on its merry way
We’ve effectively told webpack how we want our chunks split up through code, rather than via config. And through the magic of @babel/plugin-syntax-dynamic-import, this JavaScript chunk can be loaded asynchronously, on demand as needed.
Notice we did the same thing with our .vue single file components, too. Nice.
Instead of using await, we could also just execute our code after the import() Promise has returned:
// Async load the vue module
import(/* webpackChunkName: "vue" */ 'vue').then(Vue => {
    // Vue has loaded, do something with it
    // Create our vue instance
    const vm = new Vue.default({
        el: "#app",
        components: {
            'confetti': () => import(/* webpackChunkName: "confetti" */ '../vue/Confetti.vue'),
        },
    });
});
Here instead of using await with import() we’re using the Promise, so then we know the dynamic import has happened and can happily use Vue.
If you’re paying attention, you can see that we’ve effectively solved JavaScript dependencies via Promises. Nice!
We can even do fun things like load certain JavaScript chunks only after the user has clicked on something, scrolled to a certain position, or satisfied some other condition. Check out the Module Methods import() for more.
If you’re interested in learning more about Babel, check out the Working with Babel 7 and Webpack article.
Next up we have configureEntries():
// Configure Entries
const configureEntries = () => {
    let entries = {};
    for (const [key, value] of Object.entries(settings.entries)) {
        entries[key] = path.resolve(__dirname, settings.paths.src.js + value);
    }

    return entries;
};
Here we pull in the webpack Entry Points from our webpack.settings.js via settings.entries. For a Single Page App (SPA) you’ll have just one entry point. For a more traditional website, you may have several entry points (perhaps one per page template).
Either way, because we’ve defined our entry points in our webpack.settings.js, it’s easy to configure them there. An entry point is really just a <script src="app.js"></script> tag that you’ll include in your HTML to bootstrap the JavaScript.
Since we’re using dynamically imported modules, we typically would have only one <script></script> tag on a page; the rest of our JavaScript gets loaded dynamically as needed.
Next we have the configureFontLoader() function:
// Configure Font loader
const configureFontLoader = () => {
    return {
        test: /\.(ttf|eot|woff2?)$/i,
        use: [
            {
                loader: 'file-loader',
                options: {
                    name: 'fonts/[name].[ext]'
                }
            }
        ]
    };
};
Font loading is the same for both dev and prod builds, so we include it here. For any local fonts that we’re using, we can tell webpack to load them in our JavaScript:
import comicsans from '../fonts/ComicSans.woff2';
Next we have the configureManifest() function:
// Configure Manifest
const configureManifest = (fileName) => {
    return {
        fileName: fileName,
        basePath: settings.manifestConfig.basePath,
        map: (file) => {
            file.name = file.name.replace(/(\.[a-f0-9]{32})(\..*)$/, '$2');
            return file;
        },
    };
};
This configures the webpack-manifest-plugin for filename-based cache busting. In a nutshell, webpack knows about all of the JavaScript, CSS, and other resources we need, so it can generate a manifest that points to the content-hashed name of the resource, e.g.:
{
  "vendors~confetti~vue.js": "/dist/js/vendors~confetti~vue.03b9213ce186db5518ea.js",
  "vendors~confetti~vue.js.map": "/dist/js/vendors~confetti~vue.03b9213ce186db5518ea.js.map",
  "app.js": "/dist/js/app.30334b5124fa6e221464.js",
  "app.js.map": "/dist/js/app.30334b5124fa6e221464.js.map",
  "confetti.js": "/dist/js/confetti.1152197f8c58a1b40b34.js",
  "confetti.js.map": "/dist/js/confetti.1152197f8c58a1b40b34.js.map",
  "js/precache-manifest.js": "/dist/js/precache-manifest.f774c437974257fc8026ca1bc693655c.js",
  "../sw.js": "/dist/../sw.js"
}
We pass in a filename because we create both a modern manifest.json and a legacy manifest-legacy.json that have the entry points for our modern ES2015+ modules and legacy ES5 modules, respectively. The keys in both of the manifests are identical for resources that are built for both modern and legacy builds.
Next up we have a pretty standard looking configureVueLoader():
// Configure Vue loader
const configureVueLoader = () => {
    return {
        test: /\.vue$/,
        loader: 'vue-loader'
    };
};
This just lets us load Vue Single File Components easily. webpack takes care of extracting the appropriate HTML, CSS, and JavaScript for you.
BASE CONFIG
The baseConfig gets merged with both the modernConfig and legacyConfig:
// The base webpack config
const baseConfig = {
    name: pkg.name,
    entry: configureEntries(),
    output: {
        path: path.resolve(__dirname, settings.paths.dist.base),
        publicPath: settings.urls.publicPath()
    },
    resolve: {
        alias: {
            'vue$': 'vue/dist/vue.esm.js'
        }
    },
    module: {
        rules: [
            configureVueLoader(),
        ],
    },
    plugins: [
        new WebpackNotifierPlugin({title: 'Webpack', excludeWarnings: true, alwaysNotify: true}),
        new VueLoaderPlugin(),
    ]
};
Everything here is pretty standard webpack fare, but note that we alias vue$ to vue/dist/vue.esm.js so that we can get the ES2015 module version of Vue.
We use the WebpackNotifierPlugin to let us know the status of our builds in a friendly way.
LEGACY CONFIG
The legacyConfig is for building ES5 legacy JavaScript with the appropriate polyfills:
// Legacy webpack config
const legacyConfig = {
    module: {
        rules: [
            configureBabelLoader(Object.values(pkg.browserslist.legacyBrowsers)),
        ],
    },
    plugins: [
        new CopyWebpackPlugin(
            settings.copyWebpackConfig
        ),
        new ManifestPlugin(
            configureManifest('manifest-legacy.json')
        ),
    ]
};
Note that we pass in pkg.browserslist.legacyBrowsers to configureBabelLoader(), and we pass in 'manifest-legacy.json' to configureManifest().
We also include the CopyWebpackPlugin in this build, so that we only copy the files defined in settings.copyWebpackConfig once.
MODERN CONFIG
The modernConfig is for building modern ES2015 JavaScript modules without the cruft:
// Modern webpack config
const modernConfig = {
    module: {
        rules: [
            configureBabelLoader(Object.values(pkg.browserslist.modernBrowsers)),
        ],
    },
    plugins: [
        new ManifestPlugin(
            configureManifest('manifest.json')
        ),
    ]
};
Note that we pass in pkg.browserslist.modernBrowsers to configureBabelLoader(), and we pass in'manifest.json' to configureManifest().
MODULE.EXPORTS
Finally, the module.exports uses the webpack-merge package to merge the configs together, and returns an object that is used by the webpack.dev.js and webpack.prod.js.
// Common module exports
// noinspection WebpackConfigHighlighting
module.exports = {
    'legacyConfig': merge.strategy({
        module: 'prepend',
        plugins: 'prepend',
    })(
        baseConfig,
        legacyConfig,
    ),
    'modernConfig': merge.strategy({
        module: 'prepend',
        plugins: 'prepend',
    })(
        baseConfig,
        modernConfig,
    ),
};
Annotated webpack.dev.js
Now let’s have a look at our webpack.dev.js config file that has all of the settings that are used for developmental builds while we’re working on the project. It gets merged with the settings in webpack.common.js to form a complete webpack configuration.
// webpack.dev.js - developmental builds

// node modules
const merge = require('webpack-merge');
const path = require('path');
const webpack = require('webpack');

// webpack plugins
const DashboardPlugin = require('webpack-dashboard/plugin');

// config files
const common = require('./webpack.common.js');
const pkg = require('./package.json');
const settings = require('./webpack.settings.js');
In the webpack.dev.js config, there isn’t a concept of modern & legacy builds, because in local dev when we’re using webpack-dev-server, we can assume a modern build.
In the preamble we again pull in the Node packages we need, and the webpack plugins we use. We then import our webpack.settings.js as settings so we can access the settings there, and also import our package.json as pkg to access a few settings there as well.
We also import our webpack.common.js common webpack config that we’ll merge our dev settings with.
CONFIGURATION FUNCTIONS
Here’s what the configureDevServer() looks like:
// Configure the webpack-dev-server
const configureDevServer = () => {
    return {
        public: settings.devServerConfig.public(),
        contentBase: path.resolve(__dirname, settings.paths.templates),
        host: settings.devServerConfig.host(),
        port: settings.devServerConfig.port(),
        https: !!parseInt(settings.devServerConfig.https()),
        disableHostCheck: true,
        hot: true,
        overlay: true,
        watchContentBase: true,
        watchOptions: {
            poll: !!parseInt(settings.devServerConfig.poll()),
            ignored: /node_modules/,
        },
        headers: {
            'Access-Control-Allow-Origin': '*'
        },
    };
};
When we do a production build, webpack bundles up all of our various assets and saves them to the file system. By contrast, when we’re working on a project in local dev, we use a development build via webpack-dev-server that:
- Spins up a local Express web server that serves our assets
- Builds our assets in memory rather than to the file system, for speed
- Will rebuild assets like JavaScript, CSS, Vue components, etc. as we change them and inject them into the webpage via Hot Module Replacement (HMR) without a page reload
- Will reload the page when we make changes to our templates
This is akin to a much more sophisticated variant of Browsersync, and greatly speeds development.
Note that config for the webpack-dev-server again comes from our webpack.settings.js file. The defaults are probably okay for many people, but I use Laravel Homestead for local dev, as discussed in the Local Development with Vagrant / Homestead article. This means I run all development tooling inside of my Homestead VM.
So instead of hard-coding the local development environment in my webpack.settings.js file (since it can vary from person to person working on a team), the webpack.settings.js can read from an optional .env file for your own particular devServer config:
# webpack example settings for Homestead/Vagrant
PUBLIC_PATH="/dist/"
DEVSERVER_PUBLIC="http://192.168.10.10:8080"
DEVSERVER_HOST="0.0.0.0"
DEVSERVER_POLL=1
DEVSERVER_PORT=8080
DEVSERVER_HTTPS=0
You may use something different, so change the settings as appropriate in your .env file as needed. The idea behind dotenv is that we put anything specific to an environment in the .env file, and we do not check it in to our git repo. If the .env file isn’t present, that’s fine, it just uses default values:
devServerConfig: {
    public: () => process.env.DEVSERVER_PUBLIC || "http://localhost:8080",
    host: () => process.env.DEVSERVER_HOST || "localhost",
    poll: () => process.env.DEVSERVER_POLL || false,
    port: () => process.env.DEVSERVER_PORT || 8080,
    https: () => process.env.DEVSERVER_HTTPS || false,
},
urls: {
    live: "https://example.com/",
    local: "http://example.test/",
    critical: "http://example.test/",
    publicPath: () => process.env.PUBLIC_PATH || "/dist/",
},
We also use the PUBLIC_PATH .env variable (if present) to allow for per-environment builds of the production build. This is so that we can do a local production build, or we can do a distribution production build in a Docker container that builds with URLs ready for distribution via a CDN.
Next up is the configureImageLoader():
// Configure Image loader
const configureImageLoader = () => {
    return {
        test: /\.(png|jpe?g|gif|svg|webp)$/i,
        use: [
            {
                loader: 'file-loader',
                options: {
                    name: 'img/[name].[hash].[ext]'
                }
            }
        ]
    };
};
It’s important to note that this is only for images that are included in our webpack build; many other images will be coming from elsewhere (a CMS system, an asset management system, etc.).
To let webpack know about an image, you import it into your JavaScript:
import Icon from './icon.png';
Check out the Loading Images section of the webpack docs for more details on this.
Next up is our configurePostcssLoader():
// Configure the Postcss loader
const configurePostcssLoader = () => {
    return {
        test: /\.(pcss|css)$/,
        use: [
            {
                loader: 'style-loader',
            },
            {
                loader: 'vue-style-loader',
            },
            {
                loader: 'css-loader',
                options: {
                    url: false,
                    importLoaders: 2,
                    sourceMap: true
                }
            },
            {
                loader: 'resolve-url-loader'
            },
            {
                loader: 'postcss-loader',
                options: {
                    sourceMap: true
                }
            }
        ]
    };
};
We use PostCSS to process all of our CSS, including Tailwind CSS. I think of it as the Babel of CSS, in that it compiles all sorts of advanced CSS functionality down to plain old CSS that your browsers can understand.
It’s important to note that for webpack loaders, they are processed in reverse order that they are listed:
- postcss-loader — Loads and processes files as PostCSS
- resolve-url-loader — Rewrites any url()s in our CSS to public path relative
- css-loader — Resolves all of our CSS @import and url()s
- vue-style-loader — Injects all of our CSS from .vue Single File Components linline
- style-loader — Injects all of our CSS into the document inline in <style></style> tags
Remember, since this is what we do in local development, we don’t need to do anything fancy in terms of extracting all of our CSS out into a minimized file. Instead, we just let the style-loader inline it all in our document.
The webpack-dev-server will use Hot Module Replacement (HMR) for our CSS, so any time we change anything, it rebuilds our CSS and re-injects it automatically. It’s somewhat magical.
We tell webpack about our CSS by including it:
import styles from '../css/app.pcss';
This is discussed in detail in the Loading CSS section of the webpack docs.
We do this from our App.js entry point; think of this as the PostCSS entry point. The app.pcss file @imports all of the CSS that our project uses; this will be covered in detail later on.
MODULE.EXPORTS
Finally, the module.exports uses the webpack-merge package to merge the common.modernConfig with our dev config:
// Development module exports
module.exports = merge(
    common.modernConfig,
    {
        output: {
            filename: path.join('./js', '[name].[hash].js'),
            publicPath: settings.devServerConfig.public() + '/',
        },
        mode: 'development',
        devtool: 'inline-source-map',
        devServer: configureDevServer(),
        module: {
            rules: [
                configurePostcssLoader(),
                configureImageLoader(),
            ],
        },
        plugins: [
            new webpack.HotModuleReplacementPlugin(),
            new DashboardPlugin(),
        ],
    }
);
By setting the mode to 'development' we’re telling webpack that this is a development build.
By setting devtool to 'inline-source-map' we’re asking for our .maps for our CSS/JavaScript to be inlined into the files themselves. This makes the files huge, but it’s convenient for debugging purposes.
The webpack.HotModuleReplacementPlugin enables support for Hot Module Replacement (HMR) on the webpack side of things.
The DashboardPlugin plugin lets us feel like an astronaut with a fancy webpack build HUD:

I’ve found the DashboardPlugin development HUD to be significantly more useful than the default webpack progress scroll.
If you find that you need to debug the webpack config itself, you can use yarn run debug or npm run debug to run the local development build but bypass the webpack-dashboard.
And that’s it, we now have a nice development build for our projects; check out the Hot Module Replacement video for an example of this in action:
Annotated webpack.prod.js
Now let’s have a look at our webpack.prod.js config file that has all of the settings that are used for production builds while we’re working on the project. It gets merged with the settings in webpack.common.js to form a complete webpack configuration.
// webpack.prod.js - production builds
const LEGACY_CONFIG = 'legacy';
const MODERN_CONFIG = 'modern';

// node modules
const git = require('git-rev-sync');
const glob = require('glob-all');
const merge = require('webpack-merge');
const moment = require('moment');
const path = require('path');
const webpack = require('webpack');

// webpack plugins
const BundleAnalyzerPlugin = require('webpack-bundle-analyzer').BundleAnalyzerPlugin;
const { CleanWebpackPlugin } = require('clean-webpack-plugin');
const CreateSymlinkPlugin = require('create-symlink-webpack-plugin');
const CriticalCssPlugin = require('critical-css-webpack-plugin');
const HtmlWebpackPlugin = require('html-webpack-plugin');
const ImageminWebpWebpackPlugin = require('imagemin-webp-webpack-plugin');
const MiniCssExtractPlugin = require('mini-css-extract-plugin');
const OptimizeCSSAssetsPlugin = require('optimize-css-assets-webpack-plugin');
const PurgecssPlugin = require('purgecss-webpack-plugin');
const SaveRemoteFilePlugin = require('save-remote-file-webpack-plugin');
const TerserPlugin = require('terser-webpack-plugin');
const WebappWebpackPlugin = require('webapp-webpack-plugin');
const WhitelisterPlugin = require('purgecss-whitelister');
const WorkboxPlugin = require('workbox-webpack-plugin');

// config files
const common = require('./webpack.common.js');
const pkg = require('./package.json');
const settings = require('./webpack.settings.js');
In the preamble we again pull in the Node packages we need, and the webpack plugins we use. We then import our webpack.settings.js as settings so we can access the settings there, and also import our package.json as pkg to access a few settings there as well.
We also import our webpack.common.js common webpack config that we’ll merge our dev settings with.
TAILWIND EXTRACTOR
This class is a custom PurgeCSS extractor for Tailwind CSS that allows special characters in class names.
// Custom PurgeCSS extractor for Tailwind that allows special characters in
// class names.
//
// https://github.com/FullHuman/purgecss#extractor
class TailwindExtractor {
    static extract(content) {
        return content.match(/[A-Za-z0-9-_:\/]+/g) || [];
    }
}
This is taken from the Removing unused CSS with PurgeCSS section of the Tailwind CSS docs. See below for details on how this extractor works with PurgeCSS to magically make your CSS svelte and tidy.
CONFIGURATION FUNCTIONS
Here’s what the configureBanner() looks like:
// Configure file banner
const configureBanner = () => {
    return {
        banner: [
            '/*!',
            ' * @project ' + settings.name,
            ' * @name ' + '[filebase]',
            ' * @author ' + pkg.author.name,
            ' * @build ' + moment().format('llll') + ' ET',
            ' * @release ' + git.long() + ' [' + git.branch() + ']',
            ' * @copyright Copyright (c) ' + moment().format('YYYY') + ' ' + settings.copyright,
            ' *',
            ' */',
            ''
        ].join('\n'),
        raw: true
    };
};
This simply adds a banner with project name, file name, author, and git information for each file we build.
Next up is the configureBundleAnalyzer():
// Configure Bundle Analyzer
const configureBundleAnalyzer = (buildType) => {
    if (buildType === LEGACY_CONFIG) {
        return {
            analyzerMode: 'static',
            reportFilename: 'report-legacy.html',
        };
    }
    if (buildType === MODERN_CONFIG) {
        return {
            analyzerMode: 'static',
            reportFilename: 'report-modern.html',
        };
    }
};
This uses the WebpackBundleAnalyzer plugin to generate a report for both our modern and legacy bundle builds that results in a self-contained interactive HTML page that allows you to explore what exactly is in the bundle that has been generated by webpack.

I’ve found it to be very useful to help me keep my bundle sizes down, and understand exactly what webpack is building, so I’ve made it part of my production build process.
Next up is the configureCriticalCss():
// Configure Critical CSS
const configureCriticalCss = () => {
    return (settings.criticalCssConfig.pages.map((row) => {
            const criticalSrc = settings.urls.critical + row.url;
            const criticalDest = settings.criticalCssConfig.base + row.template + settings.criticalCssConfig.suffix;
            let criticalWidth = settings.criticalCssConfig.criticalWidth;
            let criticalHeight = settings.criticalCssConfig.criticalHeight;
            // Handle Google AMP templates
            if (row.template.indexOf(settings.criticalCssConfig.ampPrefix) !== -1) {
                criticalWidth = settings.criticalCssConfig.ampCriticalWidth;
                criticalHeight = settings.criticalCssConfig.ampCriticalHeight;
            }
            console.log("source: " + criticalSrc + " dest: " + criticalDest);
            return new CriticalCssPlugin({
                base: './',
                src: criticalSrc,
                dest: criticalDest,
                extract: false,
                inline: false,
                minify: true,
                width: criticalWidth,
                height: criticalHeight,
            })
        })
    );
};
This uses the CriticalCssPlugin to generate CriticalCSS for our website by chunking through the settings.criticalCssConfig.pages from our webpack.settings.js.
Note that if the page passed in has settings.criticalCssConfig.ampPrefix anywhere in its name, it generates CriticalCSS for the entire webpage (not just the above the fold content) by passing in a very large height.
I won’t go into too much detail on CriticalCSS here; check out the Implementing Critical CSS on your website article for more information on CriticalCSS.
Next up is the configureCleanWebpack():
// Configure Clean webpack
const configureCleanWebpack = () => {
    return {
        cleanOnceBeforeBuildPatterns: settings.paths.dist.clean,
        verbose: true,
        dry: false
    };
};
This just uses the CleanWebpackPlugin to delete the build directory in settings.paths.dist.base from our webpack.settings.js.
Next up is configureCompression():
// Configure Compression webpack plugin
const configureCompression = () => {
    return {
        filename: '[path].gz[query]',
        test: /\.(js|css|html|svg)$/,
        threshold: 10240,
        minRatio: 0.8,
        deleteOriginalAssets: false,
        compressionOptions: {
            numiterations: 15,
            level: 9
        },
        algorithm(input, compressionOptions, callback) {
            return zopfli.gzip(input, compressionOptions, callback);
        }
    };
};
This uses the CompressionPlugin to pre-compress our static resources into .gz files so we can serve them up pre-compressed via a simple webserver config.
Next up is configureHtml():
// Configure Html webpack
const configureHtml = () => {
    return {
        templateContent: '',
        filename: 'webapp.html',
        inject: false,
    };
};
This uses the HtmlWebpackPlugin in conjunction with the WebappWebpackPlugin (see below) to generate the HTML for our favicons. Note that we pass in an empty string in templateContent so that the output is just the raw output from the WebappWebpackPlugin.
Next up is the configureImageLoader():
// Configure Image loader
const configureImageLoader = (buildType) => {
    if (buildType === LEGACY_CONFIG) {
        return {
            test: /\.(png|jpe?g|gif|svg|webp)$/i,
            use: [
                {
                    loader: 'file-loader',
                    options: {
                        name: 'img/[name].[hash].[ext]'
                    }
                }
            ]
        };
    }
    if (buildType === MODERN_CONFIG) {
        return {
            test: /\.(png|jpe?g|gif|svg|webp)$/i,
            use: [
                {
                    loader: 'file-loader',
                    options: {
                        name: 'img/[name].[hash].[ext]'
                    }
                },
                {
                    loader: 'img-loader',
                    options: {
                        plugins: [
                            require('imagemin-gifsicle')({
                                interlaced: true,
                            }),
                            require('imagemin-mozjpeg')({
                                progressive: true,
                                arithmetic: false,
                            }),
                            require('imagemin-optipng')({
                                optimizationLevel: 5,
                            }),
                            require('imagemin-svgo')({
                                plugins: [
                                    {convertPathData: false},
                                ]
                            }),
                        ]
                    }
                }
            ]
        };
    }
};
We pass in the buildType so that we can return different results depending on whether it is a legacy or modern build. In this case, we run images through a variety of image optimizations via img-loader for the modern build.
We only do this for the modern build, because there’s no sense in spending the time to optimize the images for both the modern and the legacy builds (the images are the same for both).
It’s important to note that this is only for images that are included in our webpack build; many other images will be coming from elsewhere (a CMS system, an asset management system, etc.).
To let webpack know about an image, you import it into your JavaScript:
import Icon from './icon.png';
Check out the Loading Images section of the webpack docs for more details on this.
Next up is our configureOptimization():
// Configure optimization
const configureOptimization = (buildType) => {
    if (buildType === LEGACY_CONFIG) {
        return {
            splitChunks: {
                cacheGroups: {
                    default: false,
                    common: false,
                    styles: {
                        name: settings.vars.cssName,
                        test: /\.(pcss|css|vue)$/,
                        chunks: 'all',
                        enforce: true
                    }
                }
            },
            minimizer: [
                new TerserPlugin(
                    configureTerser()
                ),
                new OptimizeCSSAssetsPlugin({
                    cssProcessorOptions: {
                        map: {
                            inline: false,
                            annotation: true,
                        },
                        safe: true,
                        discardComments: true
                    },
                })
            ]
        };
    }
    if (buildType === MODERN_CONFIG) {
        return {
            minimizer: [
                new TerserPlugin(
                    configureTerser()
                ),
            ]
        };
    }
};
This is where we configure the webpack production optimization. For the legacy build only (there’s no sense in doing it twice), we use the MiniCssExtractPlugin to extract all of the CSS used project-wide into a single file. If you’ve used webpack before, you might have used the ExtractTextPlugin to do this in the past; no more.
We then also use the OptimizeCSSAssetsPlugin to optimize the resulting CSS by removing duplicate rules, and minimizing the CSS via cssnano.
Finally, we set the JavaScript minimizer to be the TerserPlugin; this is because the UglifyJsPlugin no longer supports minimizing ES2015+ JavaScript. And since we’re generating modern ES2015+ bundles, we need it.
Next up is the configurePostcssLoader():
// Configure Postcss loader
const configurePostcssLoader = (buildType) => {
    if (buildType === LEGACY_CONFIG) {
        return {
            test: /\.(pcss|css)$/,
            use: [
                MiniCssExtractPlugin.loader,
                {
                    loader: 'css-loader',
                    options: {
                        importLoaders: 2,
                        sourceMap: true
                    }
                },
                {
                    loader: 'resolve-url-loader'
                },
                {
                    loader: 'postcss-loader',
                    options: {
                        sourceMap: true
                    }
                }
            ]
        };
    }
    // Don't generate CSS for the modern config in production
    if (buildType === MODERN_CONFIG) {
        return {
            test: /\.(pcss|css)$/,
            loader: 'ignore-loader'
        };
    }
};
This looks very similar to the dev version of configurePostcssLoader(), except that for our final loader, we use the MiniCssExtractPlugin.loader to extract all of our CSS into a single file.
We do this only for the legacy build, since there’s no sense in doing it for each build (the CSS is the same). We use the ignore-loader for modern builds, so a loader exists for our .css & .pcss files, but it does nothing.
As mentioned earlier, we use PostCSS to process all of our CSS, including Tailwind CSS. I think of it as the Babel of CSS, in that it compiles all sorts of advanced CSS functionality down to plain old CSS that your browsers can understand.
Again, it’s important to note that for webpack loaders, they are processed in reverse order that they are listed:
- postcss-loader — Loads and processes files as PostCSS
- resolve-url-loader — Rewrites any url()s in our CSS to public path relative
- css-loader — Resolves all of our CSS @import and url()s
- MiniCssExtractPlugin.loader — Extracts all of our production CSS to a single file
Since this is a production build, we pull out all of the CSS used everywhere with the MiniCssExtractPlugin.loader, and save it to a single .css file. The CSS also gets minimized, and optimized for production.
We tell webpack about our CSS by including it:
import styles from '../css/app.pcss';
This is discussed in detail in the Loading CSS section of the webpack docs.
We do this from our App.js entry point; think of this as the PostCSS entry point. The app.pcss file @imports all of the CSS that our project uses; this will be covered in detail later on.
Next up is the configurePurgeCss():
// Configure PurgeCSS
const configurePurgeCss = () => {
    let paths = [];
    // Configure whitelist paths
    for (const [key, value] of Object.entries(settings.purgeCssConfig.paths)) {
        paths.push(path.join(__dirname, value));
    }

    return {
        paths: glob.sync(paths),
        whitelist: WhitelisterPlugin(settings.purgeCssConfig.whitelist),
        whitelistPatterns: settings.purgeCssConfig.whitelistPatterns,
        extractors: [
            {
                extractor: TailwindExtractor,
                extensions: settings.purgeCssConfig.extensions
            }
        ]
    };
};
Tailwind CSS is a fantastic utility-first CSS framework that allows for rapid prototyping because in local development, you rarely have to actually write any CSS. Instead, you just use the provided utility CSS classes.
The downside is that the resulting CSS can be a little large. This is where PurgeCSS comes in. It will parse through all of your HTML/template/Vue/whatever files, and strip out any unused CSS.
The savings can be dramatic; Tailwind CSS and PurgeCSS are a match made in heaven. We talked about this in depth on the Tailwind CSS utility-first CSS with Adam Wathan podcast.
It iterates through all of the path globs in settings.purgeCssConfig.paths looking for CSS rules to keep; any CSS rules not found get stripped out of our resulting CSS build.
We also use the WhitelisterPlugin to make it easy to whitelist entire files or even globs when we know we don’t want certain CSS stripped. The CSS rules in all of the files that match our settings.purgeCssConfig.whitelist are whitelisted, and never stripped from the resulting build.
Next up is configureTerser():
// Configure terser
const configureTerser = () => {
    return {
        cache: true,
        parallel: true,
        sourceMap: true
    };
};
This just configures some settings used by the TerserPlugin that minimizes both our legacy and modern JavaScript code.
Next up is the configureWebApp():
// Configure Webapp webpack
const configureWebapp = () => {
    return {
        logo: settings.webappConfig.logo,
        prefix: settings.webappConfig.prefix,
        cache: false,
        inject: 'force',
        favicons: {
            appName: pkg.name,
            appDescription: pkg.description,
            developerName: pkg.author.name,
            developerURL: pkg.author.url,
            path: settings.paths.dist.base,
        }
    };
};
This uses the WebappWebpackPlugin to generate all of our site favicons in a myriad of formats, as well as our webapp manifest.json and other PWA niceties.
It works in conjunction with the HtmlWebpackPlugin to also output a webapp.html file that contains links to all of the generated favicons and associated files, for inclusion in our HTML page’s <head></head>.
Next up is the configureWorkbox():
// Configure Workbox service worker
const configureWorkbox = () => {
    let config = settings.workboxConfig;

    return config;
};
We use Google’s WorkboxWebpackPlugin to generate a Service Worker for our website. It’s beyond the scope of this article explain what a Service Worker is, but you can check out the Going Offline: Service Workers with Jeremy Keith podcast for a primer.
The configuration all comes from the settings.workboxConfig object in our webpack.settings.js. In addition to pre-caching all of the assets in our modern build manifest.json, we also include a workbox-catch-handler.js to configure it to use a fallback response catch-all route.
// fallback URLs
const FALLBACK_HTML_URL = '/offline.html';
const FALLBACK_IMAGE_URL = '/offline.svg';

// This "catch" handler is triggered when any of the other routes fail to
// generate a response.
// https://developers.google.com/web/tools/workbox/guides/advanced-recipes#provide_a_fallback_response_to_a_route
workbox.routing.setCatchHandler(({event, request, url}) => {
    // Use event, request, and url to figure out how to respond.
    // One approach would be to use request.destination, see
    // https://medium.com/dev-channel/service-worker-caching-strategies-based-on-request-types-57411dd7652c
    switch (request.destination) {
        case 'document':
            return caches.match(FALLBACK_HTML_URL);
            break;

        case 'image':
            return caches.match(FALLBACK_IMAGE_URL);
            break;

        default:
            // If we don't have a fallback, just return an error response.
            return Response.error();
    }
});

// Use a stale-while-revalidate strategy for all other requests.
workbox.routing.setDefaultHandler(
    workbox.strategies.staleWhileRevalidate()
);
MODULE.EXPORTS
Finally, the module.exports uses the webpack-merge to merge the common.legacyConfig from the webpack.common.js with our production legacy config, and the common.modernConfig with our production modern config:
// Production module exports
module.exports = [
    merge(
        common.legacyConfig,
        {
            output: {
                filename: path.join('./js', '[name]-legacy.[chunkhash].js'),
            },
            mode: 'production',
            devtool: 'source-map',
            optimization: configureOptimization(LEGACY_CONFIG),
            module: {
                rules: [
                    configurePostcssLoader(LEGACY_CONFIG),
                    configureImageLoader(LEGACY_CONFIG),
                ],
            },
            plugins: [
                new MiniCssExtractPlugin({
                    path: path.resolve(__dirname, settings.paths.dist.base),
                    filename: path.join('./css', '[name].[chunkhash].css'),
                }),
                new PurgecssPlugin(
                    configurePurgeCss()
                ),
                new webpack.BannerPlugin(
                    configureBanner()
                ),
                new HtmlWebpackPlugin(
                    configureHtml()
                ),
                new WebappWebpackPlugin(
                    configureWebapp()
                ),
                new CreateSymlinkPlugin(
                    settings.createSymlinkConfig,
                    true
                ),
                new SaveRemoteFilePlugin(
                    settings.saveRemoteFileConfig
                ),
                new BundleAnalyzerPlugin(
                    configureBundleAnalyzer(LEGACY_CONFIG),
                ),
            ].concat(
                configureCriticalCss()
            )
        }
    ),
    merge(
        common.modernConfig,
        {
            output: {
                filename: path.join('./js', '[name].[chunkhash].js'),
            },
            mode: 'production',
            devtool: 'source-map',
            optimization: configureOptimization(MODERN_CONFIG),
            module: {
                rules: [
                    configurePostcssLoader(MODERN_CONFIG),
                    configureImageLoader(MODERN_CONFIG),
                ],
            },
            plugins: [
                new CleanWebpackPlugin(
                    configureCleanWebpack()
                ),
                new webpack.BannerPlugin(
                    configureBanner()
                ),
                new ImageminWebpWebpackPlugin(),
                new WorkboxPlugin.GenerateSW(
                    configureWorkbox()
                ),
                new BundleAnalyzerPlugin(
                    configureBundleAnalyzer(MODERN_CONFIG),
                ),
            ]
        }
    ),
];
By returning an array in our module.exports, we’re telling webpack that we have more than one compile that needs to be done: one for our legacy build, and another for our modern build.
Note that for the legacy build, we output processed JavaScript as [name]-legacy.[hash].js, whereas the modern build outputs it as [name].[hash].js.
By setting the mode to 'production' we’re telling webpack that this is a production build. This enables a number of settings appropriate for a production build.
By setting devtool to 'source-map' we’re asking for our .maps for our CSS/JavaScript to be generated as separate .map files. This makes it easier for us to debug live production websites without adding the file size of our assets.
There are a couple of webpack plugins used here that we haven’t covered already:
- CreateSymlinkPlugin — this is a plugin I created to allow for symlink creation as part of the build process. I use it to symlink the generated favicon.ico to /favicon.ico because many web browsers look for in the web root.
- SaveRemoteFilePlugin — this is a plugin I created to download remote files and emit them as part of the webpack build process. I use this for downloading and serving up Google’s analytics.js locally.
- ImageminWebpWebpackPlugin — this plugin creates .webp variants of all of the JPEG and PNG files that your project imports
And that’s it, we now have a nice production build for our projects with all of the bells & whistles.
Tailwind CSS & PostCSS Config
To make webpack build Tailwind CSS and the rest of our CSS properly, we need to do a little setup. Credit to my partner in crime, Jonathan Melville, for working this aspect of the build out. First we need a postcss.config.js file:
module.exports = {
    plugins: [
        require('postcss-import')({
            plugins: [
                require('stylelint')
            ]
        }),
        require('tailwindcss')('./tailwind.config.js'),
        require('postcss-preset-env')({
            autoprefixer: { grid: true },
            features: {
                'nesting-rules': true
            }
        })
    ]
};
This can be stored in the project root; PostCSS will look for it automatically as part of the build process, and apply the PostCSS plugins we’ve specified. Note this is where we include the tailwind.config.js file to make it part of the build process.
Finally, our CSS entry point app.pcss looks something like this:
/**
 * app.css
 *
 * The entry point for the css.
 *
 */

/**
 * This injects Tailwind's base styles, which is a combination of
 * Normalize.css and some additional base styles.
 *
 * You can see the styles here:
 * https://github.com/tailwindcss/tailwindcss/blob/master/css/preflight.css
 */
 @import "tailwindcss/preflight";

/**
 * This injects any component classes registered by plugins.
 *
 */
@import 'tailwindcss/components';

/**
 * Here we add custom component classes; stuff we want loaded
 * *before* the utilities so that the utilities can still
 * override them.
 *
 */
@import './components/global.pcss';
@import './components/typography.pcss';
@import './components/webfonts.pcss';

/**
 * This injects all of Tailwind's utility classes, generated based on your
 * config file.
 *
 */
@import 'tailwindcss/utilities';

/**
 * Include styles for individual pages
 *
 */
@import './pages/homepage.pcss';

/**
 * Include vendor css.
 *
 */
 @import 'vendor.pcss';
Obviously, tailor it to include whatever components/pages that you use for your custom CSS.
Post-Build Project Tree
Here’s what our project tree looks like post-build:
├── example.env
├── package.json
├── postcss.config.js
├── src
│   ├── css
│   │   ├── app.pcss
│   │   ├── components
│   │   │   ├── global.pcss
│   │   │   ├── typography.pcss
│   │   │   └── webfonts.pcss
│   │   ├── pages
│   │   │   └── homepage.pcss
│   │   └── vendor.pcss
│   ├── fonts
│   ├── img
│   │   └── favicon-src.png
│   ├── js
│   │   ├── app.js
│   │   └── workbox-catch-handler.js
│   └── vue
│   └── Confetti.vue
├── tailwind.config.js
├── templates
├── web
│   ├── dist
│   │   ├── criticalcss
│   │   │   └── index_critical.min.css
│   │   ├── css
│   │   │   ├── styles.d833997e3e3f91af64e7.css
│   │   │   └── styles.d833997e3e3f91af64e7.css.map
│   │   ├── img
│   │   │   └── favicons
│   │   │   ├── android-chrome-144x144.png
│   │   │   ├── android-chrome-192x192.png
│   │   │   ├── android-chrome-256x256.png
│   │   │   ├── android-chrome-36x36.png
│   │   │   ├── android-chrome-384x384.png
│   │   │   ├── android-chrome-48x48.png
│   │   │   ├── android-chrome-512x512.png
│   │   │   ├── android-chrome-72x72.png
│   │   │   ├── android-chrome-96x96.png
│   │   │   ├── apple-touch-icon-114x114.png
│   │   │   ├── apple-touch-icon-120x120.png
│   │   │   ├── apple-touch-icon-144x144.png
│   │   │   ├── apple-touch-icon-152x152.png
│   │   │   ├── apple-touch-icon-167x167.png
│   │   │   ├── apple-touch-icon-180x180.png
│   │   │   ├── apple-touch-icon-57x57.png
│   │   │   ├── apple-touch-icon-60x60.png
│   │   │   ├── apple-touch-icon-72x72.png
│   │   │   ├── apple-touch-icon-76x76.png
│   │   │   ├── apple-touch-icon.png
│   │   │   ├── apple-touch-icon-precomposed.png
│   │   │   ├── apple-touch-startup-image-1182x2208.png
│   │   │   ├── apple-touch-startup-image-1242x2148.png
│   │   │   ├── apple-touch-startup-image-1496x2048.png
│   │   │   ├── apple-touch-startup-image-1536x2008.png
│   │   │   ├── apple-touch-startup-image-320x460.png
│   │   │   ├── apple-touch-startup-image-640x1096.png
│   │   │   ├── apple-touch-startup-image-640x920.png
│   │   │   ├── apple-touch-startup-image-748x1024.png
│   │   │   ├── apple-touch-startup-image-750x1294.png
│   │   │   ├── apple-touch-startup-image-768x1004.png
│   │   │   ├── browserconfig.xml
│   │   │   ├── coast-228x228.png
│   │   │   ├── favicon-16x16.png
│   │   │   ├── favicon-32x32.png
│   │   │   ├── favicon.ico
│   │   │   ├── firefox_app_128x128.png
│   │   │   ├── firefox_app_512x512.png
│   │   │   ├── firefox_app_60x60.png
│   │   │   ├── manifest.json
│   │   │   ├── manifest.webapp
│   │   │   ├── mstile-144x144.png
│   │   │   ├── mstile-150x150.png
│   │   │   ├── mstile-310x150.png
│   │   │   ├── mstile-310x310.png
│   │   │   ├── mstile-70x70.png
│   │   │   ├── yandex-browser-50x50.png
│   │   │   └── yandex-browser-manifest.json
│   │   ├── js
│   │   │   ├── analytics.45eff9ff7d6c7c1e3c3d4184fdbbed90.js
│   │   │   ├── app.30334b5124fa6e221464.js
│   │   │   ├── app.30334b5124fa6e221464.js.map
│   │   │   ├── app-legacy.560ef247e6649c0c24d0.js
│   │   │   ├── app-legacy.560ef247e6649c0c24d0.js.map
│   │   │   ├── confetti.1152197f8c58a1b40b34.js
│   │   │   ├── confetti.1152197f8c58a1b40b34.js.map
│   │   │   ├── confetti-legacy.8e9093b414ea8aed46e5.js
│   │   │   ├── confetti-legacy.8e9093b414ea8aed46e5.js.map
│   │   │   ├── precache-manifest.f774c437974257fc8026ca1bc693655c.js
│   │   │   ├── styles-legacy.d833997e3e3f91af64e7.js
│   │   │   ├── styles-legacy.d833997e3e3f91af64e7.js.map
│   │   │   ├── vendors~confetti~vue.03b9213ce186db5518ea.js
│   │   │   ├── vendors~confetti~vue.03b9213ce186db5518ea.js.map
│   │   │   ├── vendors~confetti~vue-legacy.e31223849ab7fea17bb8.js
│   │   │   ├── vendors~confetti~vue-legacy.e31223849ab7fea17bb8.js.map
│   │   │   └── workbox-catch-handler.js
│   │   ├── manifest.json
│   │   ├── manifest-legacy.json
│   │   ├── report-legacy.html
│   │   ├── report-modern.html
│   │   ├── webapp.html
│   │   └── workbox-catch-handler.js
│   ├── favicon.ico -> dist/img/favicons/favicon.ico
│   ├── index.php
│   ├── offline.html
│   ├── offline.svg
│   └── sw.js
├── webpack.common.js
├── webpack.dev.js
├── webpack.prod.js
├── webpack.settings.js
└── yarn.lock
Injecting script & CSS tags in your HTML
With the webpack config shown here, <script> and <style> tags do not get injected into your HTML as part of the production build. The setup uses Craft CMS, which has a templating system, and we inject the tags using the Twigpack plugin.
If you’re not using Craft CMS or a system that has a templating engine, and want these tags injected into your HTML, you’ll want to use the HtmlWebpackPlugin to do that for you. This plugin is already included, you’d just need to add a little config to tell it to inject the tags into your HTML.
Craft CMS 3 Integration with the Twigpack plugin
If you’re not using Craft CMS 3, you can safely skip this section. It just provides some useful integration information.
![]()
I wrote a free plugin called Twigpack that makes it easy to integrate our fancy webpack build setup with Craft CMS 3.
It handles accessing the manifest.json files to inject entry points into your Twig templates, and it even handles patterns for doing the legacy/modern module injection, asynchronous CSS loading, and a whole lot more.
It’ll make working with the webpack 4 config presented here very simple.
To include the CSS, I do:
<!--# if expr="$HTTP_COOKIE=/critical\-css\=1/" -->
    {{ craft.twigpack.includeCssModule("styles.css", false) }}
<!--# else -->
    <script>
        Cookie.set("critical-css", '1', { expires: "7D", secure: true });
    </script>
    {{ craft.twigpack.includeCriticalCssTags() }}

    {{ craft.twigpack.includeCssModule("styles.css", true) }}
    {{ craft.twigpack.includeCssRelPreloadPolyfill() }}
<!--# endif -->
The <!--# --> HTML comments are Nginx Server Side Includes directives. The pattern is that if the critical-css cookie is set, the user has already visited our website in the last 7 days, so their browser should have the site CSS cached, and we just serve up the site CSS normally.
If the critical-css cookie is not set, we set the cookie via Tiny Cookie, include our Critical CSS, and load the site CSS asynchronously. See the Implementing Critical CSS on your website article for details on Critical CSS.
To serve up our JavaScript, we just do:
{{ craft.twigpack.includeSafariNomoduleFix() }}
{{ craft.twigpack.includeJsModule("app.js", true) }}
The second true parameter tells it to load the JavaScript async as a module, so the resulting HTML looks like this:
<script>
!function(){var e=document,t=e.createElement("script");if(!("noModule"in t)&&"onbeforeload"in t){var n=!1;e.addEventListener("beforeload",function(e){if(e.target===t)n=!0;else if(!e.target.hasAttribute("nomodule")||!n)return;e.preventDefault()},!0),t.type="module",t.src=".",e.head.appendChild(t),t.remove()}}();
</script>
<script type="module" src="http://example.test/dist/js/app.273e88e73566fecf20de.js"></script>
<script nomodule src="http://example.test/dist/js/app-legacy.95d36ead9190c0571578.js"></script>
See the Twigpack documentation for details
Here’s my full config/twigpack.php file that I use; note that it has local settings for running inside of my Homestead VM. Your settings may differ:
return [
    // Global settings
    '*' => [
        // If `devMode` is on, use webpack-dev-server to all for HMR (hot module reloading)
        'useDevServer' => false,
        // The JavaScript entry from the manifest.json to inject on Twig error pages
        'errorEntry' => '',
        // Manifest file names
        'manifest' => [
            'legacy' => 'manifest-legacy.json',
            'modern' => 'manifest.json',
        ],
        // Public server config
        'server' => [
            'manifestPath' => '/dist/',
            'publicPath' => '/',
        ],
        // webpack-dev-server config
        'devServer' => [
            'manifestPath' => 'http://localhost:8080/',
            'publicPath' => 'http://localhost:8080/',
        ],
        // Local files config
        'localFiles' => [
            'basePath' => '@webroot/',
            'criticalPrefix' => 'dist/criticalcss/',
            'criticalSuffix' => '_critical.min.css',
        ],
    ],
    // Live (production) environment
    'live' => [
    ],
    // Staging (pre-production) environment
    'staging' => [
    ],
    // Local (development) environment
    'local' => [
        // If `devMode` is on, use webpack-dev-server to all for HMR (hot module reloading)
        'useDevServer' => true,
        // The JavaScript entry from the manifest.json to inject on Twig error pages
        'errorEntry' => 'app.js',
        // webpack-dev-server config
        'devServer' => [
            'manifestPath' => 'http://localhost:8080/',
            'publicPath' => 'http://192.168.10.10:8080/',
        ],
    ],
];
Wrapping up!
Well, that was quite a deep dive! When I first started delving into webpack, I soon realized that it’s a tremendously powerful tool, with very deep functionality. How deep you go depends on how far you want to dive.

For the complete source code for everything presented here, check out the annotated-webpack-4-config github repo.
Hopefully this was helpful to you, enjoy your journey, and go build something awesome!
Further Reading
If you want to be notified about new articles, follow nystudio107 on Twitter.
Copyright ©2020 nystudio107. Designed by nystudio107

Top comments (1)
thanks bro,
Some comments may only be visible to logged-in visitors. Sign in to view all comments.