Atomic Deployments Without Tears
Learn how to use atomic deployments to automatically, deterministically, and safely deploy changes to your website using Continuous Integration (CI) tools
Andrew Welch / nystudio107

Once you have developed a website, you then have to face the challenge of deploying that website to a live production environment where the world can see it.
Back in the mean old days, this meant firing up an FTP client to upload the website to a remote server.
The reason doing it this way isn’t so great is that it’s a manual, error-prone process. Many services in the form of Continuous Integration tools have sprung up to make the process much easier for you, and importantly, automated.
This article will show you how you can leverage the CI tool buddy.works to atomically deploy your Craft CMS websites like a pro.
However, the concepts presented here are universal, so if you’re using some other CI tool or CMS/platform, that’s totally fine. Read on!
Anatomy of a web project
Let’s have a look at what a typical project setup might look like:

We work on the project in our local development environment, whether individually or with a team of other developers. We push our code changes up to a git repository in the cloud.
The git repository is where all source code is kept, and allows us to work with multiple people or multiple revisions without fear. This git repo can be hosted via GitHub, GitLab, or any number of other places.
We may also be using cloud file storage such as Amazon S3 as a place to store the client-uploaded content, as described in the Setting Up AWS S3 Buckets + CloudFront CDN for your Assets article.
A general workflow for code is:
- Push code changes from local development up to your git repo
- Pull code changes down from your git repo to your live production or staging servers
If you’re working on a team or in multiple environments, you may also be pulling code down to your local development environment from your git repo as well, to stay in sync with changes other people have made.
Non-Atomic Deployment Flow
But how do you pull code changes down to your live production or staging servers?
Deployment is getting your code from your local development environment to your live production server.
A simple method (dubbed the #YOLO method by Matthew Stein) could be to trigger a shell script when we push to the master branch of our project’s git repo:
cd /home/forge/devmode.fm
git pull origin master
cd /home/forge/devmode.fm/cms
composer install --no-interaction --prefer-dist --optimize-autoloader
echo "" | sudo -S service php7.1-fpm reload
In my case, this is how I was previously doing deployments for the devMode.fm website: it’s just a shell script that’s executed when a webhook that is triggered when we push to the master branch of our git repo.
Line by line, here’s what this shell script does:
- Change directories to the root directory of our project
- Pull down the latest changes from the master branch of the project’s git repo
- Change directories to the root of the Craft CMS project
- Run composer install to install the latest composer dependencies specified in the composer.lock file
- Restart php-fpm to clear our opcache
For a hobby project site, this is totally fine.

But there are downsides to doing it this way:
- The deployment is done in multiple steps
- The work happens on the production server, which is also serving frontend requests
- The entire git repo is deployed to the server, when only part of it is actually needed on the production server
- If there’s a problem with the deploy, the site could be left broken
- Any website CSS/JavaScript assets need to built in local development, and checked into the git repo
You might notice that there are a number of steps listed, and some of the steps such as git pull origin master and composer install can be quite lengthy processes.
And we’re doing them in situ, so if someone visits the website when we’re in the middle of pulling down our code, or Composer is in the middle of installing PHP packages… that person may see errors on the frontend.
The fact that there are multiple, lengthy steps in this process makes it a non-atomic deployment.
Atomic Deployment Flow
So while we have an automated deployment method, it’s a bit fragile in that there’s a period of time during which people visiting our website may see it broken. To solve this, let’s introduce how an atomic deployment would work.
An atomic deployment is just a fancy nomenclature for a deployment that happens in such a way that the switch to the new version of the site as a single — or atomic — step.
This allows for zero downtime, and no weirdness in partially deployed sites.
We’re going to set up our atomic deployments using buddy.works, which is a tool that I’ve chosen because it is easy to use, but also very powerful.
There’s a free tier that you can use for up to 5 project while you’re testing it out, you can give it a whirl, or you can use some other deployment tool like Envoyer (and there are many others). The principle is the same.
Here’s what an atomic deployment setup might look like:

Note that we’re still doing the same work as in our non-atomic deployment, but we’re changing where and how that work is done.
This nicely solves all of the downsides we noted in our non-atomic deployment:
- The switchover to the newly deployed website code happens in a single atomic step
- No work is done on the live production server other than deploying the files
- Only the parts of the project needed to serve the website are deployed
- If there’s a problem with the build, it never reaches the server
- Any website CSS/JavaScript assets are built “in the cloud”
So this is all wonderful, but how does it work? Continue on, dear reader!
Atomic Deployments Under the Hood
We’ll get to the actual setup in a bit, but first I think it’s instructive to see how it actually works under the hood.

As usual, we’ll be using the devMode.fm website as our guinea pig, the source code of which is available in the nystudio107/devmode repo.
Our project root directory looks like this on our production server:
forge@nys-production ~/devmode.fm $ ls -Al
total 32
lrwxrwxrwx 1 forge forge 49 Jun 28 19:08 current -> releases/33a5a7f984521811c5db597c7eef1c76c00d48e2
drwxr-xr-x 7 forge forge 4096 Jun 27 01:39 deploy-cache
-rw-rw-r-- 1 forge forge 2191 Jun 22 18:14 .env
drwxrwxr-x 12 forge forge 4096 Jun 28 19:08 releases
drwxrwxr-x 5 forge forge 4096 Jun 22 18:11 storage
drwxrwxr-x 2 forge forge 4096 Jun 26 12:30 transcoder
This may look a little foreign to you, but bear with me, you’ll get it!
The deploy-cache/ directory is where files are stored as they are being uploaded to the server. In our case, it looks like this:
forge@nys-production ~/devmode.fm $ ls -Al deploy-cache/
total 328
-rw-r--r-- 1 forge forge 2027 Jun 26 22:46 composer.json
-rw-r--r-- 1 forge forge 287399 Jun 27 01:39 composer.lock
drwxr-xr-x 4 forge forge 4096 Jun 27 01:39 config
-rwxr-xr-x 1 forge forge 577 Jun 23 07:25 craft
-rw-r--r-- 1 forge forge 330 Jun 23 07:25 craft.bat
-rw-r--r-- 1 forge forge 1582 Jun 23 07:25 example.env
drwxr-xr-x 3 forge forge 4096 Jun 23 07:25 modules
drwxr-xr-x 11 forge forge 4096 Jun 23 07:25 templates
drwxr-xr-x 60 forge forge 4096 Jun 27 01:40 vendor
drwxr-xr-x 5 forge forge 4096 Jun 28 19:08 web
This should look pretty familiar to you if you’re a Craft CMS developer, it’s the project root for the actual Craft CMS project. Check out the Setting up a New Craft CMS 3 Project article for more information on that.
Since this is a cache directory, the contents can be deleted without any ill effect, other than our next deployment will be slower since it’ll need to be done from scratch.
Next let’s have a look at the releases/ directory:
forge@nys-production ~/devmode.fm $ ls -Al releases/
total 48
drwxr-xr-x 7 forge forge 4096 Jun 27 14:17 2c8eef7c73f20df9d02f6f071656331ca9e08eb0
drwxr-xr-x 7 forge forge 4096 Jun 28 19:08 33a5a7f984521811c5db597c7eef1c76c00d48e2
drwxrwxr-x 7 forge forge 4096 Jun 26 22:48 42372b0cd7a66f98d7f4dc83d8d99c4d9a0fb1f6
drwxrwxr-x 7 forge forge 4096 Jun 27 01:43 7b3d57dfedf5bf275aeddc6d799e3264e02d2b88
drwxrwxr-x 8 forge forge 4096 Jun 26 21:21 8c2448d252651b8cb0d69a72e327dac3541c9ba9
drwxr-xr-x 7 forge forge 4096 Jun 27 14:08 9b5c8c7cf6a7111220b66d21d811f8e5a1800507
drwxrwxr-x 8 forge forge 4096 Jun 23 08:16 beaef13f5bda9d7c2bb0e88b300f68d3b663528e
drwxrwxr-x 8 forge forge 4096 Jun 26 21:26 c56c13127b4a5ff779a155a211c07f604a4dcf8b
drwxrwxr-x 7 forge forge 4096 Jun 27 14:04 ce831a76075f57ceff8822641944e255ab9bf556
drwxrwxr-x 8 forge forge 4096 Jun 23 07:57 ebba675ccd2bb372ef82795f076ffd933ea14a31
Here we see 10 really weirdly named directories. The names here don’t really matter (they are automatically generated hashes), but what does matter is that each one of these directories contains a full deployment of your website.
You can set how many of these directories should be kept on the server, in my case I have it set to 10.
If you look carefully at the current symlink:
lrwxrwxrwx 1 forge forge 49 Jun 28 19:08 current -> releases/33a5a7f984521811c5db597c7eef1c76c00d48e2
…you’ll see that it actually points to the current deployment in the releases/ directory (notice that the hash-named directory it points to has the latest modification date on it, too).
So when a deployment happens:
- Files are synced into the deploy-caches/ directory (we’ll get into this more later)
- Then those files are copied from deploy-caches/ directory to a hash-named directory in the releases/ directory
- After everything is done, the current symlink is updated to point to the latest deployment
That’s it! That’s the atomic part: the changing of the current symlink is the single atomic operation that makes that version of the website live.
We just have to make sure that our web server root path contains the symlink, so we can swap out where it points to as needed:
root /home/forge/devmode.fm/current/web;
If you ever encounter a regression, you can roll your website back to a previous revision just by changing the current symlink.
Also note that we have storage/ and transcoder/ directories in our project root, as well as a .env file.
These are all directories & files that we want to persist between and be shared by each atomic deployment. Since each deployment is a clean slate, we just move anything we need to keep persistent into the root directory, and symlink to them from each deployment.
The .env file is something you’ll have to create yourself manually, using the example.env as a guide.
The storage/ directory is Craft’s runtime storage directory. We keep this as a persistent directory so that log files and other Craft runtime files can persist across atomic deployments.
The transcoder/ directory is used to store the transcoded audio for the podcast, as created by our Transcoder plugin. It’s very project specific, so you’re unlikely to need it in your projects.
Let’s have a look at the current deployment in the releases/ directory:
forge@nys-production ~/devmode.fm $ ls -Al releases/33a5a7f984521811c5db597c7eef1c76c00d48e2/
total 320
-rw-r--r-- 1 forge forge 2027 Jun 29 14:10 composer.json
-rw-r--r-- 1 forge forge 287399 Jun 29 14:10 composer.lock
drwxr-xr-x 4 forge forge 4096 Jun 29 14:10 config
-rwxr-xr-x 1 forge forge 577 Jun 29 14:10 craft
-rw-r--r-- 1 forge forge 330 Jun 29 14:10 craft.bat
lrwxrwxrwx 1 forge forge 27 Jun 29 14:10 .env -> /home/forge/devmode.fm/.env
-rw-r--r-- 1 forge forge 1582 Jun 29 14:10 example.env
drwxr-xr-x 3 forge forge 4096 Jun 29 14:10 modules
lrwxrwxrwx 1 forge forge 30 Jun 29 14:10 storage -> /home/forge/devmode.fm/storage
drwxr-xr-x 11 forge forge 4096 Jun 29 14:10 templates
drwxr-xr-x 60 forge forge 4096 Jun 29 14:10 vendor
drwxr-xr-x 6 forge forge 4096 Jun 29 14:11 web
N.B.: this is the exact same as doing ls -Al current/ since the current symlink points to this latest deployment.
Here we can see the current deployment root, with the .env & storage aliases in place, pointing back to the persistent files/directories in our project root.
Something that might not be immediately apparent is that we’re only deploying part of what is in our project git repo. The git repo root looks like this:
❯ ls -Al
total 80
-rw-r--r-- 1 andrew staff 868 Jun 22 17:24 .gitignore
-rw-r--r-- 1 andrew staff 1828 Feb 18 10:22 CHANGELOG.md
-rw-r--r-- 1 andrew staff 1074 Feb 4 09:54 LICENSE.md
-rw-r--r-- 1 andrew staff 7461 Jun 29 09:03 README.md
-rw-r--r-- 1 andrew staff 5094 Jun 27 14:15 buddy.yml
drwxr-xr-x 16 andrew staff 512 Jun 27 14:06 cms
-rwxr-xr-x 1 andrew staff 2064 Mar 17 16:37 docker-compose.yml
drwxr-xr-x 10 andrew staff 320 Feb 17 16:58 docker-config
drwxr-xr-x 7 andrew staff 224 Mar 17 16:37 scripts
drwxr-xr-x 12 andrew staff 384 Feb 17 15:51 src
lrwxr-xr-x 1 andrew staff 47 Jun 27 14:06 tsconfig.json -> docker-config/webpack-dev-devmode/tsconfig.json
lrwxr-xr-x 1 andrew staff 45 Jun 27 14:06 tslint.json -> docker-config/webpack-dev-devmode/tslint.json
So instead of deploying all of the source code and build tools that aren’t needed to serve the website (they are only needed to build it), we instead just deploy just what’s in the cms/ directory.
Nice.
Now that we know how it works under the hood, let’s create the atomic deployment pipeline!
Step 1: Creating a new project
We’ll go step by step through how to build a simple but effective atomic deployment with buddy.works.

The deployment pipeline we’re going to set up will:
- Automatically deploy to our production server whenever we push to the master branch of our git repo
- Utilize the Docker containers we already use for local development for building the website in the cloud, as discussed in the An Annotated Docker Config for Frontend Web Development article
- Build all of our CSS & JavaScript assets via the webpack setup discussed in the An Annotated webpack 4 Config for Frontend Web Development article
- Efficiently sync just the changed files down to our live production server
- Do an atomic deployment by swapping the current site
- Prep Craft CMS by running all migrations, syncing Project Config, and clearing all caches
So let’s get down to it
After logging into buddy.works, make sure that you’ve linked buddy.works to your git repo provider (such as GitHub, GitLab, etc.). It needs this to allow you to choose a git repo for your atomic deployment setup, and also to be notified when you push code to that git repo.
You can configure this and other settings by clicking on your user icon in the upper-right corner of the screen, and choosing Manage your project.
Once that’s all set, click on New Project from your Dashboard:

Next click on the Add a new pipeline button to create a new deployment pipeline for this project. A pipeline is just a series of instructions to execute in sequence.
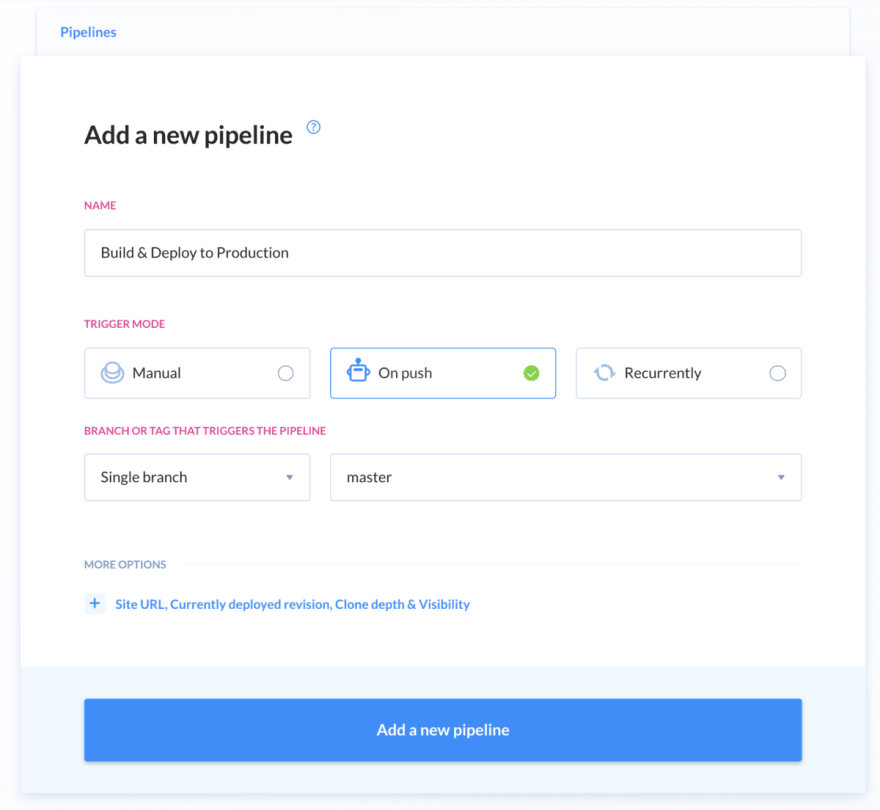
Set the Name to Build & Deploy to Production , set Trigger Mode to On push and then set the Trigger to Single Branch and master (or whatever the name of your primary git repo branch is).
Then click on + Site URL, Currently deployed revision, Clone depth & Visibility to display more options, and set the Target website URL to whatever your live production website URL is.
We won’t be changing anything else here, so click on Add a new pipeline to create a new empty pipeline (you can have as many pipelines as you like per project).
Step 2: Setting Variables
Before we add any actions to our pipeline, we’re going to set some environment variables for use in the buddy.works build pipeline.
Click on the Edit pipeline settings link on the right, then click on Variables :

We’re adding these variables to our pipeline to make it easier to build our individual actions, and make our pipeline generic so it can be used with any project.
Add the following key/value pair variables by clicking on Add a new variable , changing them to suit your project (by convention, environment variables are SCREAMING_SNAKE_CASE):
- PROJECT_SHORTNAME — devmode — a short name for the project with no spaces or punctuation; it’s used to create working directories in the buddy.works containers
- PROJECT_URL — https://devmode.fm — a URL to your live production website
- REMOTE_PROJECT_ROOT — /home/forge/devmode.fm — a path to the root directory of the project on the server
- REMOTE_SSH_HOST — devmode.fm — the host name that should be used to ssh into your server
- REMOTE_SSH_USER — forge — the user name that should be used to ssh into your server
N.B.: the buddy.works docs say to use the variables in a ${VARIABLE_NAME} format, but you can also use them just as $VARIABLE_NAME (in fact the latter is how they are auto-completed for you).
These variables are defined inside of the pipeline, but you can also have variables that are project-wide, as well as workspace-wide in buddy.works.
Step 3: Execute: webpack build
Now that our variables are all set, click on Actions and then click on the Add the first action button.
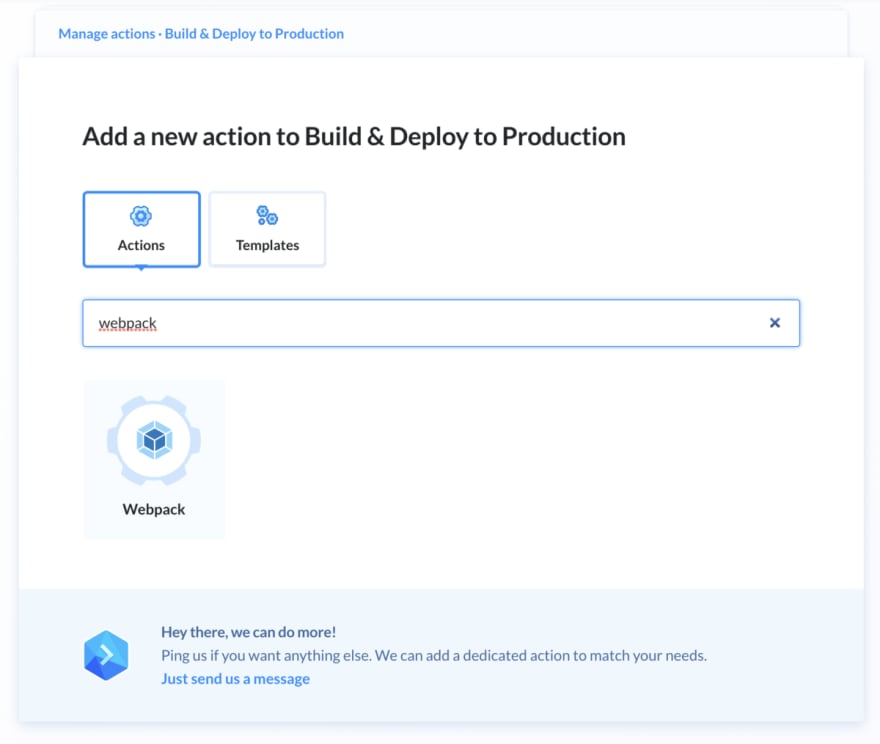
Type webpack into the search field to find the Webpack action, and click on it.

We’re assuming you are using the webpack setup described in the An Annotated webpack 4 Config for Frontend Web Development article and the Docker setup described in the An Annotated Docker Config for Frontend Web Development article.
Add the following script under the Run tab; it installs our npm packages via npm ci and then executes webpack to build our build:
cd docker-config/webpack-dev-devmode
npm ci
npm run build
You can change this to be whatever you need to execute your CSS & JavaScript build, if you’re using something other than the aforementioned setups.
Next click on the Environment tab, and change the Image to our custom webpack-dev-base that we used in the An Annotated Docker Config for Frontend Web Development article, since it has everything we need in it for building our CSS & JavaScript:
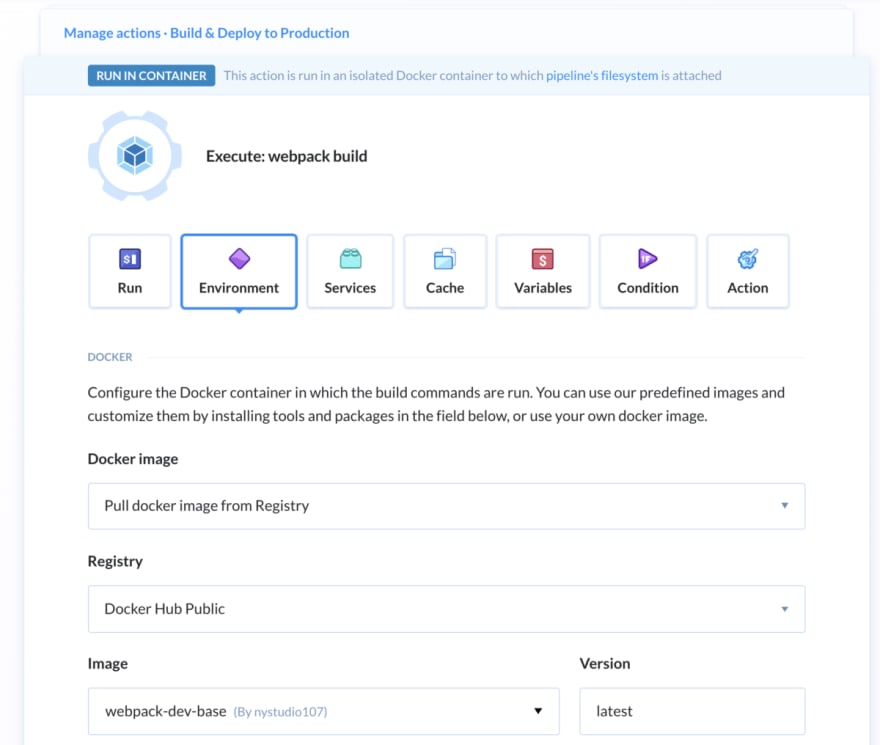
This Environment tab allows you to pick any Docker image you like — public or private — to use when running you webpack build in the cloud. The default is an old (but official) Node 6 image at the time of this writing.
Clicking on the Action tab allows you to change the name of the action; change it to: Execute: webpack build.
Step 4: Execute: composer install
Next up we’ll create another action to our pipeline by clicking on the + icon below the Execute: webpack build action.

Type php into the search field to find the PHP action, and click on it.

We’re assuming you are using the Docker setup described in the An Annotated Docker Config for Frontend Web Development article.
Add the following script under the Run tab; it changes directories to the cms/ directory, and then runs composer install with some flags:
cd cms
composer install --no-scripts --no-interaction --prefer-dist --optimize-autoloader --ignore-platform-reqs
You can change this to be whatever you need to execute to install your Composer packages, if you’re using something other than the aforementioned setup.
Next click on the Environment tab, and change the Image to our custom php-dev-base that we used in the An Annotated Docker Config for Frontend Web Development article, since it has everything we need for our PHP application:

This Environment tab allows you to pick any Docker image you like — public or private — to use when running your composer install in the cloud. The default is php 7.4 image at the time of this writing.
Still on the Environment tab, scroll down to CUSTOMIZE ENVIRONMENT and paste this in:
echo "memory_limit=-1" >> /usr/local/etc/php/conf.d/buddy.ini
apt-get update && apt-get install -y git zip
curl -sS https://getcomposer.org/installer | php -- --install-dir=/usr/local/bin --filename=composer
# php ext pdo_pgsql
docker-php-ext-install pdo_pgsql pgsql
This script runs inside the Docker container to customize the environment by setting PHP to have no memory limit, installing Composer, and then installing some Postgres php extensions. If you’re using MySQL, you’d change it to:
# php ext pdo_mysql
docker-php-ext-install pdo_mysql mysql
In actuality, it doesn’t matter, because we’re not even doing anything with the database on deploy currently.
Clicking on the Action tab allows you to change the name of the action; change it to: Execute: composer install.
Step 3: Rsync files to production
Now that we have our updated website code from our git repo, our built CSS & JavaScript assets, and all of our Composer packages in the Docker container in the cloud, we need to deploy them to our production server.
To do this, we’re going to use rsync to sync only the files that have changed to our deploy-cache/ directory.
Create another action to our pipeline by clicking on the + icon below the Execute: composer install action.

Type rsync into the search field to find the RSync action, and click on it.

Here we’ve chosen to synchronize just the cms/ directory of our project with the deploy-caches/ directory on our live production server.
To allow buddy.works to access our live production server, we have to provide it with how to connect to our server. Fortunately, we can use the environment variables set up in step #1.
So set Hostname & Port to $REMOTE_SSH_HOST, Login to $REMOTE_SSH_USER, and Authentication mode to Buddy workspace key.
We’re using ssh keys here because the provisioner I use, Laravel Forge, disables password-based auth by default as a security best practice.

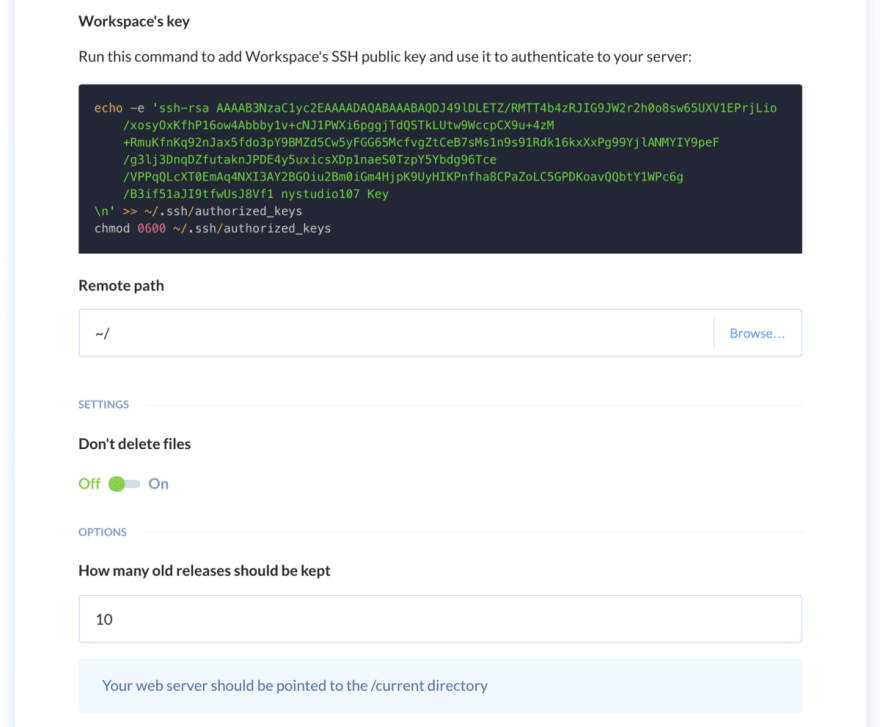
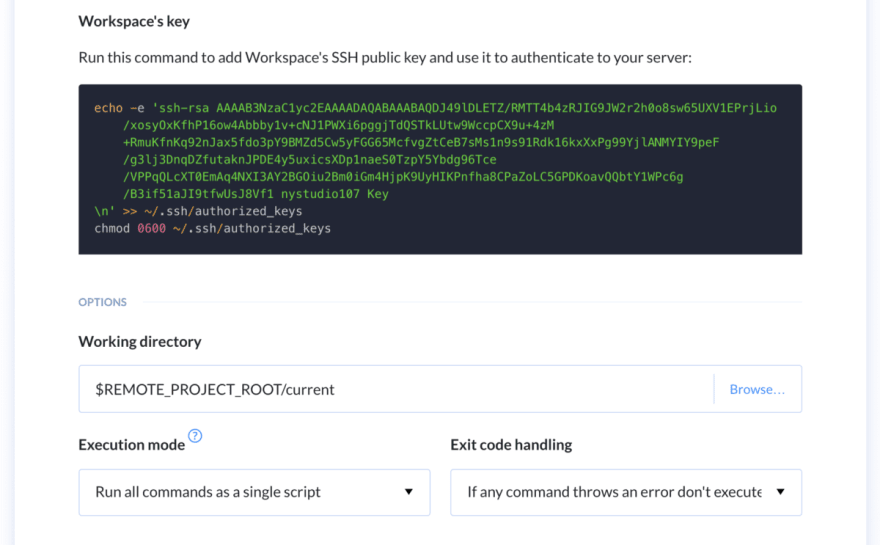
If you’re going to use Buddy workspace key too, you’ll need to ssh into your live production server, and run the code snippet. This will add Buddy’s workspace key to your live production server’s list of hosts that are authorized to connect to it.
Then set Remote path to $REMOTE_PROJECT_ROOT/deploy-cache. This tells the rsync action what directory on the live production server should be synced with the cms/ directory in our buddy.works Docker container in the cloud.
Finally, check the following:
- ✓ Compress file data during the transer
- ✓ Archive mode
- ✓ Delete extraneous files
- ✓ Recurse into directories
Using Rsync for our deployment allows it to be very smart about deploying only files that have actually changed, and also compress the files before they are transferred over the wire.
N.B.: In the Ignore paths tab, you can add any directories you want ignored during the sync
Clicking on the Action tab allows you to change the name of the action; change it to: Rsync files to production.
Step 4: Atomic Deploy
Finally, we’re getting to the actual atomic deployment!
Create another action to our pipeline by clicking on the + icon below the Rsync files to production action.
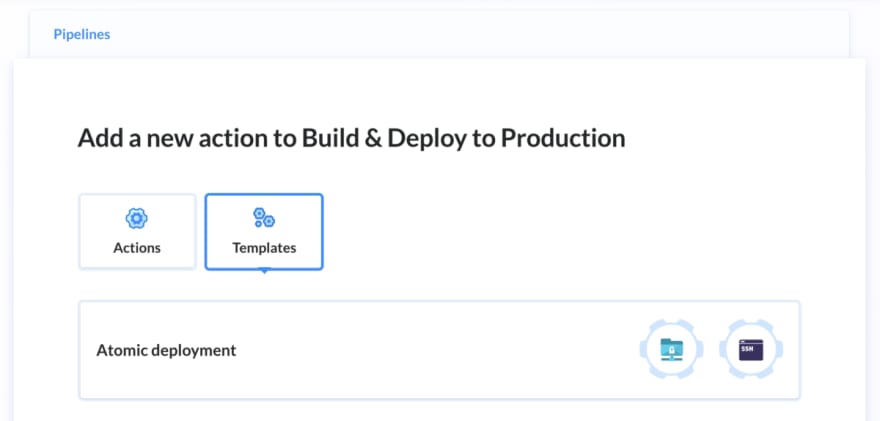
This time we’re going to click on Templates and then click on Atomic Deployment. You’ll see some documentation on what the Atomic Deployment template does; click on Configure this template :

For Source , click on Pipeline Filesystem and leave Source path set to /
Set Hostname & Port to $REMOTE_SSH_HOST, Login to $REMOTE_SSH_USER, and Authentication mode to Buddy workspace key just like we did in step #3.
Again we’re using the same Buddy workspace key we used in step #3, so we won’t need to re-add this key to our live production server.
Leave Remote path set to ~/ and the double-negative Don’t delete files set to Off. You can also configure how many releases to keep on your server via How many old releases should be kept.
Then click on Add this action.
We’re not quite done with this action though. Click on it again in the list of pipeline actions to edit it, and you’ll see some shell code the template added for us under RUN SSH COMMANDS :
if [-d "releases/$BUDDY_EXECUTION_REVISION"] && ["$BUDDY_EXECUTION_REFRESH" = "true"];
then
 echo "Removing: releases/$BUDDY_EXECUTION_REVISION"
 rm -rf releases/$BUDDY_EXECUTION_REVISION;
fi
if [! -d "releases/$BUDDY_EXECUTION_REVISION"];
then
 echo "Creating: releases/$BUDDY_EXECUTION_REVISION"
 cp -dR deploy-cache releases/$BUDDY_EXECUTION_REVISION;
fi
echo "Linking current to revision: $BUDDY_EXECUTION_REVISION"
rm -f current
ln -s releases/$BUDDY_EXECUTION_REVISION current
echo "Removing old releases"
cd releases && ls -t | tail -n +11 | xargs rm -rf
This is the code that handles creating the hash-named revision directories, copying files from the deploy-cache/ directory, updating the current symlink, and trimming old releases.
You needn’t grok all that it’s doing, we’re just going to make a small addition to it to create and symlink our persistent directories & files:
if [-d "releases/$BUDDY_EXECUTION_REVISION"] && ["$BUDDY_EXECUTION_REFRESH" = "true"];
then
 echo "Removing: releases/$BUDDY_EXECUTION_REVISION"
 rm -rf releases/$BUDDY_EXECUTION_REVISION;
fi
if [! -d "releases/$BUDDY_EXECUTION_REVISION"];
then
 echo "Creating: releases/$BUDDY_EXECUTION_REVISION"
 cp -dR deploy-cache releases/$BUDDY_EXECUTION_REVISION;
fi
echo "Creating: persistent directories"
mkdir -p storage
mkdir -p transcoder
echo "Symlinking: persistent files & directories"
ln -nfs $REMOTE_PROJECT_ROOT/.env $REMOTE_PROJECT_ROOT/releases/$BUDDY_EXECUTION_REVISION
ln -nfs $REMOTE_PROJECT_ROOT/storage $REMOTE_PROJECT_ROOT/releases/$BUDDY_EXECUTION_REVISION
ln -nfs $REMOTE_PROJECT_ROOT/transcoder $REMOTE_PROJECT_ROOT/releases/$BUDDY_EXECUTION_REVISION/web
echo "Linking current to revision: $BUDDY_EXECUTION_REVISION"
rm -f current
ln -s releases/$BUDDY_EXECUTION_REVISION current
echo "Removing old releases"
cd releases && ls -t | tail -n +11 | xargs rm -rf
Here we’re ensuring that the storage/ and transcoder/ directories exist, and then we’re symlink’ing them and our .env file from their persistent location in the project root in the appropriate places in the deployed website.
The transcoder/ directory is used to store the transcoded audio for the podcast, as created by our Transcoder plugin. It’s very project specific, so you’re unlikely to need it in your projects.
Clicking on the Action tab allows you to change the name of the action; change it to: Atomic deploy.
Step 5: Prep Craft CMS
Create another action to our pipeline by clicking on the + icon below the Atomic deploy action.
Technically this action could be combined with Step #4, but logically they do different things, so keeping them separate seems appropriate.

Type ssh into the search field to find the SSH action, and click on it.
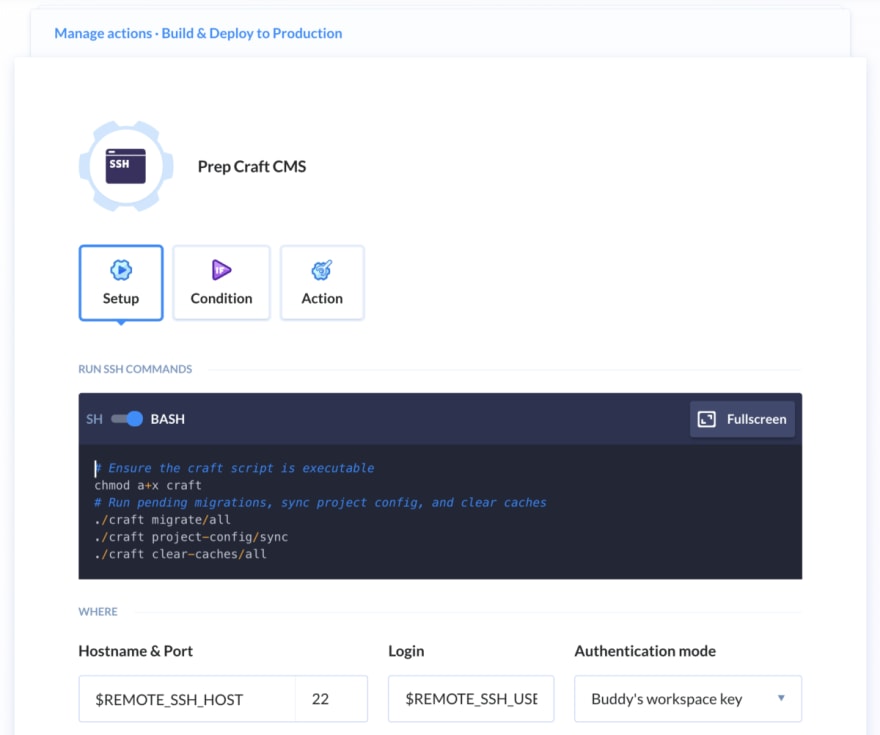
Under RUN SSH COMMANDS we have the following shell script:
# Ensure the craft script is executable
chmod a+x craft
# Run pending migrations, sync project config, and clear caches
./craft migrate/all
./craft project-config/sync
./craft clear-caches/all
This ensures that all of the migrations are run, Project Config is synced, and all caches are cleared on every deploy.
Set Hostname & Port to $REMOTE_SSH_HOST, Login to $REMOTE_SSH_USER, and Authentication mode to Buddy workspace key just like we did in steps #3 & #4.
Again we’re using the same Buddy workspace key we used in steps #3 & #4, so we won’t need to re-add this key to our live production server.
Then set Working directory to $REMOTE_PROJECT_ROOT/deploy-cache to tell buddy.works which directory should be current when the script above is run.
Clicking on the Action tab allows you to change the name of the action; change it to: Prep Craft CMS.
Step #6: Send notification to nystudio107 channel
Create another action to our pipeline by clicking on the + icon below the Prep Craft CMS action.
This optional action sends a notification on deploy to the #nystudio107 channel on the private nystudio107 Slack.
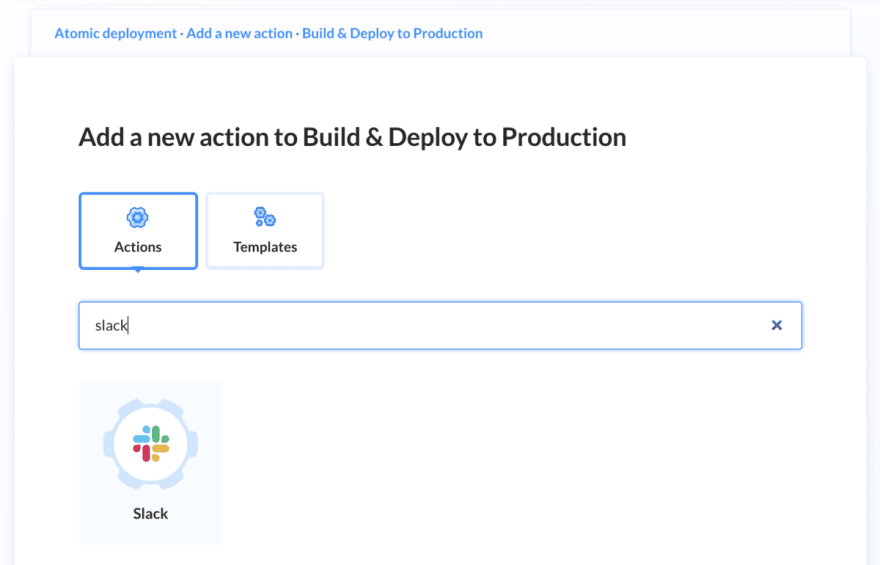
Type slack into the search field to find the Slack action, and click on it.

You’ll have to grant buddy.works access to your Slack by auth’ing it, then set the Send message to:
[#$BUDDY_EXECUTION_ID] $BUDDY_PIPELINE_NAME execution by $BUDDY_EXECUTION_REVISION_COMMITTER_NAME .
Or customize it however you like, and configure the Integration and Target channel as appropriate for your Slack.
Clicking on the Action tab allows you to change the name of the action; change it to: Send notification to nystudio107 channel.
The Golden Road (to unlimited deployment)
If all of this setup seems like a whole lot of work to you, it’s really not so bad once you are familiar with the buddy.works GUI.
However, I also have good news for you. There’s a reason why we used environment variables: buddy.works allows you to save your entire configuration out to a buddy.yml file.

Go to your project view, and click on YAML configuration: OFF and you’ll see:
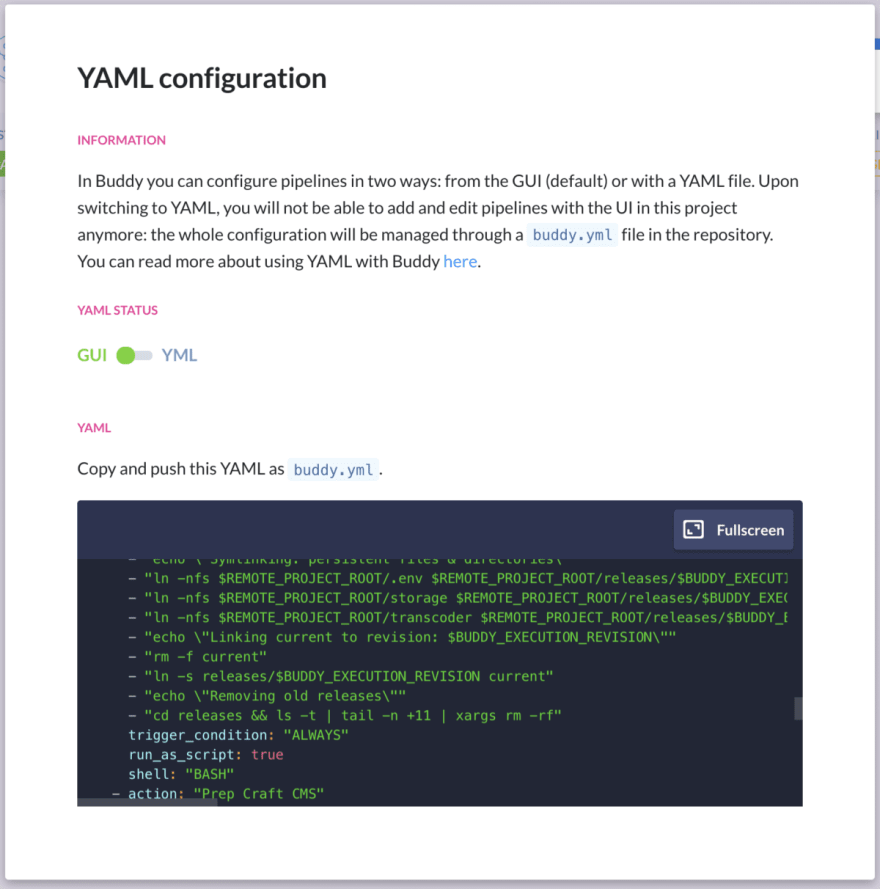
If you have a buddy.yml in your project root and switch your project to YAML configuration: ON, then you’ll get your pipelines configured for you automatically by the buddy.yml file:
- pipeline: "Build & Deploy to Production"
  trigger_mode: "ON_EVERY_PUSH"
  ref_name: "master"
  ref_type: "BRANCH"
  target_site_url: "https://devmode.fm/"
  trigger_condition: "ALWAYS"
  actions:
    - action: "Execute: webpack build"
      type: "BUILD"
      working_directory: "/buddy/$PROJECT_SHORTNAME"
      docker_image_name: "nystudio107/webpack-dev-base"
      docker_image_tag: "latest"
      execute_commands:
        - "cd docker-config/webpack-dev-devmode"
        - "npm ci"
        - "npm run build"
      volume_mappings:
        - "/:/buddy/$PROJECT_SHORTNAME"
      trigger_condition: "ALWAYS"
      shell: "BASH"
    - action: "Execute: composer install"
      type: "BUILD"
      working_directory: "/buddy/$PROJECT_SHORTNAME"
      docker_image_name: "nystudio107/php-dev-base"
      docker_image_tag: "latest"
      execute_commands:
        - "cd cms"
        - "composer install --no-scripts --no-interaction --prefer-dist --optimize-autoloader --ignore-platform-reqs"
      setup_commands:
        - "echo \"memory_limit=-1\" >> /usr/local/etc/php/conf.d/buddy.ini"
        - "apt-get update && apt-get install -y git zip"
        - "curl -sS https://getcomposer.org/installer | php -- --install-dir=/usr/local/bin --filename=composer"
        - "# php ext pdo_mysql"
        - "docker-php-ext-install pdo_pgsql pgsql"
      volume_mappings:
        - "/:/buddy/$PROJECT_SHORTNAME"
      trigger_condition: "ALWAYS"
      shell: "BASH"
    - action: "Rsync files to production"
      type: "RSYNC"
      local_path: "cms/"
      remote_path: "$REMOTE_PROJECT_ROOT/deploy-cache"
      login: "$REMOTE_SSH_USER"
      host: "$REMOTE_SSH_HOST"
      port: "22"
      authentication_mode: "WORKSPACE_KEY"
      archive: true
      delete_extra_files: true
      recursive: true
      compress: true
      deployment_excludes:
        - "/.git/"
      trigger_condition: "ALWAYS"
    - action: "Atomic deploy"
      type: "SSH_COMMAND"
      working_directory: "$REMOTE_PROJECT_ROOT"
      login: "$REMOTE_SSH_USER"
      host: "$REMOTE_SSH_HOST"
      port: "22"
      authentication_mode: "WORKSPACE_KEY"
      commands:
        - "if [-d \"releases/$BUDDY_EXECUTION_REVISION\"] && [\"$BUDDY_EXECUTION_REFRESH\" = \"true\"];"
        - "then"
        - " echo \"Removing: releases/$BUDDY_EXECUTION_REVISION\""
        - " rm -rf releases/$BUDDY_EXECUTION_REVISION;"
        - "fi"
        - "if [! -d \"releases/$BUDDY_EXECUTION_REVISION\"];"
        - "then"
        - " echo \"Creating: releases/$BUDDY_EXECUTION_REVISION\""
        - " cp -dR deploy-cache releases/$BUDDY_EXECUTION_REVISION;"
        - "fi"
        - "echo \"Creating: persistent directories\""
        - "mkdir -p storage"
        - "echo \"Symlinking: persistent files & directories\""
        - "ln -nfs $REMOTE_PROJECT_ROOT/.env $REMOTE_PROJECT_ROOT/releases/$BUDDY_EXECUTION_REVISION"
        - "ln -nfs $REMOTE_PROJECT_ROOT/storage $REMOTE_PROJECT_ROOT/releases/$BUDDY_EXECUTION_REVISION"
        - "ln -nfs $REMOTE_PROJECT_ROOT/transcoder $REMOTE_PROJECT_ROOT/releases/$BUDDY_EXECUTION_REVISION/web"
        - "echo \"Linking current to revision: $BUDDY_EXECUTION_REVISION\""
        - "rm -f current"
        - "ln -s releases/$BUDDY_EXECUTION_REVISION current"
        - "echo \"Removing old releases\""
        - "cd releases && ls -t | tail -n +11 | xargs rm -rf"
      trigger_condition: "ALWAYS"
      run_as_script: true
      shell: "BASH"
    - action: "Prep Craft CMS"
      type: "SSH_COMMAND"
      working_directory: "$REMOTE_PROJECT_ROOT/current"
      login: "$REMOTE_SSH_USER"
      host: "$REMOTE_SSH_HOST"
      port: "22"
      authentication_mode: "WORKSPACE_KEY"
      commands:
        - "# Ensure the craft script is executable"
        - "chmod a+x craft"
        - "# Run pending migrations, sync project config, and clear caches"
        - "./craft migrate/all"
        - "./craft project-config/sync"
        - "./craft clear-caches/all"
      trigger_condition: "ALWAYS"
      run_as_script: true
      shell: "BASH"
    - action: "Send notification to nystudio107 channel"
      type: "SLACK"
      content: "[#$BUDDY_EXECUTION_ID] $BUDDY_PIPELINE_NAME execution by $BUDDY_EXECUTION_REVISION_COMMITTER_NAME ."
      blocks: "[{\"type\":\"section\",\"fields\":[{\"type\":\"mrkdwn\",\"text\":\"*Successful execution:* <$BUDDY_EXECUTION_URL|Execution #$BUDDY_EXECUTION_ID $BUDDY_EXECUTION_COMMENT>\"},{\"type\":\"mrkdwn\",\"text\":\"*Pipeline:* <$BUDDY_PIPELINE_URL|$BUDDY_PIPELINE_NAME>\"},{\"type\":\"mrkdwn\",\"text\":\"*Branch:* $BUDDY_EXECUTION_BRANCH\"},{\"type\":\"mrkdwn\",\"text\":\"*Project:* <$BUDDY_PROJECT_URL|$BUDDY_PROJECT_NAME>\"}]}]"
      channel: "CAYN15RD0"
      channel_name: "nystudio107"
      trigger_condition: "ALWAYS"
      integration_hash: "5ef0d26820cfeb531cb10738"
  variables:
    - key: "PROJECT_SHORTNAME"
      value: "devmode"
    - key: "PROJECT_URL"
      value: "https://devmode.fm"
    - key: "REMOTE_PROJECT_ROOT"
      value: "/home/forge/devmode.fm"
    - key: "REMOTE_SSH_HOST"
      value: "devmode.fm"
    - key: "REMOTE_SSH_USER"
      value: "forge"
The fact that we refactored things that change from project to project into environment variables makes it super easy to re-use this config on multiple projects.
And here’s what the final pipeline looks like in the GUI:

One more deploy for the road
The advantages that I find with buddy.works over tools like Ansible & Puppet or services like DeployBot & Envoyer are that it’s very easy to set up, and you can run all of your build steps in Docker containers in the cloud.

Because everything runs in Docker containers in the cloud, you also do not need Composer or Node or anything else that’s used only to “build the thing” installed on your server.
GitLab CI/CD works similarly to this, and is also a solid choice. But I prefer buddy.works being decoupled from where the git repo is hosted, because this flexibility can be very handy when dealing with varied client needs & requirements.
There’s also plenty more that buddy.works can do that we haven’t explored here. For example, you’d typically set up another pipeline for your staging server, which would auto-deploy on pushes to the develop branch.
We also could go a step further with our deployments and do blue/green database deployments if the project warranted it.
Automated acceptance tests could be run in the buddy.works containers, and deployment would only happen if they pass.
Or we could run accessibility tests on deploy, and block deployment if there were regressions there.
The options are limitless, and buddy.works makes it easy for me to explore them.
But whatever deployment tool you use… happy deploying!
Further Reading
If you want to be notified about new articles, follow nystudio107 on Twitter.
Copyright ©2020 nystudio107. Designed by nystudio107

Top comments (0)