
What is Spline Tool?? 🤔
Simple as it is, it's a design tool for 3d web development. What is actually unique about it is you can see your designs in real-time and yes, it uses three.js to render the 3d components. But most importantly you can now focus more on your design rather than your code. You can do pretty much everything from creating texts to making bunnies on your canvas.
In this blog, I'll try to explain Spline's UI along with how to make your first 3d web design!
What we'll make? 🔧

Click here to see it live!
Download Spline from their Home page.
Understanding Spline's UI 🤯
- Home Page

On the home page, you can see your existing files out of which 4 are there for the showcase. If you want to explore more designs for your inspiration you can go to Library or visit Spline's Official Twitter account.
Click on New File to get started with your first design instantly!

The rectangle on the screen is of not much use, anyways we are going to remove it but note that this object is now positioned at the origin of the viewport with coordinates (0, 0, 0). This is our point of reference furthermore, any object we add to the viewport will be with respect to the origin which is later important if you want to maintain symmetry with your design.

Over here you can see all the objects you have added to the viewport. Feel free to rename them by double-clicking on the object name. Soon after we'll be nesting the objects as sub-components to animate the design effectively.
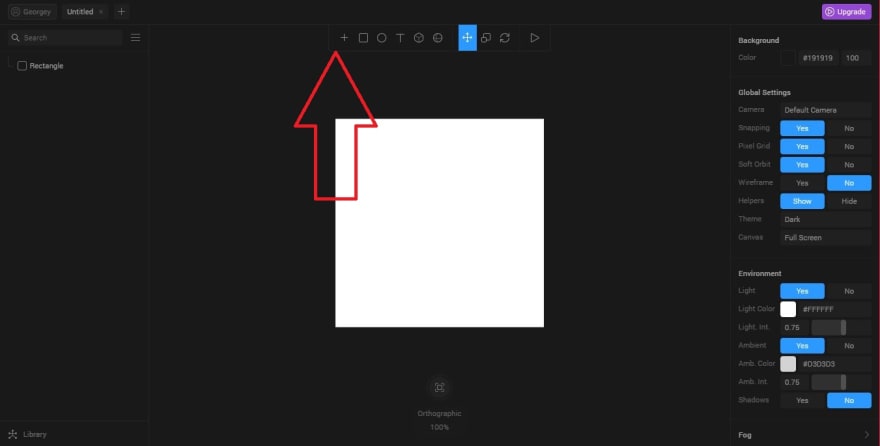
Then comes the toolbar with an array of options for creating shapes of various kinds ranging from a square to a Teapot. (Trust me you can actually, do check it out!😁)

The right-sidebar shows the property-panel which allows you to change the various properties related to each object on the viewport. Here you can even add different hover transitions and states which we will later come back to to make our atom spin🔁.
Interacting with the Viewport
- Move the objects on the viewport using the mouse.
- Click on the object once to pop up the axis of the object, assuming we all know the basic coordinate geometry we have three-axis, the x-axis, y-axis, and the z-axis. By holding on to the axis bars you can move it parallel to the respective axis.
- To rotate the object on the viewport: Press Alt + left-click and move with the mouse.
- To zoom-in & out use the scroll-button.
- Use the keyboard keys to reach different parts of the viewport.
Making the basic Structure of Atom
Remove the white rectangle by clicking on the object.

Set the background color by changing the property on the right side-bar.
We'll be needing 4 objects for this:-
- One Main-Sphere and 2 spheres of radius 1/10 that of the main sphere.
- A circle of radius = radius of main-sphere + 20/30 pixels.

Make sure your main nucleus is positioned at the origin( refer to the property panel on the right side-bar). This step is important to maintain symmetry. Maintain equal dimensions over all the three-axis hereafter for all the objects on the viewport.
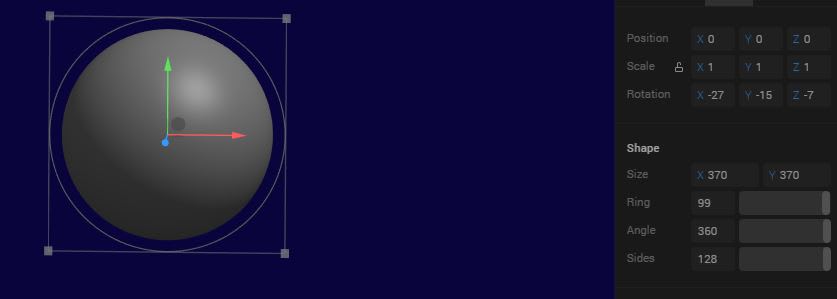
Create a circle that has a radius of at least +40 pixels from the main sphere and then change the ring property of the circle to 99 (refer to the right-sidebar if you are lost).

Use the axis-arrows to move the object in a particular axis and make sure the ring passes through the center of the sub-spheres.

Now it's time for defining the states of our design. There is base-state: The state from which you want to transition to that is -> State-1. Now we want the sub-spheres to rotate around the main-sphere. To achieve that, make sure our design is symmetrical, to avoid any irregularities.
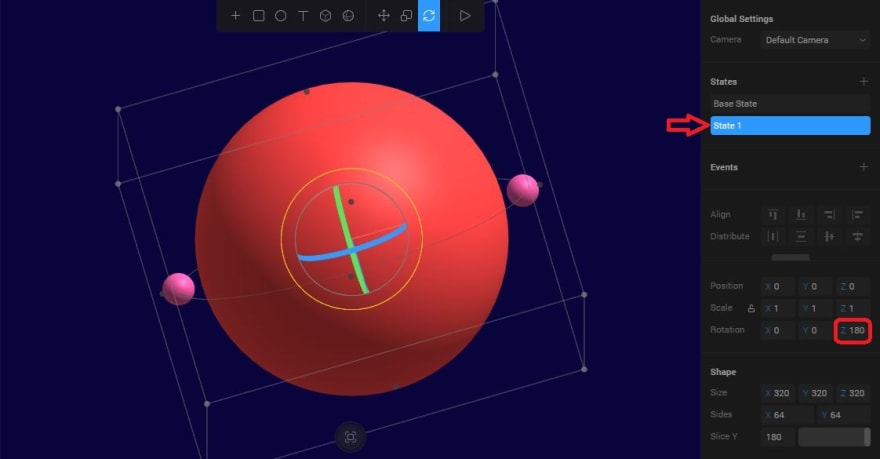
Here, in this case, I had to rotate the z-axis about 180 degrees. We can achieve this step either manually or just set the rotate property to 180 for accuracy🤘.

Now we have to create an event to transition from the base-state.
To do this first -
- Click the + sign to create a new event.
- Select type - Start. (The transition will start as soon as the page loads)
- Select the state ie: State-1
- Set cycle to -No.
- Set Repeat to Yes- This will continuously loop the same animation.
- Set the transition to Linear. ( this will make the animation move at a constant speed)
- Set the duration to 7. (more the delay slower will be the transition)
- Delay to 0. ( We want it to start as soon as the page loads)

Finally, you can view your current project by moving to presentation mode!
All that is left is to add the text using the text tool.

Now you can export your file as a -
- Public URL: Export as a public link which spline will host and then share it with your peers.
- Web Component: Export as an HTML file for web developers like me to add to our own upcoming project.
- Image/ VIdeo.
I tried to cover every single step you can start with your next project using Spline. There is much more stuff you can do with spline but the UI of Spline is so simple that it is very much self-explanatory.
If I have misinterpreted any of the steps, do feel free to comment and let me know.
Hats off to the Spline Team for making such a great application, moreover the UI is lag-free and works like butter even in low-end PCs.
Really good to see that you have read till the end.
If this blog has made you hooked to the screen, do give this Blog a ❤.
Retweet on Twitter by tagging me.
Meet you'll in another Blog some other day, till then...Adios⭐🙌.

Top comments (0)