Hey here! If you prefer a video over text, we've got you covered!
In previous posts we talked about host files and the use of modules. Now we will combine these to create and run playbooks.
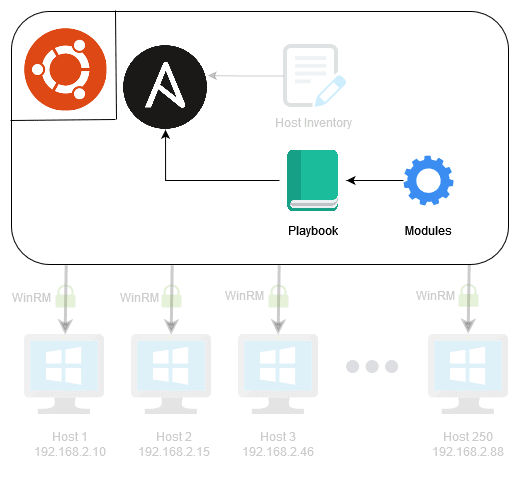
What are playbooks?
In this section we will be covering playbooks, which make use of modules in order to automate task execution.
Playbooks are a list of configurations which, if done correctly, are declarative (meaning, you describe what you want, instead of the steps to get there) and idempotent (you can keep executing the playbooks and you will always get the same result). A playbook can be run in parallel on many hosts at the same time.
As you can see in the diagram, Ansible accepts a playbook containing modules. Ansible takes this playbook, connects to the hosts you want to configure, and executes the tasks needed to get to the desired configuration.
Making a playbook
Playbooks are written in YAML. For this tutorial we will be using nano to write our first playbook.
$ nano playbook_name.yml
There are a plethora of plugins for all popular IDE’s. These check your syntax without having to execute the playbook to find mistakes. A good example of this is the Ansible plugin for VScode. It is recommended to use these plugins to write playbooks for production.
We will now write our first playbook:
---
- hosts: Windows
  tasks:
These are the essential elements of a playbook that define the minimal knowledge Ansible will need to configure a machine.
- hosts: defines the hosts to which the playbook gets applied. In this case that is the Windows group
tasks: a list of tasks that need to be applied to all machines in the group.
Note that tasks is still empty, Ansible will apply these tasks from top to bottom to all machines. Let's add a task to install the package manager chocolatey to see how this looks:
---
- hosts: Windows
  tasks:
  - name: install chocolatey
    win_chocolatey:
      name:
        - chocolatey
        - chocolatey-core.extension
      state: present
- name: the name of the current step that Ansible will show in the terminal, so you can follow along where you are when you run this playbook.
win_chocolatey: we've seen before and is the module we'll be using for this task.
name: and state: are arguments of this module.
Be aware that arguments are not the same across modules, so you will have to change them depending on the module you will use.
Now that we have a complete playbook, we can execute it with the ansible-playbook command followed by the name of the playbook.
$ ansible-playbook playbook_name.yml
Attributes of modules
When it comes to managing Windows computers, one common module you will use is the win_user module. It allows you to add users and manage the groups they are in. However to do this you will need to use many of the modules parameters.
Below is a list of all fields that can be assigned:
-
account_disabledallows you to disable the user account -
account_lockedallows you to unlock the user account -
descriptionallows you to describe the user -
fullnameprovides a way the give the user a name not used for logging in -
groupsis a field used to define groups that thegroups_actionfield defines -
groups_actionallows you to define whether the user should beadd,removeorreplaceassigned groups from the -
groupsfield. It has a default value -
namethis is a required field and defines the vale that is used as login name -
passwordallows you to define a plaintext password of a user -
password_expiredallows you to force the user to change password on their next login -
password_never_expiresallows you to define if the password expires -
statedefines if the user account isabsent,presentwhich will also update the user account, orquerywhich checks if the settings are applied. as default present is used. -
update_passwordis by default set toalwayshowever you can also set it toon_create -
user_cannot_change_passwordallows you to prevent the user from changing their password
Managing users
Sometimes you want to remove old user accounts or update current user accounts. Below is an example that does exactly this.
- name: remove the user jeff
  win_user:
    name: jeff
    state: absent

- name: update the user
  win_user:
    name: user
    state: present
    groups: serverabc
    groups_action: add
    description: user is a server and network admin
    fullname: philippa michael
    password_expired: yes
    update_password: on_create
    password: default_password
As you can see the user account jeff was removed in the first task. In the second task however the user account is updated with new settings.
First the user is added to the server group using the groups and groups_action fields.
Then the user account is given a description and full name for convenience using the description and fullname fields respectively.
Lastly, the password is set to be changed with the password_expired field and if the user needs to be created it defines a default password with the fields update_password and password.
Setting up Firefox policies
Some policies need to be added separately as they belong to a specific application. Some of these are having a specific homepage in a Firefox browser, preventing users from installing extensions, and disabling advanced settings. All of these are done by copying a file into the distribution folder of Firefox. The tasks below install Firefox and then copies a policies.json file into the correct folder.
  - name: install firefox
    win_chocolatey:
      name: firefox
      state: latest
  - name: provide policies
    win_copy:
      dest: "C:/Program Files/Mozilla Firefox/distribution"
      src: "~/policies.json"
The policies.json file describes the policies that are enabled for Firefox. You can find an description of all possible policies for Firefox on their Github page.
{
    "policies": {
        "BlockAboutConfig": true,
        "ExtensionSettings": {
            "*": {
                "blocked_install_message": "Installing extensions is not allowed in this company.",
                "install_sources": ["about:addons","https://addons.mozilla.org/"],
                "installation_mode": "blocked",
                "allowed_types": ["extension"]
            },
            "uBlock0@raymondhill.net": {
                "installation_mode": "force_installed",
                "install_url": "https://addons.mozilla.org/firefox/downloads/latest/ublock-origin/latest.xpi"
            }
        },
        "Homepage": {
            "URL": "https://bbc.com",
            "Locked": false,
            "StartPage": "none"
        }
    }
}
In short
In this post we have shown you how to write a basic playbook, how to add tasks to a playbook and explained how the playbook is structured.
With this we have explained all basic knowledge that you need in order to use Ansible for Windows machines. Thank you for reading! In the next post we will show a few peculiarities that you might encounter when using Ansible. Handy to know, but not required.
See you there!

Top comments (0)