TL;DR
If you just want to see the code, it is here. And this is the PR with the latest changes that are discussed in the post.
Background
In a previous post, we implemented the authentication. Now, we need to gather additional user information through an onboarding flow. After authentication, users will go through a registration/onboarding process to complete their profiles.
Disclaimer
To align with the Firebase API, I've added a few methods to api.ts and improved existing ones to better simulate a real user session. There are two storages: one represents the auth table, and the other stores authenticated user details.
-
readFromDb- Reads data from the database, similar to Firestore document and collection queries. -
onboard- Simulates a cloud function that stores newly onboarded users in the database.
New navigator
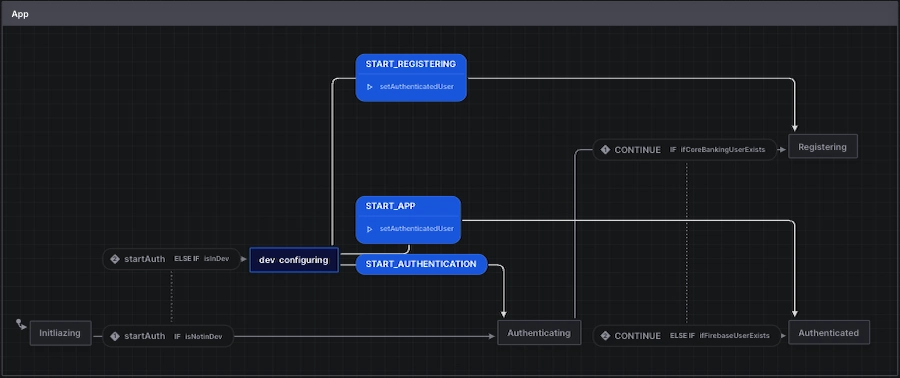
To support the onboarding flow, a new onboarding state is introduced in the appMachine. A key change is the introduction of a transitional gettingUser state, which determines whether a user proceeds directly to the app or needs onboarding.
initializing: {
  on: { START_APP: { target: "authenticating" } },
  always: [
    {
      guard: "isUserAuthenticated",
      target: "gettingUser",
    },
    { target: "authenticating" },
  ],
},
authenticating: {
  entry: ["setRefAuthenticating"],
  on: {
    SIGN_IN: {
      target: "gettingUser",
    },
  },
  exit: [stopChild("authenticatingMachine"), "stopRefAuthenticating"],
}
/* ... */
gettingUser: {
  invoke: {
    src: "getUser",
    onDone: [
      {
        guard: {
          type: "isUserOnboarded",
          params: ({ event }) => {
            return { user: event.output.user };
          },
        },
        actions: [
          {
            type: "setUser",
            params: ({ event }) => {
              return { user: event.output.user as User };
            },
          },
        ],
        target: "authenticated",
      },
      {
        target: "onboarding",
      },
    ],
  },
},
It is important to note again (following Firebase principles) that the authentication and the onboarded user concepts are distinct. The auth table stores all authenticated users, while onboarding creates a separate collection to store onboarded users linked to their auth IDs. This ensures the correct user data retrieval.
getUser: fromPromise(async () => {
  const currentUser = getCurrentUser();
  const user = await readFromDb(`users/${currentUser?.uid}`);

  return { user };
}),
signOut: fromPromise(async () => {
  await signOut();
}),
Onboarding machine
The onboarding machine itself is not too complicated. It follows a structure similar to the authenticated machine. It consists of three steps, each represented by a separate screen and child machine. These machines are spawned, stored in the context, and handled via the navigationSubscriber actor.
On the other hand, it introduces two new concepts:
- Caching the step machines ensures state persistence when navigating between screens.
setRefStepOne: assign({
  refStepOne: ({ spawn, context }) => {
    return (
      context.refStepOne ??
      spawn("onboardingStepOneMachine", {
        id: "onboardingStepOneMachine",
        input: { persistedContext: context.persistedContext?.stepOne },
      })
    );
  },
})
- The machine is
parallel, maintaining separatestepsandonboardingstates to keep step screens linked to their states even during async operations.
Persistency
To enhance the user experience, we need to ensure that onboarding resumes from the exact step where the user left off, even if the app is closed or moved to the background. While xState offers deep persistency improvements with version v5, its built-in solution does not perfectly align with our app architecture.
In order to take advantage of the .getPersistedSnapshot() method, we need to store the entire application state at the root level using createActorContext. Instead, we take another approach and manually store the whole onboarding state in the local storage and reconstruct the step machines when needed.
We rely on react-native-mmkv for local storage due to its synchronous operations, making state retrieval efficient. At the end of each wizard step, we save:
- The user's input from the step.
- The identifier of the next step.
The stored data follows this structure:
export interface PersistedOnboardingState {
  currentStep: keyof OnboardingParamList;
  stepOne?: StepOneContext;
  stepTwo?: StepTwoContext;
  stepThree?: StepThreeContext;
}
When the app reopens, the onboarding state is retrieved from local storage and applied to the onboardingNavigator machine:
context: () => {
  const persistedOnboardingState = getOnboardingState();

  return {
    refStepOne: undefined,
    refStepTwo: undefined,
    refStepThree: undefined,
    persistedOnboardingState,
  };
},
The currentStep is passed to the OnboardingNavigator as initialRouteName:
<Stack.Navigator
initialRouteName={
  state?.context.persistedOnboardingState?.currentStep ?? "StepOne"
}
screenOptions={{
  header: (props) => {
    return (
      <OnboardingBar
        {...props}
        onGoBackPress={() => {
          actorRef?.send({ type: "GO_BACK" });
        }}
        onLogoutPress={() => {
          actorRef?.send({ type: "SIGN_OUT" });
        }}
      />
    );
  },
}}
>
TopBar
Since the onboarding process consists of multiple steps, we need an intuitive way to navigate back and forth. To handle the navigation for the onboarding wizard, we need to extend the AppBar component with custom logic.
export function OnboardingBar({
  route,
  onLogoutPress,
  onGoBackPress,
}: OnboardingBarProps) {
  return (
    <Appbar.Header>
      {route.name !== "StepOne" ? (
        <Appbar.BackAction onPress={onGoBackPress} />
      ) : null}
      <Appbar.Content title={"Onboarding"} />
      <Appbar.Action
        icon="logout"
        onPress={() => {
          onLogoutPress();
        }}
      />
    </Appbar.Header>
  );
}
- The back button is only shown when the user is not on the first step.
- The
onGoBackPresscallback sends aGO_BACKevent to theonboardingNavigatormachine.
Each onboarding step handles GO_BACK individually, deciding what data to persist and which screen to navigate to next.
GO_BACK: {
  actions: [
    {
      type: "persistOnboardingStep",
      params: () => {
        return { screen: "StepOne" };
      },
    },
    {
      type: "navigateToOnboardingStep",
      params: () => {
        return { screen: "StepOne" };
      },
    },
  ],
}
Result

Conclusion
I've started these series with the idea to experiment with the back then new version of xState, so that I can easily upgrade my existing codebase. Several months later I'm so used to xState v5, that I'm taking the new API for granted. Still, if I have to highlight a feature, it will be the input data mechanism and how easy to make it work with the context.
In the following post, I'm planning to work on the input validation
I started this series as an experiment with the then-new version of xState, aiming to upgrade my existing codebase smoothly. Several months later, I now take xState v5 improvements for granted.
If I had to highlight one standout feature from this functionality, it would be the input data mechanism and how seamlessly it integrates with the context. This has significantly streamlined the state management.
In the next post, I'll dive into input validation.

Top comments (0)