Authentication is a really common middleware in backend. in this article I will show you how to create a simple authentication without need of setting up passport.
first let's init the express app
yarn add express
then creating a simple index.js
const express = require('express');
const app = express();

app.use(express.json());
app.use(express.urlencoded());


app.listen(8000, () => {
  console.log('server run successfully')
})
allright, then let's setup our mongoose model in models/user.js
yarn add mongoose bcrypt
const mongoose = require("mongoose");
const bcrypt = require("bcrypt");

function setPassword(value) {
  return bcrypt.hashSync(value, 10);
}

const UserSchema = new mongoose.Schema({
  email: {
    type: String,
    required: true
  },
  password: {
    type: String,
    required: true,
    set: setPassword
  }
});

const model = mongoose.model("User", UserSchema);

module.exports = model;
then let's create our create user and login user controller in controllers/users.js (let's also create a jwt token)
yarn add jsonwebtoken
const User = require("../models/user");
const jwt = require("jsonwebtoken");
const bcrypt = require("bcrypt");

async function create(req, res) {
  const { email, password } = req.body;

  const user = await User.create({
    email,
    password
  });

  res.json({
    user,
    message: "create user successfully"
  });
}

async function login(req, res) {
  const { email, password } = req.body;
  const user = await User.findOne({
    email
  });

  if (!user) {
    throw Error("User not found");
  }
  if (bcrypt.compareSync(password, user.password)) {
    const token = jwt.sign({ user }, "yourSecretKey", {
      expiresIn: "24h"
    });

    res.json({
      user,
      token,
      message: "create user successfully"
    });
  } else {
    res.status(401).json({
      message: "Unauthenticated"
    });
  }
}

module.exports = {
  create,
  login,
}
let's add those controller to the route:
POST /users
POST /users/login
your index.js become like this
const express = require("express");
const mongoose = require("mongoose");
const app = express();
const userController = require("./controllers/user");

mongoose.connect("mongodb://localhost/exampledb").then(() => {
  console.log("success connect db");
});
app.use(express.json());
app.use(express.urlencoded({ extended: true }));

app.post("/users", userController.create);
app.post("/users/login", userController.login);

app.listen(8000, () => {
  console.log("server run successfully");
});
now let's create a router
GET /users
GET /users/:id
but protected with a jwt auth. how do we do that. first lets install express-kun
yarn add express-kun
then first let's export user to separate router in routes/user.js
const { Router } = require('express');
const userController = require('../controllers/user');
const router = Router();

router.post('/', userController.create);
router.post('/login', userController.login);

module.exports = router;
then use it in our app in index.js
const express = require("express");
const mongoose = require("mongoose");
const app = express();
const userRouter = require("./routes/user");

mongoose.connect("mongodb://localhost/exampledb").then(() => {
  console.log("success connect db");
});
app.use(express.json());
app.use(express.urlencoded({ extended: true }));

app.use("/users", userRouter);

app.listen(8000, () => {
  console.log("server run successfully");
});
allright now lets build the protected router. the most simple thing is you can use withJWTAuthMiddleware from express-kun. (behind the scene it just utilize withMiddleware but using a pre-made middleware for jwt authentication)
let's use that with our secretKey
const { Router } = require("express");
const userController = require("../controllers/user");
const { withJWTAuthMiddleware } = require("express-kun");
const router = Router();

const protectedRouter = withJWTAuthMiddleware(router, "yourSecretKey");


router.post("/", userController.create);
protectedRouter.get("/", userController.getAll);
router.post("/login", userController.login);
protectedRouter.get("/:id", userController.get);

module.exports = router;
then let's create the corresponding controllers/user.js
async function getAll(req, res) {
  const user = await User.find({});
  res.json({
    user,
    message: "create user successfully"
  });
}

async function get(req, res) {
  const user = await User.findOne({
    _id: req.params.id
  });
  res.json({
    user,
    message: "create user successfully"
  });
}

module.exports = {
  create,
  login,
  get,
  getAll,
};
let's try access the GET /users route to get all users, you will get this 401 error:
{
"message": "Invalid Token",
"error": "No Authorization Header"
}
to be able to access you need a bearer token in Authorization with this format
Authorization: `Bearer $token`
let's login, get the token and try in postman. it will return successfully
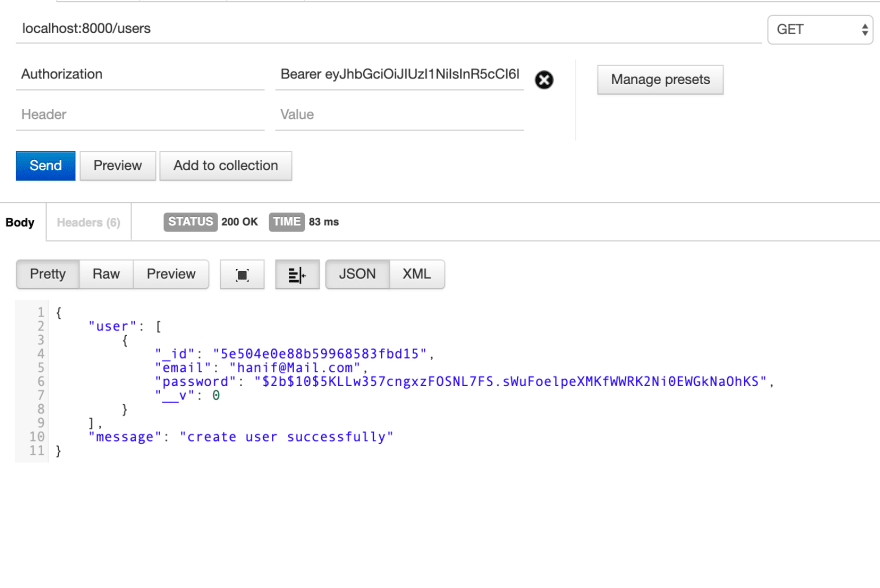
Done. you created your first authenticateed route successfully.
Going further
let's deep further. the above work simply. but how to make it more efficient ? if you know a routes is containing all protected routes you can create and exports protectedRoutes instead the main routes for example
// /Gallery Resource
const router = Router();

const protectedRouter = withJWTAuthMiddleware(router, "yourSecretKey");
prtectedRouter.post("/", userController.create);
protectedRouter.get("/", userController.getAll);
protectedRouter.get("/:id", userController.get);

module.exports = protectedRouter;
well this is a repeating process if you have other "all protected" routes. to simplify it you can create a helper in helpers/createProtectedRouter
module.exports = function() {
  const router = Router();
  return withJWTAuthMiddleware(router, 'yourSecretKey');
};
so now in other part of the apps you can do
// Resource /Friends
const protectedRouter = createProtectedRouter();
prtectedRouter.post("/", userController.create);
protectedRouter.get("/", userController.getAll);
protectedRouter.get("/:id", userController.get);

module.exports = protectedRouter;
this was the main philosophy of express-kun. you can build a reusable 'midlewared router' and pass it anywhere, even between project. remember that withJWTAuthMiddleware is using withMiddleware behind the scene.
Customization
So you want to customize the authentication, for example you dont want to use bearer ? it's really possible. actually, here is the source code of withJWTAuthMiddleware
export default function withJWTAuthMiddleware(
  router: Router,
  secretKey: string,
  getToken: GetTokenFun = getTokenFromBearer,
  preCheckFun?: PreCheckFun,
  errorHandler?: ErrorRequestHandler,
  verifyOptions?: jwt.VerifyOptions
) {
  return withMiddleware(
    router,
    jwtAuthMiddleware(
      secretKey,
      getToken,
      preCheckFun,
      errorHandler,
      verifyOptions
    )
  );
}
and here is the source code for pre made jwtAuthMiddleware
export default function jwtAuthMiddleware(
  secretKey: string,
  getToken: GetTokenFun,
  preCheckFun?: PreCheckFun,
  errorHandler?: ErrorRequestHandler,
  verifyOptions?: jwt.VerifyOptions
) {
  return async function middleware(
    req: Request,
    res: Response,
    next: NextFunction
  ) {
    try {
      const token = await getToken(req);
      if (preCheckFun) {
        preCheckFun(req, res);
      }
      await jwt.verify(token, secretKey, verifyOptions);
      res.locals.token = token;
      res.locals.decoded = jwt.decode(token);
      next();
    } catch (e) {
      if (errorHandler) {
        errorHandler(e, req, res, next);
        return;
      }
      if (e instanceof jwt.JsonWebTokenError || e instanceof TokenError) {
        res.status(401).json({
          message: "Invalid Token",
          error: e.message
        });
        return;
      }
      res.status(500).json({
        message: "Internal server Error",
        error: e.message,
        stack: e.stack
      });
    }
  };
}
first thing to note, it will pass your decoded json into res.locals.decoded that you can access in your controller.
moreover. it actually accept and run getToken function.
getToken function is a function that passing a request object and should return the token.
for example, here was the default getTokenFromBearer source code
export default function getTokenFromBearer(req: Request) {
  const authorization = req.headers.authorization;
  if (!authorization) {
    throw new TokenError("No Authorization Header");
  }
  try {
    const token = authorization?.split("Bearer ")[1];
    return token;
  } catch {
    throw new TokenError("Invalid Token Format");
  }
}
so if the token in the ?token queryString you can create something like this
export default function getTokenFromQuery(req: Request) {
  const {token} = req.query;
  if (!token) {
    throw new TokenError("No Token Query");
  }
  return token;
}
you can also havee a preCheck function that will pass you a request and response object and can do literally anything there. for example if you want to check if user exists etc, and also you can provide it with your own custom error handler !
That's all for this post. Thanks, if you interested in the library, please do try !

Top comments (9)
Great writeup man.
Please, upload the full code to GitHub so people can use it as a template
actually I already have template for it: github.com/hanipcode/express-kun-b... but it's in typescript tho . Do you think I should write another writeup?
No need to write another.
Just compile the code in this post into a repo.
Thank you for this. I was able to easily apply your tutorial.
Hi man, thanks for trying the helper, really appreciated it !
hey bro.. can you make an example of how to handle it from the website frontend?
Ah alright. I will try to include how to use those route in the frontend side in the next writeup
Thankyou very much.
You are welcome bro. the library is getting updated. stay tuned !