
In this post we will look at how to make a web app offline first using a client side database (PouchDB) that is synced securely with Postgres.
We'll be using two open-source tools, RxDB and Hasura to help set up the sync.

Contents
- Overview
- Offline first Todo App
- Demo
- Boilerplate setup
- Offline mode for assets
- Hasura Setup
- RxDB Setup
- Making the app functional
- Setting up GraphQL replication
- Pull Query
- Push Query
- Trigger replication on change
- Authorization
- Limitations
- Compaction
- Conflict Resolution
- Eventual consistency
- Conclusion
Overview
To make an app truly offline first, we primarily need to do two things:
- Any code and assets used should be available offline
- Any data changes should be made locally first and then synced to the cloud.
We will briefly look at 1) and spend more time on 2).
For achieving 2) we make all changes locally first using RxDB and then sync to Postgres using Hasura in the background. If you are an existing Postgres user, this approach is appealing as it allows you to continue using Postgres while implementing an offline first design on the front end. Making changes locally first also has the additional advantage of removing network latency on user operations. (Related: Optimistic UI updates).
RxDB uses PouchDB under the hood to provide a NoSQL database on the client. It then provides an ability to replicate this data with either CouchDB or a GraphQL server.
An offline-first Todo App
Demo
Try it out here: https://rxdb-hasura-demo.netlify.com/
Try out the sync:
- Login to the app from two different browsers.
- Create some todos in one and watch as they get synced to the other (Note: This might not work in a private window on firefox due to this bug).
Try out the offline-first:
- On browser 1: Simulate offline mode using the "Work offline" option under File menu on firefox or devtools on chrome.
- On browser 1: Create/edit/delete todos in offline mode. You'll see that nothing has changed on browser 2.
- On browser 1: Go back online. You'll see that browser 2 gets synced!
You can also go offline and refresh the page and see that data is persisted offline too.
Boilerplate Setup
To build this app locally, head to this github repo (note the boilerplate git tag).
The boilerplate consists of a simple react todo app along with Authentication using Auth0. If you try running the app at this point, you will be able to login, and see an empty todo list, but you won’t be able to add any todos. That is because the functionality required to add a todo to a store, fetch todos from the store, etc has been left unimplemented in the boilerplate.
Part 1: Offline mode for our web app
To make our app work offline, we need to get the web assets to work offline. Create React App already has the required boilerplate for making an app offline using service workers.
We need to change serviceWorker.unregister() to serviceWorker.register() in index.js.
Once you do this, refresh the page, go offline and refresh again. You will see that the page loads despite there being no network connection!
One thing to keep in mind here is the design of the Authentication mechanism. We are using JWTs issued by Auth0 for authentication. While refreshing these tokens, we need to make sure that the user is online, otherwise the user will see a network error from Auth0.
 renewSession() {
    const interval = setInterval(() => {
      const shouldRenewSession = this.isLoggedIn && (!this.idToken || this.isExpired());
      if (window.navigator.onLine && shouldRenewSession) {
        this.auth0.checkSession({}, (err, authResult) => {
          if (authResult && authResult.accessToken && authResult.idToken) {
            this.setSession(authResult);
          } else if (err) {
            this.logout();
            console.log(err);
            alert(`Could not get a new token (${err.error}: ${err.error_description}).`);
          }
        });
      }
    }, 5000);
  }
Part 2: Setting up the backend (Postgres + Hasura + Auth)
We will use a simple schema with two tables on Hasura:
todo (
  id: text primary key unique,
  userId: text,
  text: text,
  createdAt: timestamp,
  isCompleted: boolean,
  deleted: boolean,
  updatedAt: boolean
)

users (
  auth0_id: text primary key unique,
  name: text
)
Hasura is integrated with Auth0 for illustrative purposes. If you are new to Hasura & Auth0, this tutorial has a good overview.
Once this setup is done, you'll have a working secure GraphQL API for a todo backend app. For now, we're not going to use it and proceed instead with making our web app work completely offline.
Part 3: Setting up the client side db (RxDB)
👉 The overall RxDB setup is in this commit.
Setting up the client db schema:
We only need one collection ‘todos’ with fields (id, userId, text, isCompleted, createdAt, updatedAt, userId) as defined in src/components/schema.js for this application.
Read more about setting up RxDB in your web app and a basic schema here: https://rxdb.info/install.html
Once you're done with this, you'll be able to play around with RxDB from the devtools console in your browser.
> window.db.todos.insert({
    id: "mytodo1",
    text: 'Todo 1',
    isCompleted: false,
    createdAt: new Date().toISOString(),
    updatedAt: new Date().toISOString(),
    userId: localStorage.getItem("userId")
}).then((doc) => console.log(doc.toJSON()))
---------------------------------------------------------------------------
{
    id: "mytodo1",
    text: "Todo 1",
    isCompleted: false,
    createdAt: "2019-12-31T16:31:24.541Z",
    updatedAt: "2019-12-31T16:31:24.541Z",
    ...
}
Part 4: Making the app work "client-side only"
Making the app functional is fairly straight forward and requires wiring the up the client side db calls with the right UI actions.
For example adding a todo can be achieved as shown in this commit:
--- a/src/components/Todo/TodoInput.js
+++ b/src/components/Todo/TodoInput.js

   addTodo(text) {
+ this.props.db.todos.insert({
+ id: uuidv4(),
+ text: text,
+ isCompleted: false,
+ createdAt: new Date().toISOString(),
+ userId: this.props.auth.userId
+ });
   }
Similarly we can:
- Implement loading existing todos as shown in this commit.
- Implement marking a todo as completed as shown in this commit.
- Implement deleting a todo as shown in this commit.
- Implement clear completed functionality as shown in this commit.
Note that RxDB has an issue that prevents us from updating a document if the GraphQL replication plugin is enabled. We have worked around this issue in the commit above.
At this point we can create, edit & delete todos client-side only and everything will work entirely offline too!
However since replication is not yet setup, if you say open the app in a different browser and login, you will not see the todo items you created in the first browser window.
Part 5: Setting up GraphQL replication to sync data from the app to Postgres
Replication using GraphQL for RxDB is described here (Note that this feature was released in November and is still in beta). In short RxDB expects two GraphQL queries, one for pulling changes that have happened on the server and one for pushing changes that have happened on the client. Conflicts are assumed to be taken care of by the server (more on this later).
👉 The code to setup replication can be seen in this commit.
5a) Pull Query
The pull query is as follows:
const pullQueryBuilder = (userId) => {
    return (doc) => {
        if (!doc) {
            doc = {
                id: '',
                updatedAt: new Date(0).toUTCString()
            };
        }

        const query = `{
            todos(
                where: {
                    _or: [
                        {updatedAt: {_gt: "${doc.updatedAt}"}},
                        {
                            updatedAt: {_eq: "${doc.updatedAt}"},
                            id: {_gt: "${doc.id}"}
                        }
                    ],
                    userId: {_eq: "${userId}"}
                },
                limit: ${batchSize},
                order_by: [{updatedAt: asc}, {id: asc}]
            ) {
                id
                text
                isCompleted
                deleted
                createdAt
                updatedAt
                userId
            }
        }`;
        return {
            query,
            variables: {}
        };
    };
};
Essentially RxDB fetches documents in batches by using the updatedAt timestamp for the last synced document. If there are multiple documents with the same updatedAt timestamp and the current fetch retrieves only some of them, then the next fetch will use the id of the last fetched document to fetch the remaining documents.
To make sure that we do not miss any updates we need the server to set the updatedAt whenever it receives the document. To see why, suppose we have two client A & B both offline. Consider the following sequence of events:
- A performs an update t1.
- B performs an update at t2
- A performs an update at t3 (t1 < t2 < t3).
- A goes online and syncs the changes at t1 & t3. updatedAt will now be set to t3.
- B goes online and syncs the document
Now A will not fetch the change at t2 because it queries only for changes that have happend after t3. Having the server create timestamps will make sure that B's update has a timestamp > t3.
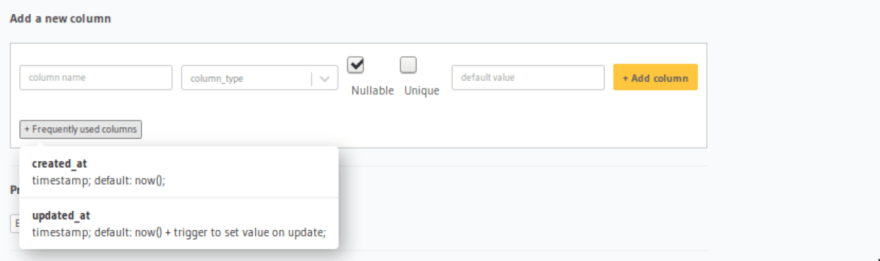
Luckily an updatedAt column that will auto update on every change is part of Hasura’s frequently used columns list:
5b) Push Query
For the push query we essentially need an upsert. Luckily Hasura provides exactly that. 🤓
const pushQueryBuilder = doc => {
    const query = `
        mutation InsertTodo($todo: [todos_insert_input!]!) {
            insert_todos(
                objects: $todo,
                on_conflict: {
                    constraint: todos_pkey,
                    update_columns: [text, isCompleted, deleted, updatedAt]
                }){
                returning {
                  id
                }
              }
       }
    `;
    const variables = {
        todo: doc
    };

    return {
        query,
        variables
    };
};
5c) Trigger replication on changes
To trigger replication as soon as a change happens on the backend, we use a GraphQL subscription:
  async setupGraphQLReplication(auth) {
        const replicationState = this.db.todos.syncGraphQL({
           url: syncURL,
           headers: {
               'Authorization': `Bearer ${auth.idToken}`
           },
           push: {
               batchSize,
               queryBuilder: pushQueryBuilder
           },
           pull: {
               queryBuilder: pullQueryBuilder(auth.userId)
           },
           live: true,
           /**
            * Because the websocket is used to inform the client
            * when something has changed,
            * we can set the liveIntervall to a high value
            */
           liveInterval: 1000 * 60 * 10, // 10 minutes
           deletedFlag: 'deleted'
       });

       replicationState.error$.subscribe(err => {
           console.error('replication error:');
           console.dir(err);
       });

       return replicationState;
    }
5d) Authorization for secure replication
We can't "replicate" data directly to/fro the client and the backend! This is because we shouldn't let clients get access to data that their users don't have read and/or write access to.
Assuming you've setup the right permission rules on Hasura for securing the GraphQL API, all you need to do is pass the JWT to Hasura to make sure the data replicated back and forth is the right data for the logged in user!
We will pass the id token we receive from Auth0 to Hasura while making the GraphQL queries to pull/push/subscribe. In addition whenever we refresh the token, we will restart replication to make sure that the user is seeing the right data based on their latest access rules. We do this by encapsulating the replication as well as the subscription in a GraphQLReplicator class:
export class GraphQLReplicator {
    constructor(db) {
        this.db = db;
        this.replicationState = null;
        this.subscriptionClient = null;
    }

    async restart(auth) {
        if(this.replicationState) {
            this.replicationState.cancel()
        }

        if(this.subscriptionClient) {
            this.subscriptionClient.close()
        }

        this.replicationState = await this.setupGraphQLReplication(auth)
        this.subscriptionClient = this.setupGraphQLSubscription(auth, this.replicationState)
    }

    async setupGraphQLReplication(auth) {
        const replicationState = this.db.todos.syncGraphQL({
           url: syncURL,
           headers: {
               'Authorization': `Bearer ${auth.idToken}`
           },
           push: {
               batchSize,
               queryBuilder: pushQueryBuilder
           },
           pull: {
               queryBuilder: pullQueryBuilder(auth.userId)
           },
           live: true,
           /**
            * Because the websocket is used to inform the client
            * when something has changed,
            * we can set the liveIntervall to a high value
            */
           liveInterval: 1000 * 60 * 10, // 10 minutes
           deletedFlag: 'deleted'
       });

       replicationState.error$.subscribe(err => {
           console.error('replication error:');
           console.dir(err);
       });

       return replicationState;
    }

    setupGraphQLSubscription(auth, replicationState) {
        ...
    }
}
Limitations
Compaction
By default, PouchDB will store upto 1000 revisions of a document. The problem is amplified by the fact that each change causes two versions of the document to be created - one when the change is made and the other when the change is re-synced from the server. To avoid this, while creating/initialising RxDB set the revs_limit parameter to a smaller value.
Further when we call "remove" on a document, it is not actually purged from disk, instead a flag is set marking the item as deleted. If your documents are large in size or are frequently updated this might become an issue.
A simple workaround to these compaction issues (that might work in some cases) is to destroy the entire database periodically and let it re-sync from the server.
Conflict Resolution
When we have clients from multiple devices making changes we will potentially have conflicting changes. We can divide the kind of conflicts we will have as follows:
- Two (or more) clients edit the same key of a document
- A client deletes a document while other client(s) edit some fields in it.
For the simple todo app it might be okay to adopt a conflict resolution strategy of last write wins. A more sophisticated strategy would be to keep track of multiple versions and alert the user in case of a conflict. Pouchdb has an existing conflict resolution mechanism, however this data is not exposed during GraphQL replication by RxDB. Currently the only way out is to build a similar system on top of RxDB.
Eventual Consistency
Even if individual documents are consistent, it is possible to get into a scenario where the data as a whole is inconsistent. For example, let us consider a case where we have two entities with a many to many relation. With RxDB we would model it as three collections A, B and AtoB. Now consider the following sequence of events:
- client X creates document a, b & atob of types A, B and atob
- documents a & atob sync to the server
- document disconnects (note that b has not yet synced to the server)
- Client Y fetches documents a & atob and will see an inconsistency when if tries to fetch the associated document of type b.
Clients have to explicitly deal with issues like the above, where related data might not be present.
Conclusion
In this post we have looked at how to create a simple offline first todo app using Hasura as a GraphQL backend and RxDB as the store on the front end. Here are some other good reads on similar offline-first topics:

Top comments (0)