
Pharothings
Live programming platform for IoT projects based on Pharo.
It includes:
- development tools to lively program, explore and debug remote boards (based on TelePharo)
-
board modeling library which simplifies board configuration
- Raspberry driven by WiringPi library
- Arduino driven by Firmata
- Beaglebone, soon
Now PharoThings is in beta stage together with documentation and videos. It will be improved constantly.
To install Pharo/Pharothings you can read the instruction on their website
Firmata
Firmata is a generic protocol for communicating with microcontrollers from software on a host computer.
It is intended to work with any host computer software package. Right now there is a matching object in a number of languages.
It is easy to add objects for other software to use this protocol.
Basically, this firmware establishes a protocol for talking to the Arduino from the host software.
The aim is to allow people to completely control the Arduino from software on the host computer.
What do we need?
In this lesson, we will use a setup with Pharo and Firmata.
Components
- 1 Arduino Uno
- 1 Breadboard
- 1 LED
- 1 Resistor (330 ohms)
- 1 Soil Moisture Sensor
- Jumper wires
Installation
Arduino: Installing Standard Firmata
Your first step should be to download the Arduino application from
Arduino Website.
Be sure to choose the latest version and also the correct download for your computer and operating system.
Once the software has downloaded, you can install the application using the method appropriate for your system.
- For
Mac OSX, you will be downloading a ZIP file. Double-clicking on the ZIP should produce a single "Arduino" application file which you can then copy into your Applications folder. - For
Windows, you should download the .EXE containing a full Windows installer. Double clicking on the .EXE should start the installation. - For
Linux, you will download a compressed TAR file. You can use the "tar" command to uncompress and unpack the application. Plug in Your Arduino Board as shown in Figure below.

Note: Disconnect any wires that may be attached to your Arduino and plug the board into the computer.
You'll need to select the entry in the Tools > Board menu that corresponds to your Arduino board.
- Here we are using Arduino UNO board and my port is
/dev/tty.usbmodem14201( You may have a different port name depend on your operating system ). - Upload the Standard Firmata Sketch.

- StandardFirmata is included with the Arduino IDE. To compile and upload StandardFirmata to your Arduino, open the IDE and select
File/Examples/Firmata/StandardFirmata. - Now at the top of the text editor window, click the
Uploadbutton on the IDE. - At the bottom of the text editor window, you should see a small status window. This will report the progress as the code is compiled and then uploaded to the Arduino.
- While the code is being uploaded, you should see some very small LED lights (the Transmit (TX) and Receive (RX) lights) on your Arduino board blinking as the data is transferred.
- When the process is completed, you should see the message
Done Uploadingin the status window at the bottom of the editor.
Pharo with Firmata
To load latest version of Firmata you can evaluate the following expression in playground:
  Metacello new
  baseline: 'Firmata';
  repository: 'github://pharo-iot/Firmata';
  load
We have tested this library so far with Arduino Uno and Funduino Uno.
To connect to your firmatata enable device, you need the following things:
- Know the device's port name.
- Know its baud rate.
- Install firmata in it (you can do it using your arduino IDE).
For example, our Arduino boards use a baud rate of 57600, and were detected by our operating system in the /dev/ttyACM0 port.
Connecting the Firmata client to arduino is as easy as follows:
firmata := Firmata onPort: '/dev/ttyACM0' baudRate: 57600.
Connecting to an arduino will check that the port exists, and will verify that Arduino has installed a compatible version of Firmata.
In case one of these conditions does not hold, an exception is thrown.
Once we are connected, we can ask the Firmata driver if it is connected or not.
firmata isConnected.
And finally, we can disconnect it by doing:
firmata disconnect.
Digital Pins
The digital inputs and outputs (digital I/O) on the Arduino are what allow you to connect the Arduino sensors, actuators, and chips (intergrated circuit).
For example in Arduino UNO which is a microcontroller board based on the ATmega328.
It has a few types of pins: digital pin ( 6 can be used as PWM outputs ), analog pins and orther pins like power pins
The digital pins on the Arduino can be configured as either inputs or outputs.
There are only two state, either ON or OFF state and these states are represented by the binary values 1 and 0.
You use digital signals in situations where the input or output will have one of those two values.
In Arduino sketch terms, a ON state is known as HIGH (5V) and OFF state is known as LOW (0V).
In other words, we can use them to obtain a digital value (for example, if a button is pressed or not), or to set a value (set if a led is turned on or off) but not both at the same time.
Writing to Digital Pins
To write to a digital pin, you should first set it to output mode using the digitalPin:mode: message.
The first argument of the message is the number of the pin, and the second is a numeric value representing the output mode value.
We use the FirmataConstants class that encapsulates many of the different numeric values used by firmata.
In the following example, we set the digital pin 13 in output mode, so we can write to it.
firmata digitalPin: 13 mode: FirmataConstants pinModeOutput.
We can then write to a digital port with the #digitalWrite:value: message, giving the pin number as first argument, and the value to write (0 or 1) as second argument.
Thus, to turn on the pin 13 we can do:
firmata digitalWrite: 13 value: 1.
And to turn it off:
firmata digitalWrite: 13 value: 0.
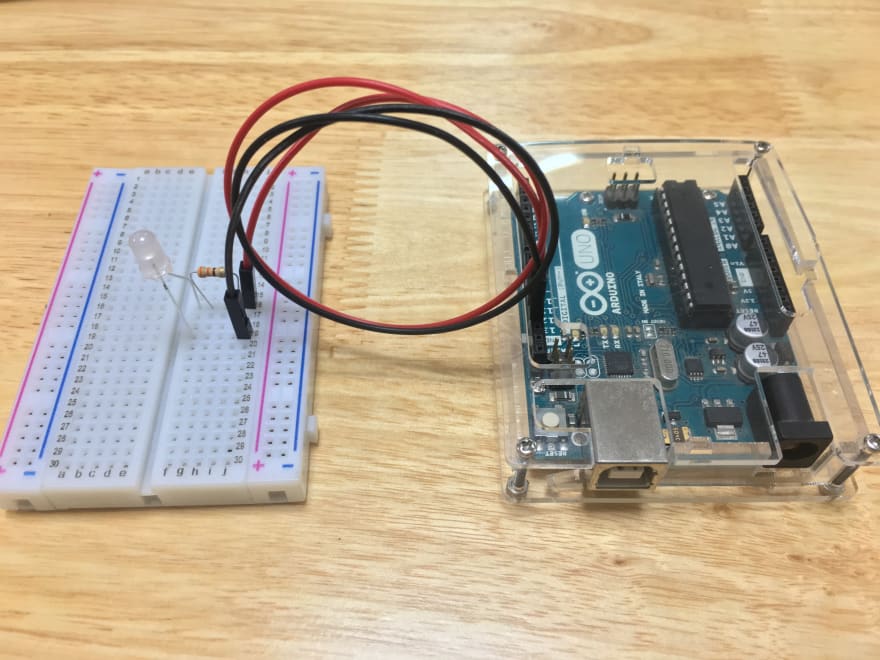
You can use this method to toggle the LED as shown in Figure bellow.
Reading from Digital Pins
To read from a digital pin, you should first set it to input mode using the #digitalPin:mode: message.
The first argument of the message is the number of the pin, and the second is a numeric value representing the input mode value.
We use the FirmataConstants class that encapsulates many of the different numeric values used by firmata.
In the following example, we first setup a push down button with a pull-down resistor.
We connect the button output to digital pin 2.
When we push the button and Firmata should tell us that the value of pin 2 is 1. When we do not push it, its value should be 0.

First, we set the digital pin 2 in input mode, so we can read from it.
firmata digitalPin: 2 mode: FirmataConstants pinModeInput.
Then, we can read the value of the pin using the #digitalRead: message.
firmata digitalRead: 2.
If we ask the value and press the button at the same time, we get the value 1.
Analog Pins
Analog pins are pins whose state range in the continuum between 0 and 1. These states are represented as floating point numbers.
As with digital pins, analog pins work both in read and write mode.
Typical usages of reading analog pins is retrieving data from sensors, such as temperature, humidity, light and so on.
Writing analog pins can be used to, for example, turn on leds with a given intensity instead of just turning on like we do with the digital pins.
Activating Analog Pins
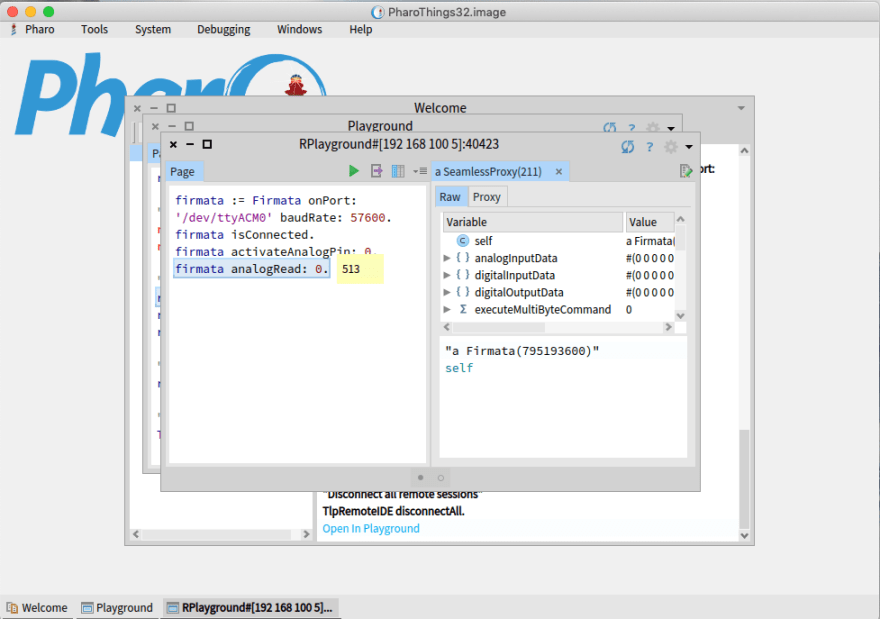
firmata activateAnalogPin: 0.
Reading from Analog Pins
((firmata analogRead: 0) * 500 / 1024) asFloat.
Experimental procedure
The Soil Moisture Sensor measures soil moisture grace to the changes in electrical conductivity of the earth ( soil resistance increases with drought ).
The electrical resistance is measured between the two electrodes of the sensor.
A comparator activates a digital output when a adjutable threshold is exceeded.
There are a lot of moisture sensors but in our example, we use the Capacitive Soil Moisture Sensor from DFTrobot as the figure @Capacitive-Soil-Moisture Sensor

The Figure @Capacitive-Soil-Moisture Sensor Sketch shows how the electric connection is made.
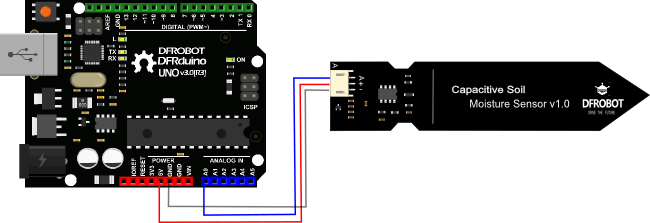
| Aduino Uno | Capacitive Soil Moisture Sensor |
|---|---|
| GND | Black wire |
| 5V | Red Wire |
| Analog output | Blue Wire |
Connecting the Firmata client to arduino
firmata := Firmata onPort: '/dev/ttyACM0' baudRate: 57600.
Check the firmata connection
firmata isConnected.
Getting the temperature with Capacitive-Soil-Moisture Sensor
  firmata activateAnalogPin: 0.
  firmata analogRead:0.
Result
This is very simple and you can get these values and stored in a variable, to use to different purposes, like send a message to an LCD display, send the values to a cloud server and simply do some action.

Top comments (4)
is it possible with your tools to program Arduino in Smalltalk in a way, that Arduino operates stand alone? Or does it works only with connected computer that operates the Pharo image. Sorry, I'm a total new with this combination of Arduino and Smalltalk. I am looking for a way to program Arduino in Smalltalk instead of C++
Thanks a lot for ideas.
Sorry for late repy but currently you cannot run a smalltalk vm in arduino.
This is awesome, thanks a lot, more Pharothings tutorials will add more awesomeness to dev.to
great, make pharo/smalltalk more popular 🎉🎉🎉