
You fetched some data in React, now what?
Don't just map through your data right away.
Recently, one of the first things I like to do whenever I'm working with data, is to use basic javascript to add some user friendly "reactivity."
My aim is to make this quick, and impactful. Let's get straight to it 💯
Preface and Resources 📚
Although this is quick and beginner friendly example, I'm assuming you have some working knowledge in:
Let's take a look at an e-commerce example

A gallery or grid just like this one, showcasing the entire stores products may be something you see, when initially arriving at an e-commerce website.

Or how about your portfolio? You may have all your projects displayed beautifully. However, wouldn't it be better if we gave our users the ability to filter our projects by technologies like Vue or React or our stores products by category?
Fresh create-react-app project.
Let's start off with our trusty create-react-app. I left all pre-loaded files and CSS alone. Only thing I did was removed the boilerplate code in our App() and the logo.
First, let's import useState and useEffect in our app like so: ```import
{ useEffect, useState } from 'react'
Then, in our terminal let's install our choice of CSS in JS library like so:
yarn add styled-components // yarn
npm install styled-components --save // npm
Next, let's import our library like so: ```import

 styled from 'styled-components'
Lastly, I moved the React logo png from the /public folder into our /src folder. Then I renamed it to react-logo.png. I will use this image for our loader later. Import it into our App.js like so: import Logo from './react-logo-.png
All our imports at the top should now look like this

Let's knock a few things out in index.js next
We're going to add global styles to our app so we can adjust the body and html how we like. At the top of index.js: ```import
{createGlobalStyle} from 'styled-components'
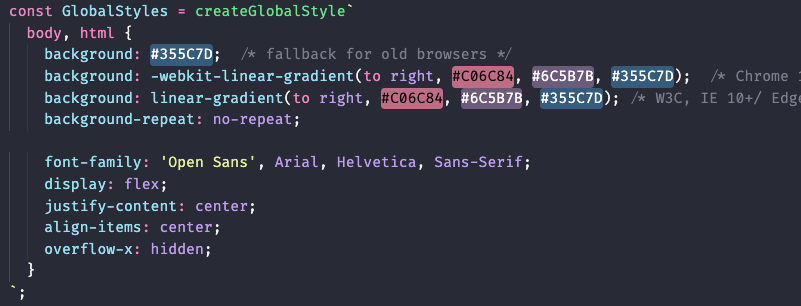
Next we're going to create a `GlobalStyles` variable and add some styles to the body and html. It should look like this:
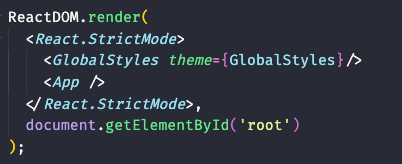
Lastly, above our `<App/>` component in `ReactDOM.render()` add our `<GlobalStyles />` component. Don't forget to add the `theme` prop with our `GlobalStyles` variable as it's value, like so:
That's it for index.js!
---
## Back in `App.js` lets set up our state
We're going to need two pieces of state. A `products` state, and a `loading` state.
```javascript
const [products, setProducts] = useState([]);
const [loading, setLoading] = useState(false);
We're expecting an array of data for our products, so we'll initialize it with an empty array. We also want a loading state, so users know things are happening in the background, while fetching data. Like a spinning logo for example.
Let's get some data
Let's start with a function that handle our fetch request.
We'll be using the fetch api. I prefer to use two variables. One for fetching our endpoint, and one for storing our results. It looks like this:
const fetchproducts = async () => {
    setLoading(true);
    const req = await fetch(`https://fakestoreapi.com/products`);
    const products = await req.json();
    setProducts(products);
    setLoading(false);
    console.log(products);
  }
We're also setting the loading state to true during our request, and once we have our results, setting the loading state back to false. We should also console.log() our products, to make sure we are indeed populating our state with data. It'll also make it easier to see our response from the API in chrome dev tools.
If you'd like to learn more about the Fetch API and async functions check out this resource.
Lastly, let's use our useEffect hook.
Below our state, and fetchProducts() function, let's call our request:
useEffect(() =>
  fetchProducts();
},[]);
We have our state, we have our data, now let's start creating our components
We are going to need a Grid, Product, Price and Image and Loading component. And don't create new files, as we're building custom styled components.
Below our App() but before our export let's begin creating our components.


Let's add our components to our App()

Now that we have our layout, you're probably noticing we're not using our data from our state.
Let's map through our products array like so:

Let' take it one step further. Let's take a preventive measure, and make sure we only render our products if we indeed have data in our states product array. And, we'll only render our data if we are no longer fetching the data from our API. A very simple way to handle this would be a ternary operator. Let me explain what's happening here in pseudocode: if notLoading AND if weHaveData ? mapThroughOurData : ELSE render loadingComponent.

Hopefully, everything is working properly. If you are running into any problems, please hit me up on Twitter!
You should have a fully responsive web app displaying content from the Fake Store API.
However, we have not added that spicy "reactivity" yet.
Let's do that next!
- Let's add a
querystate to ourApp()component. Go ahead and addconst [query, setQuery] = useState('').Our state should now look like this:
- Next, we need an event handler to handle the users input, and update our query state. It looks like this:

- Next, let's build our
Inputas a styled-component. It should look like this:
- Add our
Inputcomponent to ourAppcomponent and add theonChangeprop and set it to ourhandleUserQueryfunction like so:
- We're almost done! Let's add the secret sauce. We're going to create a simple function and its only responsibility is to filter our products state by filtering out everything that does not match the users input. It looks like this: ```javascript
const filteredProducts = products.filter(product =>
product.category.toLowerCase().includes(query.toLowerCase()) || product.title.toLowerCase().includes(query.toLowerCase())
);
We're simply filtering __out__ any products that do __not__ match our users input. Our users will be able to filter their results by searching for
categories or titles.
6. Lastly, instead of mapping through `products` in our `Grid` component, let's instead map through `filteredProducts.` Replace `products` with `filteredProducts` and that's it! The store should render all the same, accept the user now has the ability to filter results according to the way they search for their products.
---
## Conclusion! 👏
That's a wrap for __Filter Your React Data With Basic Javascript__ 🤘 The idea was to inspire you to take this concept, and use it the way you see fit! Wether that's for an e-commerce store, a photo gallery, or your projects for your personal portfolio! You can get really creative with some basic javascript 😎 If something doesn't make sense, or you find an error, please don't hesitate to yell at me on [Twitter!](https://www.twitter.com/hyggedev)
---
## Are you a beginner web dev on the learning journey!?
Check out some of these articles also written by me!


Latest comments (0)