
Building Hygraph FM
In the first part of this series, we created an artist content model and components as well as connected LastFM as a remote source to get our music platform project, Hygraph FM. Now that these elements are in place, it’s time to put our content model into action!
In this article, we will build a frontend using Next.js 13 and federated content from Hygraph. To do this, we’ll create the artist summary pages to render the artist bio, genre tags, and similar artists. Additionally, we will create a home page that showcases featured artists, a landing page that lists all artists on Hygraph FM, and render our promotional block components.
Missed the first part of the series? Clone the schema and content to follow along with this article.
Series:
Project setup
To start, we need to initialize a new Next.js 13 project. Open up your terminal and navigate to where you want your project, then run the following command:
npx create-next-app hygraphfm
The interactive setup will ask you questions to configure your project. Initialize with the following answers:
- Typescript: No
- ESLint: Yes
- Tailwind CSS: Yes
-
src/directory: No - App Router: Yes
- Import alias: No
Once the options are chosen, the CLI will install all the necessary pieces to run your Next.js site.
Once the installation completes, open the new Next project in a code editor of your choice. We need to adjust the default Tailwind styling that Next.js gives us from the installation.
Update the global CSS rules in app/globals.css to add the following extra styling but leave the file with the following Tailwind imports:
@tailwind base;
@tailwind components;
@tailwind utilities;
Additional Styling:
/* global.css */

@tailwind base;
@tailwind components;
@tailwind utilities;

:root {
  --foreground-rgb: 29, 33, 39;
  --background-start-rgb: 214, 219, 220;
  --background-end-rgb: 255, 255, 255;
}

@media (prefers-color-scheme: dark) {
  :root {
    --foreground-rgb: 255, 255, 255;
    --background-start-rgb: 29, 33, 39;
    --background-end-rgb: 29, 33, 39;
  }
}

body {
  color: rgb(var(--foreground-rgb));
  background: linear-gradient(
      to bottom,
      transparent,
      rgb(var(--background-end-rgb))
    )
    rgb(var(--background-start-rgb));
}

/* Add the following styling */

.background-radial-gradient {
    background-color: hsl(218, 41%, 15%);
    background-image: radial-gradient(650px circle at 0% 0%,
            hsl(218, 41%, 35%) 15%,
            hsl(218, 41%, 30%) 35%,
            hsl(218, 41%, 20%) 75%,
            hsl(218, 41%, 19%) 80%,
            transparent 100%),
          radial-gradient(1250px circle at 100% 100%,
            hsl(218, 41%, 45%) 15%,
            hsl(218, 41%, 30%) 35%,
            hsl(218, 41%, 20%) 75%,
            hsl(218, 41%, 19%) 80%,
            transparent 100%);
      }
.all-links > a {
  text-decoration: underline;
}

.fm-mode {
  mix-blend-mode: color-dodge
}
After adding a few global styles, we need to connect Hygraph to our Next project so that we can use the data from our artist content model.
Connecting Hygraph to Next
To make Hygraph accessible to our Next.js project, we need to allow read permissions on the Content API. Head over to your project’s settings and click on API Access. To start, let’s set the public content API to its default. This will give us access to all the content in our models, including the remote data from LastFM to read into our Next project. From this same screen, copy the Content API endpoint URL.
Create a new file in the root of your project named .env.local and add the variable HYGRAPH_ENDPOINT.
This will be where we paste the endpoint URL we copied from Hygraph:
//.env.local

HYGRAPH_ENDPOINT=YOUR-URL-HERE
Now we can start our Next site and build our frontend. In the terminal, type the following command to run the project locally in a browser of your choice:
# Terminal command to start Next project
npm run dev
Creating the homepage and featured artists
First, let’s build our header, navbar, and footer. In your app directory, create a new folder called components . In the components folders, create three files: Header.js, Footer.js, Navbar.js and add the following code respectively:
Header
// Header component: app/components/Header.js

export default function Header() {
    return (
        <header className="py-6 mt-0 background-radial-gradient">
            <div className="px-6 py-12 text-center md:px-12 lg:text-left">
                <div className="container mx-auto">
                    <div className="grid items-center gap-12 lg:grid-cols-2">
                    <div className="mt-12 lg:mt-0">
                        <h1 className="mb-12 text-3xl font-bold tracking-tight text-[hsl(218,81%,95%)] md:text-6xl xl:text-7xl">
            Hygraph<span className="text-[hsl(218,81%,75%)]">FM</span>
                        </h1>
                            <p className="text-lg text-[hsl(218,81%,95%)]">Hygraph FM is a community of artists, producers, listeners who are passionate about music and the creative process!
                        </p>
                    </div>
                    </div>
                </div>
            </div>
          </header>
      )
}
Navbar
// Navbar component: app/components/Navbar.js

'use client';
import Head from 'next/head';
import Link from 'next/link';
import { useState } from 'react';

export default function Navbar() {
  const [navbar, setNavbar] = useState(false);
      return (
      <nav aria-label="Hygraph FM Menu" role="navigation" className="w-full bg-gray-800 shadow">
        <div className="justify-between px-4 mx-auto lg:max-w-7xl md:items-center md:flex md:px-8">
          <div>
            <div className="flex items-center justify-between py-3 md:py-5 md:block">
              <Link href="/">
                <h2 className="text-3xl font-bold text-[hsl(218,81%,75%)]">HyFM</h2>
              </Link>
              <div className="md:hidden">
                <button
                  aria-label="Toggle Hamburger menu"
                  aria-expanded="false"
                  aria-controls="main-menu"
                  aria-haspopup="false"
                  className="p-2 text-gray-700 rounded-md outline-none focus:border-gray-400 focus:border"
                  onClick={() => setNavbar(!navbar)}
                >
                  {navbar ? (
                    <svg
                      xmlns="http://www.w3.org/2000/svg"
                      className="w-6 h-6 text-white"
                      viewBox="0 0 20 20"
                      fill="currentColor"
                    >
                      <path
                        fillRule="evenodd"
                        d="M4.293 4.293a1 1 0 011.414 0L10 8.586l4.293-4.293a1 1 0 111.414 1.414L11.414 10l4.293 4.293a1 1 0 01-1.414 1.414L10 11.414l-4.293 4.293a1 1 0 01-1.414-1.414L8.586 10 4.293 5.707a1 1 0 010-1.414z"
                        clipRule="evenodd"
                      />
                    </svg>
                  ) : (
                    <svg
                      xmlns="http://www.w3.org/2000/svg"
                      className="w-6 h-6 text-white"
                      fill="none"
                      viewBox="0 0 24 24"
                      stroke="currentColor"
                      strokeWidth={2}
                    >
                      <path
                        strokeLinecap="round"
                        strokeLinejoin="round"
                        d="M4 6h16M4 12h16M4 18h16"
                      />
                    </svg>
                  )}
                </button>
              </div>
            </div>
          </div>
          <div>
            <div
              className={`flex-1 justify-self-center pb-3 mt-8 md:block md:pb-0 md:mt-0 ${
                navbar ? 'block' : 'hidden'
              }`}
            >
              <ul
              role="menubar"
              aria-label="HygraphFM Menu Bar"
              className="items-center justify-center space-y-8 md:flex md:space-x-6 md:space-y-0">
                <li className="text-white">
                  <Link role="menuitem" href="/">
                    Home
                  </Link>
                </li>
                <li className="text-white">
                  <Link role="menuitem" href="/artists">
                    Artists
                  </Link>
                </li>
                <li className="text-white">
                  <Link role="menuitem" href="/login">
                    Login
                  </Link>
                </li>
                <li className="text-white">
                  <Link role="menuitem" href="/contact">
                    Contact US
                  </Link>
                </li>
              </ul>
            </div>
          </div>
        </div>
      </nav>
  );
}
Note: Since we are using state, the Navbar is no longer a server component like the Header and Footer. It is now part of the client bundle. As a result, we need to add the ‘use client’; directive at the top of the file to denote this change.

Footer
// Footer component: app/components/Footer.js

import Link from 'next/link';

export default function Footer() {
    return (
        <footer className="bg-gray-800">
            <div className="container flex flex-col items-center justify-between px-6 py-12 mx-auto md:flex-row">
                <a href="#" className="text-3xl font-bold text-white hover:text-gray-300">HyFM</a>
                <p className="mt-4 text-sm text-white md:mt-0">© 2023 HyFM —
                <Link href="/" className="ml-1 text-gray-400 hover:text-gray-300" rel="noopener noreferrer" target="_blank">@hyfm </Link>
                </p>
                <div className="flex mt-4 mb-2 -mx-2 md:mt-0 md:mb-0">
                    <Link href="#" className="mx-2 text-white hover:text-gray-300" aria-label="Linkden">
                        <svg className="w-4 h-4 fill-current" viewBox="0 0 512 512">
                            <path d="M437.019,0H74.981C33.629,0,0,33.629,0,74981v362.038C0,478.371,33.629,512,74.981,512h362.038
                                C478.371,512,512,478.371,512,437.019V74.981C512,33.629,478.371,0,437.019,0z M154.854,416H92.308V200.923h62.545V416z
                                M123.581,173.846c-20.654,0-37.423-16.769-37.423-37.423c0-20.654,16.769-37.423,37.423-37.423
                                c20.654,0,37.423,16.769,37.423,37.423C161.004,157.077,144.235,173.846,123.581,173.846z M416,416h-62.545V299.077
                                c0-24.654-0.469-56.308-34.308-56.308c-34.308,0-39.654,26.769-39.654,54.462V416h-62.545V200.923h59.115v28.923h0.831
                                c8.231-15.577,28.308-32.062,58.308-32.062c62.769,0,74.154,41.346,74.154,95.115V416z"/>
                        </svg>
                    </Link>
                    <Link href="#" className="mx-2 text-white hover:text-gray-300" aria-label="Facebook">
                        <svg className="w-4 h-4 fill-current" viewBox="0 0 512 512">
                            <path d="M437,0H75C33.6,0,0,33.6,0,75v362c0,41.4,33.6,75,75,75h362c41.4,0,75-33.6,75-75V75C512,33.6,478.4,0,437,0z M480,437
                                c0,24.9-20.1,45-45,45H75c-24.9,0-45-20.1-45-45V75c0-24.9,20.1-45,45-45h362c24.9,0,45,20.1,45,45V437z"/>
                            <path d="M341.3,164.7h-51.2c-14.1,0-25.6,11.5-25.6,25.6v51.2h-51.2v51.2h51.2v153.6h51.2V292.3h51.2l25.6-51.2h-76.8v-25.6
                                C366.9,176.2,355.4,164.7,341.3,164.7z"/>
                        </svg>
                    </Link>
                    <Link href="#" className="mx-2 text-white hover:text-gray-300" aria-label="Twitter">
                        <svg className="w-4 h-4 fill-current" viewBox="0 0 512 512">
                            <path d="M437,0H75C33.6,0,0,33.6,0,75v362c0,41.4,33.6,75,75,75h362c41.4,0,75-33.6,75-75V75C512,33.6,478.4,0,437,0z M384,188.8
                                c0,0.3,0,0.6,0,0.9c0,114.7-87.4,246.9-246.9,246.9c-49.1,0-94.9-14.3-133.3-39.1c7.1,0.8,14.3,1.2,21.6,1.2
                                c42,0,80.5-14.3,111.4-38.5c-39.3-0.8-72.3-26.6-83.7-62.3c5.5,1.2,11.1,1.8,16.9,1.8c8.2,0,16.3-1.2,23.9-3.4
                                c-41.4-8.2-72.3-44.7-72.3-88.5v-1.2c12.1,6.7,26.1,10.7,41.2,11.3c-24.5-16.3-40.5-44.1-40.5-75.4c0-16.3,4.1-31.4,11.3-44.7
                                c41.2,50.3,103.9,83.7,174.1,87.4c-1.8-8.2-2.9-16.6-2.9-25.1c0-60.3,48.9-109.2,109.2-109.2c31.4,0,59.2,13.4,78.8,34.7
                                c24.5-4.1,47.5-13.4,68.6-26.1c-8.2,25.1-25.1,46.2-47.5,59.2c21.6-2.9,42-8.2,61.1-16.6C448.8,153.6,418.7,174.7,384,188.8z"/>
                        </svg>
                    </Link>
                </div>
            </div>
        </footer>
    )
}

Now that we have these components in place, we are ready to create our homepage with featured artists.
Querying recent artists for featured artist content
On our homepage, we want to provide a curated selection of artists for our users. To achieve this, we can create a section showcasing featured or recently added artists on our platform.
To implement this feature, we can send a query to Hygraph using the last operator, which allows us to retrieve the latest additions to our platform. By requesting the last six artists added, we can display them in a dedicated, appealing content section on our homepage.
# GraphQL query to get the 6 most recent artists from Hygraph

query Artists {
        artists(last: 6) {
          slug
          artist
          id
          artistImage {
            altText
            url
            height
            width
          }
        }
      }
In the app directory, go to the file called page.js , delete everything and paste in the following code:
//Homepage with featured artists: app/page.js

import Image from 'next/image';
import Link from "next/link";

//Get all Artists

async function getArtists() {
  const response = await fetch(process.env.HYGRAPH_ENDPOINT, {
    method: 'POST',
    headers: {
      'Content-Type': 'application/json',
    },
    body: JSON.stringify({
      query: `
      query Artists {
        artists(last: 6) {
          slug
          artist
          id
          artistImage {
            altText
            url
            height
            width
          }
        }
      }`,
    }),
  });
  const json = await response.json();
  return json.data.artists;
}

export default async function Home() {
  const artists = await getArtists();
  //console.log(artists);
  return (
    <main className="flex flex-col justify-between">
      <section className="mb-32 text-center">
      <h2 className="my-12 text-5xl font-bold">
      Featured <span className="text-[hsl(218,81%,75%)] px-2 py-2">Artists</span>
      </h2>
          <div className="grid px-5 lg:gap-xl-12 gap-x-6 md:grid-cols-2 lg:grid-cols-4">
        {artists.map((artist) => {
          return (
            <div key={artist.id} className="px-2 pb-5 my-12 rounded-lg lg:mb-0 shadow-[0_2px_15px_-3px_rgba(0,0,0,0.07),0_10px_20px_-2px_rgba(0,0,0,0.04)] background-radial-gradient">
              <Image
                className="mx-auto my-6 rounded-lg shadow-lg dark:shadow-black/20 w-[350px] h-[175px]"
                src={artist.artistImage.url}
                width={artist.artistImage.width}
                height={artist.artistImage.height}
                alt={artist.artistImage.altText}
              />
              <Link
                className="text-xl font-bold text-white underline"
                href={`/artist/${artist.slug}`}>
                  {artist.artist}
              </Link>
            </div>
          );
          })}
      </div>
    </section>
  </main>
  )
}
The above code makes a request to Hygraph gives us the name, slug, and image information for the last 6 artists from our artist content. This data is then rendered in a function that creates the Homepage.
Featured artist content will not only enhance the user experience by providing them with a selection of artists they may be interested in, but it will also help promote new artists and encourage users to explore the platform.
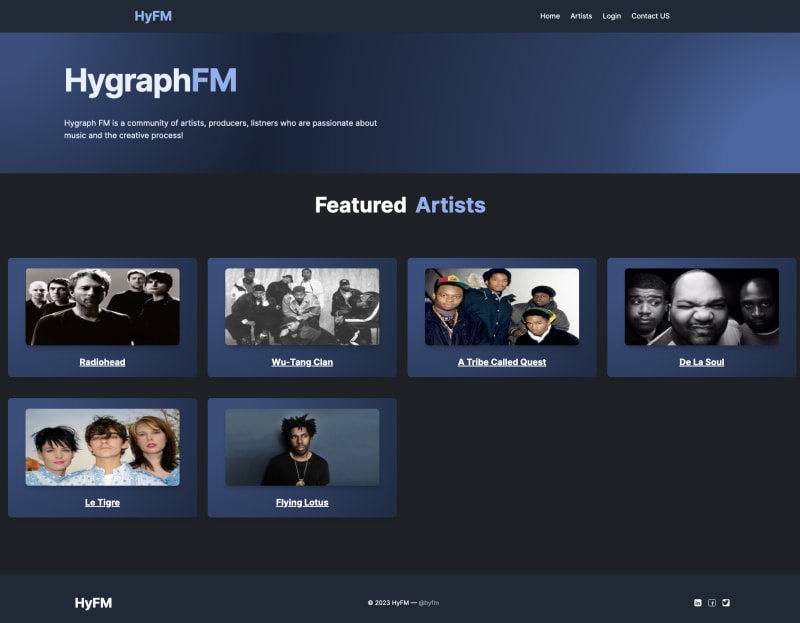
Great job! We now have a functional homepage for the Hygraph FM site, complete with featured artists that link to their individual bio pages. However, these links currently return a 404 error because the pages have not been created yet. Let's create them now!
Creating artist summary pages
To create individual pages for each artist on our platform, we need to establish a dynamic route to generate a unique page for every artist based on their slug. This allows us to provide content for each artist on our platform.
We will add a new directory called artist/[slug] in the app directory. Next, add a page.jsx file in your new artist/[slug] directory, which will serve as the template for each individual artist page. We will use this template to dynamically generate unique content for each artist based on their slug.
By creating a dynamic route for each artist, we can provide a more personalized experience for users on our platform. This will help to increase engagement and improve overall user satisfaction.
app/
┣ artist/
┃ ┗ [slug]/
┃   ┗ page.jsx
The structure of your project should match the file tree above. The [slug] new directory allows us to use our page.jsx as a file template to make a page for every artist. In the artist/[slug]/page.jsx file, add the following code:
//Artist individual page: app/artist/[slug]/page.jsx
import Image from "next/image";
async function getArtist(slug) {
const response = await fetch(process.env.HYGRAPH_ENDPOINT, {
method: "POST",
headers: {
"Content-Type": "application/json",
},
body: JSON.stringify({
// GraphQL query to Hygraph to retrieve artist content by slug
query: `
query Artist($slug: String!) {
artist(where: {slug: $slug}) {
lastFm: hygraphLastFmRemoteSourceField {
__typename
artist {
bio {
summary
}
tags{
tag{
name
}
}
similar {
artist {
name
}
}
}
}
artist
id
slug
artistImage {
altText
height
url
width
}
promotionalBlock {
... on Callout {
__typename
id
button {
text
url
id
}
title
}
... on CallToAction {
__typename
id
button {
text
url
}
heading
image {
altText
height
width
url
}
body {
html
}
}
}
}
}`,
variables: {
slug: slug,
},
}),
}
);
const data = await response.json();
//console.log(data.data.artist);
return data.data.artist
}
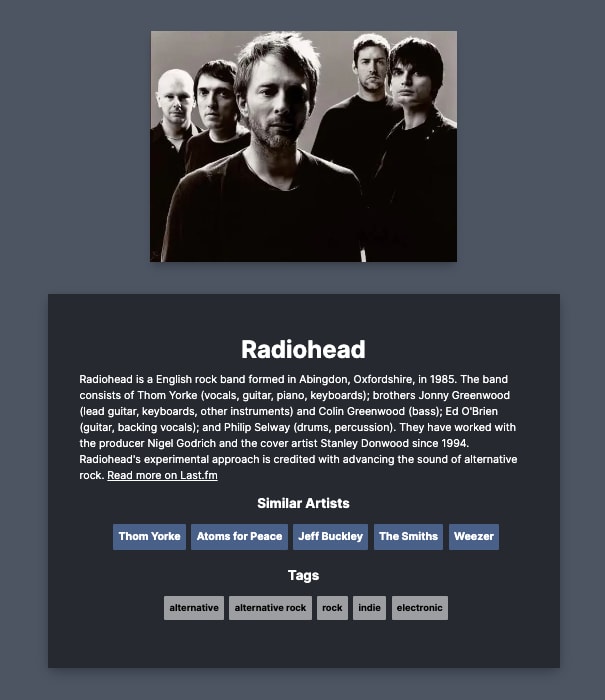
export default async function Artist({ params }) {
const artistData = await getArtist(params.slug);
return (
<main className="flex flex-col justify-between w-full mx-auto bg-gray-600">
<Image
className="w-1/2 mx-auto mt-12 shadow-lg dark:shadow-black/20"
src={artistData.artistImage.url}
width={artistData.artistImage.width}
height={artistData.artistImage.height}
alt={artistData.artistImage.altText}
/>
<section className="p-12">
<div className="container mx-auto text-center xl:px-32">
<div className="grid items-center lg:grid-cols-2">
<div className="mb-12 lg:mb-0">
<div className="relative z-[1] block bg-[hsla(0,0%,100%,0.55)] px-6 py-16 shadow-[0_2px_15px_-3px_rgba(0,0,0,0.07),0_10px_20px_-2px_rgba(0,0,0,0.04)] backdrop-blur-[30px] dark:bg-[hsla(0,0%,2%,0.55)] dark:shadow-black/20 md:px-12 lg:mr-16">
<h2 className="mb-3 text-4xl font-bold text-white">{artistData.artist}</h2>
<p className="text-left text-white all-links" dangerouslySetInnerHTML={{ __html: artistData.lastFm.artist.bio.summary }}>
</p>
<h3 className="my-4 text-xl font-bold text-center">Similar Artists</h3>
{artistData.lastFm.artist.similar.artist.map((similar) => {
return (
<div className="inline-grid grid-cols-1 gap-2 mb-2">
<span className="px-2 py-2 text-md ml-2 font-bold text-white rounded-sm bg-[hsl(215,34%,40%)]">{similar.name}</span>
</div>
);
})}
<h4 className="my-4 text-xl font-bold text-center">Tags</h4>
{artistData.lastFm.artist.tags.tag.map((tag) => {
return (
<div className="inline-grid grid-cols-1 gap-2 mb-2">
<span className="px-2 py-2 ml-2 text-sm font-bold text-black rounded-sm bg-[hsla(0,0%,100%,0.55)]">{tag.name}</span>
</div>
);
})}
</div>
</div>
</div>
</div>
</section>
</main>
);
}
Let’s breakdown this code down a bit. At the top of the file, we have an async function to fetch an artist by slug. The getArtist function fetches the artist data from Hygraph using the provided slug. Our content and remote data from LastFM is federated into a single API call that allows us to generate metadata for each artist dynamically. The Artist function is the template for each individual artist page and uses the getArtist function to retrieve and render the artist data. The page displays the artist's name, image, bio summary, similar artists, and tags.
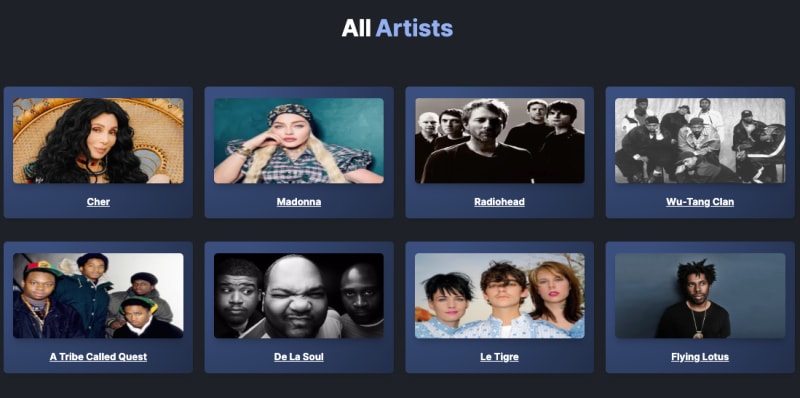
Landing page for all Hygraph FM artists
To create a landing page that shows all artists on the platform, we need to create a new directory route in our app directory called artists . Create a new file called page.jsx inside the artists directory. Notice a pattern? In Next.js 13, page.jsx acts as file templates and the directory denotes what the route should be called when using the app router. In our case, this will contain the code to display all artists on the platform in a grid format.
/* File tree with artist
landing page template */
app/
┣ artist/
┃ ┗ [slug]/
┃   ┗ page.jsx
┣ artists/
┃ ┗ page.jsx
Add the following code in the artists/page.jsx file:
// Landing page for all artists: app/artists/page.jsx

import Image from 'next/image';
import Link from "next/link";

// Get all Artists
async function getAllArtists() {
  const response = await fetch(process.env.HYGRAPH_ENDPOINT, {
    method: 'POST',
    headers: {
      'Content-Type': 'application/json',
    },
    body: JSON.stringify({
      query: `
      query Artists {
        artists {
          slug
          artist
          id
          artistImage {
            altText
            url
            height
            width
          }
        }
      }`,
    }),
  });
  const json = await response.json();
  return json.data.artists;
}

export default async function Artists() {
  const artists = await getAllArtists();

  return (
    <main className="flex flex-col justify-between">
      <section className="mb-32 text-center">
      <h2 className="my-12 text-5xl font-bold">
      All<span className="text-[hsl(218,81%,75%)] px-2 py-2">Artists</span>
      </h2>
      <div className="grid px-5 lg:gap-xl-12 gap-x-6 md:grid-cols-2 lg:grid-cols-4">
        {artists.map((artist) => {
          return (
            <div key={artist.id} className="px-2 pb-5 my-12 rounded-lg lg:mb-0 shadow-[0_2px_15px_-3px_rgba(0,0,0,0.07),0_10px_20px_-2px_rgba(0,0,0,0.04)] background-radial-gradient">
              <Image
                className="mx-auto my-6 rounded-lg shadow-lg dark:shadow-black/20 w-[350px] h-[175px]"
                src={artist.artistImage.url}
                width={artist.artistImage.width}
                height={artist.artistImage.height}
                alt={artist.artistImage.altText}
              />
              <Link
                className="text-xl font-bold text-white underline"
                href={`/artist/${artist.slug}`}>
                  {artist.artist}
              </Link>
            </div>
          );
          })}
      </div>
    </section>
  </main>
  )
}
In the above code, we create an async function called getAllArtists(). This function contains a GraphQL query that fetches all of the artists from Hygraph. The response will be returned as a JSON object, which we can loop through and display in our grid.
Once we have fetched all of the artists, we can then render them in our grid using the map() function. This function allows us to loop through each artist and display their information in a card-like format.
Our HygraphFM project now has a homepage and landing page for artists, and we created individual artist pages that display a bio, image, tags, and similar artists using a dynamic route in the app directory. We are almost done with our Next build! The last thing we need is to create server components to render our promotional content to help fulfill our organization’s business goals. We will start with creating the Callout server component.
Building server components in Next
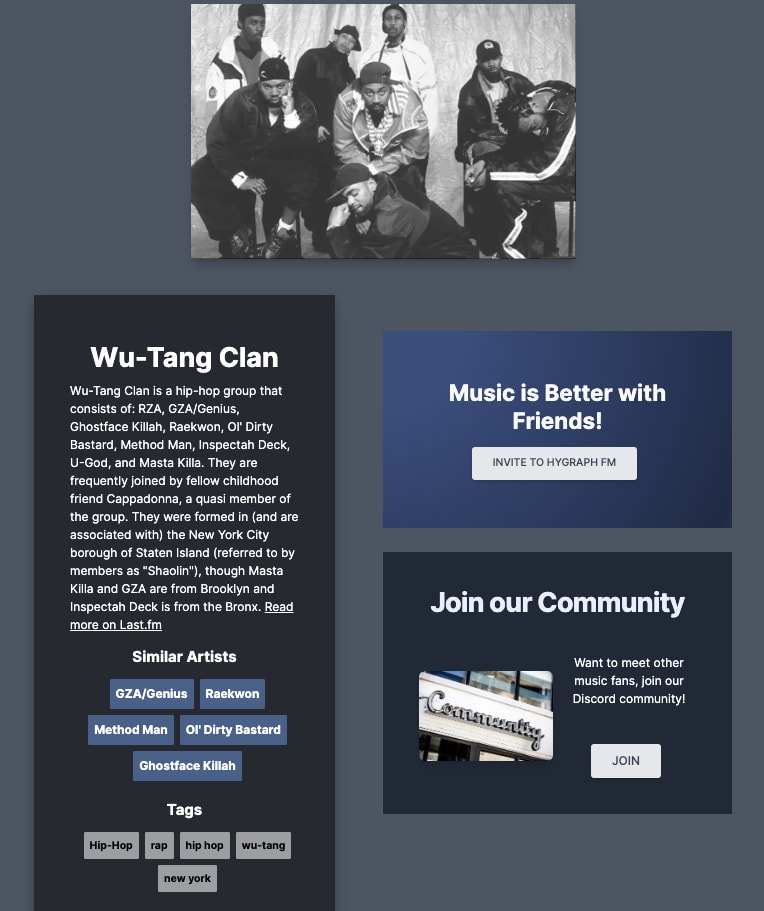
In part 1 of this series, we built Button, Callout, and CTA components in Hygraph. These components will help content editors, and marketers create content for promotional and engagement campaigns. We added these components as a collection or modular component to our Artist content model, enabling us to create frontend code to display these content areas.
Making a Callout component
To implement a Callout component, we need to create a file named Callout.js inside the components directory. This component will render a promotional message with a button to invite new users to join Hygraph FM.
// Callout component: app/components/Callout.js

import Link from "next/link";

export default function Callout({button, title}) {
    return (
        <div className="block p-16 mb-8 background-radial-gradient">
            <h4 className="text-3xl font-bold leading-tight text-neutral-800 dark:text-neutral-50">{title}
            </h4>
            {button ? <Link className="inline-block py-3 mt-4 mr-2 text-sm font-medium leading-snug text-gray-700 uppercase bg-gray-200 rounded shadow-md px-7 hover:bg-gray-800 hover:shadow-lg hover:text-white" href={button.url} role="button">
{button.text}</Link> : ''}
        </div>
    )
}
The Callout component takes two props: button and title. The title prop is the main text of the message, while the button prop is an object with two properties: text and url.

The Callout is ready to use in our application to promote our content and increase user engagement.
Call to Action (CTA) component
To create the CTA component, we need to create a new file in the components directory called CallToAction.js.
// CTA component: app/components/CallToAction.js

import Link from "next/link";
import Image from "next/image";

export default function CallToAction({body, heading, button, image}) {
    return (
        <section className="mb-32 bg-gray-800">
            <div className="px-6 py-12 text-center md:px-12">
                <div className="container mx-auto">
                <h2 className="mb-12 text-3xl font-bold tracking-tight md:text-4xl text-[hsl(218,81%,95%)]">{heading}</h2>
                    <div className="grid items-center gap-12 sm:gap-3 lg:grid-cols-2">
                        {image ? <div className="mb-6 lg:mb-0">
                            <Image
                            className="w-full rounded-lg shadow-lg"
                            src={image.url}
                            alt={image.altText}
                            width={image.width}
                            height={image.height}
                            />
                        </div> : ''}
                        <div className="mt-6 lg:mt-0">
                           <div className="mb-12 text-white text-md" dangerouslySetInnerHTML={{ __html: body.html }} />
                           {button ? <Link className="inline-block py-3 mr-2 font-medium leading-snug text-gray-700 uppercase bg-gray-200 rounded shadow-md text-md px-7 hover:bg-gray-800 hover:shadow-lg hover:text-white" href={button.url} role="button">{button.text}</Link> : ''}
                        </div>
                    </div>
                </div>
            </div>
  </section>
    )

}
Let’s break down the code a bit. The CTA component takes several props, including body, heading, button, and image. These are the same field types we used when we created the CTA component in Hygraph. The body prop will contain the body text of the CTA, while the heading prop will contain the main heading. The button prop will contain an object with two properties: text and url, which will be used to render a button with a link. The image prop will contain an object with properties such as url, altText, width, and height to render an image.

We can now import these components into a page template and render them on the homepage, individual artist pages, or wherever needed! For example, in the app/artist/[slug]/page.jsx file, we can modify the code to include the updated query fetching promotional blocks content.
//Artist individual page: app/artist/[slug]/page.jsx

import Image from "next/image";
import Callout from "@/app/components/Callout";
import CallToAction from "@/app/components/CallToAction";

async function getArtist(slug) {
    const response = await fetch(process.env.HYGRAPH_ENDPOINT, {
          method: "POST",
          headers: {
            "Content-Type": "application/json",
          },
          body: JSON.stringify({
            query: `
            query Artist($slug: String!) {
              artist(where: {slug: $slug}) {
                lastFm: hygraphLastFmRemoteSourceField {
                    __typename
                    artist {
                      bio {
                        summary
                      }
                      tags{
                        tag{
                            name
                        }
                      }
                      similar {
                        artist {
                          name
                        }
                      }
                    }
                  }
                artist
                  id
                  slug
                  artistImage {
                    altText
                    height
                    url
                    width
                  }
                  promotionalBlock {
                    ... on Callout {
                      __typename
                      id
                      button {
                        text
                        url
                        id
                      }
                      title
                    }
                    ... on CallToAction {
                      __typename
                      id
                      button {
                        text
                        url
                      }
                      heading
                      image {
                        altText
                        height
                        width
                        url
                      }
                      body {
                        html
                      }
                    }
                  }
                }
              }`,
          variables: {
            slug: slug,
          },
        }),
      }
    );
    const data = await response.json();
    //console.log(data.data.artist);
    return data.data.artist
  }

  export default async function Artist({ params }) {
    const artistData = await getArtist(params.slug);
    return (
        <main className="flex flex-col justify-between w-full mx-auto bg-gray-600">
             <Image
                className="w-1/2 mx-auto mt-12 shadow-lg dark:shadow-black/20"
                src={artistData.artistImage.url}
                width={artistData.artistImage.width}
                height={artistData.artistImage.height}
                alt={artistData.artistImage.altText}
                />
        <section className="p-12">
          <div className="container mx-auto text-center xl:px-32">
            <div className="grid items-center lg:grid-cols-2">
              <div className="mb-12 lg:mb-0">
                <div className="relative z-[1] block bg-[hsla(0,0%,100%,0.55)] px-6 py-16 shadow-[0_2px_15px_-3px_rgba(0,0,0,0.07),0_10px_20px_-2px_rgba(0,0,0,0.04)] backdrop-blur-[30px] dark:bg-[hsla(0,0%,2%,0.55)] dark:shadow-black/20 md:px-12 lg:mr-16">
                    <h2 className="mb-3 text-4xl font-bold text-white">{artistData.artist}</h2>
                    <p className="text-left text-white all-links" dangerouslySetInnerHTML={{ __html: artistData.lastFm.artist.bio.summary }}>
                    </p>
                    <h3 className="my-4 text-xl font-bold text-center">Similar Artists</h3>
                        {artistData.lastFm.artist.similar.artist.map((similar) => {
                        return (
                            <div className="inline-grid grid-cols-1 gap-2 mb-2">
                            <span className="px-2 py-2 text-md ml-2 font-bold text-white rounded-sm bg-[hsl(215,34%,40%)]">{similar.name}</span>
                            </div>
                        );
                        })}
                    <h4 className="my-4 text-xl font-bold text-center">Tags</h4>
                        {artistData.lastFm.artist.tags.tag.map((tag) => {
                        return (
                          <div className="inline-grid grid-cols-1 gap-2 mb-2">
                            <span className="px-2 py-2 ml-2 text-sm font-bold text-black rounded-sm bg-[hsla(0,0%,100%,0.55)]">{tag.name}</span>
                          </div>
                        );
                        })}
                </div>
              </div>
            <div>
                {artistData.promotionalBlock.map((block) => {
                  if (block.__typename === 'Callout') {
                    return <Callout key={block.id} title={block.title} button={block.button}/>
                  }
                  if (block.__typename === 'CallToAction') {
                    return <CallToAction key={block.id} heading={block.heading} body={block.body} button={block.button} image={block.image}
                    />
                  }
                })}
            </div>
          </div>
        </div>
      </section>
    </main>
  );
}
Once we have retrieved our promotional blocks, we can use an if statement to check the type of each block and render either the Callout or CallToAction component accordingly.
Putting it all together
Now that everything is in its right place, we can render all of our content, components, and remote source data on the artist page:
Our reusable promotional components allow us to incorporate business goals and create a scalable codebase that can be easily modified when new features are needed. Connecting a remote source allowed us to use artist metadata that will automatically update if there are any changes in the LastFM API. Moreover, by using remote source data, we avoid duplicating content that is maintained in another system. This helps us to reduce development time, increase flexibility, and maintain consistency across the content as well as our application.
Next steps…
For part 3 of this series, we will take our Hygraph FM project a step further and explore pagination to maintain user experience as our platform grows. In the meantime, try adding new callouts, CTAs, or new artists and see how the pages change.

Top comments (0)