In few-shot learning, we train a model using only a few labeled examples. Learn how to train your classifier using transfer learning and a novel framework for sample selection.
Introduction
Lately, posts and tutorials about new deep learning architectures and training strategies have dominated the community. However, one very interesting research area, namely few-shot learning, is not getting the attention it deserves. If we want widespread adoption of ML we need to find ways to train them efficiently, with little data and code. In this tutorial, we will go through a Google Colab Notebook to train an image classification model using only 5 labeled samples per class. Using only 5 exemplary samples is also called 5-shot learning.
Don’t forget to check out our Google Colab Notebook for the full code of this tutorial!
Frameworks and libraries we use
Jupyter Notebook (Google Colab)
The full code of this tutorial will be provided as a notebook. Jupyter Notebooks are python programming environments accessible by web browsers and are very useful for fast prototyping and experiments. Colab is a service from Google where you get access to notebooks running on instances for free.
Fast.ai
Training a deep learning model can be quite complicated and involve 100s of lines of code. This is where fast.ai comes to the rescue. A library developed by former Kaggler Jeremy Howard specifically aimed to make training deep learning models fast and simple. Using fast.ai we can train and evaluate our classifier with just a few lines of code. Under the hood, fast.ai is using the PyTorch framework.
WhatToLabel and borisml
WhatToLabel and it’s python package borisml aim to solve the question which samples you should work with. If you only label a few samples out of your dataset one of the key questions arising is how do you pick the samples? WhatToLabel aims at solving exactly this problem by providing you with different methods and metrics for selecting your samples
Setup your Notebook
We start by installing the necessary dependencies and downloading the dataset. You can run any shell command in a notebook by start the code with an “!”
E.g. to install our dependencies we can run the following code within a notebook cell:
In this tutorial, we work with a dataset consisting of cats and dogs images. You can download it from Kaggle using the fastai CLI (command-line interface) by running the following command. Note that you need to adapt the token you get from Kaggle:
Select the samples for few-shot learning
In order to get robust results with our few-shot learning algorithm, we want our training set to cover the full space of samples. That means we don’t want lots of similar examples but rather select a very diverse set of images. To achieve this we can create an embedding of our dataset followed by a sampling method called coreset[1] sampling. Coreset sampling ensures that we build up our dataset by only adding samples which lie furthest apart from the existing set as possible.
Now we will use WhatToLabel and its python package borisml to select the most diverse 10 samples we want to work with. We first need to create an embedding. Borisml allows us to do this without any labels by leveraging recent success in self-supervised learning. We can simply run the following command to train the model for a few epochs and create our embedding:
Finally, we need to upload our dataset and embedding to the WhatToLabel app to run our selection algorithm. Since we don’t want to upload the images we can tell the CLI to consider only metadata of the samples.
Once the data and embedding are uploaded we can go back to the web platform and run our sampling algorithm. This might take a minute to complete. If everything went smooth you should see a plot with a slider. Move the slider to the left to only keep 10 samples in the new subset. Hint: You can use the arrow keys to move the slider one by one. Once we have our 10 samples selected we need to create a new tag (left menu). For this tutorial, we use “tiny” as the name and press the enter key to create it.
Download the newly created subset using the following CLI command:
You might see that the dataset you downloaded is not perfectly balanced. E.g. you might have 4 images of cats and 6 of dogs. This is due to the algorithm we chose for selecting the samples. Our goal was to cover the whole embedding/ feature space. It might very well be that there are more similar images of cats in our dataset than images of dogs. As a result, more images of dogs than cats will be selected.
Train our model using fast.ai
If you reach this point you should have a dataset we obtained using WhatToLabel and Coreset sampling ready to be used to train our classifier.
Fast.ai requires only a few lines of code to train an image classifier. We first need to create a dataset and then a learner object. Finally, we train the model using the .fit(...) method.
Interpreting the results
To evaluate our model we use the test set of the cats and dogs dataset consisting of 2'000 images. Looking at the confusion matrix we see that our model mostly struggles with predicting dogs as being cats.

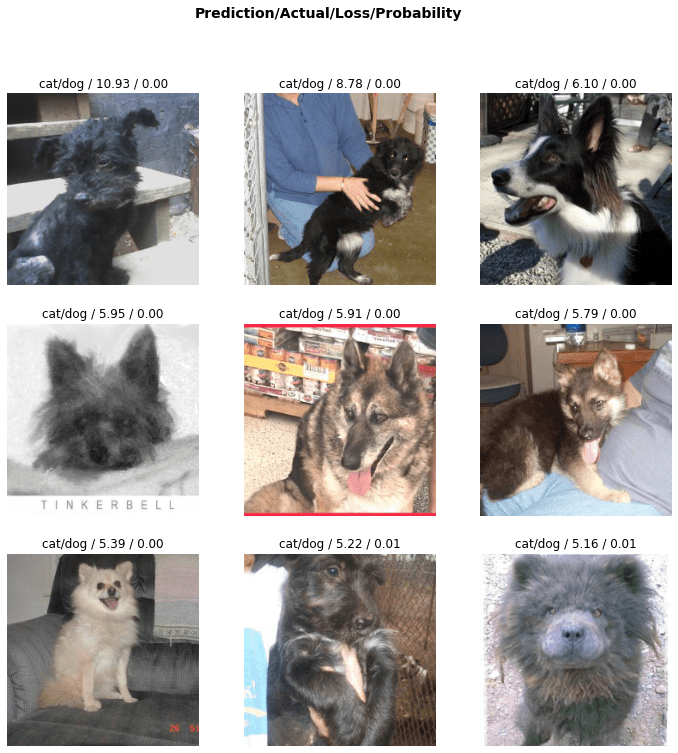
Fast.ai also helps us here getting interpretable performance plots of our model with just a few lines of code.
The library allows us also to look at the images from the test set with the highest loss of the trained model. You see that the model struggles with smaller dogs looking more similar to cats. We could improve accuracy by selecting more samples for the training routine. However, the goal of this tutorial was to show that by leveraging transfer learning and a smart data selection process you can get already high accuracy (>80%) with just a handful of training data.
I hope you enjoyed this brief guide on how to use few-shot learning using fast.ai and WhatToLabel. Follow me for further tutorials on Medium!
Igor, co-founder
whattolabel.com
[1] Ozean S., (2017), Active Learning for Convolutional Neural Networks: A Core-Set Approach

Top comments (0)