If you’ve ever worked with a database, chances are you have also worked with REST APIs in some form or other. Maybe you’ve built a REST API With Node.js, Express and MongoDB. However, writing Serverless visual APIs that are highly maintainable have never been easier.
I’ll go through creating one here that does all MongoDB CRUD operations. If you want to take a look at the end result of the frontend as well, you can go to www.trips.community to see the API in action with a NextJS application. I’ve implemented a search bar with tags here by leveraging the full-text search solution that MongoDB provides us with.
By separating the API from the frontend I can also allow people to query the API directly (without using the frontend) making it semi-public which may be cool to document later.
The end result of this API will be something like the picture below.

Some of these nodes are composites which mean a workflow within the node. This is just to keep it neat and organised. I’m adding data like date and word synonyms in the insert node before inserting it into the database.

Lets start
You’ll need a Lolo account to create this API. So go get an account if you don’t already have one. Create a new app.
Here I’ll do this the easy way so you can get this one up and running in a few minutes. You’ll be copying my entire workflow and pasting it into your application.
To do this, copy the contents of this document and merely do a Command + V (paste) in a new app. Yes, it should copy the entire API (i.e. all nodes) into your graph. I’m showing you how to do it in the below image.

Yes. It is that simple. You only need to copy the contents of this document and then just paste it into a Lolo application graph. It’s magic.
Explaining the workflow
The first nodes you see are the routes, they are built with the Lolo/HTTP Trigger. The second node that you see being connected to the HTTP nodes is the Lolo/Lolo API Auth which is authentication. This is also a pre-defined function that enables us to use a Lolo api key to authorize our requests. We can create a new api key in our Admin section. We are keeping one route public (“GET /api/trips”) in this flow.
You can add pre-defined functions by pressing the + sign to the left of the graph. Here you’ll be able to see your own predefined library functions as well, if you have any set up.

Next we got a Lolo/Validate node. This node helps us define a JSON schema. Again, this one has already been made for us by Lolo. If you leave it empty it won’t validate anything. Right now it is empty but do use it.
Next up I’ve separated these two nodes for my own sake. One to set the MongoDB collection based on the path of the request and then the other to set up a MongoDB client and route it to the event that we are sending onto the other nodes. This is just to keep the flow cleaner. See the code from the MongoDB Setup node below.

The next node will define our operations based on the request coming in. Here I am using a param ?limit= or I count the array of the body to see if the request should be sent to One or Many. A bit of a funny way of doing it, you can obviously change this.
After this I send it to the appropriate MongoDB operation node. Insert and Find has additional work where I needed to add on data and then transform the data coming in so it could give the appropriate query.
The last thing is the response I send back, if it made it this far I send back a 200 and then close the MongoDB client.

Before you hit Save and Run for this app though you’ll need to add and change some things.
What you need to do
From here you’ll need to change some variables (MongoDB URI, DB, Collection names) in some of these nodes and add some NPM packages to your app but this shouldn’t take more than 2 minutes.
To add in your URI, go to the MongoDB Setup node and add in your url string that is right now empty (“”). You can use an env variable here as well as it is never best practice to keep sensitive information like this right in the code. But I’m a lazy. I will change it later.
To change the database/collection go to the Set Collection/DB node. I am using two collections but you can change this logic to only have one.
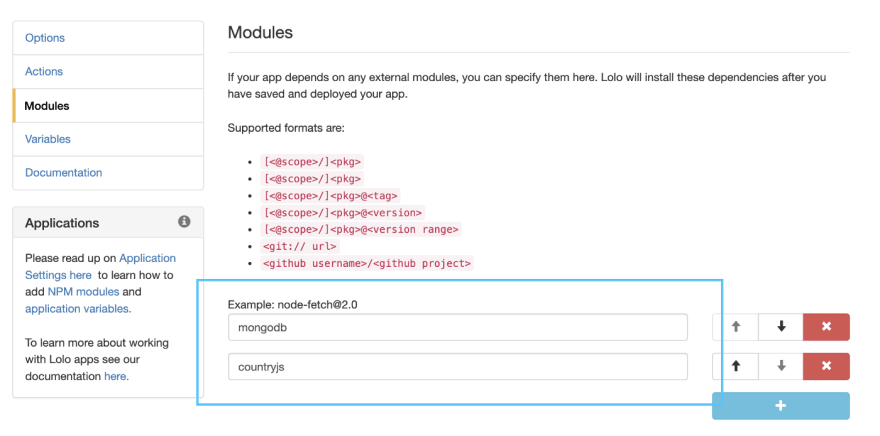
I’ve added the NPM packages mongodb and countryjs. So make sure you add those under Settings → Modules if you don’t want any errors logged after you’ve deployed your app. See the screen below.
If you’ve added them you can now Save and then Run the application. Wait until you see confirmation in the logs tab. This may take a minute or two. It always takes a minute with new NPM module installs (we’re working on it).
If you want to set a JSON schema, do so in the Lolo/Validate node. Mine is empty right now but was planning on adding a schema later.
Try your HTTP routes
Now you’ll have a few HTTP endpoints set up for you. To see all of them go to the Docs tab in the app. From here you can test them as well. Your URL will look different but the endpoints should be the same as you’ve copied all of mine.

Having authorization issues? You should be.
Create an API key
As you see in your graph we have a Lolo API Auth node that is connected to some of these HTTP routes/nodes in the graph. This means you need to get an API key in the Admin section and use it in the header of the request to be able to call these HTTP endpoints. Use the name Lolo-Api-Key in the header.
See the screen below for help on how to navigate to Admin to create your own API key.

Test it out
Test the routes via the Docs section of your Lolo app or via an external service like Postman. See an example for a POST request below with the right headers and body. You’ll see what a 200 response looks like as well.
Obviously use your own URL with those endpoints.
Remember to set your Lolo-Api-Key both in Postman or via your Docs tab (see Authorize) otherwise you’ll run into authorization issues.


Some notes
I’ve added som functionality in this app to allow me to query data in a simple way.
- Use data in the params of the url and simply append the entire query in there (?data={ “title”:”Mont Blanc”}), it will use it in the find() operation to query the right data.
- Use sort (?sort={ “title”:-1}) to sort data in the get requests.
- Use search (?search=”hiking, june”) to search for several tags.
- Set the limit (?limit=1) to route your request to the findOne, updateOne or deleteOne operations.
Also, remember to set your indexes to text search in MongoDB if you are using the search functionality I’ve implemented. Use a wildcard for simplicity.
See example below.

Let me know if you stumble on any issues.

Top comments (0)