In this article, we will see how to set up TDD for Nodejs Typescript API.
The benefits of writing tests
The purpose of a test case is to determine if different features within a system are performing as expected and to confirm that the system satisfies all related standards, guidelines and customer requirements. The process of writing a test case can also help reveal errors or defects within the system.
-- Kate Brush, What is a Test Case? - SearchSoftwareQuality
The above is the best way to describe tests.
Typescript
TypeScript is a strongly typed programming language that builds on JavaScript.
Node.js
Node.js is a JavaScript runtime built on Chrome's V8 JavaScript engine.
Jest
Jest is a JavaScript Testing Framework.
Prerequisites
- Install Nodejs https://nodejs.org
- Familiarity with Typescript or JavaScript is required
Check if Nodejs is installed
node -v
You should have the below output, it varies on the version you install
v14.18.1
Start the project
We will start by initializing a new nodejs application. Create a folder for your project, let call it HelloWorld. In the directory open your terminal and run the code
npm init -y
You are instructing Nodejs to initialize a new application and accept every question as default, this should create a package.json file in the directory.
Typescript is a superset of javascript, in this case, typescript still transpile to javascript before you can run and execute your code.
Dependencies
Let's add dependencies for the application.
- Expressjs: A nodejs API framework.
To install Expressjs run
npm install --save express
DevDependencies
Development dependencies, this is a typescript project we are required to install dependencies types as devDependencies to help nodejs with type definitions for the dependencies.
@types/express@types/node: This helps with type definitions for Node.jsts-node: It JIT transforms TypeScript into JavaScript, enabling you to directly execute TypeScript on Node.js without precompiling, we should run the tests without compiling our code into javascript first.jest, jest-cli: Javascript testing framework to run tests@types/jestts-jest: A Jest transformer with source map support that lets you use Jest to test projects written in TypeScript.supertest: HTTP assertions to help our test make API calls of GET, POST, etc@types/supertesttypescript: well, this is a Typescript project
Now let install these dependencies.
npm install --save-dev @types/express @types/node ts-node jest jest-cli @types/jest ts-jest supertest @types/supertest request @types/request typescript
Configuration
Typescript
To set up the typescript project we need to initialise typescript configuration, run
npx tsc --init
This will create a tsconfig.json file with the minimal configuration which is okay for this tutorial.
Jest Configuration
Now we will set up jest configuration for the test environment, create a file name jest.config.ts and add the below code. To learn more about jest configuration visit https://jestjs.io/docs/getting-started.
export default {
  moduleFileExtensions: ["ts", "tsx"],
  transform: {
    "^.+\\.(ts|tsx)$": "ts-jest",
  },
  testMatch: [
    "**/tests/**/*.spec.ts",
    "**/tests/**/*.test.ts",
  ],
  testEnvironment: "node",
};
A little about the properties above.
-
moduleFileExtensions: An array of file extensions your modules use. -
transform: This is to tell jest that we will be using a different file extension not the usual .js files, in our case we are using .ts so we passed a Regex to match our file type and a module to help handle the filetype, this is where we make use of ts-jest we installed. -
testMatch: This property is to tell jest the directory and/or files to run for test cases. -
testEnvironment: We are telling jest which environment our project is targeted for in this case we are targeting Node environment.
Directory
This is our proposed directory structure
├──jest.config.ts
├──package.json
├──package-lock.json
├──tsconfig.json
├──server.ts
├──src
│   └──  app.ts
└──tests
     └── app.spec.ts
It is preferred to structure your app directory in this format for testing.
Now the Codes
Create a folder name src and create a file in the src folder name app.ts with the following code.
import express, { Request, Response } from 'express';
const app = express();

app.get('/', (req: Request, res: Response): Response => {
  return res.status(200).json({message: 'Hello World!'})
});

export default app;
Let work through the codes
- First, we import the
expressmodule and types ofRequest, Response. - Then we initialize our application with express and assign it to a variable.
- Then we call the
get methodfor routing, with a callback handler for our route, this callback takes to parameterreqtype Request,restype Response, which returns aResponsetype. For typescript, it is recommended to type variables, parameters and function returns in your codes. - The handler returns a response of Http status code (Learn More about status codes here)
status: 200and a json ofmessage: 'Hello World!' - Then we export our application for testing purposes and to modularize.
Was that a lot?
Next we create another file in the root folder and name it server.ts containing the following code.
import app from './src/app';

const server = app.listen(3000, ()=> {
  console.log(`This is running on port 3000`)
})

export default server
This is our application entry point.
Test
Create a directory name tests in the directory create a file name app.spec.ts
import request from "supertest";
import {Express} from 'express-serve-static-core';
import app from "../src/app"

let server: Express

describe('APP should say "Hello World!"', () => {
  beforeAll(() => {
    server = app;
  });

  it('should return 200',  (done) => {
    request(server)
      .get('/')
      .expect(200)
      .end((err, res) => {
        if (err) return done(err)
        expect(res.body).toMatchObject({'message': `Hello World!`})
        done()
      })
  });
});
Let walk through the codes
- We import the
supertestmodule and assign a variable namerequest. - Import the Express interface
- We then import our app
- Then we declare a variable
serverwith the type of Express without assigning any value to - We describe our test suite for a test block,
describeis a jest global function that accepts astringand acallback. - We passed a description of the test suite with a string
APP should say "Hello World!". - In the
callbackscope we call another global functionbeforeAllwhich accepts acallback, this is to tell jest that we will want to run a block of code before the suite run its tests. In this case, we want to first assign a value to our declared variableserverwhich will be to assign the app that we have imported so we can run our tests. - Then we call another global function
itwhich is a test closure that takes two parameters anameand acallback. - The name of our test closure is should return 200.
- We then pass a
donecallback as a parameter for the closure callback - We call
requestand pass theservervariable to run our app in the test scope. - We call the get method and pass
'/'route. In this case, we are running HTTP GET Method to our application on the route'/'. - We expect the HTTP GET Method should return 200 Ok status and return the message
'meesage':'Hello World!' - We call
endmethod which takes a callback with two parameters oferrorandrespond - We check if the test has error then we return the
donemethod with theerrorfrom the test if otherwise which means the test runs successfully, so we call theexpectglobal method which we checkbodyproperty from therespondparameter to match our expected result. - Then we finally call
donemethod to tell jest we are through with this suite.
Before we are done
And finally, we need a way to run our test, so edit the package.json file in the scripts section change test property. The scripts section should look something like this.
...
  "scripts": {
    "dev": "ts-node server.ts",
    "test": "jest --verbose"
  },
...
Now when you run
npm run test
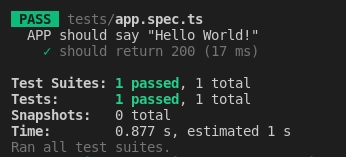
You see result like the screenshot below.
Let say we change the return value in app.ts file from Hello World! to World Hello you should see a failed test like the screenshot below.

Conclusion
Writing test could mean to write more code but a few lines are worth the hours it will save. I'm a Full Stack developer using React, React Native and Nodejs with Typescript.
Feel free to put questions or suggestion in the comment or you can also reach out on Twitter iNidAName

Top comments (0)