Timers in Apache Flink are scheduled callbacks that can be set to trigger at a specific time in the future.
Flink provides two main notions of time for stream processing: processing time and event time. Timers can be registered for either of these time domains:
⌛Processing-time timers: These timers use the system’s real clock (wall-clock time). A processing-time timer triggers when the machine’s current time reaches the specified timestamp. This is essentially "now" as measured by the processing node. Processing time is straightforward and low-latency (no need for watermark coordination), but it can be less deterministic since it depends on the clock of the machine processing the data.
⏳Event-time timers: These timers use the timestamps of events (the time when an event occurred, as embedded in the event). Flink’s event-time processing is driven by watermarks, special messages that flow with the data to indicate progress in event time. An event-time timer triggers when the operator’s watermark passes the timer’s timestamp. This means all events with a timestamp less than or equal to that time have been processed. Event-time timers allow correct handling of out-of-order events and lateness, providing deterministic results based on event timestamps, regardless of processing delays.
Key differences
👉 Trigger mechanism: A processing-time timer fires based on wall-clock time, whereas an event-time timer fires based on the advancement of watermarks (which in turn reflect event timestamps).
👉 Use cases: Event-time timers are ideal for time-dependent computations that need to respect event timestamps (for example, window aggregations, session gap detection, or complex event patterns). Processing-time timers are useful for tasks like emitting periodic updates, timing out idle sessions, or heartbeat mechanisms that rely on real-time passage.
👉 Determinism: Event-time processing yields consistent results under replay or different speeds (since event order and watermarks dictate the timing), whereas processing-time results can vary if the job is paused or slowed (because the wall clock keeps ticking).
Flink also supports ingestion time (the time events enter Flink) as a middle ground, but in modern Flink APIs, we typically choose between event time and processing time explicitly.
Stateful Processing and Timers in Flink
Most Flink streaming applications are stateful,i.e they remember information across events. Flink’s ProcessFunction gives you access to state and timers, making it a powerful “Swiss army knife” for custom streaming logic.
When using a ProcessFunction -- KeyedProcessFunction for example, Flink provides:
✅ Keyed state: You can declare state (e.g., ValueState, ListState) that is scoped to each key in a keyed stream. Only events with the same key share that state. The state for each key is stored by Flink in the state backend and is checkpointed for fault tolerance. This means your state is persisted and can be recovered on failures. State and timers are kept locally in each task and periodically snapshotted to durable storage for fault tolerance.
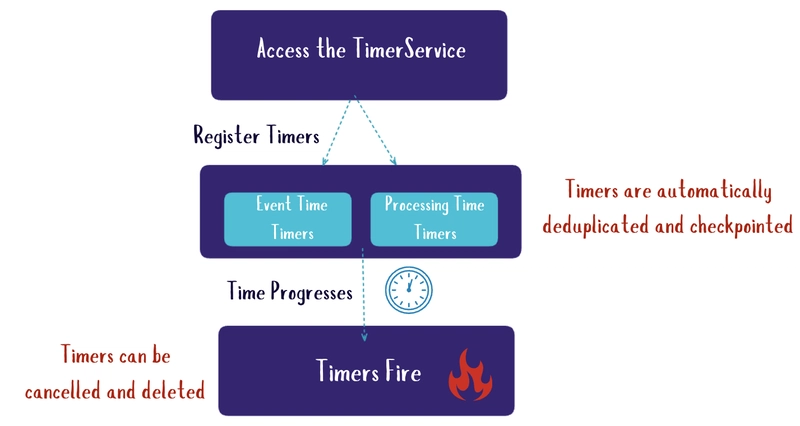
✅ TimerService: The context in a ProcessFunctionprovides a TimerService for registering timers. You can schedule a callback for a future time in event time or processing time (in milliseconds). For example, ctx.timerService().registerEventTimeTimer(t) will schedule an onTimer() call for that key when the event-time watermark reaches t, and registerProcessingTimeTimer(t) will trigger when the processing time clock reaches t. The onTimer(...) callback is where you define what should happen when the timer fires.
✅ Timer callbacks: When a timer fires, Flink invokes the onTimer() method in the ProcessFunction. Within onTimer, you can determine the time domain (event or processing) via ctx.timeDomain(), and emit results or update state.
Note: The onTimer callback, like processElement, is executed with the keyed context, meaning you can read or update the keyed state as needed for that key. Flink ensures that calls to processElement and onTimer are thread-safe and serialized per key, so you don’t need extra locking when accessing state.
✅ State and timer persistence: Both state and timers are part of Flink’s managed state and are included in snapshots. Timers are checkpointed along with state. If your job restarts from a checkpoint or savepoint, any timers that were set will be restored. Notably, if a timer was supposed to fire while the job was down (e.g., the checkpoint was taken before the timer timestamp and on restore the current time or watermark is already past that point), Flink will fire the timer immediately upon restore. This guarantees no timer is “missed” across failures. Timers are also automatically deduplicated by Flink: for each key and exact timestamp, only one timer exists – if you register another timer for the same timestamp (and same key), it will not create a duplicate; the callback will only execute once. You can also cancel timers by their timestamp if needed (we’ll see an example of that).
Now that we’ve covered the basics of timers and state, let’s apply them in a concrete example.
Example Use Case: Monitoring Sensor Readings
Let's assume we have a stream of sensor readings from IoT sensors. Each reading has a sensor ID, a timestamp (when the reading was produced), and a temperature value. We want to monitor these readings for two purposes:
Periodic aggregation (event-time): Continuously compute the average temperature of each sensor over 1-minute and output the result. Yes, we could do this with just a time window 🙃, but since the goal is to demonstrate timers here we will do this using an event-time timer (to trigger at the end of each window). This simulates a custom windowing logic using timers and state.
Inactivity alert (processing-time): Detect if a sensor stops sending data for a certain amount of time (e.g., 10 seconds) in real processing time, and raise an alert if so. This will be done with processing-time timers, which naturally fit the real-time notion of “no event received for X seconds”.
Why use different timers for these? The aggregation is aligned with event time because we want the window to consider the event timestamps and handle out-of-order events correctly based on watermarks. The inactivity alert is about a real-time gap in data arrival, which is easier to measure with processing time, since if no events come, event time progress might stall, but processing time will still tick away. This should help understand both kinds of timers.
The full source code can be found here and if you are looking for production options you can check the Ververica Cloud for free.
The core of our job lives in the KeyedProcessFunction that uses state and timers to realize our two goals: 1. average computation and 2. inactivity alert.
For each sensor (key), we need to keep track of:
- The running
sumof temperatures andcountof readings in the current window (to compute the average at the window end). - The
end timestampof the current window, so we know when to trigger output, and to detect when a new event falls into the next window. - The
timestampof the currently scheduled inactivity timer, so we can cancel it if a new event arrives in time.
We will use Flink’s ValueState to store these values.
    @Override
    public void processElement(SensorReading sensorReading,
                               KeyedProcessFunction<String, SensorReading, String>.Context context,
                               Collector<String> collector) throws Exception {
        // Extract the event timestamp of the current reading
        long eventTime = sensorReading.getTimestamp();
        long currentWindowEnd = windowEndState.value();

        // 1) Event-Time Timer Logic for windowing (1-minute tumbling windows per sensor)
        if (currentWindowEnd == null) {
            // This is the first event for this key or the first event after a window reset
            long windowStart = eventTime - (eventTime % WINDOW_DURATION);
            long windowEnd = windowStart + WINDOW_DURATION;
            // register an event-time timer for end of the window
            context.timerService().registerEventTimeTimer(windowEnd);

            windowEndState.update(windowEnd);
            sumState.update(sensorReading.getTemperature());
            countState.update(1L);
        } else if (eventTime < currentWindowEnd) {
            // Still within the current window
            sumState.update(sumState.value() + sensorReading.getTemperature());
            countState.update(countState.value() + 1);
        } else {
            // The new event belongs to a next window (current window has ended)
            // Emit the result for the current window before resetting
            double sum = sumState.value();
            long count = countState.value();
            double avg = sum / count;
            collector.collect(
                    "Average temperature for sensor " + sensorReading.getSensorId()
                            + " for window ending at " + currentWindowEnd + " = " + avg
            );
            // Clear the old window state and cancel the old timer
            context.timerService().deleteEventTimeTimer(currentWindowEnd);

            sumState.clear();
            countState.clear();
            windowEndState.clear();

            // Start a new window for the incoming event
            long windowStart = eventTime - (eventTime % WINDOW_DURATION);
            long windowEnd = windowStart + WINDOW_DURATION;

            context.timerService().registerEventTimeTimer(windowEnd);
            windowEndState.update(windowEnd);
            sumState.update(sensorReading.getTemperature());
            countState.update(1L);
        }
        // 2) Processing-Time Timer Logic for inactivity alert (10s of no events)
        //      Every time we get an event, schedule a processing-time timer X ms in the future.
        //      If a new event comes before that, cancel the previous timer and schedule a new one.
        long prevTimerTimestamp = inactivityTimerState.value();
        if (prevTimerTimestamp != null) {
            // Remove the old scheduled timer because we got a new event
            context.timerService().deleteProcessingTimeTimer(prevTimerTimestamp);
        }
        // Register a new processing-time timer for now + threshold
        long newTimerTimestamp = context.timerService().currentProcessingTime() + INACTIVITY_THRESHOLD;
        context.timerService().registerProcessingTimeTimer(newTimerTimestamp);
        // Store the new timer's timestamp in state
        inactivityTimerState.update(newTimerTimestamp);
    }
Let’s break down what’s happening here:
If this is the first event for the sensor (i.e.,
currentWindowEnd == nullbecause we haven’t seen this key before or we cleared after a window), we determine the current window’s start and end. We align the window to minute boundaries using the timestamp modulo the window size. For example, if an event arrives at 12:34:45.123 (ms since epoch), and our window is 60,000 ms (1 minute), we align to12:34:00.000as start and12:35:00.000as end. We then register an event-time timer for the window end. This means “when the watermark reaches windowEnd call onTimer for this key.” We initialize the sum and count state with this first event’s values.If another event comes and its timestamp is still before the current window’s end (
eventTime < currentWindowEnd), it’s in the same window. We update the running sum and count in state. (We do not need to register a new timer because one is already set for the window end.)If an event arrives that is at or beyond the current window’s end (
eventTime >= currentWindowEnd), that indicates the previous window should be finished. This can happen if events come slightly out of order or if there was a gap. In this case, we manually close out the current window: calculate the average fromsumStateandcountState, emit it and clear the states. We also cancel the event-time timer for the old window since we’re handling it early – this prevents theonTimer()from later firing for a window we’ve already emitted. Then we start a new window: we determine the new window boundaries based on the current event’s timestamp, register a new event-time timer for the new window’s end, and set the state. In effect, we are handling the window rollover immediately when we see an event from the next window. This logic ensures that an event exactly on a window boundary or slightly late will still be accounted correctly in the next window. In a perfect scenario with in-order data, this branch might not trigger often, but it’s important for correctness with out-of-order events.
In the code, we use a ValueState<Long> (inactivityTimerState) to remember the timestamp of the last scheduled processing-time timer for the key. On each event:
- We retrieve the previous timer timestamp (if any). If it exists, we cancel that timer. If the timer had already fired, the state would likely have been cleared; if it hasn’t fired yet, now it won’t because we canceled it.
- We then register a new processing-time timer for
currentProcessingTime + 10000ms (10 seconds in the future). - We store this new timer’s timestamp in the state (so that a subsequent event can cancel it if needed).
The actual emission of the results happens in onTimer() method.
  @Override
    public void onTimer(long timestamp, KeyedProcessFunction<String, SensorReading, String>.OnTimerContext ctx, Collector<String> out) throws Exception {
        // Check the domain of the timer (event-time or processing-time)
        if (ctx.timeDomain() == TimeDomain.EVENT_TIME) {
            // Event-time timer fired (window end reached)
            double sum = sumState.value() != null ? sumState.value() : 0.0;
            long count = countState.value() != null ? countState.value() : 0L;
            if (count > 0) {
                double avg = sum / count;
                out.collect("Average temperature for sensor " + ctx.getCurrentKey() +
                        " for window ending at " + timestamp + " = " + avg);
            }
            // Clear window state after emitting result
            sumState.clear();
            countState.clear();
            windowEndState.clear();
        } else if (ctx.timeDomain() == TimeDomain.PROCESSING_TIME) {
            // Processing-time timer fired (inactivity threshold passed)
            out.collect("ALERT: Sensor " + ctx.getCurrentKey() + " has been inactive for " + (INACTIVITY_THRESHOLD / 1000) + " seconds");
            // Clear the inactivity timer state (no active timer now for this key)
            inactivityTimerState.clear();
        }
    }
Running and Testing the Flink Job
If you run the application you should see the following output:
Average temperature for sensor sensor_2 for window ending at 60000 = 30.0
Average temperature for sensor sensor_1 for window ending at 60000 = 22.625
Average temperature for sensor sensor_2 for window ending at 120000 = 32.0
ALERT: Sensor sensor_1 has been inactive for 10 seconds
ALERT: Sensor sensor_2 has been inactive for 10 seconds
Note: In order to see the above output though, some "cheating" is required 😊 Since we have a bounded source, this means that the program will exit as soon as its consumed. So we need to add some delay to make sure 10 seconds of processing time are passed, see here
For testing, you can adjust the input events or durations to see different scenarios, such as a sensor not sending any data (to quickly trigger the inactivity alert), or events coming slightly out-of-order. The WatermarkStrategy with 5 seconds out-of-orderness means the window result will wait until 5 seconds after the window to emit (to allow late arrivals) – you can lower this for faster results if needed.
Conclusion
Apache Flink’s timers are really useful for building responsive, stateful streaming applications. They allow you to implement custom time-based logic that goes beyond the built-in window and time-based operators – for example, detecting complex patterns, implementing custom windowing, or monitoring inactivity as we did.
Some key takeaways and best practices:
Decide between event time and processing time based on your use case. Use event time for correctness w.r.t event timestamps and handling of out-of-order events (with watermarks), and processing time for real-time driven actions where slight nondeterminism is acceptable.
Key your stream before using timers, as timers are per key. This also helps isolate state per entity (like sensor) for scalability.
Clean up state when it’s no longer needed (we cleared our window state after use, and managed the cancelation of timers). This prevents state from growing indefinitely for inactive keys.
Remember that timers are part of state – they will survive failures and resume, firing if their time is due.
Monitor event-time progress (watermarks) when using event-time timers. If watermarks don’t advance (e.g., if sources become idle and you haven’t marked them as idle), event-time timers won’t fire.
By leveraging timers and managed state, you can tackle a wide array of streaming scenarios that require remembering information and acting on time-based conditions. Apache Flink handles the heavy lifting of making this reliable and scalable under the hood.
You made it and reached the end. I hope you enjoyed this 👋 and happy streaming 🌊

Top comments (0)