While developing an analytical project using django we came across an issue where we have to show status when our users start analysis. We decided to implement this using django channels. There are many tutorials about django channels on the internet but all of them are a little complex or using django channels to build a chat application. So I decided to write this article where I will show how to send asynchronous status to users using django channels.
I am assuming you know at least the basics of django framework and how django works, so I am not going to show how to create a django project and django apps. I will directly start from implementing django channels.
First we will start a project channelproj and create an app notifier.
We need to install channels and channels-redis using pip :
pip install channels channels-redis
We need to install redis-server to out system:
sudo apt update
sudo apt install redis-server
Check redis-server status:
sudo systemctl status redis
Here we can see redis server is active and running on port 6379
Then open django channelproj/settings.py file and add channels and notifier to INSTALLED_APPS.
INSTALLED_APPS = [
    'django.contrib.admin',
    'django.contrib.auth',
    'django.contrib.contenttypes',
    'django.contrib.sessions',
    'django.contrib.messages',
    'django.contrib.staticfiles',
    'channels', # Here we added channels
    'notifier' # we will use django channels in this app
]
We also need to add this lines in settings.py file:
ASGI_APPLICATION = 'channelproj.asgi.application'

CHANNEL_LAYERS = {
    "default": {
        "BACKEND": "channels_redis.core.RedisChannelLayer",
        "CONFIG": {
            "hosts": [("127.0.0.1", 6379)],
        },
    },
}
To know more about channel layer click here
Now we will create a file notifier/consumers.py and add the following class
from channels.generic.websocket import AsyncJsonWebsocketConsumer

class StatusConsumer(AsyncJsonWebsocketConsumer):
    room_group_name = 'notify'

    async def connect(self):
        await self.channel_layer.group_add(
            self.room_group_name,
            self.channel_name
        )
        await self.accept()

    async def disconnect(self, code):
        await self.channel_layer.group_discard(
            self.room_group_name,
            self.channel_layer
        )

    async def status_notifier(self, event):
        await self.send_json(event)
Here we are using AsyncJsonWebsocketConsumer and creating a group named notify and we have defined a function called status_notifier which will send all the events via socket url as json format.
We will create another file notifier/routing.py and add our socket urls
from django.urls import path

from .consumers import StatusConsumer

ws_urlpatterns = [
    path('ws/status/', StatusConsumer.as_asgi())
]
Now open channelproj/asgi.py file and edit the file as below:
from channels.routing import ProtocolTypeRouter, URLRouter
from django.core.asgi import get_asgi_application

from notifier.routing import ws_urlpatterns

os.environ.setdefault('DJANGO_SETTINGS_MODULE',
'channelproj.settings')

application = ProtocolTypeRouter({
    "http": get_asgi_application(),
    "websocket": URLRouter(
        ws_urlpatterns
    )
})
Here we have imported ws_urlpatterns from notifier/routing.py added ProtocolTypeRouter and defined our websocket urls using URLRouter
Now we will create a template notifier/templates/home.html in our notifier app where we will add a form with an input field.
  {% load static %}
  <html>
    <head>
      <title>Django Channels Status</title>
    </head>
    <body>
      <h1>Check Status</h1>

    <form action="{% url 'staus' %}" method="post">
      {% csrf_token %}
      <input type="text" placeholder="enter anything" name="TB_sample" id="TB_sample"/><br>
      <input type="submit" value="submit">
    </form>

  </body>
  </html>
Now we will add a two function in notifier/views.py
from django.shortcuts import render, redirect
from asgiref.sync import async_to_sync
from channels.layers import get_channel_layer
import time


def index(request):
    return render(request, 'home.html')

def status_form(request):
    if request.method =='POST':
        num = int(request.POST['TB_sample'])
        progress = 10
        for i in range(num):
            room_group_name = f'notify'
            channel_layer = get_channel_layer()
            async_to_sync(channel_layer.group_send)(
                room_group_name, {
                    "type": "status.notifier",
                    "data": progress
                }
            )
            message = "Status Running"
            progress += 10
            time.sleep(1)

    context = {'message': message}
    return render(request, 'home.html', context)
Here we have defined a function status_form which will be called when a post request happens, it will get the post value in num variable and we have declared a variable called progress with value 10, we have defined a loop which will run and add 10 every time loop runs to progress and sleep for 1 second. We have added channel_layer = get_channel_layer() line to get the channel layer and async_to_sync method to send the data asynchronously to room_group_name.
Note: Here by declaring "type": "status.notifier" we are calling status_notifier function we wrote in notifier/consumers.py file.
Also edit channelproj/urls.py file like this:
from notifier.views import index,status_form

urlpatterns = [
    path('', index),
    path('status/', status_form, name="status"),
    path('admin/', admin.site.urls),
]
Now if we run the project using python manage.py runserver and open http://127.0.0.1:8000/ url in our browser it will look something like this
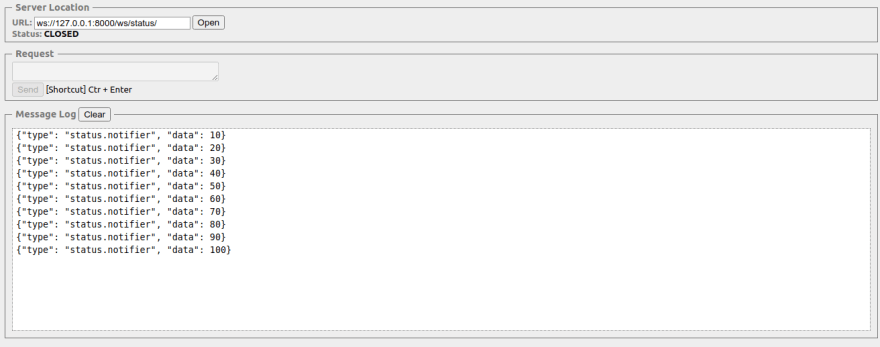
To check socket status we will use a chrome extension called Simple WebSocket Client. Add the extension and click the extension icon in chrome and insert our web socket url ws://127.0.0.1:8000/ws/status/ and click open, connection should be established.
Now go to project tab and insert 10 in input filed and submit the form and move to Simple WebSocket Client tab. We will see the status we are sending to socket appearing every second until the loop completes.
I have uploaded a sample project to github you can get here.


Top comments (0)