Hey everyone! I’m back at it with another blogpost about information-security or, more specifically, penetration testing.
This blogpost constitutes the second part in my series on penetration testing. If you are not familiar with penetration testing in general, I highly recommend checking out my first post above where I go over penetration testing methodology and show you some tools that can be useful when enumerating a target.
To finish off this mini series on penetration testing, my blogpost today will go over a target from HackTheBox. To be more precise, we'll be looking at one of their retired boxes named Blocky.

For those of you who are new to HackTheBox, think of it as a big hacking playground with lots of targets varying in difficulty. For every target out there, you need to first gain a foothold and then escalate your privileges.
Two .txt files exist on the target, and your goal is to submit the contents of both. The first .txt file is named user.txt, and submitting that will prove to HackTheBox that you’ve achieved foothold. The second .txt file is named root.txt (even on Windows), and submitting that will prove to HackTheBox that you’ve achieved escalated privileges, a.k.a root privileges (Administrator for Windows).
The foothold flag is usually the hardest to obtain, or at least the one that requires the most steps, since it requires combing through lots of information about the services running on the server. I have intentionally not included some of the dead ends I ran into while doing this box.
Step 1: Foothold
We are given the following IP-address: 10.10.10.37
First thing I did was to run an nmap scan to see which services are running on the target. I specified -sV for versions and -p- for all ports. -oN tells nmap to output in “nmap format” to the specified file.
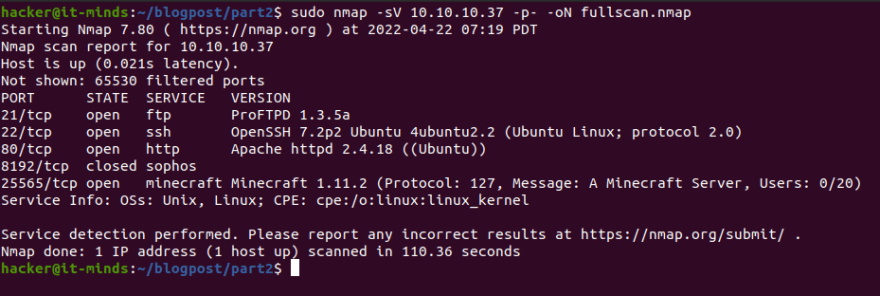
Here we see ftp, ssh, http and a minecraft server.
Let’s go ahead and visit the website.

It looks like a blog of some sort. Some might recognize that it resembles the standard Twenty Seventeen Wordpress theme. To find out more, I started a subdirectory-scan with Gobuster while continuing to explore the site manually. Here, I specified -u for url and -w for wordlist.
Looking at the source code, network traffic, etc. did not yield anything particularly useful, but eventually my Gobuster scan finished and showed me the following information:

Aha! Here, we see a bunch of sites with 403 (Forbidden) and some 301s (Redirects/Hits).
Also, we see /phpmyadmin and /plugins as well as some wordpress sites.
We can navigate to phpmyadmin and try some default credentials, such as root:root, admin:admin, root:admin etc.
We don’t get a hit, and since we don’t know any users, we are unable to progress much further in this direction right now.
However, there is a great tool for Wordpress sites called wpscan. It automatically looks through posts, authors, themes, assets etc. to spot anything vulnerable or out of the ordinary.
By running a command such as wpscan --url http://10.10.10.37/ --enumerate u, we find a user named notch.

Meanwhile, if we visit /plugins we see two .jar files.

I downloaded the first one, BlockyCore.jar, and unzipped it to find a BlockyCore.class file. Using a Java decompiler, I was able to read the contents.

Looks like we found some credentials!
We now have two users: root and notch.
Going back to the website, we can visit the /phpmyadmin endpoint and try logging in.

It worked! We now have access to phpMyAdmin and can view the underlying database.

Usually, when gaining access to admin panels, you want to look for ways to upload files, read credentials, update permissions and such. Since phpmyadmin is using SQL, we can query the database and such. We can try uploading a webshell, which would allow us to execute commands on the server. The following command takes an input and writes it to /phpmyadmin/cmd.php (assuming the folder exists under /var/www/).
SELECT "<?php if($_GET['cmd']) {system($_GET['cmd']);} ?>"

 INTO OUTFILE '/var/www/phpMyAdmin/cmd.php
We are denied access though. But it was worth a shot.

So far so good…
Okay, so where are we with all the gathered information? Well, we have obtained two usernames and a password from diving into port 80. We were able to log into phpmyadmin but unable to run any SQL queries from there.
However, a common scenario when dealing with lazy developers is the reuse of passwords. Don’t do this, people. Get a password manager and generate a new unique password every time, please.
Anyhow, once we get credentials, it is usually a good idea to look for other services where we could try those credentials as well.
Let’s remind ourselves what the other services were:
Our nmap scan showed us that the services running were ftp, ssh, http and minecraft.
We try using the notch username with the password from before on the ftp server and manage to successfully log in.
Here, we see the user.txt file. We can use the “get” command to download files over ftp.
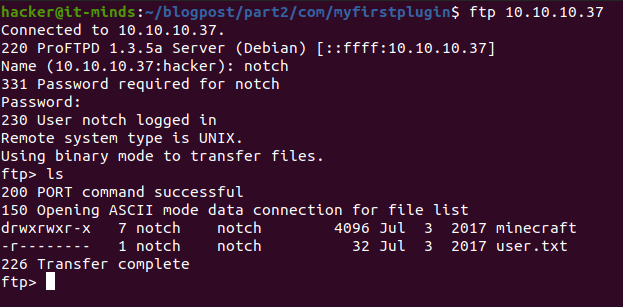
And we are rewarded with our first flag! Foothold achieved!

Step 2: Privilege Escalation
With the SAME notch credentials used for FTP, I was also able to SSH into the box.

One of the first things to enumerate, when looking to escalate privileges on a system, is which rights you have as a user. Are you able to run some commands with elevated privileges?
An easy way to see this on Linux is to run sudo -l which will list all your sudo rights.
Here, we see that we may run (ALL: ALL) ALL. This means we can run any command as the superuser.

This makes for a very easy win with sudo su root. Enter the credentials for notch and bam! We’re root.
We can see the root.txt file, readable by our user.

And that is both of the proofs we need to submit to gain full points on the box!
Were you able to follow along and understand everything that happened there?
Let’s quickly recap the steps we took:
- We scanned the site with nmap
- On port 80, we found a website and performed a subdirectory-listing scan with Gobuster
- We saw Wordpress files and used wpscan to find a user named notch
- In the /plugins folder, we found a .jar file with some credentials
- We tried reusing the credentials on the other services (foothold)
- We were able to SSH into the box
- With sudo -l we listed our privileges and saw that we could run any command as root
- We switched to root user with the
sudo su rootcommand which gave us root flag
Alright, that wraps up my second post and this series on penetration testing!
This post was a bit longer and a bit more technical than the first post, but translating theoretical knowledge into practical usage is often what helps you truly understand something new.
I hope you learned something from this mini series on penetration testing - or at least enjoyed the reading :-) Feel free to post your questions below!

Top comments (0)