
Follow me on Twitter, happy to take your suggestions on topics or improvements /Chris
This article is part of a series on GraphQL:
- Building a GraphQL server using Node.js and Express
- Building a GraphQL server using Node.js and the Apollo Framework, we are here
- Consuming an Apollo GraphQL server using React
GraphQL is a new way we can use to build APIs. One of its prominent features is content-negotiation, a way for the client to tell the backend exactly what fields it needs and at what depth. This enables you to get a smaller payload of data back, which can really make a difference on a bad network connection.
Apollo is an entire platform for handling the backend as well as the client-side when using GraphQL and can even help you in the cloud. It’s well worth checking out here.
This article will be about how to create a GraphQL server using Apollo and thus only using a small part of what the Apollo platform can do. As you will see it’s pretty easy. I hope you enjoy the read :)
In this article we will cover:
-
Install and set up, we will learn how to install
apollo-graphqlandgraphqllibraries needed to created our server - Define a schema and resolvers, a Schema is needed to describe our types. Resolvers are functions that are invoked to handle queries from the user.
- Debugging, when we start our server we can do so in a debug mode so we get a browser page we can interact with and that will help us send our queries to our server and it will also show us the results
Resources
Some of the below links are introductory so you can learn more after having read this article and some are more advanced once you feel you've grasped Graphql better.
- Apollo project landing page
- Building a schema
- How to write Resolvers for your server
- Using GraphQL with Azure Functions
- Using GraphQL on Azure generally
Install and set up
To create a GraphQL server using Apollo Server we need to do three things:
- install
apollo-serverandgraphql - define a schema
- define resolvers
Let’s install the needed dependencies:
npm install --save apollo-server graphql
Once we have done that we are able to proceed with the next steps.
Define a schema
To define a schema we need to be using a function called gql that allows us to define a schema like a multiline template string and most importantly using the GraphQL query language.
First, we import gql:
const { gql } = require("apollo-server");
Next up we can start defining the schema itself:
const typeDefs = gql`
  type Query {
    products: [Product]
    product(id: Int!): Product
  }
  type Product {
    id: Int,
    name: String,
    description: String
  }
  input ProductInput {
    name: String,
    description: String
  }
  type Mutation {
    login(email: String): String # token
    createProduct(product: ProductInput)
  }
`
Finally, we export the schema for later usage
module.exports = typeDefs;
The full file should now look like this:
const { gql } = require("apollo-server");
const typeDefs = gql`
  type Query {
    products: [Product]
    product(id: Int!): Product
  }
  type Product {
    id: Int,
    name: String,
    description: String
  }
  input ProductInput {
    name: String,
    description: String
  }
  type Mutation {
    login(email: String!): String # token
    createProduct(product: ProductInput): String
  }
`
module.exports = typeDefs;
Define resolvers
Next up we need to define what the following queries and mutations should do:
- products, this should return a list of products
- product(id: Int!), this should return one product
- login(email: String), this should log in the user
- createProduct(product: ProductInput), this should create a product
Let’s start a new file resolvers.js. At this point, we will keep things simple and have some local static data but we could improve this server by having it call a database or an API. So let’s define some static data at the top:
const products = [];
Now that Apollo server expects a certain type of object back with the following shape:
module.exports = {
  Query: {},
  Mutation: {}
};
Not the two keywords Query and Mutation above. These two are objects and we need to define each corresponding resolver function. Let’s start by adding a resolver function for products:
const getProducts = () => {
  return Promise.resolve(products);
}
module.exports = {
  Query: {
    products: async () => getProducts
  },
  Mutation: {}
};
A comment on getProducts() method is that we return a Promise. Now, we could return our products list directly but this is just a way to showcase that we can return an asynchronous response as well, which means this will fit well with us talking to a 3rd party API or doing a lookup on a database. To go along with our Promise response we mark it with async in our return object.
Define a resolver function with a parameter
We’ve learned how to define a resolver function, and now let’s look at how we can grab a parameter from the user request and query our backend based on it.
const getProductById = ({ productId }) => {
  return Promise.resolve(product.find(p => p.id === productId));
}
module.exports = {
  Query: {
    products: async () => getProducts,
    product: async (_, { id }) => getProductById({ productId: id })
  }
};
Above we added product to our Query object and as you can see we can quite easily dig out the id from the user request.
Define a resolver function for a mutation
To define resolvers for mutations we need to introduce a Mutation property on our exported object, just like we needed to introduce Query. So now our code should look like this:
module.exports = {
  Query: {
    products: async () => getProducts,
    product: async (_, { id }) => getProductById({ productId: id })
  },
  Mutation: {}
};
Note the addition of Mutation above.
The next step is to add our createProduct property and a resolver function that handles that, like so:
const createProduct = ({ product }) => {
  const newId = products.length === 0 ? 1: products[products.length-1].id + 1;
  products = [ …products, { …product, id: newId}];
  return Promise.resolve(‘success’)
}
module.exports = {
  Query: {
    products: async () => getProducts,
    product: async (_, { id }) => getProductById({ productId: id })
  },
  Mutation: {
    createProduct: async (_, { product }) => createProduct({ product      })
  }
};
Putting it all together
Now we have defined a set of resolver functions, let’s have a look at the resulting code in its entirety:
const products = [];
const getProducts = () => {
  return Promise.resolve(products);
}
const getProductById = ({ productId }) => {
  return Promise.resolve(product.find(p => p.id === productId));
}
const createProduct = ({ product }) => {
  const newId = products.length === 0 ? 1: products[products.length-1].id + 1;
  products = [ …products, { …product, id: newId}];
  return Promise.resolve(‘success’)
}
module.exports = {
  Query: {
    products: async () => getProducts,
    product: async (_, { id }) => getProductById({ productId: id })
  },
  Mutation: {
    createProduct: async (_, { product }) => createProduct({ product   })
  }
};
As you can see we have only operated on static data but we could easily switch those calls to target a database or a 3rd party API, that’s entirely up to you. As long as you remember to use the await keyword in your resolver definition you are good to go with interacting with anything return a Promise.
Start the server
We have defined a schema and a set of resolver functions. Now let’s import schema.js and resolvers.js and kick off our server:
const { ApolloServer } = require("apollo-server");
const typeDefs = require("./schema");
const resolvers = require("./resolvers");
const server = new ApolloServer({ typeDefs, resolvers });

server.listen().then(({ url }) => {
  console.log(`🚀 Server ready at ${url}`);
});
Debug
Navigate to http://localhost:4000 —
you should have something looking like this:

As you can see this looks very much like the GraphiQL environment we presented in the chapter GraphQL + Node.js Express. The idea is the same. On your left you have an area where you can enter queries and mutations and on your right is the results area. On the bottom left is avariables area that allows you to specify input variables that you can use the top left pane.
Example usage
Let’s try to create a query. We can do so in two ways:
- using the no-keyword version,
{} - using the keyword
query
The first variant looks like this:

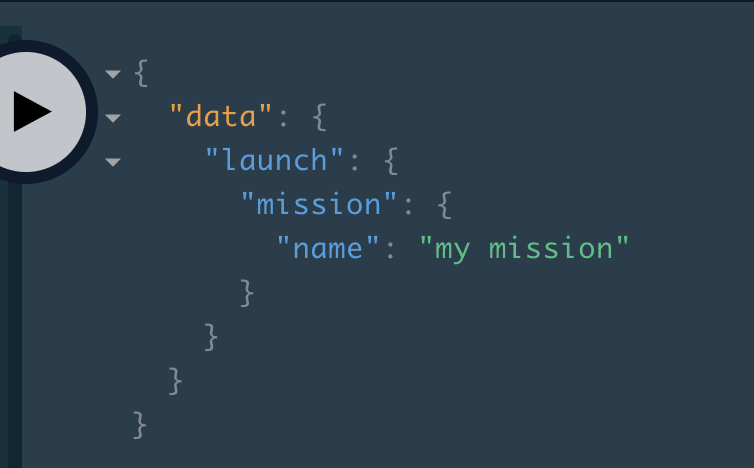
As you can see above we are only using {} to specify our query and then we query for a resource launches and drills down into the resource to get the columns that we need, i.e mission and under mission we grab the column name.
Let’s try to use the other query variant next by using the keyword query. The keyword query allows us to:
- Name the query so we can refer to it later
- Specify more than one query in the same window, so we can choose which one we want at a given point in time
- Specify a parameter for our query ( we will show this one in our next example )

Above we managed to specify two different queries and have given them the name LaunchesNameOnly and LaunchesAll. While specifying the LaunchesAll query you can see how our environment helps us by indicating the type of isBooked, that we are about to select. The type is a Boolean!, a mandatory Boolean.
In our next example we show how you hit the large play button and is given the choice between different queries, as you can see it is a really great idea to define your queries with the keyword query so to create some order in your testing environment:

Below is simply the result of executing our query

Let’s try to use variables next and see how we can declare those in the bottom left area and use them in our queries and mutations.

Above we have defined OneLaunch that takes a parameter $id. Thereafter this parameter $id is passed down to our actual query expression like so:
launch(id: $id) {
  mission {
    name
  }
}
Now, we are ready to invoke our query, with a parameter and we simply hit the play button and we get this:
The reason we get the above is that it read from the bottom left are that looks like this:

Variables in this area is all made up of one object and we simply add keys to this object when we need a new parameter like so:
{
  "id": 1,
  "otherparam": "some value"
}
Deeper queries
One of the big selling points of GraphQL is the ability to query deep into a hierarchy, like so:
{
  orders {
    created,
    createdBy {
      name,
      created
    },
    items {
      product {
        name
      },
      price
    }
  }
}
Above we are querying on the resource orders and as you can see we are able to perform a lot of subqueries and query for orders->items->product. If we were to do that with SQL, it would be quite difficult with a lot of JOINS. So how are we able to construct this in GraphQL?
In short, we need to do two things:
- define a resolver to the asked for subtype
- store the data in a resolvable format. This means we need to store the data as an
id/idsrather than the full object
Store the data as id/ids
We need to store an order like this:
const orders = [{
  id: 1,
  items: [1,2,3]
}]
Define a resolver for a subtype
How this is done syntactically depends on the GraphQL server implementation we are dealing with. In this case, we are dealing with Apollo, so let’s look at how Apollo handles it. We know that when we define a resolver object in Apollo it looks like this:
{
  Query: {
    orders: async () => getOrders(),
    order: async (_, { id }) => getOrder(id)
  },
  Mutation: {
    // add mutation resolvers here
  }
}
Now, our querying for orders means we are interested in querying for all its columns like created but also for a complex column like items and even items -> product so we can ask a query like this:
{
  orders {
    created,
    items {
      product {
        name
      },
      price
    }
  }
}
So how do we resolve items? Well let’s have a look at our schema definition of an order:
type Order {
  created: Date;
  items: [Item]
}
With this in mind let’s head back to our resolver object and now we will add a Order type to like so:
{
  Query: {
    orders: async () => getOrders(),
    order: async (_, { id }) => getOrder(id)
  },
  Mutation: {
    // add mutation resolvers here
  },
  Order {
    items: ({ items }) => getItems(items)
  }
}
Let’s zoom into our addition:
Order {
  items: ({ items }) => getItems(items)
}
Here we can see that we are resolving what happens if someone queries for items. We are missing the getItems() method though so let’s define that:
const itemsList = [{
  id: 1,
  name: ‘item’
},
{
  id: 2,
  name: ‘item2’
}]

const getItems = (items) => {
  return Promise.resolve(itemsList)
}
Ok, so that deals with items so how do we deal with items->product. Well, that one is quite simple, we just again look at our schema:
type OrderItem {
  price: Double;
  product: Product;
}
We see now that we need to add OrderItem to our resolver object, like so:
{
  Query: {
    orders: async () => getOrders(),
    order: async (_, { id }) => getOrder(id)
  },
  Mutation: {
    // add mutation resolvers here
  },
  Order {
    items: ({ items }) => getItems(items)
  },
  OrderItem {
    product: ({ product }) => getProduct(product)
  }
}
Summary
We have covered
- Installing
apollo-serverandgraphql, in order to have the necessary dependencies to create an apollo server. - Defined a
schemaand a set ofresolvers. - Booted up our server,
- Explored the visual environment that allows us to run queries or mutations
Moving on we will look at different ways to consume said server using apollo-client so stay tuned for that.

Top comments (0)