![Cover image for [AWS] Using API Gateway for S3 Uploads to Trigger Lambda Functions](https://media2.dev.to/dynamic/image/width=1000,height=420,fit=cover,gravity=auto,format=auto/https%3A%2F%2Fiwaduarte.dev%2F_astro%2F1_xoMn_6ya52svpYzin1qUPA.d82feecd_Z24FyPH.webp)
I have stated a few posts back that I would make a tutorial like that. And yet due to procrastination, I did not do it. Also, there are a lot of tutorials on the internet that try to achieve the same thing.
And that conflicts with my statement of no bullshit, no copy/pasta, direct-to-the-point mottos. When I had the idea to create this tutorial it was years ago. I had researched extensively to create a test framework for a company for which I was a consultant.
At the time, serverless was being born, and not many tutorials or tools were available. I had to resort to the few that were there and a lot of sweat and pain through the hell which is the AWS documentation.
I got to a pretty decent solution and thought: "Awesome if I could share this, someone would expend less time and I would win hearts in my goal of conquering and destroying worlds". Epic.
 (https://makeameme.org/meme/planning-world-domination-418f014b3d)
Nowadays we have chatGPT which gives you half-terrible answers to some topics and very good ones to others. Now serverless has been elevated and bashed.
For that reason, a tutorial in the old format would be pointless. Thus, I will try to come up with a revision of other tutorials and add my flavor to it.
Let's begin with our architecture. I want to send images to S3 using only AWS API Gateway as a proxy. These images once there will be checked for dimensions, resized if larger than 1024x1024, and if its size is bigger than 5MB deleted.
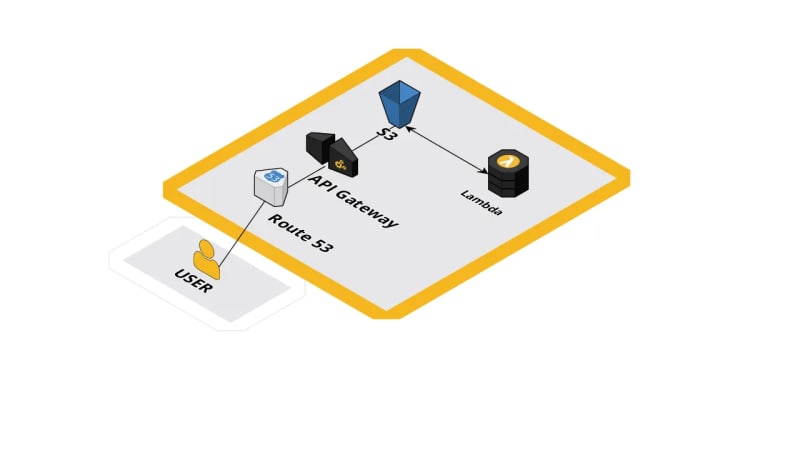 Our intended architecture ( app.cloudcraft.co )
Why use API Gateway as a proxy instead of using lambda?
Someone created a tutorial at:
https://lumigo.io/blog/the-why-when-and-how-of-api-gateway-service-proxies/
For the lazy ones:
"Cold starts:
...However, some applications have more strict latency requirements. Or maybe if the API is part of a call chain that involves multiple Lambda functions. In which case the cold starts can stack up and become problematic as a whole, even if individually they're fine."
"Cost:
Having a Lambda function in the mix means you also have to pay for the Lambda invocations as well as associated costs such as CloudWatch Logs."
"Limits
Lambda also has two concurrency limits. ThereΓÇÖs the total number of concurrent executions of ALL functions in the region."(extracted from lumigo.io)
I would add other points here. Simplicity. Less maintenance. Configure and forget. Powerful scaling solution.
For our use case, we are going to use the Serverless Framework to speed things up.
- Create a folder called
upload-s3. - Go to your
terminal. Navigate to the folder created. - Install these dependencies on your project:
npm init -y
npm install -g serverless
npm install -D serverless-apigateway-service-proxy serverless-domain-manager
- Create a
.envfile inside the folder with a few variables that will help set your AWS services upon deployment.
CUSTOM_DOMAIN=images.yourdomain.com
CERTIFICATE_ARN=arn:aws:acm:region:account-id:certificate/certificate-id
SECRET=DONOTDRINKTHEKOOLAID
- Create a
serverless.ymlfile:
# Name of the service
service: upload-s3
# Use environment variables from .env file
useDotenv: true
# Provider-specific configuration
provider:
  name: aws  # Cloud provider
  runtime: nodejs18.x  # Runtime language and version
  # Deployment stage (default to 'dev' if not specified)
  stage: ${env:stage, 'dev'}
  region: us-east-1  # AWS region
  versionFunctions: false
  environment:
    # Environment variable for the S3 bucket name
    BUCKET_NAME: ${self:service}-apigateway-proxy
    SECRET: ${env:SECRET}
  iamRoleStatements:
    - Effect: Allow
      Action:
        - s3:*
      Resource:
        - arn:aws:s3:::${self:provider.environment.BUCKET_NAME}
        - arn:aws:s3:::${self:provider.environment.BUCKET_NAME}/*
  apiGateway:
    binaryMediaTypes:
      - image/png
      - image/jpg
      - image/jpeg
      - image/gif
      - image/x-icon
      - application/octet-stream

# Lambda functions
functions:
  jwtAuthorizer:
    handler: authorizer.jwtAuthorizer  # Path to the JWT authorizer function

  checkFileSize:
    # Path to the function that checks file size
    handler: handler.checkFileSize
    # Triggered when a new object is created in the S3 bucket
    events:
      - s3:
          bucket: ${self:provider.environment.BUCKET_NAME}  # Reference to the S3 bucket created in Resources
          event: s3:ObjectCreated:*
          rules:
            - prefix: temp/


# AWS CloudFormation Resources
resources:
  Resources:
    Authorizer:
      Type: AWS::ApiGateway::Authorizer
      DependsOn:
        - JwtAuthorizerLambdaFunction
      Properties:
        AuthorizerResultTtlInSeconds: 0
        IdentitySource: method.request.header.Authorization
        Name: jwtAuthorizer
        RestApiId:
          Ref: ApiGatewayRestApi
        Type: TOKEN
        AuthorizerUri:
          Fn::Sub: arn:aws:apigateway:${AWS::Region}:lambda:path/2015-03-31/functions/${JwtAuthorizerLambdaFunction.Arn}/invocations
    LambdaInvokePermission:
      Type: AWS::Lambda::Permission
      DependsOn:
        - JwtAuthorizerLambdaFunction
      Properties:
        FunctionName: !GetAtt JwtAuthorizerLambdaFunction.Arn
        Action: lambda:InvokeFunction
        Principal: apigateway.amazonaws.com
        SourceArn:
          Fn::Sub: arn:aws:execute-api:${AWS::Region}:${AWS::AccountId}:${ApiGatewayRestApi}/*/*

# Custom configurations
custom:
  apiGatewayServiceProxies:
    - s3:
        path: /images
        method: post
        action: PutObject
        bucket: ${self:provider.environment.BUCKET_NAME}
        pathOverride: 'temp/{object}'
        key:
          queryStringParam: filename
        cors: true
        authorizationType: CUSTOM
        authorizerId: { Ref: Authorizer }
        requestParameters:
          'integration.request.header.x-amz-acl': "'private'"


    - s3:
        path: /images/{filename}
        method: get
        action: GetObject
        bucket: ${self:provider.environment.BUCKET_NAME}
        key:
          pathParam: filename
        cors: true
        authorizationType: CUSTOM
        authorizerId: { Ref: Authorizer }

  # Comment it out if you do not want a customized domain.
  customDomain:
    domainName: ${env:CUSTOM_DOMAIN}  # Custom domain from environment variable
    certificateArn: ${env:CERTIFICATE_ARN}  # Certificate ARN from environment variable
    stage: ${self:provider.stage}
    createRoute53Record: true


plugins:
  - serverless-apigateway-service-proxy  # Plugin to simplify API Gateway service proxy configurations
  - serverless-domain-manager # Comment it out if you do not want a customized domain.
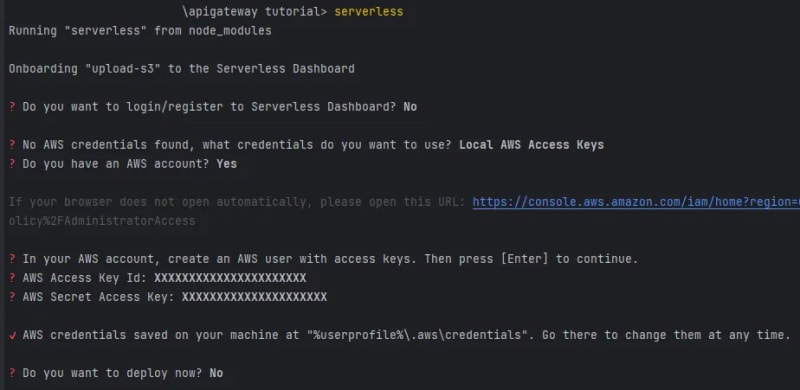
- Run
serverless: You should have an AWS account created. If not create it here. After that, create an IAM User with permission to run your lambda and services. The configuration will be saved on your computer for future use. ( If you already have an AWS account set and configured on your PC this part can be skipped.)
- Create the
authorizer.mjsfile and install its dependency:
npm install jsonwebtoken
import jwt from "jsonwebtoken";

const { SECRET } = process.env;

export const jwtAuthorizer = async (event) => {
  const { authorizationToken, methodArn } = event;
  try {
    jwt.verify(authorizationToken, SECRET);
  } catch (err) {
    throw new Error("Unauthorized");
  }
  return {
    principalId: "user",
    policyDocument: {
      Version: "2012-10-17",
      Statement: [
        {
          Action: "execute-api:Invoke",
          Effect: "Allow",
          Resource: methodArn,
        },
      ],
    },
  };
};
- Create the
handler.mjsfile and install its dependency:
npm install --arch=x64 --platform=linux --libc=glibc sharp
import {
  S3Client,
  HeadObjectCommand,
  DeleteObjectCommand,
  GetObjectCommand,
  PutObjectCommand,
} from "@aws-sdk/client-s3";
import sharp from "sharp";

const s3 = new S3Client({});

export const checkFileSize = async (event) => {
  const bucket = event.Records[0].s3.bucket.name;
  const key = decodeURIComponent(
    event.Records[0].s3.object.key.replace(/\+/g, " "),
  );
  const params = {
    Bucket: bucket,
    Key: key,
  };

  const { ContentLength, ContentType } = await s3.send(
    new HeadObjectCommand(params),
  );

  if (!ContentLength) return;
  if (ContentLength > 5 * 1024 * 1024) {
    await s3.send(new DeleteObjectCommand(params));
    console.log(`Deleted ${key} as it was larger than 5MB`);
    return;
  }

  const { Body } = await s3.send(new GetObjectCommand(params));
  const BodyBuffer = Buffer.concat(await Body.toArray());
  const metadata = await sharp(BodyBuffer).metadata();
  const newKey = key.replace("temp/", "");
  const shouldResize = metadata.width > 1024 || metadata.height > 1024;

  const newBody = shouldResize
    ? await sharp(BodyBuffer)
        .resize(1024, 1024, {
          fit: "inside",
          withoutEnlargement: true,
        })
        .toBuffer()
    : BodyBuffer;

  shouldResize && console.log(`Resized ${key} to ${newKey}`);
  console.log(`Moved ${key} to ${newKey}`);

  await s3.send(
    new PutObjectCommand({
      Bucket: bucket,
      Key: newKey,
      Body: newBody,
      ContentType,
    }),
  );

  console.log(`Deleted the original file ${key}`);
  await s3.send(new DeleteObjectCommand(params));
};
Serverless vs CloudFormation
There are a lot of things happening above and we will touch on most points. If it is the first time you are dealing with serverless do not worry. If you are a more seasoned developer you can skip this part.
The serverless framework is a way of automating the myriad of configurations that AWS requires you to do to create their services programmatically.
There are a lot of ways of creating services via code with AWS. One of them is to use the CloudFormation service.
https://www.youtube.com/watch?v=Omppm_YUG2g
In the end, CloudFormation is just a YAML file with directives of what to create and how to create.
Import note:
Back then, this main tutorial inspired me and used a full-fledged resources feature and no serverless plugins. Thankfully for us, the plugin s*erverless-apigateway-service-proxy* is well-developed now and all boilerplate can be avoided. You can check the differences between our code and theirs by looking at this repo:
The serverless framework helps you by creating a more simplified version of a CloudFormation.json file and other configurations that are handled for you. In the end, you will only need to type:
serverless deploy
And that will be it.
Going through the serverless.yml
I have added comments on the serverless.yaml file above but I want to touch on a few points:
iamRoleStatements: Roles are temporary credentials that accounts or services can acquire. These roles let you manage/access/modify/listen to other services.
binaryMediaTypes: Every request sent to API Gateway is by default treated as text. So it is important when sending binary data (images, audio, etc.) to specify the type to prevent unwanted coercion/parsing/encoding and therefore data corruption.
functions:
Functions are the whole grail. There you add your code and forget about everything else (after the initial configuration) and that is serverless in a nutshell:
"Forget about everything. Think about your logic and code, we handle the rest."
jwtAuthorizer: This function is responsible for making the endpoint secure. Only authorized requests are allowed. This configuration is used in conjunction with the serverless-apigateway-service-proxy plugin.
checkFileSize: This is the function of our logic. It is responsible for checking the file size and deleting it in case surpasses our defined limit of 5MB and resizing images with dimensions higher than 1024x1024. I am using the package sharp for that. As you can see I have defined directives when installing it which will ensure the binary for lambda is installed.
Resources: This is the extra stuff and extra resources that you will add when the serverless framework and its plugins have failed you. It is here that you will define everything and it is pretty much copied to a CloudFront file without much alteration. For instance Authorizer: Type: AWS::ApiGateway::Authorizer will create an authorization layer in AWS that connects API Gateway to our function to ensure proper access. You can see all types of resources/services here.
custom: Here is where the pluginΓÇÖs configurations are defined. AWS is a monster with 200+ services and even the Serverless Framework can not cater to all types of needs and uses. Sometimes plugins are the best bet, sometimes we need to create everything using resources. Sometimes we just cry.
apiGatewayServiceProxies: Our serverless-apigateway-service-proxy plugin
customDomain: Our domain plugin: serverless-domain-manager
Wait what? Domains? What is that?
Domains are names (i.e. www.google.com) that point to IP addresses. When the whole serverless stack is created the naming for accessing the API is something like this:
https://api-id.execute-api.region.amazonaws.com/stage
This name can be customized with your own domain. LetΓÇÖs say you have bought your domain for your site and it is called: coolpeopleneverdies.com and you like our whole application to update images to: images.coolpeopleneverdies.com.
That is what the plugin is for. For managing and simplifying the images.coolpeopleneverdies.com part. You do not want to send that ugly ass link to your friends to flex your skills with AWS. You would like to use the domain that you bought and it is beautiful.
Before using that plugin you need to know that is mandatory (only if you want custom domains) to buy and configure your domain, the certificates, and records.
Here we have two nice tutorials on how to do it:
Route53 (inside AWS):
https://www.readysetcloud.io/blog/allen.helton/adding-a-custom-domain-to-aws-api-gateway/
Without Route53 (external domain registrar)
https://medium.com/@sameera.godakanda/custom-domain-names-for-api-gw-e1deefe27ed
Note that, the serverless.yaml file in our tutorial is configured for having the domain inside Route53 as well as its certificate (the first tutorial is the desired option). Also, there are manual parts in both tutorials above that are being automated here. So, skip those parts and follow the tutorial here instead.
If everything is looking complex already, you can just disable the whole domain's shenanigans. I have placed comments on the serverless.yaml file on the lines you need to comment/delete so you can have your application and worry about that later. No big deal.
If again, you already have your certificate set and it is using your domains in route 53 everything here will be a breeze.
Going through the .env
The variables that you should set here are variables essential to your service to work. The variables set throughout the applications are:
CUSTOM_DOMAIN, CERTIFICATE_ARN, and SECRET.
Make sure to populate these in your .env file.
How about our SECRET?
We need these to make sure that our request is secure (authorized). I have decided to use JWT because it is simple to set up and is well-adopted for authorization.
Our secret alone will not do it. It needs to be signed with a header and a payload ( that is how JWT works).
Signing is like stamping a letter and saying and making sure that it will be recognized. We use cryptographic and shenanigans for that (HMAC if you are interested in the deep bottom of the sea)
We would probably programmatically use a package to obtain the signed version providing only the SECRET. However, in our case, and for simplicity we are going to use this jwt.io website. You are going to find a VERIFY SIGNATURE field, there you should add your SECRET.
I have set a public payload with “expires”: “1h” but you can add whatever you feel like.
Copy the encoded result. That is what we are going to need to authorize our requests.
Finally…The magic is happening.
After all this initial configuration you can run our final deployment:
serverless create_domain
serverless deploy
It will create everything for you. If you wanna see the magic happening apart from the serverless logs you should go to AWS CloudFormation. There you will have detailed information about your stack recently created.
After finishing we should start testing it. To make things more dynamic I have added a testing video.
https://www.youtube.com/watch?v=COOmY-tLESg
And there you go. After watching this amazing scene you can see that images.iwaduarte.dev is uploading and retrieving images from S3 and doing proper modifications (following our logic established at the beginning of the tutorial).
I have also created a repository where you can check how the code integrates in case you feel like you cannot work it out from here.
You can access the repo here.
Do not for one second think that this implementation was without hiccups.
I had to read and re-read the documentation on a few parts and tweak it here and there. So you are not alone if you want to customize something and you are not getting anywhere. Keep working my young one you will get there.
Also, there are a lot of optimizations and things that could be added and I have skipped or ignored.
- For instance, I am installing binaries for sharp for Linux although I am deploying inside a Windows machine. https://sharp.pixelplumbing.com/install#cross-platform
- I am not packaging individual functions https://www.serverless.com/framework/docs/providers/aws/guide/packaging#packaging-functions-separately
- I could have added layers https://www.serverless.com/framework/docs/providers/aws/guide/layers
- I am not catering for local development https://www.serverless.com/plugins/serverless-offline
- I am not working with streams. I could be using the Readable Stream from the s3 GetObjectCommand, the problem is that would require much more configuration since it is very hard to use metadata and resize (sharp methods) and streams. The metadata function reads the entire stream so I may as well simplify my code considering the files are small. For more info, you can check this answer: https://stackoverflow.com/a/66837302/7350853
- I particularly do not like the domain manager approach, especially because it is a separate command with a lot of implications. I have set domain configuration only using resources and works better in my view. But I did not want to make things even more complicated for you.
Well, I did not want to create a book, and yet... here we are HAHAHAHAHAH. Thanks for getting here though. Hope this tutorial helps you become a better developer. Also, there are things you will need to figure out by yourself in case you need customization, that is the path mate. Embrace it. It is like life can be pretty easy sometimes and pretty intimidating too.
 (https://www.amazon.com/Confucius-Philosophy-Demotivational-Sarcastic-Poster/dp/B08LF4JNX8?th=1)
Before I become too philosophical leave a comment and I will answer as I feel like it. Cheers.

Top comments (0)