
Introduction
So, you're learning programming for web development, and you're trying to get a full-stack application off the ground. You have already built out the front end, and you're trying to manage and interact with a massive database, but while you were distracted by Postgres joins and updates, you suddenly find yourself in the "Desert of Despair".
Well, you're in luck because there's a whole group of us lost in the desert, and I am determined to get us to the oasis of Object Relational Mapping (ORM). I'm glad to have you with us.
What
the f**kis Active Record
- Someone (probably)
Table of Contents
Our journey to the ORM oasis will come in three parts:
- What is ORM?
- Why are ORM libraries useful to us?
- The Sequelize Javascript ORM library and how to use it
As we discover Sequelize and how to use it, we will go over an example by applying it to a cheese review app that you will build for your cheese party this weekend!
Follow along with the Github repo for this blogpost!
Cheese Party Repo
What is Object Relational Mapping?
This section starts with two assumptions:
1 You have some familiarity with objects in Javascript or a programming language that is object oriented.
2 You're familiar with databases (or at least tables and spreadsheets)
ORM describes how the contents (the data) of a database can be represented (mapped) and accessed as an object.

What does this actually look like?
You know I love my cheese, Gromit!
- Wallace
The Cheese Party
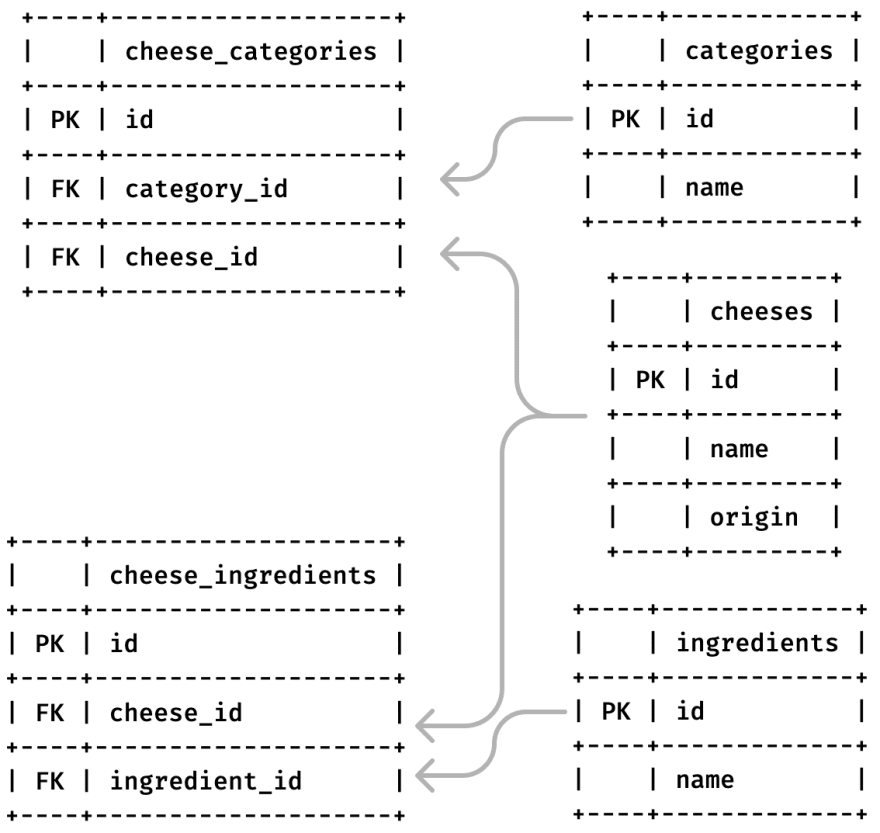
You're hosting a cheese party this weekend. There's going to be cheese. Lots of cheese. Rather than writing out the information about each cheese on a piece of paper, you decide to create an app that your guests can use to look up and read basic info on each cheese. You start by making a simple database with some tables containing info about your cheeses:
If you want to try these yourself, follow along with the Github repo and the README.md file!
Method: Runtime Client
Without an ORM library, in order to interact with a database using Javascript you could use a client like node-postgres for the NodeJS runtime:
You can see this by checking out the method/pg branch and following the instructions in the README
git checkout method/pg
// Require node-postgres ("pg")
// Use destructuring syntax
// to extract the "Pool" class
const { Pool } = require('pg')

// Create a new pool object from the pool class
// Pass a config objects with the details of our database
const pool = new Pool({
  host: 'localhost',
  user: 'cheesepartyhost',
  password: 'cheeseforever',
  database: 'cheeseparty',
  port: '5432'
})

dbConnection.connect();

module.exports = { dbConnection };
Find this in /db/connection.js file!
using this you would then have to write and send queries like this to get information about your cheese:
// This is our test SQL query we're going to use
const testQuery = `SELECT * FROM cheeses WHERE name = 'Gouda';`

// Use the new instance of the Pool class
// The 'poolDataBase' object to query the database
// Pass in the testQuery to .query method
poolDataBase.query(testQuery)
  // .query returns a promise we can consume with .then/catch
  .then(data => {
    console.log(data.rows[0]);
    // This will return {id: 3, name: 'Gouda', origin: 'Netherlands'}
  })
  .catch(error => {
    console.log(error.message);
    // What did you do?!
  });
Run this code in the terminal by going to the root of the repo and running this command:
node db/queries/exampleQuery.js
Method: ORM Library
Setting up a database with an ORM library like Sequelize is very different. We'll go over some key concepts here, but the actual setup process will be detailed in the Sequelize section. We won't be discussing intallations and require statements here, so, you don't have to follow along with the code in this section.
ORM Models
Here, we have to introduce a very important concept common to most (if not all) ORM libraries: The Model
To quote the Sequelize documentation:
Models are the essence of Sequelize. A model is an abstraction that represents a table in your database ... The model tells Sequelize several things about the entity it represents, such as the name of the table in the database and which columns it has (and their data types).
So, to reiterate, a Model is a piece of code that represents a table in the database, this can be a table that already exists or a model could also be used to create a table (don't worry about the detiails on how this happens, we'll get into it later).

In Sequelize, a model (e.g. a model for a database table for Cheeses) is a class that extends a parent class called "Model"

To create our the tables in our ERD from earlier, we would initialize a new class to represent a given table in our database:
const { Model, DataTypes } = require("sequelize");
const { sequelize } = require('../connection');

// Make a Cheese class that represents our cheese table
class Cheese extends Model {};

// Fill out the details of what our table is supposed to look like/have
// The .init method is looking for certain keys and values to inform it on how to make and interact with the database table, we'll go over which ones we'll need later
Cheese.init({
  // Define our name column for the Cheese table
  name: {
    type: DataTypes.STRING,
    allowNull: false
  },
  // Define our origin column for the Cheese table
  origin: {
    // DataTypes is an object containing many predefined kinds of data that our column can be
    // Sequelize already has this so all we have to do is require it at the top of our files
    type: DataTypes.STRING,
    allowNull: false
  }
}, { sequelize });


// This command 'executes' this model against the database to generat our table
Cheese.sync({force: true});
We now have a fleshed out class that we can use to interact with the Cheeses table!
But wait, with node-postgres, we populated the cheese table with all these rows of funky, delicious cheese? So far we've initialized a class called "Cheese" to represent the table in our database, what about the actual rows of cheese data?
ORM Model Instances
Now we build on the model just made and introduce Model Instances
If a model is a representation of a table as a class, a model instance is the representation of a row of that table.
If you're familiar with classes you might think we would do something like this:
// No
const gouda = new Cheese('Gouda', 'Netherlands');
But in Sequelize we have a special system of doing things using the built in methods of sequelize and the parent Model class.
// Yes
const gouda = await Cheese.create({name: "Gouda", origin: "Netherlands"});
console.log(gouda.origin); // "Netherlands"
So, now we've created a Cheese model instance, or, a row in our Cheeses table. Theoretically, we could just repeat this process of making models of all our tables by extending the Model parent class, then creating individual objects by calling the .build method with the info we want to give. But this isn't how ORMs are typically used. This would be time consuming and wouldn't really offer that much in terms of net gains over our node-postgres method.
So in our next section, we'll get into ORM project setup proper and show you some real ORM magic.
Now, you might be concerned by all this code that we're not explaining - we're going to go in detail in the Sequelize section, for now:

Section Summary
In our section on what is ORM we've learned:
- How a node-postgres client would set up a database
- How an ORM library does things differently
- We set up Models (classes that interface with tables in the database)
- We interact with the Model to configure our tables with columns, datatypes, and rows
- To add rows to our table, we create model instances (objects that represent rows built from the model of the database table)
Why are ORM libraries useful to us?
In short, for small scale projects, ORM libraries do not present a significant advantage. They are huge libraries with massive overhead and affects performance to a degree.
As projects scale, however, complex application and business logic will require us to interact with thousands of tables that all interact with each other. This is where ORM libraries shine because they provide a consistent and organized framework for how to perform CRUD operations on the database.
That's it? I wasted so much time reading this when I could have learned this in half the time by reading this Stack Overflow Article
- you (maybe)
Javascript ORM Libraries
So now that we've learned about the core concepts of what an ORM library does and how it differs from methods like the node-postgres client, let's learn the basics of two Javascript ORM libraries by implementing the same cheese database and server queries.

Sequelize
Introduction
Sequelize is a popular and well established ORM library for Javascript and offers wide support for popular DBMS.
Follow along with the Github repo and the README.md file!
Installation
Installation will require you to build on the dependencies intalled in the "method/pg" branch. If you don't already have PostgreSQL installed, follow along with the README in the "method/pg" branch to get set up.
Run this command to install all dependencies:
npm install
If you're missing any dependencies, or you're installing packages individually, make sure you run all of these:
npm install --save sequelize # Sequelize
npm install --save pg pg-hstore # Postgres
npm install -g --save-dev sequelize-cli # Sequelize CLI
Project Bootstrapping
In the node-postgres method, we used psql to manually run our schema and seed files to create and populate our tables in our database.
With Sequelize, while it is possible to write out all of our Models and individual rows in individual files, that would be labour intensive and would underutilize the powerful tools that Sequelize offers. Moreover, Sequelize is a large and feature-rich application, and to make the best use of these, we're going to use a program that comes with Sequelize called the Sequelize CLI (SeqCLI).

Like how we used psql from the command line to interact with our database, we will use the SeqCLI to run certain commands.
Bootstrapping is the process of jumpstarting a project with the setup and boilerplate code that Sequelize can use to generate models.
1 Run sequelize init
- Go to the 'method_sequelize/cheese-party-api-sequelize' directory and run the command
- this will create 4 directories: /config, /models, /migrations, /seeders
- This will generate a lot of boilerplate code, but first we want to focus on the configuration file
# From inside cheese-party-api-sequelize directory
npx sequelize-cli init
2 Update the configuration file
- Find the 'sequelize/config/config.json' file
- SeqCLI gives us a "test" and "production" configuration parameters, but we won't be using them here.
- Our configuration parameters are going to be the same from our setup for node-postgres, but this is what it should look like after you change it:
{
  "development": {
    "username": "cheesepartyhost",
    "password": "cheeseforever",
    "database": "cheeseparty_sequelize",
    "host": "localhost",
    "dialect": "postgres",
    "port": "5432",
    "logging": "console.log"
  }
}
WARNING: in a real life project you would not want sensitive information about your database on the web. Normally, these parameters would be stored in a .env file.
You
dumbassyou already uploaded your database password to Github!
-Me
Migrations
NOTE:
- You might have noticed we're going to use another database. We already have a database filled out from implementing our node-postgres method. To try everything with Sequelize, we're going to create another identical database.
- Get set up by running this in psql:
CREATE DATABASE cheeseparty_sequelize;
GRANT ALL PRIVILEGES ON DATABASE "cheeseparty_sequelize" TO cheesepartyhost;

Migrations?
If a model is a representation of table in your database, a migration is like a set of instructions on how to make that table/model.
In ORM libraries like Sequelize, migrations are used as a kind of version control. They're both snapshots of what the database looks like at that moment in the project, and they're also instructions on how to (re)create a database the database in that state.
But ORM migrations offer another function: where commits in Git serve primarily as documentation to which we can refer and revert, migrations can also serve as a set of instructions on how to create models and data for the database.

This is a very different approach to how we made tables and inserted data with psql: instead of defining models directly, we define a set of instructions on how to create the models and data that we want.
This way, if we make a mistake we can just undo the last set of instructions. Moreover, if we want to share our database exactly with another developer, with migrations, they have all the instructions to generate the same database that you have without having to manually run and edit models.
1 Generate a Migration and Model
- We do this with the sequelize command line interface (SeqCLI) by using the 'migration:generate' command and passing it the specifics of the table we want to generate
- --name (the name migration),
# Inside the cheese-party-api-sequelize directory
npx sequelize-cli migration:generate --name initial-cheese
- After this command has run, you should now see a new file in your migrations directory
// migrations/XXXXXXXXXXXXXX-initial-cheese.js
'use strict';
/** @type {import('sequelize-cli').Migration} */
module.exports = {
  async up(queryInterface, Sequelize) {
    // Code for the model(s) you want in the database goes here
  },
  async down(queryInterface, Sequelize) {
    // Code to return to previous version of the database goes here
  }
};
- We now go in and configure this migration to generate the cheese table/model
'use strict';
/** @type {import('sequelize-cli').Migration} */
module.exports = {
  async up (queryInterface, Sequelize) {
    // We use the queryInterface object that's given as an argument to the 'up' function
    // We then call the .createTable method
    // We pass it the name of the table as the first argument
    // And an object with the column details as the second argument
    await queryInterface.createTable('Cheeses', {
      id: {
        allowNull: false,
        autoIncrement: true,
        primaryKey: true,
        type: Sequelize.INTEGER
      },
      name: {
        allowNull: false,
        type: Sequelize.STRING
      },
      origin: {
        allowNull: false,
        type: Sequelize.STRING
      },
      createdAt: {
        allowNull: false,
        type: Sequelize.DATE
      },
      updatedAt: {
        allowNull: false,
        type: Sequelize.DATE
      }
    });
  },

  async down (queryInterface, Sequelize) {
    await queryInterface.dropTable('Cheeses');
  }
};
2 Run the migration
- We now have a migration that contains all of the instructions we need to create a Cheese table, but if we check our psql our Cheeses table does not show up :
# psql
\d "Cheeses"
- This is because we have created the instructions for how to create our table, but we have yet to run the instructions.
# Inside the cheese-party-api-sequelize directory
npx sequelize-cli db:migrate
- You should see some confirmation in your terminal that shows the sql operations it performs and a confirmation of the migration.
- Great! Now if we run our psql command again we should see our new cheeses table!
EDIT:
Sequelize-cli - while a popular tool - has some quirks:You've noticed that while we have a migration, and we can see the table in psql, we don't actually see a model appear in the /models directory after running the migration. This is a problem because we will need to define a model object in our code so that we can interact with the database table by interacting with its object representation (the model).
A large part of the appeal of ORM libraries is that you can define a migration or a model, and the library will create everything else based on one set of instructions you provide. This feature is still missing from Sequelize.
If you're familiar with other ORM libraries like Active Record, this may seem very strange to you.
These missing 'magic' features seem to be a common complaint that have yet to be addressed in the past 7 years of people complaining about them. There are some workarounds that have been implemented but are still incomplete:
- npx sequelize-cli model:create is a command that will generate a model and a migration based on the arguments you pass the command, however, if you update the table with a new migration, the model will not be updated, still leaving you to write out your model definitions and changes twice - once in the migration and once in the model.js file.
- sequelize-auto-migrations attempts to fix this issue by creating a module with extra functions. This package (as of 2022) has not been updated in some time, and I have not been able to confirm how well it is supported.
Based on these issues, the best recourse for now is to use model:create to generate the models and the migrations. Edit the model as necessary, and then copy that over into the accompanying migration file, then run the migration.
1 Run model:create
npx sequelize-cli model:create --name <ModelName> --attributes <attr1:detail1,attr2:detail2 >
2 Configure the model file
'use strict';
const {
  Model
} = require('sequelize');
module.exports = (sequelize, DataTypes) => {
  class Cheese extends Model {
    static associate(models) {
      // define association here
    }
  }
  Cheese.init({
    name: {
      allowNull: false,
      type: Sequelize.STRING
    },
    origin: {
      allowNull: false,
      type: Sequelize.STRING
    }
  }, {
    sequelize,
    modelName: 'Cheese',
  });
  return Cheese;
};
3 Copy over the model configuration to the migration file
await queryInterface.createTable('Cheeses', {
    id: {
      allowNull: false,
      autoIncrement: true,
      primaryKey: true,
      type: Sequelize.INTEGER
    },
    name: {
      allowNull: false,
      type: Sequelize.STRING
    },
    origin: {
      allowNull: false,
      type: Sequelize.STRING
    },
    createdAt: {
      allowNull: false,
      type: Sequelize.DATE
    },
    updatedAt: {
      allowNull: false,
      type: Sequelize.DATE
    }
  });
4 Run the migrations
npx sequelize-cli db:migrate

Seeders
1 Create the seeds
- Creating the seeds (our data/rows of our cheese table) is much the same as our model:generate command
npx sequelize-cli seed:generate --name cheese
- This will generate a new file in our seeders directory
// seeders/XXXXXXXXXXXXXX-cheese.js
'use strict';
/** @type {import('sequelize-cli').Migration} */
module.exports = {
async up (queryInterface, Sequelize) {

},

async down (queryInterface, Sequelize) {

}
};
- We will again use a method of queryInterface - .bulkInsert, passing it the name of our table and an array of objects, each representing a row of our table.
'use strict';
/** @type {import('sequelize-cli').Migration} */
module.exports = {
  async up (queryInterface, Sequelize) {
    await queryInterface.bulkInsert('Cheeses', [
      {
        name: 'Brie',
        origin: 'France',
        createdAt: new Date(),
        updatedAt: new Date(),
      },
      // ...
      {
        name: 'Cendrillon',
        origin: 'Canada',
        createdAt: new Date(),
        updatedAt: new Date(),
      },
    ], {});
  },

  async down (queryInterface, Sequelize) {
    await queryInterface.bulkDelete('Cheeses', null, {});
  }
};
- Great! Now we have our table for our cheese, and the data to populate it! 2 Run the seeds
- Like how we ran our migrations, we can also run the seeders:
npx sequelize-cli db:seed:all
- We should get a similar confirmation that the seeders have ran
- Now when we run a query for the "Cheese table in psql, we should see our table and our data
# Inside psql
SELECT * FROM "Cheeses";
Associations
Associations are key to databases and tables. If we look back at our database from our node-postgres implementation, we see that the cheese_categories and the cheese_ingredients table exist only to define a relationship between cheese and ingredients/categories, respectively.
After repeating the steps in our previous section to set up the models and migrations related to our cheeses, ingredients, and cateogries tables, we now need to define how these three tables are associated.

Sequelize provides us with a few different ways of doing this, but here we will be using the knowledge that Andre Woons shares in his article.
Because our cheese party database only has many-to-many relationships (that get distilled into pairs of one-to-many relationhships). If you are trying to create different types of associations, refer back to the article above by Andre Woons.
1 Define Associations on the Model
- First we will edit our models to include the appropriate associations.
// models/cheese.js
module.exports = (sequelize, DataTypes) => {
class Cheese extends Model {
  static associate(models) {
    Cheese.belongsToMany(models.Ingredient, { through: 'CheeseIngredients' });
    Cheese.belongsToMany(models.Category, { through: 'CheeseCategories' });
  }
}
Cheese.init({
  name: {
    allowNull: false,
    type: DataTypes.STRING
  },
  origin: {
    allowNull: false,
    type: DataTypes.STRING
  }
}, {
  sequelize,
  modelName: 'Cheese',
});
return Cheese;
};
// models/category.js
module.exports = (sequelize, DataTypes) => {
class Category extends Model {
  static associate(models) {
    Category.belongsToMany(models.Cheese, { through: 'CheeseCategories' });
  }
}
Category.init({
  name: {
    allowNull: false,
    type: DataTypes.STRING
  },
}, {
  sequelize,
  modelName: 'Category',
});
return Category;
};
// models/ingredient.js
module.exports = (sequelize, DataTypes) => {
class Ingredient extends Model {
  static associate(models) {
    Ingredient.belongsToMany(models.Cheese, { through: 'CheeseIngredients' });
  }
}
Ingredient.init({
  name: {
    allowNull: false,
    type: DataTypes.STRING
  },
}, {
  sequelize,
  modelName: 'Ingredient',
});
return Ingredient;
};
2 Define Associations on the Migration
- Now that we have our associations in the models, we need to generate the migrations (like before with with migration:create) and configure them to reflect the changes we've made in our models
// xxxxxxxxxx-associate-cheese-category.js
async up (queryInterface, Sequelize) {
    await queryInterface.createTable('CheeseCategories', {
      id: {
        allowNull: false,
        autoIncrement: true,
        primaryKey: true,
        type: Sequelize.INTEGER
      },
      CheeseId: {
        references: {
          model: 'Cheeses',
          key: 'id'
        },
        type: Sequelize.INTEGER
      },
      CategoryId: {
        references: {
          model: 'Categories',
          key: 'id'
        },
        type: Sequelize.INTEGER
      },
      createdAt: {
        allowNull: false,
        type: Sequelize.DATE
      },
      updatedAt: {
        allowNull: false,
        type: Sequelize.DATE
      }
    });
  },

  async down (queryInterface, Sequelize) {
    await queryInterface.dropTable('CheeseCategories');
  }
// xxxxxxxxxx-associate-cheese-ingredient.js
async up (queryInterface, Sequelize) {
  await queryInterface.createTable('CheeseIngredients', {
      id: {
        allowNull: false,
        autoIncrement: true,
        primaryKey: true,
        type: Sequelize.INTEGER
      },
      CheeseId: {
        references: {
          model: 'Cheeses',
          key: 'id'
        },
        type: Sequelize.INTEGER
      },
      IngredientId: {
        references: {
          model: 'Ingredients',
          key: 'id'
        },
        type: Sequelize.INTEGER
      },
      createdAt: {
        allowNull: false,
        type: Sequelize.DATE
      },
      updatedAt: {
        allowNull: false,
        type: Sequelize.DATE
      }
    });
  },

  async down (queryInterface, Sequelize) {
    await queryInterface.dropTable('CheeseIngredients');
  }
- Don't forget to send these changes to the database by running:
npx sequelize-cli db:migrate
3 Seed the new join tables
- We have two new tables, so like we did with the node-postgres method, we will populate these tables with data
npx sequelize-cli seed:create --name cheese-ingredients-seed
npx sequelize-cli seed:create --name cheese-categories-seed
- These files will come with the standard boilerplate you've seen before, we'll populate these with data for each association:
// xxxxxxxxxxx-cheeseingredients-seed.js
async up (queryInterface, Sequelize) {
    await queryInterface.bulkInsert('CheeseIngredients', [
      // Insert data here
      {
        CheeseId: 1,
        IngredientId: 1,
        createdAt: new Date(),
        updatedAt: new Date(),
      },
      {
        CheeseId: 1,
        IngredientId: 3,
        createdAt: new Date(),
        updatedAt: new Date(),
      },
      // ...
      {
        CheeseId: 10,
        IngredientId: 3,
        createdAt: new Date(),
        updatedAt: new Date(),
      }
    ], {});
  },

  async down (queryInterface, Sequelize) {
    await queryInterface.bulkDelete('CheeseIngredients', null, {});
  }
- Now we just have to run the seeds to populate our tables!
npx sequelize-cli db:seed:all
Clarifications
1 Table name inference
- You may at this point have noticed that though we may name our model "Cheese", the table name is still "Cheeses". This is something called Table Name Inference that Sequelize (and many other ORM libraries) do. When you name a model a singular noun (as is convention), Sequelize uses a library called inflection to get the plural form of the word. So, if you put "Person" as the name of a model, the plural of "Person" would be looked up from the inflection library and the table would be named "People".

2 The Sequelize-CLI
- We've already covered bootstrapping and the built in methods of the Sequelize-CLI like model:generate and db:migrate
- It's important to keep in mind that though the Sequelize-CLI offers us tools that are convenient, it is not the only, and sometimes not the best way to utilize the methods and functionality that Sequelize possesses. This will become more apparent as we build out the other models in the BREAD section
3 Migrations
- Though in our earlier section we covered how to define models and generate tables, we will be using migrations exclusively to populate and update our database. Mind, this is not the only way to do this, but given the advantages of having a record of instructions on how to recreate a database at any point in the project, migrations offer both documentation and safety to our database.
- To this end, we will first create or edit our models, and then transfer those changes over into their corresponding migrations. We be using the methods included with the queryInterface object to perform our BREAD operations directly on the database, and Model and Sequelize methods to query our database tables from within our app.

BREAD
- BREAD stands for the Browse, Read, Edit, Add, and Delete - standard conventions on the kind of actions we can perform on our database.
1 Browse
- Browsing operations are greatly simplified as there is no sql to write, and the resulting query is very concise
// routes/cheeses.js
db.Cheese.findAll()
  .then((data) => {
    console.log("Response from query to api/cheeses/: ", JSON.stringify(data, null, 2))
    res.send(JSON.stringify(data, null, 2));
  })
  .catch((err) => {
    console.log(err.message);
  });
- The .findAll method can be called on any model to query and return all the data (rows of a table or class isntances).
- The .findAll method takes many arguments and configurations to help us hone in on the exact data that we want returned. For more info, refer to the documentation on model querying.
2 Read
- For more selective querying, Sequelize has a variet of methods. In our code for example, we use findByPk:
// routes/cheeses.js
db.Cheese.findByPk(id)
  .then((data) => {
    console.log(`Response from query to api/cheeses/${id}: `, JSON.stringify(data, null, 2))
    res.send(JSON.stringify(data, null, 2));
  })
  .catch((err) => {
    console.log(err.message);
  });
- There are many more methods of querying, each that takes many arguments (too many to cover in this post), so please refer to the documentation as needed.
3 Edit
- To edit our tables queryInterface has methods like addColumn, changeColumn and removeColumn:
await queryInterface.addColumn('Ingredients', 'Organic-status', { type: Sequelize.BOOLEAN });

await queryInterface.changeColumn('Ingredients', 'Organic-status', { type: Sequelize.BOOLEAN, allowNull: false });

await queryInterface.removeColumn('Ingredients', 'Organic-status');
4 Add
- We've already seen this when we created our Cheeses table:
await queryInterface.createTable('Ingredients', {
  id: {
    allowNull: false,
    autoIncrement: true,
    primaryKey: true,
    type: Sequelize.INTEGER
  },
  name: {
    allowNull: false,
    type: Sequelize.STRING
  },
  createdAt: {
    allowNull: false,
    type: Sequelize.DATE
  },
  updatedAt: {
    allowNull: false,
    type: Sequelize.DATE
  }
  });
- As well as adding data to a table
await queryInterface.bulkInsert('Ingredients', [
  {
    name: "cows milk",
    createdAt: new Date(),
    updatedAt: new Date(),
  },
  {
    name: "goats milk",
    createdAt: new Date(),
    updatedAt: new Date(),
  },
  {
    name: "salt",
    createdAt: new Date(),
    updatedAt: new Date(),
  }
])
5 Delete
- We've already seen the delete operations in our 'down' functions inside of migrations:
await queryInterface.dropTable('Ingredients');
- As well as for data insertions
await queryInterface.bulkDelete('Ingredients');
Summary
We've covered three large topics:
1 What is an ORM?
2 Why are ORM libraries useful to us?
3 The Sequelize ORM library and how to use it.
Hopefully, this has given you an idea of what an ORM is and how it fits in to a web application as well as how it differs in approach from running raw SQL queries through a client like node-postgres.
In my time in this desert of despair, I've come to deeply appreciate the convenience that ORM libraries offer, but also their hefty cost. Learning how to use an ORM library like Sequlize can take quite some time, and by the time you realise the limitations of a given library are incompatible with your project, you may have already sunk many hours into learning a very bulky program.

With this in mind, we will soon discuss another ORM library with a very different paradigm: Prisma.
In the future, I will also explore GraphQL, a larger API Query language.
Further reference
WittCode's Sequelize Tutorial: Going over the basics together in short videos - does not go into migrations, but discusses validations and other deeper topics related to models and querying.
Traversy Media's Full Application Tutorial with NodeJS and Sequelize: Building an application from start to finish with Node and Sequelize. A tight follow along with a repo from a well known source.

Top comments (0)