Overview
- Hangfire is open-source and used to schedule the job at a particular event and time.
- It is also, uses to create, process, and manage your background jobs.
- Basically, we use this in Background Processing without user intervention.
- Hangfire is reliable and persistent It will take care of all things once the job is scheduled.
- Hangfire Dashboard is also available for us to manage all things easily.
Why Hangfire is required in Background Processing
- Sometimes we need to do lengthy operations like database updates and database maintenance so that also we managed periodically basis.
- Batch import from XML, JSON, and YAML files.
- Recurring reports periodically basis.
- Mass Notification on Subscription, Sign up basis.
- So, these are things which we are able to do periodically over a certain period of time as per our requirement.
Prerequisites
- Basic understanding of .NET Core 6 API and C#.
- Visual Studio 2022
- SQL Server
Agenda
- Create .NET Core API using version 6
- Configure Hangfire in .NET
- Look into the different types of Jobs which are present in Hangfire.
There are different types of jobs that are present in Hangfire. We will look at that one by one
Fire-and-Forget Job:
Fire and Forget jobs are executed only one time after certain conditions which we provide
Delayed Job:
A delayed job is also, execute only once but after a specific interval of time.
Recurring Job:
Recurring Job is executed many times after specified condition and time interval
Continuations Job:
The continuation job is executed when its parent job is executed and finished.
There are also two jobs present now in Hangfire one is Batch Job and another is Batch Continuation but these are present in the Hangfire Pro version and which are used to execute multiple jobs in batch as a single entity.
Step 1)
Open Visual Studio 2022 and create a new .NET Core Web API Project

Step 2)
Provide the Project name HangfireDemo and then provide the location

Step 3)
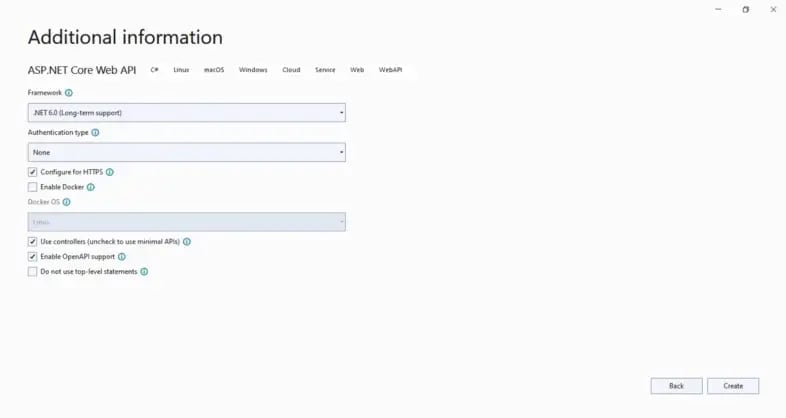
Also, provide additional information like .NET Framework 6, Configure HTTPS, and enable Open API support and swagger
Step 4)
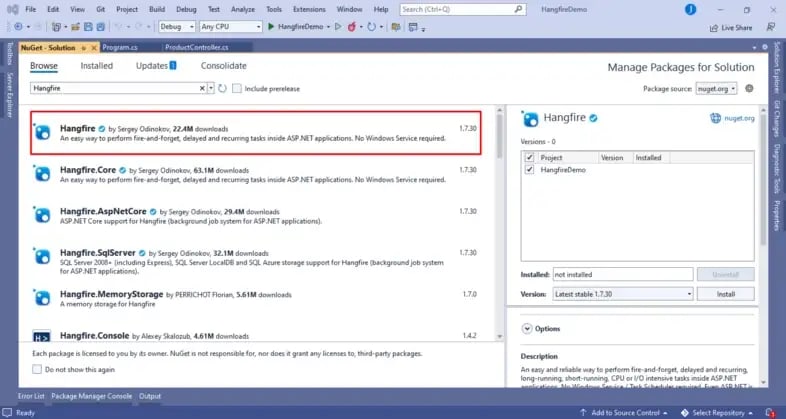
Install Hangfire NuGet Package.
Step 5)
Create API Controller and name it as ProductController
using Hangfire;
using Microsoft.AspNetCore.Mvc;
namespace HangfireDemo.Controllers
{
    [Route("api/[controller]")]
    [ApiController]
    public class ProductController : ControllerBase
    {
        [HttpGet]
        [Route("login")]
        public String Login()
        {
            //Fire - and - Forget Job - this job is executed only once
            var jobId = BackgroundJob.Enqueue(() => Console.WriteLine("Welcome to Shopping World!"));
            return $"Job ID: {jobId}. Welcome mail sent to the user!";
        }
        [HttpGet]
        [Route("productcheckout")]
        public String CheckoutProduct()
        {
            //Delayed Job - this job executed only once but not immedietly after some time.
            var jobId = BackgroundJob.Schedule(() => Console.WriteLine("You checkout new product into your checklist!"),TimeSpan.FromSeconds(20));
            return $"Job ID: {jobId}. You added one product into your checklist successfully!";
        }
        [HttpGet]
        [Route("productpayment")]
        public String ProductPayment()
        {
            //Fire and Forget Job - this job is executed only once
            var parentjobId = BackgroundJob.Enqueue(() => Console.WriteLine("You have done your payment suceessfully!"));
            //Continuations Job - this job executed when its parent job is executed.
            BackgroundJob.ContinueJobWith(parentjobId, () => Console.WriteLine("Product receipt sent!"));
            return "You have done payment and receipt sent on your mail id!";
        }
        [HttpGet]
        [Route("dailyoffers")]
        public String DailyOffers()
        {
            //Recurring Job - this job is executed many times on the specified cron schedule
            RecurringJob.AddOrUpdate(() => Console.WriteLine("Sent similar product offer and suuggestions"), Cron.Daily);
            return "offer sent!";
        }
    }
}
- Here we created different endpoints based on product scenarios like when a user login to the shopping site it will get a welcome message on an immediate basis using the fire and forget job.
- After that, we created another endpoint related to the product checklist. That when the user adds a new product to the checklist it will get notified and reminded after a few seconds like you are adding a new product to your checklist.
- In the third endpoint, we created a job for payment. When the user completes the process then it will get an email immediately using Fire-and-Forget Job and later on when this job is executed the Continuation job will get executed which is the child job and executed after the parent job will get executed.
- Finally, In the last endpoint, we want to send special offers monthly basis for that we use a recurring job that will execute continuously in the background after specified Cron conditions.
Step 6)
Finally, Let’s configure things in Program.cs Class related to Hangfire like SQL Server Database and middleware which we need.
using Hangfire;
var builder = WebApplication.CreateBuilder(args);
// Add services to the container.

//Hangfire
builder.Services.AddHangfire(x => x.UseSqlServerStorage(@"Data Source=DESKTOP-8RL8JOG;Initial Catalog=hangfire;Integrated Security=True;Pooling=False"));
builder.Services.AddHangfireServer();
builder.Services.AddControllers();
// Learn more about configuring Swagger/OpenAPI at https://aka.ms/aspnetcore/swashbuckle
builder.Services.AddEndpointsApiExplorer();
builder.Services.AddSwaggerGen();
var app = builder.Build();
// Configure the HTTP request pipeline.
if (app.Environment.IsDevelopment())
{
    app.UseSwagger();
    app.UseSwaggerUI();
}
app.UseHttpsRedirection();
app.UseHangfireDashboard();
app.UseAuthorization();
app.MapControllers();
app.Run();
So here we register a few things related to Hangfire and SQL Server Database.
Step 7)
Now, after you run the Application, this swagger window will open, and using this we will perform operations one by one after hitting API endpoints.

Also, it will create the following tables in the database related to Hangfire to manage jobs.

Step 8)
You can now also open the Hangfire dashboard to manage background running jobs after hitting
same API port in another window https://localhost:7204/hangfire

Now we are going to execute API endpoints one by one and check newly created jobs in the Hangfire dashboard.
First when we hit the login endpoint from swagger UI. Then it will create one job and execute that job immediately as shown in the below images


Here, in Hangfire Dashboard you can see all the details about jobs like succeeded, scheduled, failed, and processing as I have shown in the above images.
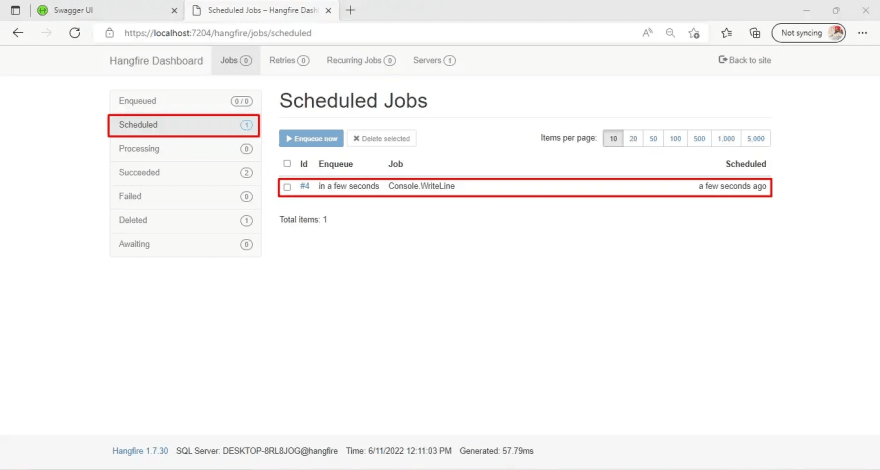
Now we hit another endpoint product checkout and it will schedule one background job and execute once after a specified time interval
After this we are going to hit the third endpoint which is to create a continuation job and execute it after its parent job will get executed as shown in the image here first parent job is to execute and after that immediate child job which is the continuation job is executed.

Finally, we are going to hit our last API endpoint and check how recurring job is executed one by one.

Here you can see how recurring job is created and executed one by one after a specific time interval.
So, this is all about Hangfire which we used in .NET Core to schedule background jobs as per our requirements.
I hope you understand a few things related to Hangfire
Happy Coding!

Top comments (1)
Some comments may only be visible to logged-in visitors. Sign in to view all comments.