
Why am i writing this?
I have been working on a project recently where i wanted to have a private repository for the code where i could track and work on issues, but didn't want to have to maintain a seperate, publically available changelog page too manually. I couldn't find anyone who had explained this method that i am using now so i thought i would spread it about a bit.
The problem
Maintaining a publicly accessible changelog for a privately versioned project on github seemed complicated. I wanted it all to be fairly automated but there was too many manual steps that would increase error when i first start out.... There had to be a better way than copy pasting markdown into vuepress!
(For context i use this for a discord bot using discord.js)
Assumptions
- You have a project you want to maintain a changelog for which sits in a private repository on github and you want a public changelog for it.
- You have either a vuepress documentation page already or plan on using one.
- You will be using netlify to host your page (otherwise you will need to tweak this)
- You aren't using another project management tool that will complicate using github issues to manage release notes.
Goals of this guide
- Be able to publish a release to github in a private repo with Organised notes that are easy to transfer to the public in your vuepress documentation
- This should be done within a few commands and automate the procedure for the most part.
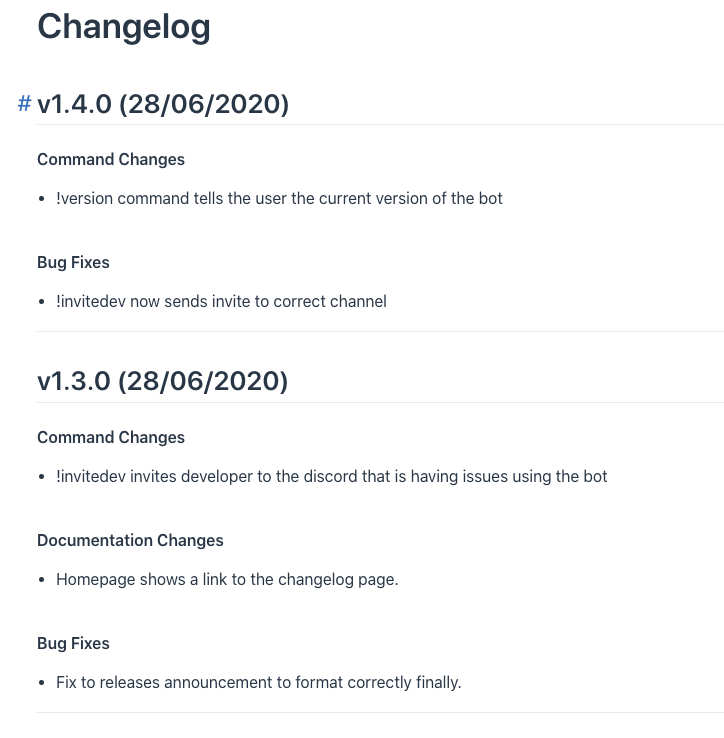
- Should end up with a vuepress page that looks like this. (Or better because i think it could be improved)
Downsides
- It took me a minute to figure out the best way to do this and i am pretty sure it could still be improved, so please comment if you have suggestions!
- The changelog will not be uploaded to your private repo until 1 commit after the release commit. (Once again please comment if you have a suggestion for this)
- Your documentation will be in a seperate folder to your project (losing one of the good upsides to normal vuepress use)
- With the current method and not refining it for future versions, you will end up with an enourmous MD file with all your releases in it at the moment. This is me trying to stick to a default repeatable workflow, it would take some tweaking to change this. (Read on for more)
I had already decided to use Vuepress, I also wanted to have the documentation hosted on netlify because i think it is great for static hosting (and it is free). This is the last part in the puzzle, as later on when i use a bash script to copy the changelog to the documentation, it the commit to git will trigger netlify to rebuild the site with the new changelog.
In short if you haven't checked out netlify for your static hosting, i urge you to give it a go. The process is really simple!
So let's get started...
Install vuepress
You can skip this section if you have already got a vuepress installation going already (You will have to tweak the bash script later however for copying the changelog.)
However also the vuepress team have some great docs that you can follow to help you with the installation so i won't repeat all that here. The docs for installation and more can be found here.
So in essence the structure of my project became like this
├── project-dir - upstream to a private repo
│   ├── ...
├── docs-dir - upstream to public repo
│   ├── ...
Once you have the docs installed, run the dev server to see it in all its glory!
The main thing that i then wanted to happen was on a release of a version in the private repo, i wanted nice structured release notes of all the issues that i had worked on since the last release.
Enter Gren!
This handy little tool will check out all your closed issues since your last tagged release and update the release notes for you. It can also generate your changelog for you in markdown.
Gren can do this in many flavours, but for the best results without too much noise, i have found it best to use Issues from your private repo to generate the release notes.
Create a folder in the docs for your changelog
I created a changelog folder within the docs folder of vuepress so my structure became this. You will use this folder later
docs-dir
├── docs
│   ├── changelog
│   ├── ...
Set up gren
After installing gren, go to your project folder..
cd ../project-dir
and type gren init.
This will set up a configuration file for gren that will allow you to stick to a set of options every time you run the gren release and gren changelog generate command.
Follow the general options it gives you and at the end when it asks you what type of file you would want your config file, i chose .grenrc.js.
As i am working on issues in the private repository, i have been following some naming conventions that make it easier to have the release notes generated for me. I.E rather typing
"Need to fix the output of this function"
I was using something like this
Fix to output of about command and then tagging the issue as a bug (You will see why shortly)
Or an enhancement to the project could be named like this
!changelog command returns a link to the most recent changelog
Bare in mind that these examples relate specifically to the bot that i have been building, it is more the way of writing these issues that help the generation of your release notes, but also keep relevance. There is some tips on the gren page that relate to this.
Open up your .grenrc.js in the root of your project directory.(Note this is a hidden file).
If you want to see it in your folder structure from terminal you can run
ls -alt
Taking from the initial examples on the options page my config file looks something like this.
module.exports = {
    "dataSource": "issues",
    "prefix": "",
    "onlyMilestones": false,
    "ignoreIssuesWith": ["test", "private", "changelog", "wontfix", "duplicate"],
    "groupBy": {
        "Enhancements": ["enhancement"],
        "Command Changes" : ["commands"],
        "Presentation Changes" : ["presentation"],
        "Documentation Changes": ["documentation"],
        "Bug Fixes": ["bug"],
    },
    "changelogFilename": "CHANGELOG.md",
    "template": {
        commit: ({ message }) => `- ${message}`,
        issue: "- {{name}}",
        label: "[**{{label}}**]",
        noLabel: "closed",
        group: "\n#### {{heading}}\n",
        changelogTitle: "# Changelog\n\n",
        release: "## {{release}} ({{date}})\n{{body}}",
        releaseSeparator: "\n---\n\n"
    }
}
A few things of note here...
"dataSource": "issues",
This will use the issues from your repo as the source of your release note generation.
I use a v prefixed in my tags, if you do not but would like it to appear in your release notes, you can set it here.
"prefix": "",
"groupBy": {
        "Enhancements": ["enhancement"],
        "Command Changes" : ["commands"],
        "Presentation Changes" : ["presentation"],
        "Documentation Changes": ["documentation"],
        "Bug Fixes": ["bug"],
    },
You should edit this according to the tags on your issues that you would like in your release notes.
This will produce us human friendly names for your tags of our issues in github and will also order it appropriately according to the order of the object. This has also so far been the most reliable way i could find to have restrict what tags get put into the release notes.
"template": {
        commit: ({ message }) => `- ${message}`,
        issue: "- {{name}}",
        label: "[**{{label}}**]",
        noLabel: "closed",
        group: "\n#### {{heading}}\n",
        changelogTitle: "# Changelog\n\n",
        release: "## {{release}} ({{date}})\n{{body}}",
        releaseSeparator: "\n---\n\n"
    }
This template is just a cut down version of the default template given in the examples of gren. The template here
commit: ({ message, url, author, name }) => `- [${message}](${url}) - ${author ? `@${author}` : name}`,
This line in the default config makes sure the release notes include links to our issues and authors name. As this guide is focused on making a private repos changes available publically on a page, we don't want the links and other details to be included so the default template has been modified. If we had a public project that you want to use gren for, it is a really nice feature though!
Let's again observe this final product
We can see how the groupBy and template objects affect the output of the release page.
Set up the bash script to copy the changelog.
We create thisbash script above the project dir and docs dir but to be honest we could create this anywhere, it just makes it easily accesible.
cd ..
# Should be above the docs and project dir now
touch copychangelog
vim copychangelog
We will be left with this..
├── copychangelog - Bash script that will copy the changelog
├── project-dir - upstream to a private repo
│   ├── ...
├── docs-dir - upstream to public repo
│   ├── ...
We should be ready to copy this bash script in there and edit it according to our correct paths
#!/bin/sh
# change this to your project dir path
cd ~/Path/To/Your/ProjectDir
# This needs to be edited according to your docs dir name
cp CHANGELOG.md ../docs-dir/docs/changelog/README.md
# same as this
cd ../docs-dir/
# Explicitely name the file to add to commit incase you have
# worked on something else
git add docs/changelog/README.md
git commit -m "Updated documentation to include most recent changelog"
git push origin master
This script will do us a few favours.
- Go to your project directory and copy the newly generated
CHANGELOG.mdthat we will make ina minute, to yourdocs-dir/docs/changelogfolder asREADME.md(This means it is the root of yourvuepresssite.com/changelog/ this could be changed to your liking) - change directory to the docs folder
- add the newly created
README.mdto staged files in git (Explicitely) - Will commit to git with a friendly message
Feel free to edit this to your liking.
We need to make it executable
chmod 700 copychangelog
Finally time to use it!
We get a couple of issues worked on in your project, named correctly for release notes.
We Commit to git and tag your release
Push tags
git push --tags-
Close the issues you have worked on. Then head to your github releases page of your project and draft a new release.

-
Let's find this button

-
Put in the tag of the version that you are releasing...
Note: In my case, I use a v as mentioned above in my own tags, but you don't have to.
*We do not add any text to our release yet. *
Head to our project dir
cd /myprojectdir/-
gren release --overrideYou should see some confirmation that your release was published with a link to your new notes!
-
Generate our changelog
gren changelog generate --override Go up one level to our bash script -
cd ..Run your bash script
./copychangelogProfit
You should see confirmation that it has pushed to git and netlify will step in and rebuild your site with your updated changelog.
Then we can jump back into the project-dir and commit the changelog (As mentioned earlier this is the downside of this method and i am working on it.
If you have made it this far...Awesome! You now have a nicely maintainable changelog that is generated from your closed issues on github in a private repo and pushed to vuepress and deployed by netlify!
This is my first tutorial i have written so please if you have any comments let me know.
Happy coding!

Top comments (0)