
I have a question in my mind right now, "Should I call this blog Web Automation or Web Scraping ?" Leave it for now.
< Hello World /> I suppose you are here because "You search Puppeteer in dev.to" or "My Blog is trending right now" but I am here to tell you about Web Automation or Web Scraping. When I first read about Web Scraping, I had a question "In order to do these web automation or web scraping , Is Python only the language ?" The answer is no and I am here to tell you how to do this with Javascipt.

Web Scraping
Web Scraping is the process of extracting information from the internet, now the intention behind this can be research, education, business, analysis, and others. Basic web scraping script consists of a “crawler” that goes to the internet, surf around the web, and scrape information from given pages. We have gone over different web scraping tools by using programming languages and without programming like selenium, request, BeautifulSoup, MechanicalSoup, Parsehub, Diffbot, etc. It makes sense why everyone needs web scraping because it makes manual- data gathering processes very fast. And web scraping is the only solution when websites do not provide an API and data is needed. Collection of data from the web has various name like Web Scraping, Web Data Extraction & Web Harvesting. These days everything & everyone needs fuel to run. Data is the most precious fuel to run any organization. Finding the data is good; extracting it even better; doing it using automation is perfect.
Using Javascipt
In this demonstration we are going to use Node JS and Puppeteer. Node JS is a open source javascript run time environment built on Chrome's V8 javascript engine written in C++ which enables javascript to run on your machine rather than your browser console. It is capable of reading or writing files on server and used in networking.
Puppeteer
According to its official documentation -
Puppeteer is a Node library which provides a high-level API to control Chrome or Chromium over the DevTools Protocol. Puppeteer runs headless by default, but can be configured to run full (non-headless) Chrome or Chromium.
Let's understand this one-by-one -
- It is a node library
- Puppeteer provides us with a function to access Chrome or Chromium which in turn means we can automate anything we do on these browsers with it like emulating a key press, a click etc.
- By headless, it means that the whole operation on the browser by puppeteer can be done without ANY GUI (Graphical User Interface) .
Using it we can Scare data from the internet, Create pdf from web pages, Take screenshots, Create automation testing and many more.
Now I think you are understanding the hard text of documentation right now. If not, wait for it you will understand when we do coding part.
Prerequisites
This tutorial is beginner friendly, no advanced knowledge of code is required. If you’re following along you’ll need NodeJS installed, basic knowledge of the command line, knowledge of JavaScript and knowledge of the DOM. If you don't have Node JS installed download it from here.
Show Time
Project Setup
- Make a folder with any name
- Open that folder in VS Code
- Open terminal in VS Code and type
npm init --yes. This will generate apackage.jsonfor managing project dependencies like this - ```
{
"name": "puppeteer-nodejs",
"version": "1.0.0",
"description": "",
"main": "index.js",
"scripts": {
"test": "echo \"Error: no test specified\" && exit 1"
},
"keywords": [],
"author": "",
"license": "ISC"
}
* Now install puppeteer by using command `npm install puppeteer` or you can also see their [documentation](https://github.com/puppeteer/puppeteer/blob/main/README.md) and read the installation.
* After installing you can see the puppeteer in the dependencies in the `package.json` file like this -
{
"name": "puppeteer-nodejs",
"version": "1.0.0",
"description": "",
"main": "index.js",
"scripts": {
"test": "echo \"Error: no test specified\" && exit 1"
},
"keywords": [],
"author": "",
"license": "ISC",
"dependencies": {
"puppeteer": "^5.5.0"
}
}
* At last create you javascript file with any name, I personally prefer `index.js`.

###Quickstart
We will start with an easy example where we took screenshot of this [Corona Wikipedia Page](https://en.wikipedia.org/wiki/Coronavirus). In the `index.js` file write this code which you can see in the example code of documentation.
const puppeteer = require("puppeteer");
(async () => {
const browser = await puppeteer.launch();
const page = await browser.newPage();
await page.goto("https://en.wikipedia.org/wiki/Coronavirus");
await page.screenshot({ path: "corona-wiki.png" });
await browser.close();
})();
So what this example does is it uses async [IIFE](https://developer.mozilla.org/en-US/docs/Glossary/IIFE) and wraps the whole script inside it . Now run this script by writing `node index.js` in terminal of VS Code and you will see something like this.
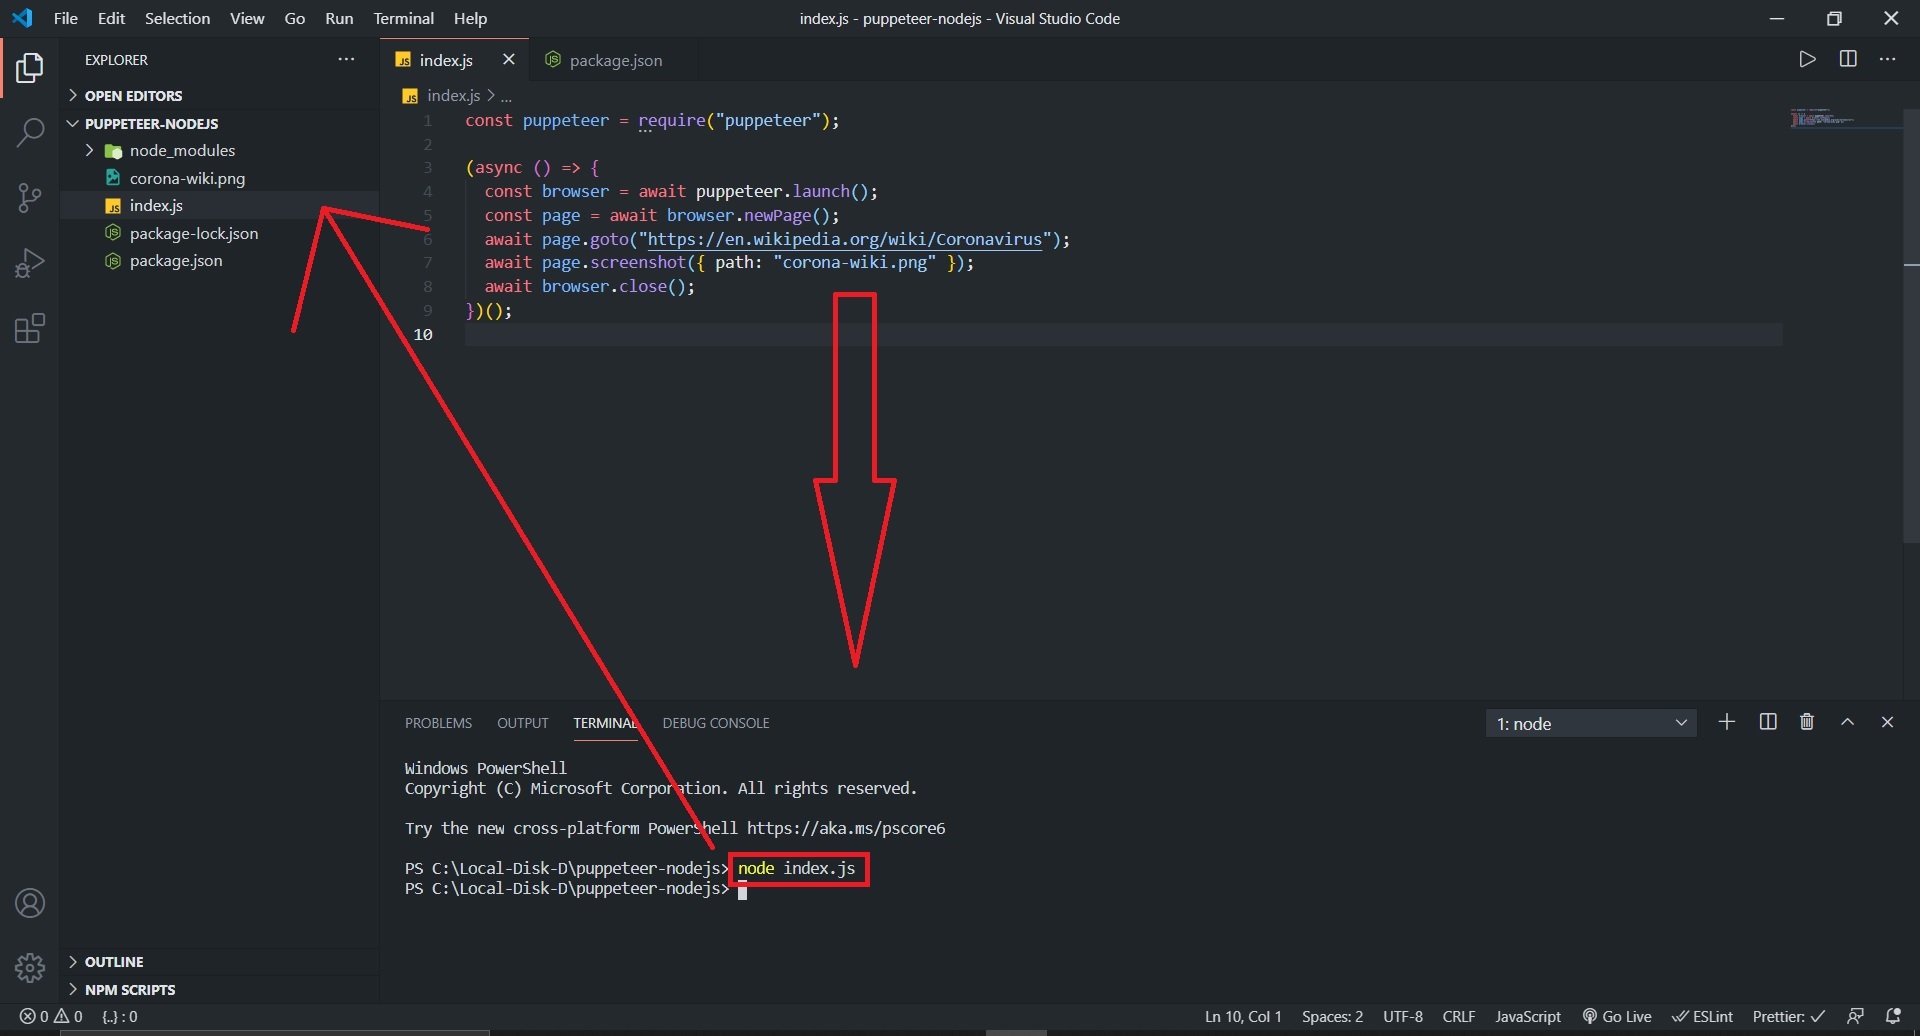
If everything went well You would see a new png file `corona-wiki.png` which contains the screenshot of our wikipedia page.
###Explanation
* `const puppeteer = require(‘puppeteer’);` is used to import puppeteer, it is going to be the first line of your scraper.
* `await puppeteer.launch();` is used to initiate a web browser or more specifically to create a browser instance you can open your browser in headless mode and non- headless mode using `{headless:false}` by default its true that means it will run browser processes in the background.
* We use await to wrap method calls in an async function, which we immediately invoke.
* `newPage()` method is used to get the page object.
* `goto()` method to surf that URL and load it in the browser.
* `screenshot()` takes a path argument and returns a screenshot of the webpage in 800×600 px form in the local directory.
* Once we are done with our script, we call `close()` method on the browser.
###Scraping Data from Wikipedia
We will scrape some basic info from our Coronavirus Wikipedia page and output this in our console or you can put it in separate file(.txt, .dat, etc) like we did above.
First of all let's go to our wikipedia page and scroll down a little you will see some headings so here we are -
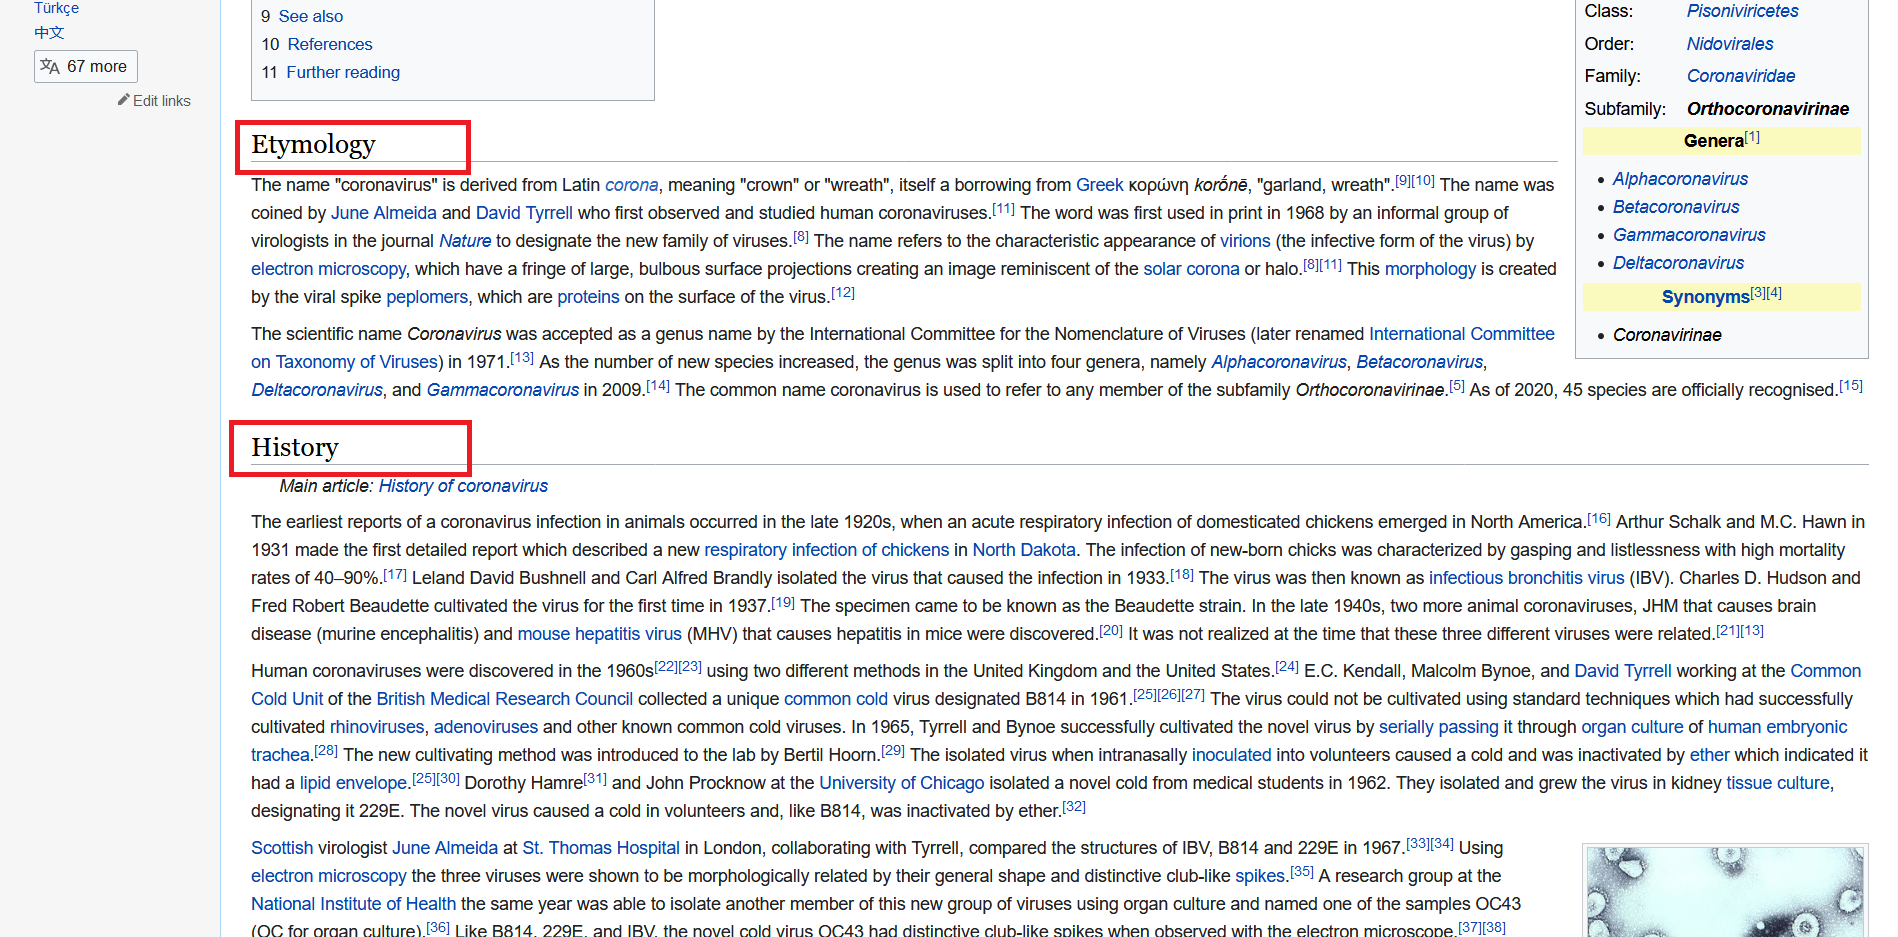
Now we will collect these all heading from this page now right click and you will see **Inspect Element** click it this will open your **Inpector**. I am using Mozilla , you can Chrome also and the process is same because we just need some class-info from inspector.
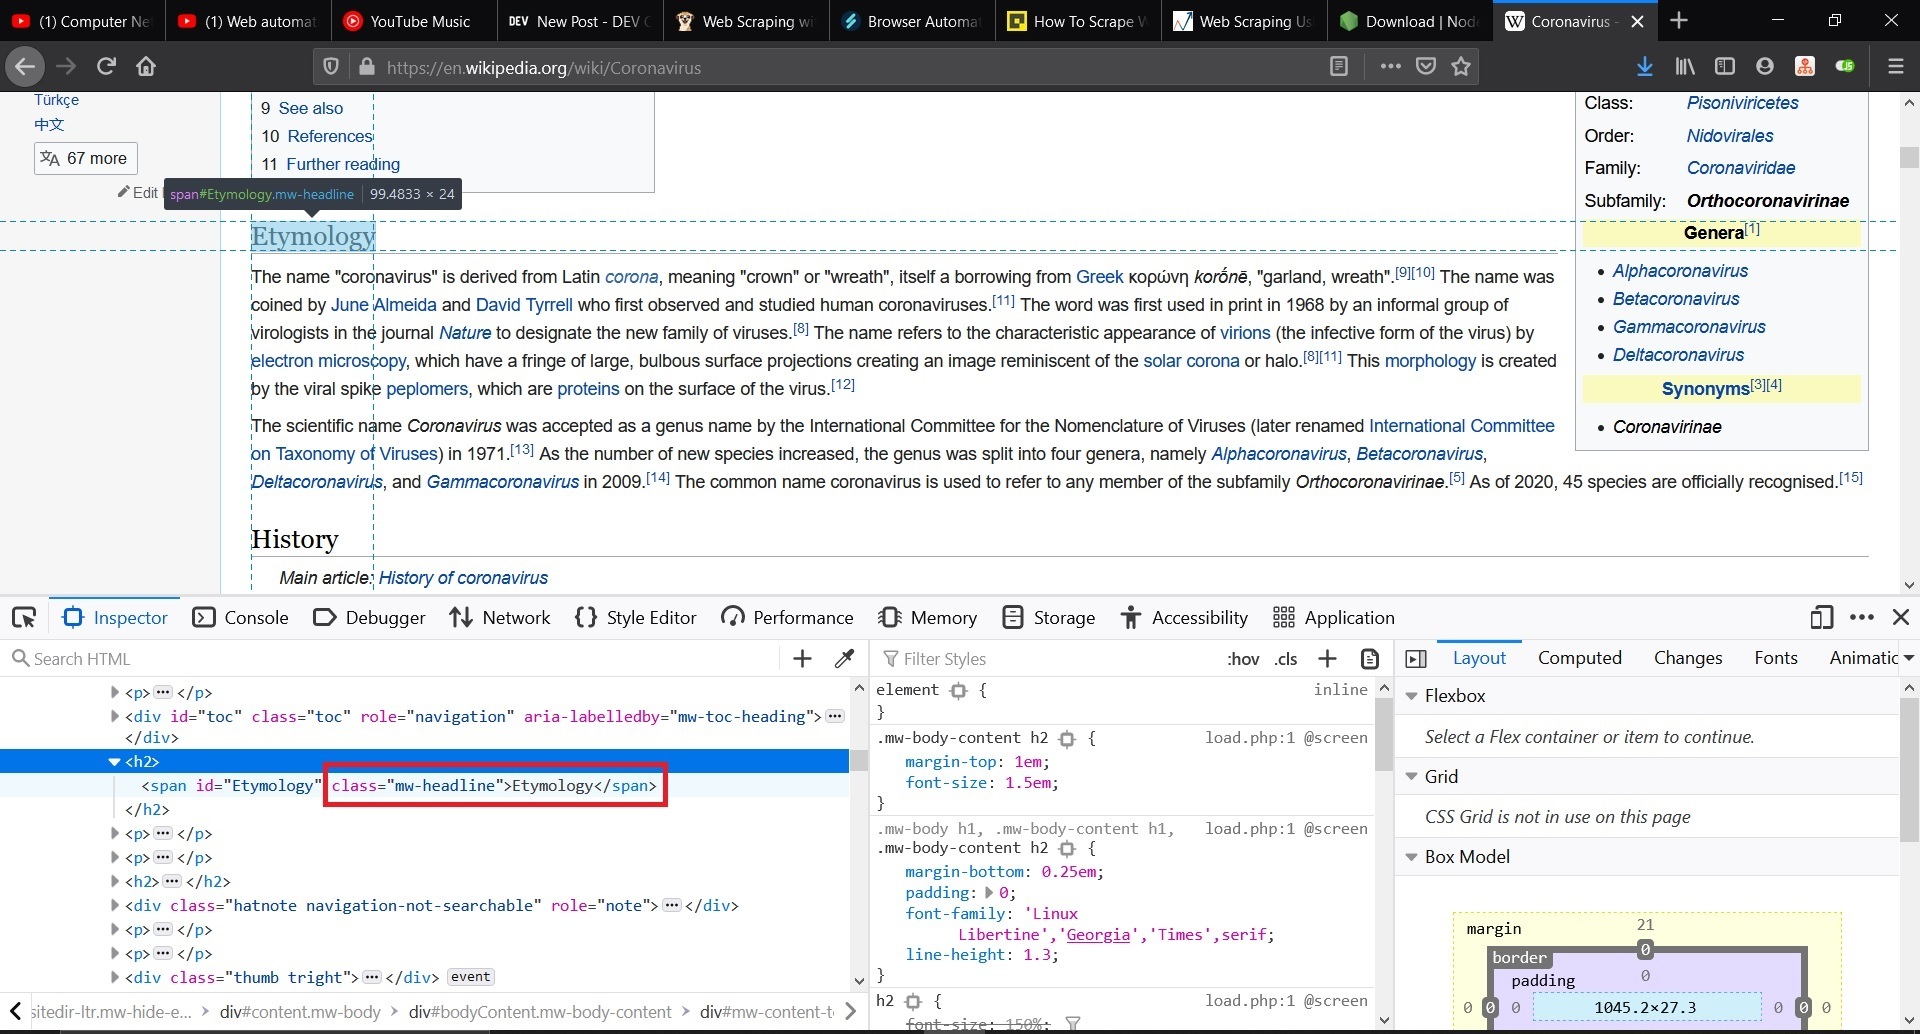
You can see the Heading `<h2>` contains span of `class = "mw-headline"` and this class is common for all heading and it is our path to collect all headings.
We add this function in our code -
const result = await page.evaluate(() => {
let headingFromWeb = document.querySelectorAll(".mw-headline");
const headingList = [...headingFromWeb];
return headingList.map((h) => h.innerText);
});
* We are using `page.evaluate()` function for this process and store it in a variable `result`.
* We are selecting that class with `document.querySelectorAll(".mw-headline");`
* Make it an array using the [spread operator](https://developer.mozilla.org/en-US/docs/Web/JavaScript/Reference/Operators/Spread_syntax) and store in other variable `headingList`.
* [Map](https://developer.mozilla.org/en-US/docs/Web/JavaScript/Reference/Global_Objects/Array/map) that array and return the inner text part which contains our Headings.

Our final code will look like this -
const puppeteer = require("puppeteer");
(async () => {
const browser = await puppeteer.launch();
const page = await browser.newPage();
await page.goto("https://en.wikipedia.org/wiki/Coronavirus");
const result = await page.evaluate(() => {
let headingFromWeb = document.querySelectorAll(".mw-headline");
const headingList = [...headingFromWeb];
return headingList.map((h) => h.innerText);
});
console.log(result);
await browser.close();
})();
We are showing our result in terminal that's why we are using `console.log(result);`. If you have done right till now then you will see output like this -
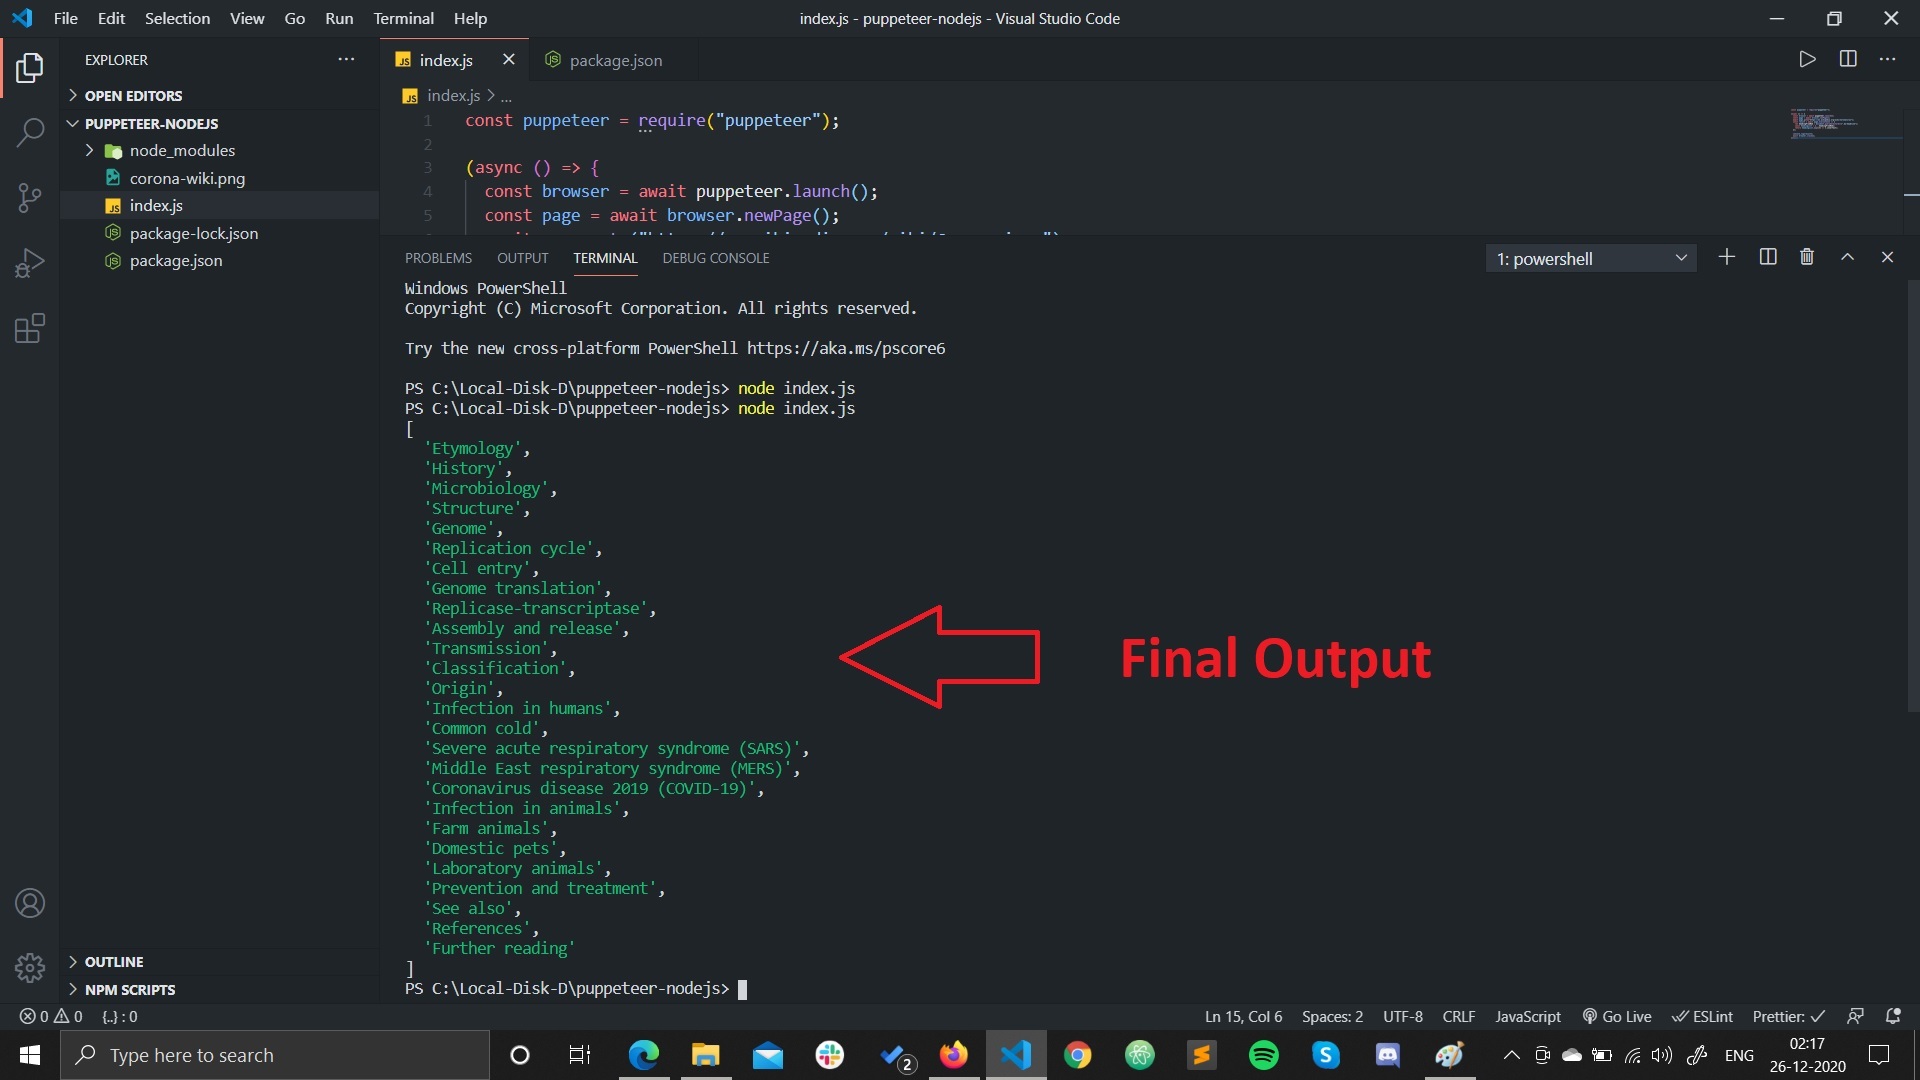
If you are seeing something like this then pat on your back you have done a great job, you did scraping from a famous site. If you don't understand some keywords first time, Don't worry I have attached the links where you can find great resource and read it on your own.
There are many things to web scraping like going to different pages like IMDb, your college site, etc. Try out on your own read the documentation and you'll like puppeteer like me.
Thanks for reading this long post! I hope it helped you understand Web Scraping a little better. If you liked this post, then please do give me a few ❤️. You are welcome to comment and ask anything!

Top comments (7)
I use to hate web scrapping but after reading your blog it change my mind 😁😁
Thank you ♥️
Thanks Man ♥️
Yo! Nice. I was struggling a bit with Python Soup!! 😁
Haha! Me too 😛
tutorial works!
Very nice tutorial!
👏👏👏