
Recently, I've wanted to better understand how APIs work. I've used some simple ones that will generate random colors for you, or give you a random dog fact (did you know that perky-eared dogs hear sounds better than floppy-eared dogs?). APIs can be a wonderful tool to get data for your web app, but almost all of the more sophisticated ones require authentication and authorization.
To this end, I decided to use Spotify's Web API. It provides extensive documentation and allows you to do nearly anything a user can do on the platform; search for songs, create playlists, get recommendations, and much much more.
The app I made is called Vibesition, and it allows a user to make a playlist that seamlessly transitions from one song's vibe to another. Its easily the my favorite web dev project that I have ever made.
Try it out yourself at vibesition.jordantwells.com! All of the source code for it can be found on my GitHub.
Authentication using NextAuth.js
NextAuth is a tool for Next.js that makes integrating with popular sign-in services such as GitHub, Facebook, Discord, and many more as simple as possible. I would highly recommend using create-t3-app to initialize your project, as it can setup much of the boilerplate of NextAuth for you.
The only changes you need to make is to the [...nextauth].ts
file, to use the SpotifyProvider and give your app the proper authorization scope. The Client ID and Client Secret both come from registering an application with the Spotify Developer Dashboard. While you're here, make sure to add something akin to "http://localhost:3000/api/auth/callback/spotify" to your Redirect URIs to ensure that you can sign in correctly.
import NextAuth, { User, type NextAuthOptions } from "next-auth";
import SpotifyProvider, { SpotifyProfile } from "next-auth/providers/spotify";
import CredentialsProvider from "next-auth/providers/credentials";

export const authOptions: NextAuthOptions = {
  // Configure one or more authentication providers
  providers: [
    SpotifyProvider({
      authorization:
      'https://accounts.spotify.com/authorize?scope=user-read-email,playlist-modify-public',
      clientId: process.env.SPOTIFY_CLIENT_ID as string,
      clientSecret: process.env.SPOTIFY_CLIENT_SECRET as string,
    })
  ],
  callbacks: {
    async jwt({token, account}) {
      if (account) {
        token.accessToken = account.refresh_token;
      }
      return token;
    },
  },
  secret: process.env.NEXT_AUTH_SECRET as string,
};

export default NextAuth(authOptions);
In my case I chose a scope that allows me to the see the user's email address, and modify their public playlists, just as much as I would need for Vibesition. To actually consume this API, the authorization code needs to be exchanged for an access token which will be your ticket to use any endpoint within your defined scope. More details about this process can be found on Spotify's documentation. Note that this refresh token comes from the token generated by NextAuth
const client_id = process.env.SPOTIFY_CLIENT_ID
const client_secret = process.env.SPOTIFY_CLIENT_SECRET
const authorization_code = Buffer.from(`${client_id}:${client_secret}`).toString('base64')

const getAccessToken = async (refresh_token: string) => {
  const response = await fetch(`https://accounts.spotify.com/api/token`, {
    method: 'POST',
    headers: {
      Authorization: authorization_code,
      'Content-Type': 'application/x-www-form-urlencoded'
    },
    body: new URLSearchParams({
      grant_type: 'refresh_token',
      refresh_token
    })
  })

  return response.json()
}

export const getUsersPlaylists = async (refresh_token: string) => {
  const { access_token } = await getAccessToken(refresh_token)
  return fetch('https://api.spotify.com/v1/me/playlists', {
    headers: {
      Authorization: `Bearer ${access_token}`
    }
  })
}
export const getSearch = async (refresh_token: string, query: string) => {
  const { access_token } = await getAccessToken(refresh_token)
  const querystring = new URLSearchParams({
    q: query,
    type: 'track',
    limit: '5',
    market: 'US'
  }).toString()
  return fetch(SEARCH_ENDPOINT + '?' + querystring, {
    headers: {
      Authorization: `Bearer ${access_token}`
    }
  })
}
Note that the "refreshToken" parameter comes from NextAuth, and with my setup can be gotten by doing.
const token = await getToken({req});
const accessToken = token.accessToken as string;
Building the App

Now that I had the power of Spotify's API behind me (within my small scope that I defined), I could finally get to work building my web app.
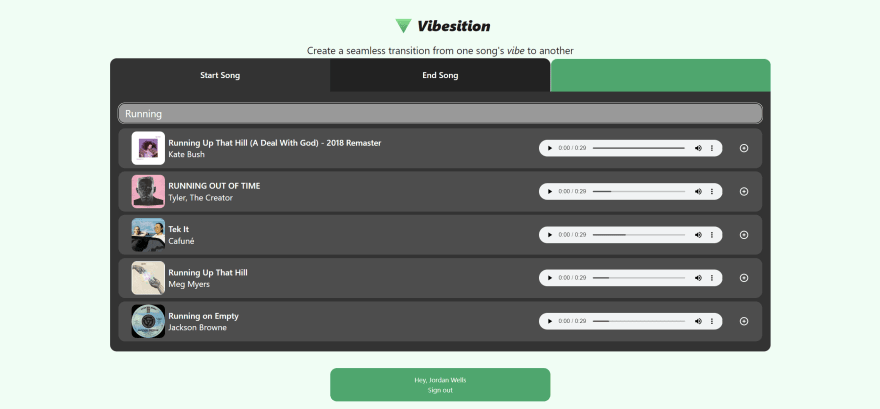
I wanted users to be able to search songs to act as the starting and ending points for their playlist. To do this, I used the search endpoint to fetch the top 5 responses from Spotify search. Once a user selects a song as shown above, it saves the Spotify ID in React state. This ID is used as a query for many of the other endpoints, so it's a good thing to save.
Once a user selects a song it automatically generates a color based on the ~vibe~ of the song using the Spotify Audio Features endpoint. Specifically, I use a combination of the song's danceability, energy, and valence (I don't know what it means either) to determine the RGB values.
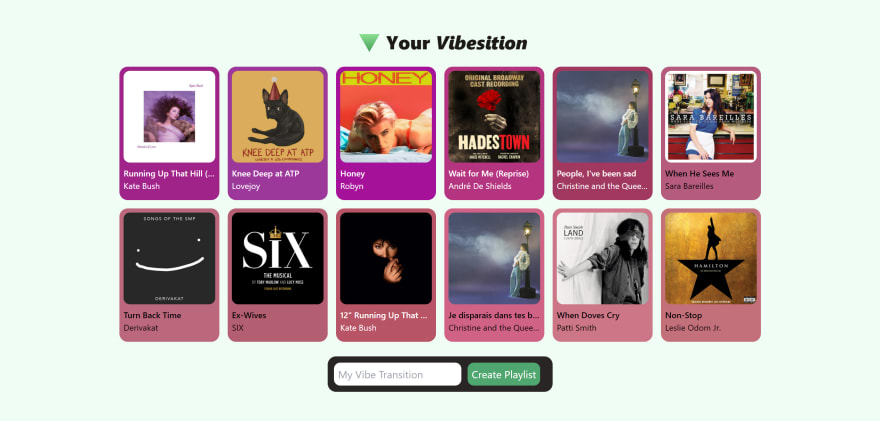
To determine what songs will be in the playlist, I use the Get Recommendations endpoint. This allows you to find songs based off target features, such as danceability, tempo, key, duration and many more. In this case I use a sigmoid-like interpolation to interpolate between the two song's values of the audio features and get 10 songs with target values on that curve.
Finally, to create the playlist, I use both the create playlist and add items to playlist end points.
There was a whole bunch of other neat things added into this project as well. I used Framer Motion to give the entire project some much needed life. I used HTML audio tags to allow users to play songs if they had a preview url from Spotify. And of course I used Tailwind CSS to make making the UI the simplest part of the process.
Conclusion
Overall, this was an incredibly fulfilling project to learn about using high-impact APIs. I hope to use many more in the future and incorporate them into my projects to make getting interesting data easy. If you're interested in more of my projects or me, check out my personal website, jordantwells.com.
Thanks for reading!

Top comments (0)