Have you ever wondered how you can deploy your NestJS API on AWS Elastic Beanstalk? Wonder no more, in this article, we'll be deploying a NestJS API from scratch.
Pre-requisites 📔
To follow this tutorial, you'll need:
- AWS Account
- NestJS project
Neither of these will be covered in this post, only the deployment.
Creating your Elastic Beanstalk Application 👷
Let's start by creating our Elastic Beanstalk application, to do so, you'll need to go to the Elastic Beanstalk service page, you'll see a button called "create application", you can click on that button to start the creation process:

PS: Make sure you're in the right region.
In the first creation step, we'll have to select the environment tier we want to create, for our API, we must use the "Web server environment" tier for our API, and then we can choose the name for our application, and environment information(you can't change this info later on) such as name and domain our API will be running:

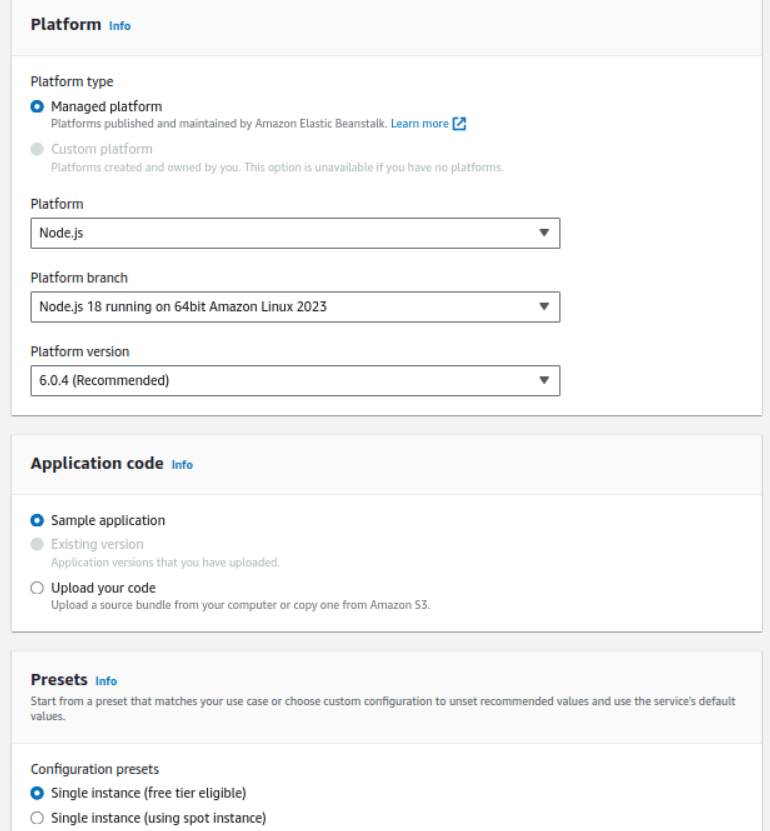
Next, we must choose the platform we're going to run, in our case, Node.js, I'll be using version 18 in this example, and then we can select to start our Elastic Beanstalk with a sample application(we'll be uploading our code later on), and we must choose which configuration preset we want to help us choose the right server configuration, I'll be going with a simple single instance:
Going to the next step, you'll have to set a role for the Elastic Beanstalk application(you can create one at that moment as well), an EC2 key pair(you can generate the SSH key on the EC2 service page by clicking on "Key pairs" on the left menu), and an instance profile for the EC2 instances that the Beanstalk is going to create(you can create this on IAM):

On the next(optional) step, you can set up networking, database, and tags; there you can select if you're going to use a VPC, select if your instance is going to be publicly accessible and the subnets, I'll be setting up a VPC and setting my instance public and choosing two subnets:

You can also integrate an RDS SQL database with your environment(we won't be covering this step config in this post):

On the 4th step(optional), you can set up info for your EC2 instances that will be created by Elastic Beanstalk, you can select the security group, and the root volume, and also set up the auto-scaling, you can choose if you want a single instance environment or a load balanced one, as well as the minimum and maximum amount of instances you want to have(if load balanced), you can also choose the instance types that Elastic Beanstalk will be creating:

On the 5th(also optional) step, you can set up updates, monitoring, and logging; we won't be covering this 5th step in this post.
In the last step, we'll be reviewing everything we have chosen and then submit our application creation:

Accessing your sample Elastic Beanstalk Application 🚀
After submitting your application creation, you can access the domain link that you have chosen in the creation process, you can see it in the "Environment overview" section:

By accessing it, you are going to see this page:

That page means your application has been successfully created 👏
Deploying your NestJS API 🙌
Now it's time to deploy our NestJS API, first, we'll need to check which port our NestJS App is running, Elastic Beanstalk uses port 8080 by default, you should either set that as your API port or check for the environment variable called "PORT", so you can run the project on the right port:

Then, you must make a change on your start script since that's the one Elastic Beanstalk will be running by default, you must make it execute the main file from the build:

now you can build your NestJS App, then we'll be compressing all local files(no need to send the node_modules, Elastic Beanstalk will be installing it for you):

Once you have compressed your project, you can go to Elastic Beanstalk, and click on "Upload and deploy":

and then choose your zip file, as well as write a label for your version being deployed:

Now you can click on "Deploy" and wait for your project to be deployed, once it's deployed, you can go to the domain you have chosen and there it is:

Hope I was able to help you guys deploy your NestJS project on AWS Elastic Beanstalk, have a good one 😉

Top comments (0)