
Although this is probably not an interesting topic to start with, I want to write about the setup of the project for our 3D renderer from scratch. Don't worry, this does not constitute as this week's article; it's just a bonus.
If you missed the series introduction, you might want to read that as well. For a short recap, we’re building a 3D renderer from scratch in glorious C and using SDL for cross-platform concerns like creating a window and input handling.
I'm writing this series while going through the 3D Graphics Programming from Scratch course at Pikuma.
With that recap out of the way, let's get into it.
Directory Structure
We're keeping the directory structure as simple as possible to start out. All we need is a root and src folder. I don't know what I'll end up naming this project, so for now I'm sticking with 3drenderer.
This will work well for using Neovim or any other editor on macOS and Linux. However, I also want to include Visual Studio Solution and Project files. I added a new directory called msvs to keep these isolated. Since SDL2 development libraries need to be downloaded and extracted manually on Windows, I added them to src/lib/sdl.
3drenderer
├── src
│   ├── main.h
│   ├── main.c
│   ├── ...
├── msvs
│   ├── lib
│   │   ├── sdl
│   │   │   ├── include
│   │   │   ├── lib
│   │   │   │   ├── x86
│   │   │   │   ├── x64
│   │   └── ...
├── Makefile
├── README.md
└── .gitignore
macOS and Linux
As you'd expect, setting up the project on macOS and Linux is quite simple. I'm using apt and brew to install SDL2 on Linux and macOS respectively.
# Linux
sudo apt install libsdl2-dev

# macOS
brew install sdl2
Homebrew downloads SDL2 in the opt/homebrew/Cellar/sdl2 directory, which is not in a default gcc search location. There are a few different ways to resolve this issue.
First, the option I went with, examine the search paths gcc uses with the following command. I found that /usr/local/include and /usr/local/lib are included by default. I created symlinks for the SDL2 include directory and libraries from homebrew into /usr/local/inlcude and /usr/local/libs so gcc will find them.
echo | gcc -xc -E -v -
Another approach is to provide the include and library directory paths to gcc via -I and -L. This adds some noise to call gcc, but we'll use a Makefile soon so we don't need to type this out every time.
gcc -Wall -std=c99 ./src/*.c -Ipath/to/includes -L/path/to/lib -lSDL2 -o renderer
Windows
Unfortunately, we have extra steps to get set up on Windows. There are several ways to go about this. You could download Visual Studio Build Tools and use any code editor along with cl.exe. You can find equivalent flags to get a similar behavior to what we use on macOS and Linux with gcc.
However, most Windows developers prefer Visual Studio and adding the Desktop Development with C++ workload for a full IDE and C/C++ compiler set up.
I installed Visual Studio Community with winget.
winget install -e Microsoft.VisualStudio.2022.Community
When that's done, open the Visual Studio Installer, choose Modify and check Desktop Development with C++ and install.
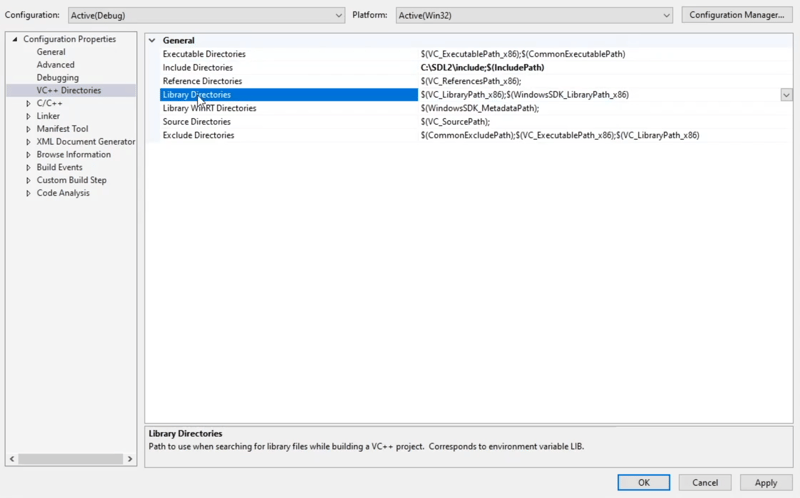
I downloaded the SDL2 development files and added them to the msvs/lib directory, but you can reference them from anywhere you prefer. In the following screenshots you can see there are in C:\SDL2, for example. Next we need to modify the project properties before we continue.
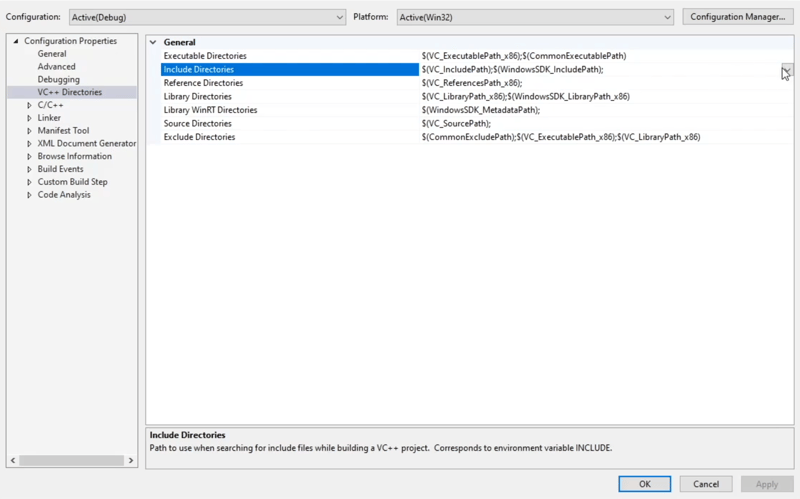
Add the SDL include files to Include Directories in VC++ Directories.
Add the SDL library directory to Library Directories in VC++ Directories.
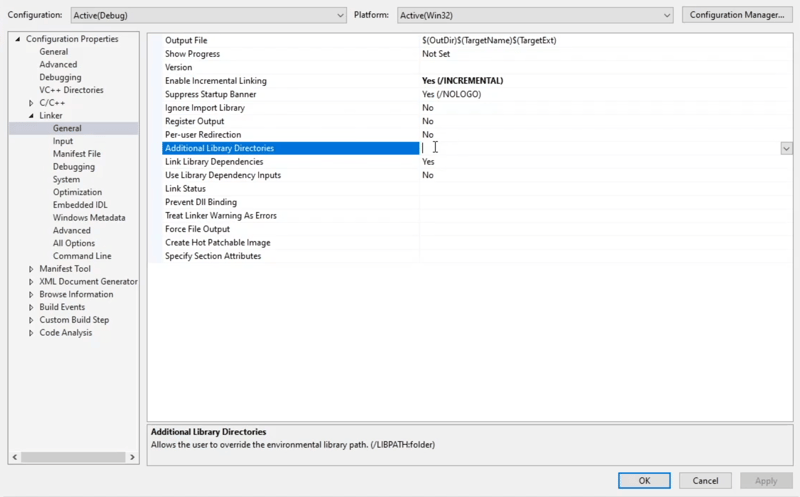
Add the SDL library directory to Additional Library Directories in Linker/General.
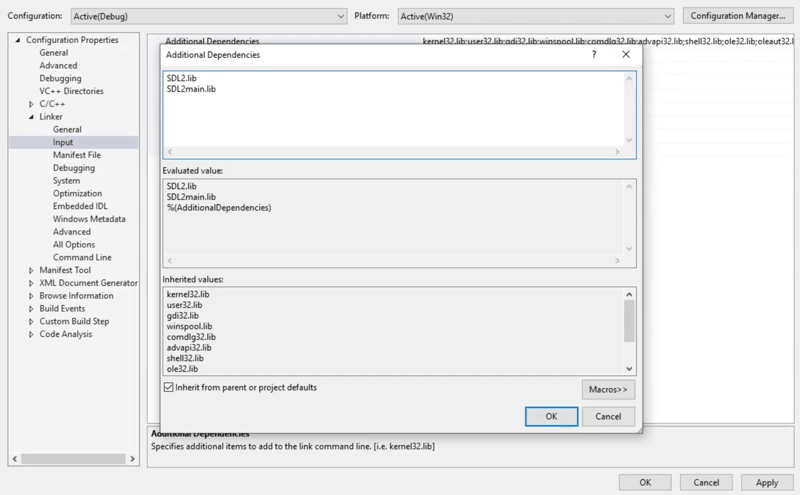
Add the library names SDL2.lib and SDL2main.lib to Additional Dependencies in Linker/Input.
Testing
We need just a few lines of code to test that we can compile and link successfully. This is the content of main.c.
#include <stdio.h>
#include <SDL2/SDL.h>

int main(void) {
    SDL_Init(SDL_INIT_EVERYTHING);
    printf("This is where it all begins!\n");
    return 0;
}
Running gcc should confirm everything is working as expected.
gcc -Wall -std=c99 ./src/*.c -lSDL2 -o renderer
Makefile
To avoid having to type the entire gcc call every time, we can use a Makefile with a few simple actions; build, run and clean.
build:
    gcc -Wall -std=c99 ./src/*.c -lSDL2 -o renderer

run:
    ./renderer

clean:
    rm renderer
With that in place, we're able to invoke these actions, for example, make build. Even better, the first action is invoked by default so we can just use make to build. Now that our project is set up we're reading to tackle our first task; creating an SDL window!
Until next time.
Take care.
Stay awesome.

Top comments (0)