In the previous article, I DevOps the solution. There are so many things I need to add to make this into real project, and end to end UI testing is one of them.
Blazor WebAssembly is just another web application, so nothing different from normal web app testing. I use Selenium to automate the test. See UI test with Selenium for detail information.
Add Testing Web Server
Although I can use slot for testing and swapping feature to release, it requires at least standard plan. Therefore I add another App Service for testing.
Run the following command from Cloud Shell or use GUI to create another App Service.
az webapp create --name DevOpsBlazor-E2E-Test -g DevOpsBlazorRG --plan DevOpsBlazorPlan
Add UI Test
Add project and first test.
UI test with Selenium has the detail information. I follow most of the steps here.
1. From solution, add new project and select xUnit project. I name it as DevOpsBlazor.EndToEnd.

2. Add below NuGet packages. I only test chrome this time.
- Selenium.WebDriver
- Selenium.WebDriver.ChromeDriver
- Selenium.Support

3. Rename existing UnitTest1.cs to IndexPageE2ETests.cs and update the code as below.
- Dispose the drive when test ends
- Get test URL from environment variable
- Use headless browser for test
using OpenQA.Selenium;
using OpenQA.Selenium.Chrome;
using System;
using Xunit;

namespace DevOpsBlazor.EndToEnd
{
    public class IndexPageE2ETests: IDisposable
    {
        private IWebDriver driver;
        private string appURL;

        public IndexPageE2ETests()
        {
            var options = new ChromeOptions();
            options.AddArgument("--headless");
            driver = new ChromeDriver(options);
            appURL = Environment.GetEnvironmentVariable("TestUrl");
            if (string.IsNullOrEmpty(appURL)) appURL = "http://localhost:59727";
            Console.WriteLine($"appURL is: {appURL}");
        }

        public void Dispose()
        {
            driver.Dispose();
        }
    }
}
4. Add one test for checking index page. I simply navigate to top page ("/") and check if "Hello world!" exists.
[Fact]
public void ShouldDisplayHelloWorld()
{
    driver.Navigate().GoToUrl(appURL + "/");
    var wait = new WebDriverWait(driver, TimeSpan.FromSeconds(10));
    wait.Until(ExpectedConditions.ElementExists(By.CssSelector("h1")));
    Assert.Equal("Hello, world!", driver.FindElements(By.CssSelector("h1"))[0].Text);
    driver.Quit();
}
5. Build the solution to confirm I don't get any errors.
Run the UI test
Once all the build succeeded, I can test it now.
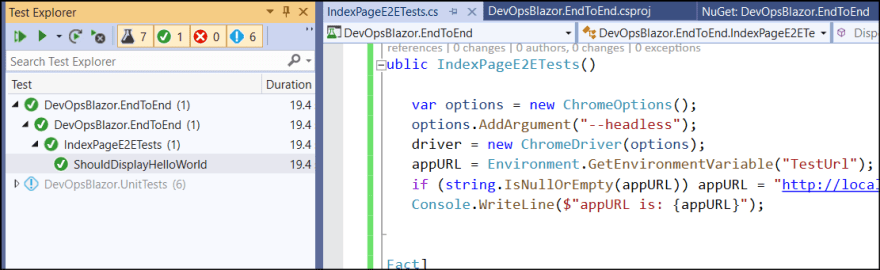
1. Hit Ctrl+F5 to start the server. It launch browser and I see the port is 59727 as I set in the code.
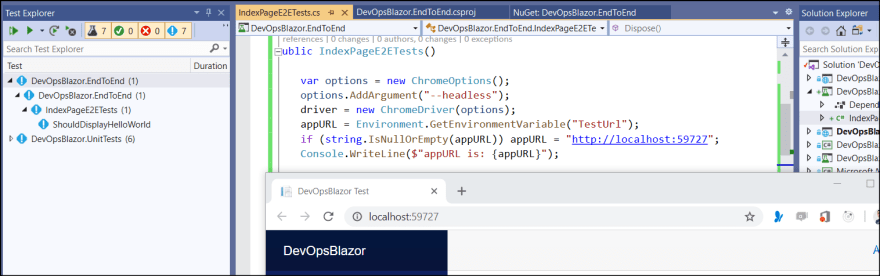
2. Run the test from Test Explorer and confirm it succeeded. I can also change the Assert to make it fail on purpose.
if you comment out headless option, then you can see browser is actually starting and running.
Add E2E test for counter page
Now, let's test something changes the UI.
1. Add new cs file and name it as "CounterPageE2ETests.cs". Update the code as below. As standard code is duplicate across all tests, I should create base class, which I will do in in the future.
using OpenQA.Selenium;
using OpenQA.Selenium.Chrome;
using OpenQA.Selenium.Support.UI;
using System;
using Xunit;

namespace DevOpsBlazor.EndToEnd
{
    public class CounterPageE2ETests : IDisposable
    {
        private IWebDriver driver;
        private string appURL;

        public CounterPageE2ETests()
        {
            var options = new ChromeOptions();
            options.AddArgument("--headless");
            driver = new ChromeDriver(options);
            appURL = Environment.GetEnvironmentVariable("TestUrl");
            if (string.IsNullOrEmpty(appURL)) appURL = "http://localhost:59727";
            Console.WriteLine($"appURL is: {appURL}");
        }

        public void Dispose()
        {
            driver.Dispose();
        }
    }
}
2. Add one test which navigate to counter page and check the value before/after click the button.
[Fact]
public void ShouldIncrementCount()
{
    driver.Navigate().GoToUrl(appURL + "/counter");
    var wait = new WebDriverWait(driver, TimeSpan.FromSeconds(10));
    wait.Until(ExpectedConditions.ElementExists(By.CssSelector(".btn")));
    Assert.Equal("Current count: 0", driver.FindElements(By.CssSelector("p"))[0].Text);
    driver.FindElement(By.CssSelector(".btn")).Click();
    Assert.Equal("Current count: 1", driver.FindElements(By.CssSelector("p"))[0].Text);
    driver.Quit();
}
3. Run the test to see the result. Make sure to run the server first.

Update Azure DevOps pipeline
Though I didn't fully implement all the test yet, I update Azure DevOps pipeline so that I can run the E2E test on the cloud as well.
1. Open Pipelines in Azure DevOps and edit. First thing I update is vmImage to windows 2019. The NuGet package I installed uses Chrome Driver 81.xx and windows 2019 hosted agent is the one which has the driver pre-installed. You can use other image to match the driver version.

2. Add new stage after Build stage.
- Create publish by dotnet run publish
- Publish to newly added App Service
- Run the test. Use task.env to specify environment variable.
- Publish the artifact for following job
- stage: End_To_End_Test
  displayName: E2E Test

  jobs:
  - job: Release
    displayName: Release to E2E
    pool:
      vmImage: $(vmImageName)

    steps:
    - task: DotNetCoreCLI@2
      displayName: Publish the project
      inputs:
        command: 'publish'
        publishWebProjects: true

    - task: AzureRmWebAppDeployment@4
      inputs:
        ConnectionType: 'AzureRM'
        azureSubscription: '<your subscription>'
        appType: 'webApp'
        WebAppName: 'DevOpsBlazor-E2E-Test'
        packageForLinux: '$(System.DefaultWorkingDirectory)/**/*.zip'

    - task: DotNetCoreCLI@2
      env: {'TestUrl':'http://devopsblazor-e2e-test.azurewebsites.net'}
      displayName: Run End to End Tests
      inputs:
        command: 'test'
        projects: '**/DevOpsBlazor.EndToEnd.csproj'
3. Save the change.
Test the pipeline
Finally, sync all the changes and push to the repository to trigger the pipeline.
1. From Visual Studio, commit all changes and "sync" the change which does pull/push of git.

2. Once push has been completed, the pipeline is triggered automatically.
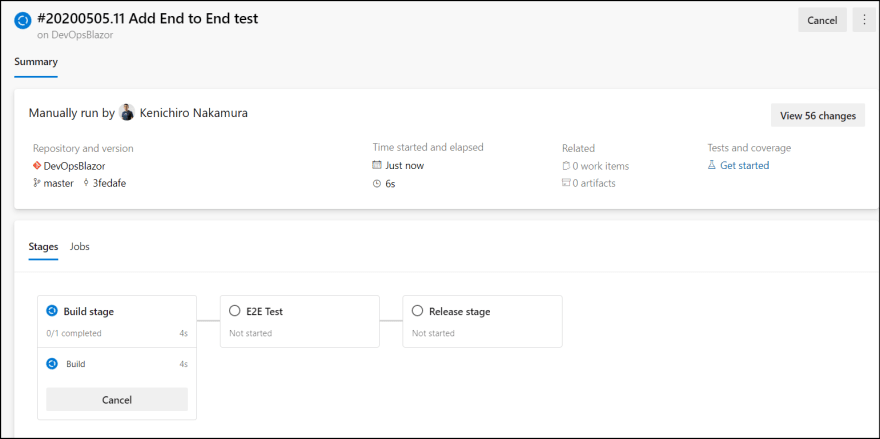
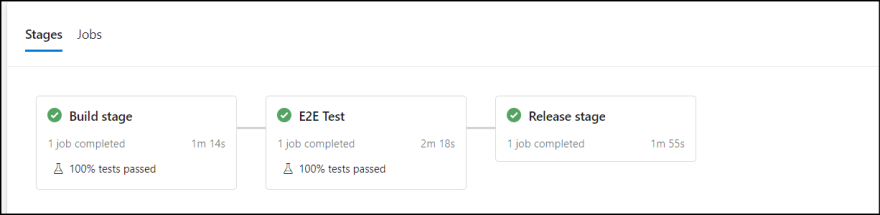
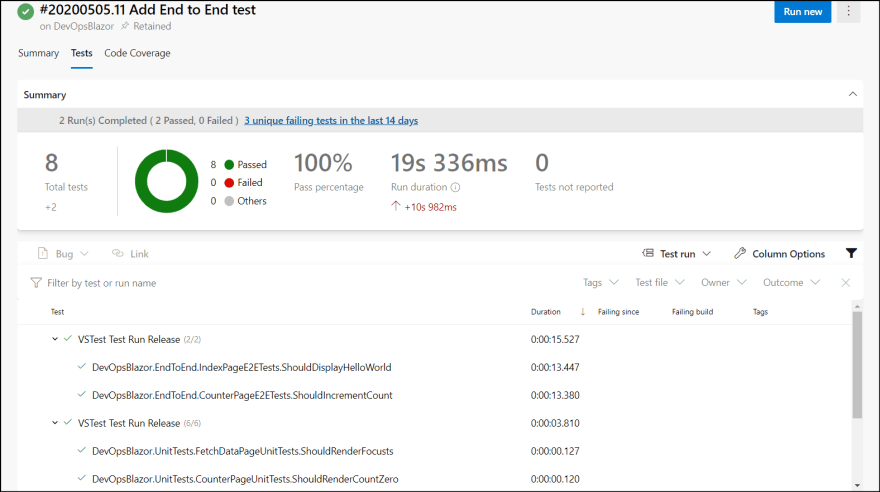
3. Once completed, see the detail log to confirm the end to end test runs as expected.
Summary
As I mentioned, UI test for Blazor is nothing different from normal UI testing, which is good. There are several more useful information at UI testing considerations.

Oldest comments (1)
Awesome, for mudblazor.com we use bUnit but it doesn't allow us to test the JS functionality. This might be interesting for us to achieve 100% coverage.