When it comes to building websites and web apps these days, it’s not uncommon to hear the term “JAMstack”. JAMstack stands for JavaScript, APIs, and Markup. The idea being to create static markup with JavaScript that is powered by communicating with APIs.
The reason this stack has become so popular is because it allows websites or apps to be bundled up and served at “the edge” via a CDN. Couple this with what is ideally a performant app that is talking to performant APIs and you get a speedy user experience. Blogs, dashboards, and even e-commerce sites are being built in this style.
However, because the content is static, it can become cumbersome, or overly complex, to ensure the content is always up to date and reflects the backing data correctly. This problem can become exaggerated when the data is provided by 3rd party vendors like headless CMSs and e-commerce platforms.
In this blog post I'll cover how to create a static e-commerce website with Gatsby and Shopify that will rebuild and deploy whenever the code for the site is changed, or the data in Shopify updated! We'll do this using AWS Amplify Console. Amplify Console provides a Git-based workflow for deploying and hosting web applications.
Setting Up Your Store
The first thing you need to do is get a new project going! For this example we'll use a Gatsby & Shopify starter that will provide us with a bare-bones web app able to handle most basic e-commerce functionality. To create a new Gatsby project using this starter, run the following commands:
npx gatsby new my-shop https://github.com/AlexanderProd/gatsby-shopify-starter
cd my-shop
gatsby develop
Next, open your browser to http://localhost:8000 to see your app. It should look like this:

Once you have verified that your app is running, you will need to create a Shopify account. The account that is being used currently you won't be able to make updates to. To create an account, navigate to shopify.com and click on the Start Free Trial button. Enter the info requested and a name for your shop, here is what I used:

Once you choose your store name, you will be asked to answer a few questions, here are the answers I chose:

After filling out the questions, click Next and fill out your personal details. Then click Go to My Store.
I recommend confirming your email now as well.
Once you're inside your store admin portal. Navigate to Products in the left menu panel and create a new product. Make sure to set a price, image, and a quantity of at least 1.
Next you will need to create a Private App to get an API access token. You will need these in the next step. Follow the instructions here to create your app and get your access token.
Note that you need to enable the Storefront API and check all permissions! You will also need to use the Storefront API token, not the Admin API token! See image below:

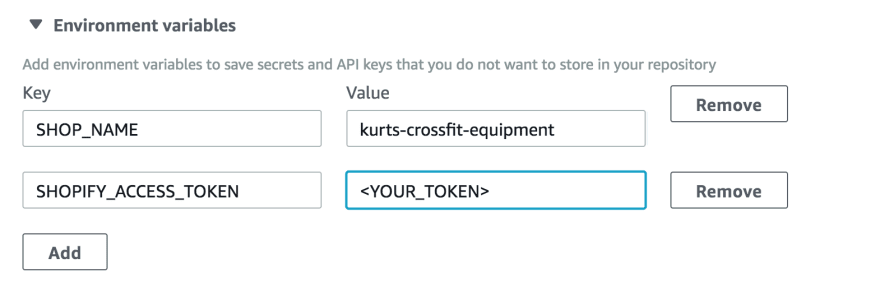
Once you have your credentials, open up .env.development and replace the existing API token and shop name with your own.
SHOP_NAME=kurts-crossfit-equipment
SHOPIFY_ACCESS_TOKEN=<YOUR_STOREFRONT_API_TOKEN>
After you have replaced the environment variables, restart Gatsby and you should now see your store's product!
Deploying Your Store
Now that you have a functioning store. The next step is to deploy it to a CDN so users can make purchases! In order to set up a deployment pipeline you'll need to create a new git repository and connect it to Amplify Console.
First create a new repo with your provider of choice (GitHub, GitLab, BitBucket, CodeCommit), then push your app.
Before adding your code to source control, delete
.env.productionand add.env.developmentto your.gitignorefile. Then run:git rm —cached .env.development.
git add .
git commit -m 'initial commit'
git remote add origin <YOUR_REPOSITORY>
git push —set-upstream origin master
The next step is to connect your repository to Amplify Console. Open the AWS Console to the Amplify service click the Connect App button. Choose your new repository, pick the branch you want to build from, and hit Next.
Amplify Console will automatically detect that this is a Gatsby project and auto-fill the correct build settings for you. However, you will need to add the Shopify environment variables. Add the shop name and access token and then click Next and then click Save and Deploy on the next step.
At this point, Amplify Console will build and deploy your store across a global CDN. Once the build completes, verify your store is live by navigating to the provided URL. Since the app is connected to your repository, every time you push to the branch you specified for your builds, Amplify Console will rebuild and deploy your app for you.
This is great for keeping your site fresh when it comes to code changes, but what happens when you change information in Shopify? How can you trigger a rebuild when this happens? Well, Amplify Console supports triggering builds based on incoming webhooks. In the next section you'll set one up and connect it to Shopify.
Setting Up A Webhook to Keep Content Fresh
In the Amplify Console, select Build Settings from the side menu. In the Incoming Webhooks section, click Create webhook. Provide a name for it and which branch it should trigger a build on, then click Create.
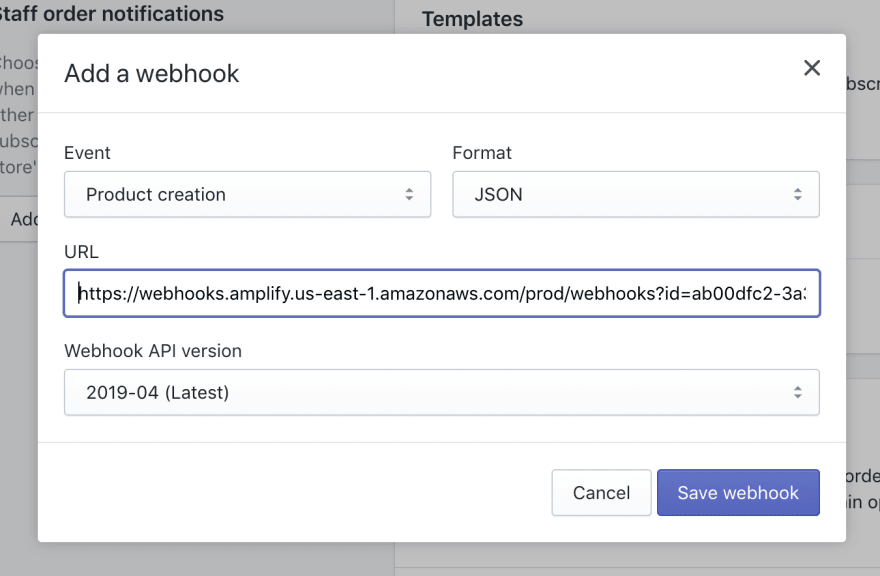
Copy the webhook URL and then go to your Shopify store admin panel. Navigate to Settings > Notifications and scroll down the page. In the Webhooks section, click create webhook.
From the events list, choose Product creation and paste the webhook URL from Amplify Console into the URL input in Shopify. Save the webhook.
Now it's time to verify it works! Create a new product and once you save it, return to Amplify Console and see if a new build is triggered for your app.
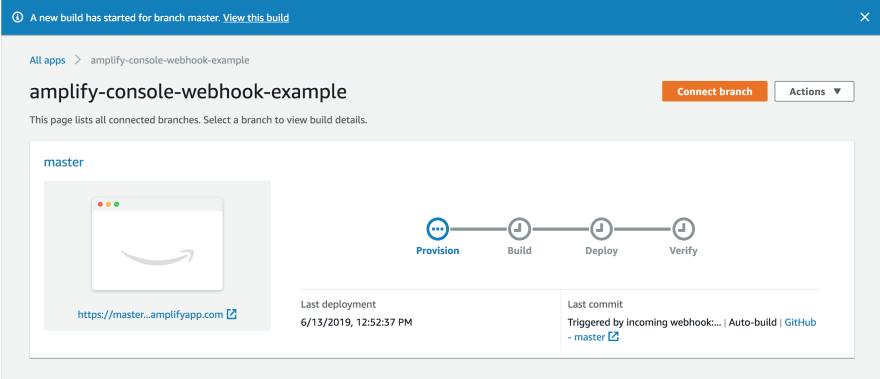
If your webhook is configured properly you will see that a new build has been started for your app! Congratulations, you can now add as many webhooks in Shopify as you want using that same URL! This will work with any service that supports calling webhooks!

Oldest comments (1)
Nice! Very helpful. I did essentially the same thing but instead of Shopify I was working with Drupal. You can use Build Hooks (drupal.org/project/build_hooks) which is a clean little module that can point to your AWS Amplify hook whenever changes are made in drupal content. Easy peasY!